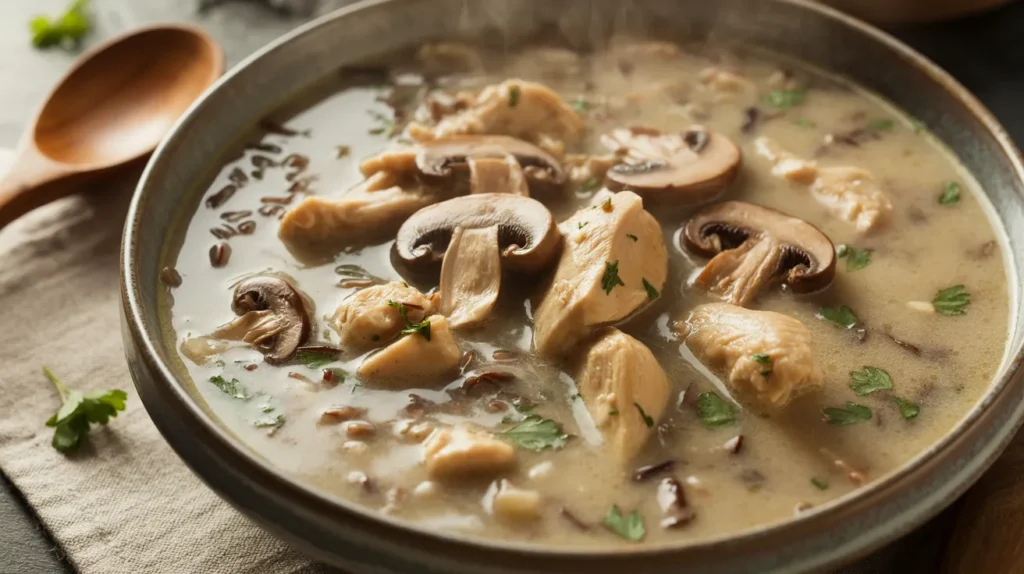
This rich and satisfying creamy mushroom chicken and wild rice soup combines tender chicken pieces, earthy mushrooms, and nutty wild rice in a velvety cream base that’s pure comfort in a bowl. When cold weather calls for something warming and substantial, this creamy mushroom chicken and wild rice soup delivers both elegance and heartiness. With simple techniques and readily available ingredients, you’ll create a restaurant-quality soup that feeds four people perfectly.
Recipe Info
SERVES: 4 | PREP: 20 MIN | COOK: 25 MIN | TOTAL: 45 MIN
Ingredients for Creamy Mushroom Chicken and Wild Rice Soup
Protein & Base
| Ingredient | Amount |
|---|---|
| Boneless chicken thighs | 1 lb, cut into bite-sized pieces |
| Mixed mushrooms (cremini, shiitake) | 8 oz, sliced |
| Wild rice | ¾ cup |
| Yellow onion | 1 medium, diced |
| Celery stalks | 2, chopped |
| Carrots | 2 medium, diced |
Flavor Foundation
| Ingredient | Amount |
|---|---|
| Garlic cloves | 4, minced |
| Fresh thyme | 2 teaspoons |
| Bay leaves | 2 |
| Low-sodium chicken broth | 6 cups |
| Dry white wine | ¼ cup (optional) |
Creamy Finish
| Ingredient | Amount |
|---|---|
| Heavy cream | ½ cup |
| All-purpose flour | 3 tablespoons |
| Butter | 3 tablespoons |
| Olive oil | 2 tablespoons |
| Salt and black pepper | To taste |
| Fresh parsley | 2 tablespoons, chopped |
Detailed Step-by-Step Instructions for Perfect Creamy Mushroom Chicken and Wild Rice Soup
Phase 1: Chicken Preparation and Initial Browning (12 minutes)
Step 1: Prepare your chicken properly. Pat the 1 pound of chicken thighs completely dry with paper towels. Moisture on the surface prevents proper browning. Cut the chicken into uniform 1-inch pieces so they cook evenly. Season all pieces generously with 1 teaspoon salt and ½ teaspoon black pepper on all sides. Let the seasoned chicken sit for 5 minutes while you prepare other ingredients – this allows the salt to penetrate the meat.
Step 2: Heat your cooking oil correctly. Place a large Dutch oven or heavy-bottomed pot (at least 5-quart capacity) over medium-high heat. Add 2 tablespoons olive oil and let it heat for 1-2 minutes until it shimmers but doesn’t smoke. You’ll know it’s ready when a small piece of chicken sizzles immediately when touched to the oil surface.
Step 3: Brown the chicken in batches for maximum flavor. Add only half the chicken pieces to the hot oil, making sure they don’t touch each other. Overcrowding lowers the oil temperature and causes steaming instead of browning. Cook for 2-3 minutes without moving the pieces – this creates a golden crust. Flip each piece and cook another 2-3 minutes until golden brown on the second side. The chicken won’t be fully cooked yet – that’s perfect. Remove to a clean plate and repeat with remaining chicken pieces.
Phase 2: Mushroom Development and Vegetable Foundation (10 minutes)
Step 4: Cook mushrooms in the same flavorful pot. Without cleaning the pot (those brown bits are pure flavor!), add your 8 ounces of sliced mushrooms directly to the hot oil. The mushrooms will initially release a lot of moisture – this is normal. Cook for 5-6 minutes, stirring occasionally, until the liquid evaporates and the mushrooms turn golden brown. You’ll hear the sizzling change from wet steaming to dry sautéing when they’re ready.
Step 5: Add butter for richness. Push the mushrooms to one side of the pot and add 3 tablespoons butter to the empty space. Let it melt completely and foam slightly, then stir it into the mushrooms. This butter will carry flavors and help cook your vegetables evenly.
Step 6: Build your vegetable base slowly. Add the diced onion first and cook for 2 minutes until it starts to become translucent. Then add the chopped celery and diced carrots. Cook all vegetables together for 3-4 minutes, stirring frequently with a wooden spoon. The vegetables should start to soften but still have some firmness. If they start browning too quickly, reduce the heat to medium.
Step 7: Add aromatics at the right moment. Stir in the 4 minced garlic cloves and 2 teaspoons fresh thyme. Cook for only 30-45 seconds while stirring constantly. Garlic burns quickly and becomes bitter, so watch carefully. You’ll smell the wonderful aroma when it’s perfectly cooked.
Phase 3: Creating the Thickening Base (5 minutes)
Step 8: Create a proper roux for thickening. Sprinkle the 3 tablespoons flour evenly over the vegetables and mushrooms. Using your wooden spoon, stir constantly for 2 full minutes. This cooking time is crucial – raw flour tastes terrible, but properly cooked flour creates a nutty flavor and smooth texture. The mixture will look pasty and thick, which is exactly what you want.
Step 9: Deglaze with wine (optional but recommended). If using wine, pour in the ¼ cup white wine now and stir vigorously. The wine will bubble and steam – this is normal. Scrape the bottom of the pot with your spoon to release any browned bits stuck there. Let the wine cook for 1 minute to evaporate the alcohol, leaving behind concentrated flavor.
Phase 4: Building the Soup Base (3 minutes)
Step 10: Add broth gradually for smooth consistency. Start by adding just 1 cup of chicken broth while whisking constantly. This prevents lumps from forming in your flour base. The mixture will be very thick at first. Once smooth, gradually add the remaining 5 cups of broth, whisking after each addition. The soup base should be smooth without any flour lumps.
Step 11: Return chicken and add wild rice. Add the browned chicken pieces back to the pot along with any juices that accumulated on the plate. Stir in the ¾ cup wild rice and 2 bay leaves. Wild rice takes longer to cook than regular rice, so it needs time to absorb flavors and become tender.
Step 12: Bring to proper cooking temperature. Increase heat to medium-high and bring the soup to a rolling boil while stirring occasionally. Once boiling, immediately reduce heat to low and cover the pot partially (leave about 1 inch gap for steam to escape). This prevents overflow while maintaining gentle cooking.
Phase 5: Simmering for Perfect Texture (15 minutes)
Step 13: Maintain gentle simmering. Keep the soup at a gentle simmer – you should see small bubbles breaking the surface occasionally, not rapid boiling. Stir every 5 minutes to prevent sticking and ensure even cooking. The wild rice will gradually absorb liquid and expand during this time.
Step 14: Test for doneness properly. After 15 minutes, carefully remove a few grains of wild rice with a spoon and test them. Wild rice should be tender when bitten but still have a slight firmness (similar to al dente pasta). The grains will have opened slightly and look plumper than when raw. If still too firm, continue simmering for 3-5 more minutes.
Step 15: Check chicken doneness. Cut into one of the larger chicken pieces to ensure it’s completely cooked through with no pink color remaining. The internal temperature should reach 165°F if using a thermometer.
Phase 6: Final Creamy Finish (5 minutes)
Step 16: Remove bay leaves completely. Use a spoon to fish out both bay leaves and discard them. Bay leaves can be sharp and unpleasant to bite into, so make sure you remove them both.
Step 17: Add cream carefully to prevent curdling. Reduce heat to the lowest setting. Pour the ½ cup heavy cream very slowly into the soup while stirring gently but constantly. Start with just a tablespoon, stir it in completely, then add another tablespoon. This gradual process prevents the cream from separating or curdling due to temperature shock.
Step 18: Final seasoning and taste testing. Taste your creamy mushroom chicken and wild rice soup carefully (it will be hot!). Add salt gradually, starting with ½ teaspoon and tasting again. Add freshly ground black pepper to taste. The soup should be rich, creamy, and well-balanced. If it seems too thick, add a little more broth; if too thin, simmer uncovered for 2-3 more minutes.
Step 19: Garnish and serve immediately. Remove the pot from heat and stir in the 2 tablespoons chopped fresh parsley. Ladle the hot soup into bowls and serve immediately while the cream is at its smoothest and most appealing.
Chef’s Notes for Perfect Creamy Mushroom Chicken and Wild Rice Soup
• Mushroom Selection: Combining cremini and shiitake mushrooms creates complex, earthy flavors in your creamy mushroom chicken and wild rice soup. Cremini provides meaty texture while shiitake adds umami depth.
• Wild Rice Cooking: Unlike regular rice, wild rice maintains texture and doesn’t become mushy when properly cooked. This gives your soup satisfying substance and nutty flavor.
• Cream Temperature: Always add cream to cooled or low-heat soup to prevent separation. If cream does curdle, remove from heat and whisk vigorously – it usually smooths out.
• Make-Ahead Benefits: This creamy mushroom chicken and wild rice soup actually improves overnight as flavors meld together beautifully in the refrigerator.
Nutrition Facts (Per Serving)
- Calories: 385
- Protein: 28g
- Carbohydrates: 32g
- Fat: 18g
- Fiber: 4g
- Sodium: 680mg
Delicious Variations of Creamy Mushroom Chicken and Wild Rice Soup
Lighter Version
Replace heavy cream with half-and-half and add an extra tablespoon of flour for thickness. You’ll maintain creaminess with fewer calories in your soup.
Herbaceous Twist
Add fresh sage and rosemary along with thyme for complex herb flavors. Perfect for fall dinners alongside this warming lemon ginger turmeric chicken and rice soup.
Protein Power
Substitute turkey thighs for chicken or add crispy bacon bits for extra richness. Both proteins work beautifully in this creamy base.
Vegetarian Option
Skip the chicken and double the mushrooms, using vegetable broth instead. Add white beans for protein, similar to how beans enhance this hearty ground beef vegetable soup.
Storage & Reheating Your Creamy Mushroom Chicken and Wild Rice Soup
Refrigerator: Store covered for up to 4 days. The soup will thicken as it cools – this is completely normal!
Freezer: Freeze for up to 3 months, but note that dairy-based soups can separate slightly when thawed.
Reheating: Warm gently over low heat, stirring frequently. Add a splash of broth or cream if needed to restore proper consistency.
Make-Ahead: Prepare everything except the cream, then add it when reheating for best texture results.
Troubleshooting Guide
Problem: Soup is too thin after adding cream Solution: Mix 1 tablespoon cornstarch with 2 tablespoons cold water, then stir into gently simmering soup until thickened.
Problem: Cream curdled when added to hot soup Solution: Remove from heat immediately and whisk vigorously. Usually smooths out with persistent whisking and patience.
Problem: Wild rice still hard after recommended cooking time Solution: Continue simmering with lid on for 5-10 more minutes. Wild rice cooking time varies by brand and age.
Problem: Soup tastes bland despite following recipe Solution: Add more salt gradually, then a squeeze of fresh lemon juice to brighten and balance all flavors.
Problem: Mushrooms released too much water and taste soggy Solution: Next time, cook mushrooms in smaller batches over higher heat to achieve proper browning and texture.
Equipment Essentials
• Dutch oven or large heavy pot (5-6 quart capacity minimum) • Sharp chef’s knife for efficient and safe chopping • Wooden spoon for stirring without scratching your pot • Wire whisk for smooth cream incorporation • Measuring cups and spoons for accurate ingredients • Two cutting boards (one for vegetables, one for raw chicken)
Organized Shopping List
Meat Department
- 1 lb boneless chicken thighs
Produce Section
- 8 oz mixed mushrooms (cremini and shiitake)
- 1 yellow onion
- 2 celery stalks
- 2 medium carrots
- 1 head fresh garlic
- Fresh thyme
- Fresh parsley
Pantry/Dry Goods
- Wild rice (¾ cup needed)
- All-purpose flour
- Bay leaves
- Salt and black pepper
Dairy Department
- Heavy cream
- Butter
Canned/Boxed Goods
- Low-sodium chicken broth (6 cups needed)
- Dry white wine (optional)
Success Secrets for Perfect Results
1. Brown the chicken properly – don’t rush this crucial step. Golden chicken pieces add incredible depth and richness to your soup base.
2. Cook vegetables until completely soft – undercooked vegetables won’t break down properly and will taste raw in the finished soup.
3. Stir the flour roux constantly – this prevents burning and ensures smooth thickening without any lumps in your final soup.
4. Maintain gentle simmering – aggressive boiling can make chicken tough and cause cream to separate in your soup.
5. Taste and adjust confidently – every batch needs personal tweaking. Trust your palate and season boldly for best results.
This comprehensive creamy mushroom chicken and wild rice soup recipe delivers restaurant-quality comfort food with beginner-friendly techniques. The combination of perfectly browned chicken, earthy mushrooms, and nutty wild rice creates a soup that’s both elegant enough for entertaining and cozy enough for family dinners. Master this creamy mushroom chicken and wild rice soup recipe once, and it will become your go-to comfort food for years to come.