Prep Time: 15 minutes | Cook Time: 40 minutes | Total Time: 55 minutes | Servings: 4 persons
Key Takeaways:
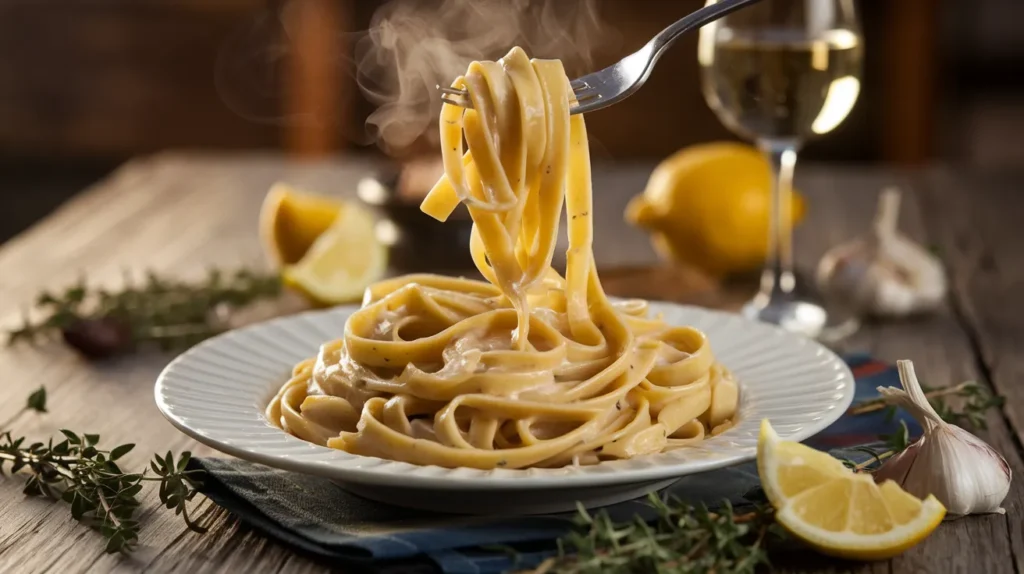
- This Creamy Roast Garlic and Lemon Pasta Sauce transforms ordinary pasta into something extraordinary
- Ready in under an hour with just 10 simple ingredients
- Perfect for weeknight dinners but impressive enough for guests
- Works with any pasta shape and stores beautifully for quick meals later
Why This Creamy Roast Garlic and Lemon Pasta Sauce Beats Store-Bought
Ever noticed how store-bought creamy pasta sauces never quite deliver that restaurant-quality taste? That’s because most lack the depth that comes from slowly roasted garlic and fresh lemon.
This Creamy Roast Garlic and Lemon Pasta Sauce recipe solves that problem. By roasting the garlic first, you’ll unlock a sweet, mellow flavor that elevates a simple cream sauce into something extraordinary.
I created this Creamy Roast Garlic and Lemon Pasta Sauce after trying dozens of versions over the years. The combination of roasted garlic, fresh lemon, and Parmesan cheese creates a sauce that’s rich without being heavy, with a bright flavor that makes it perfect year-round.
If you enjoy this sauce, you might also like my Cheesy Chicken Pasta which uses a similar creamy base.
Nutrition Facts (Per Serving)
| Nutrient | Amount | % Daily Value |
|---|---|---|
| Calories | 420 | – |
| Total Fat | 32g | 41% |
| Saturated Fat | 19g | 95% |
| Cholesterol | 95mg | 32% |
| Sodium | 580mg | 25% |
| Total Carbohydrates | 14g | 5% |
| Dietary Fiber | 1g | 4% |
| Sugars | 3g | – |
| Protein | 16g | 32% |
Dietary Notes: This Creamy Roast Garlic and Lemon Pasta Sauce is vegetarian and gluten-free (when served with gluten-free pasta). Contains dairy.
What You’ll Need
Ingredients
| Ingredient | Measurement | Notes |
|---|---|---|
| Whole garlic heads | 2 medium | Look for firm bulbs with tight skin |
| Olive oil | 2 tablespoons | Extra virgin preferred |
| Heavy cream | 1½ cups | Room temperature works best |
| Lemons | 2 medium | Need both zest and juice |
| Unsalted butter | 4 tablespoons | Cut into cubes |
| Parmesan cheese | 1 cup | Freshly grated, not pre-packaged |
| Fresh thyme | 2 teaspoons | Leaves only, stems removed |
| Red pepper flakes | ¼ teaspoon | Optional for mild heat |
| Salt | 1 teaspoon | Kosher salt preferred |
| Black pepper | ½ teaspoon | Freshly ground |
| Pasta water | ½ cup | Reserve when cooking pasta |
Kitchen Tools
| Tool | Purpose |
|---|---|
| Baking sheet | For roasting garlic |
| Aluminum foil | To wrap garlic for roasting |
| Large saucepan | For making the sauce |
| Wooden spoon | For stirring |
| Microplane or zester | For lemon zest |
| Citrus juicer | For extracting lemon juice |
| Measuring cups | For liquid ingredients |
| Measuring spoons | For smaller quantities |
| Cutting board | For prep work |
| Sharp knife | For cutting garlic and herbs |
Substitutions
If you need to make changes to this Creamy Roast Garlic and Lemon Pasta Sauce, here are some tested options:
- Heavy cream: Half-and-half works but will create a thinner sauce
- Parmesan cheese: Pecorino Romano offers a sharper flavor
- Fresh thyme: 1 teaspoon dried thyme or ½ teaspoon dried oregano
- Lemons: 3 tablespoons bottled lemon juice (but fresh is much better)
- Unsalted butter: Salted butter works, just reduce added salt by half
Step-by-Step Instructions (Beginner Friendly)
Preparation Phase
- Preheat your oven to 400°F (200°C).
- Turn the oven dial to 400°F or press the appropriate buttons on your digital oven
- Allow at least 10 minutes for the oven to fully preheat
- Tip: Place the oven rack in the middle position for even cooking
- Prepare the garlic heads:
- Place the garlic heads on a cutting board with the root end down
- Using a sharp knife, cut off approximately ¼ inch from the top of each garlic head (the pointy end)
- This should expose the tops of most of the individual garlic cloves
- Beginner tip: If some cloves are not exposed, carefully use the tip of your knife to cut their tops off individually
- Tear off two pieces of aluminum foil, each about 8 inches square
- Place one garlic head in the center of each foil piece
- Slowly drizzle 1 tablespoon of olive oil over each head, making sure it seeps between the cloves
- Use your fingers to rub the oil around if needed
- Sprinkle a small pinch of salt (about ⅛ teaspoon) over each head
- Pull the corners of the foil up and twist them together to form a sealed packet
- Warning: Make sure the foil is completely sealed to trap steam during roasting
- Prepare your other ingredients:
- Take the lemons and wash them under cool water
- Pat them dry with a paper towel (this helps with zesting)
- Using your microplane or zester, gently rub the outside of the lemon against the tool
- Beginner tip: Only zest the yellow part of the skin, not the white pith underneath (which is bitter)
- Zest both lemons completely, collecting the zest in a small bowl
- Cut the lemons in half and squeeze the juice using a citrus juicer
- You should get approximately 3-4 tablespoons of juice; measure this and set aside
- Remove thyme leaves from stems by pinching the stem at the top and pulling backward
- Collect 2 teaspoons of thyme leaves and set aside
- If using block Parmesan, grate it now using the fine side of your grater
- Beginner tip: Grate more than you think you’ll need, as some will be used for garnish
Roasting Phase
- Roast the garlic:
- Place the wrapped garlic heads on a baking sheet, seam side up
- Put the baking sheet in the middle rack of your preheated oven
- Set a timer for 35 minutes
- How to check if done: After 35 minutes, carefully open one packet (be careful of hot steam)
- Press a clove with a fork – it should be completely soft, like butter
- If cloves are still firm, rewrap and roast for an additional 5-10 minutes
- Beginner tip: The garlic should be golden brown and very soft, not dark brown or black
- Extract the roasted garlic:
- Once roasted, remove the baking sheet from the oven using oven mitts
- Place on a heat-safe surface and allow to cool for 5-10 minutes
- When cool enough to handle (but still warm), carefully open the foil packets
- Hold a garlic head at the root end with one hand
- With your other hand, gently squeeze from the bottom up, like toothpaste
- The soft, roasted cloves should easily push out from their skins
- Collect all the roasted garlic in a small bowl
- Using a fork, mash the garlic cloves until they form a smooth paste
- Troubleshooting: If any cloves are stuck, use a small fork to pull them out
- Beginner tip: The garlic should now be sweet and mellow, not harsh or pungent
Looking for a different take on garlic pasta? My Creamy Garlic Penne Pasta uses fresh garlic for a more assertive flavor profile.
Making the Sauce
- Start the sauce base:
- Place your large saucepan on the stove
- Turn the heat to medium (about halfway on most dials)
- Cut the butter into tablespoon-sized pieces
- Add all the butter to the pan
- Beginner tip: Watch carefully as butter melts – it should sizzle gently but not smoke
- Once completely melted, add the mashed roasted garlic
- Using a wooden spoon, stir constantly for 30 seconds to combine
- What to look for: The mixture should be fragrant but not browning
- Add the cream:
- Keep the heat at medium
- Hold the measuring cup with cream close to the pan
- Pour the heavy cream in slowly while continuously stirring with your wooden spoon
- Important: Stir constantly to prevent lumps and ensure even heating
- Watch for small bubbles forming around the edges of the pan – this means it’s starting to simmer
- Once you see bubbles, immediately reduce heat to medium-low (about 3 on a dial of 10)
- Warning for beginners: Do not let the cream boil or it might separate (look like curdled milk)
- If it starts to boil, immediately remove from heat for 30 seconds while stirring
- Season the sauce:
- Keep the sauce at a gentle simmer (small bubbles around the edge)
- Sprinkle in all the thyme leaves, distributing them evenly across the surface
- Add 1 teaspoon of salt, sprinkling it evenly across the surface
- Add ½ teaspoon of black pepper
- If using red pepper flakes, add ¼ teaspoon now
- Beginner tip: You can add less pepper flakes if you’re sensitive to heat
- Use your wooden spoon to stir everything together
- Let the sauce simmer for 5 minutes, stirring occasionally (about every 30 seconds)
- What to look for: The sauce should thicken slightly but still be pourable
- Add the cheese and lemon:
- Important step: Remove the pan completely from the heat
- Allow the sauce to stop bubbling (about 30 seconds)
- Add about ¼ cup of the grated Parmesan to the sauce
- Stir continuously until completely melted
- Repeat with small additions of cheese until all Parmesan is incorporated
- Beginner tip: Adding the cheese slowly prevents clumping
- Add 1 tablespoon of lemon zest (about half of what you collected)
- Add 2 tablespoons of lemon juice
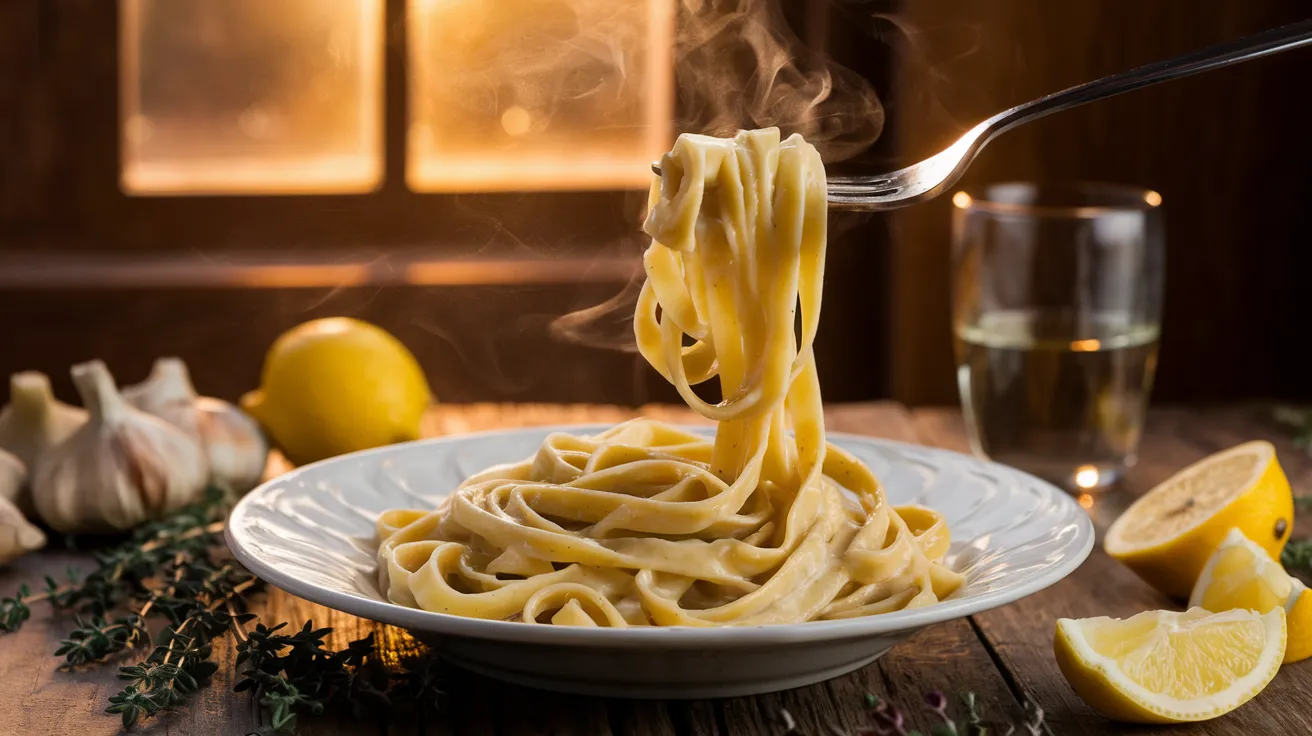
- Stir well for about 1 minute to combine everything
- What to look for: The sauce should be smooth and have a pale yellow color
- Finish the sauce:
- Return the pan to the stove on low heat (about 2 on a dial of 10)
- If you haven’t cooked your pasta yet, now is the time to cook it according to package directions
- Important reminder: Save at least ½ cup of pasta water before draining!
- Add ¼ cup of the reserved pasta water to the sauce
- Stir continuously for 2-3 minutes
- Texture check: The sauce should coat the back of a spoon but still flow
- If too thick, add more pasta water, 1 tablespoon at a time
- If too thin, continue simmering for a few more minutes
- Taste the sauce using a clean spoon
- Add more salt, pepper, or lemon juice if needed
Final Steps
- Combine with pasta:
- If you haven’t already, cook 12 ounces of your favorite pasta according to package directions
- Beginner tip: Cook pasta to al dente (firm to the bite) as it will continue cooking slightly in the sauce
- Drain pasta but do not rinse (remember to save some pasta water first!)
- Add the hot, drained pasta directly to the sauce in the saucepan
- Using tongs or two large spoons, gently lift and turn the pasta to coat it completely
- Visual cue: Every strand should be glossy and coated with sauce
- If the sauce becomes too thick, add more pasta water, 1 tablespoon at a time
- Let the pasta and sauce sit together for 1 minute to let the pasta absorb some flavor
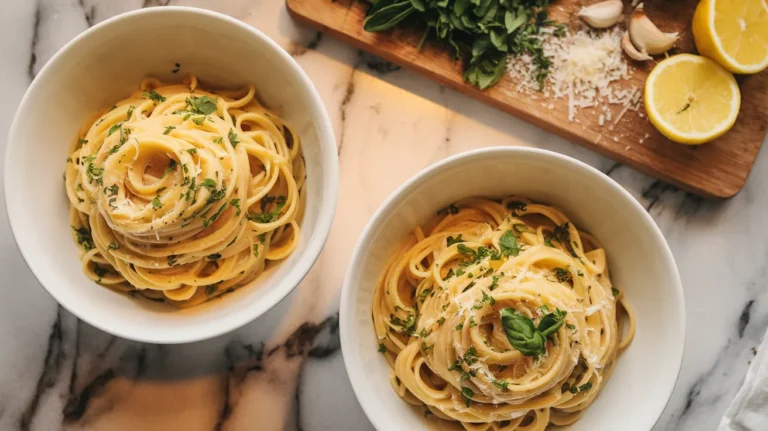
- Serve immediately:
- Warm your serving plates or bowls by running them under hot water and drying them
- Using tongs, twist pasta onto warmed plates, creating a small mound
- Spoon any extra sauce from the pan over each serving
- Sprinkle each portion with some of the remaining Parmesan cheese
- Add a small pinch of remaining lemon zest on top of each serving
- Give each plate a twist of fresh black pepper
- For a professional touch, add a few fresh thyme leaves on top
- Beginner tip: Serve right away while the sauce is still creamy and warm
Troubleshooting Your Creamy Roast Garlic and Lemon Pasta Sauce
Common Issues and Solutions
Problem: Sauce is too thin
- Solution: Continue simmering for a few more minutes. The sauce will thicken as it cools.
- Beginner fix: If it’s still too thin, mix 1 teaspoon of cornstarch with 1 tablespoon of cold water, then stir into the sauce and heat until thickened.
Problem: Sauce is too thick
- Solution: Add more pasta water, 1 tablespoon at a time, until desired consistency is reached.
- Visual cue: The sauce should easily coat the back of a spoon but still flow off.
Problem: Cheese clumps instead of melting smoothly
- Solution: Remove pan from heat completely before adding cheese. Make sure to add it gradually while stirring constantly.
- Beginner recovery: If it’s already clumpy, put the sauce in a blender and pulse until smooth, then return to pan.
Problem: Sauce tastes too lemony
- Solution: Add a little more cream (2 tablespoons) and Parmesan (2 tablespoons) to balance the acidity.
- Taste test: After adding, wait 30 seconds, then taste again before making further adjustments.
Problem: Garlic flavor isn’t strong enough
- Solution: Next time, try using three garlic heads instead of two, or add a clove of minced fresh garlic to the sauce.
- Quick fix: Add ⅛ teaspoon of garlic powder and stir well.
Problem: Sauce separated or looks curdled
- Solution: This usually happens if the heat was too high. Try whisking vigorously off the heat.
- Beginner fix: In extreme cases, start over with a new batch of cream and slowly whisk in the separated sauce.
For a completely different approach to pasta sauce, try my Creamy Tomato Sauce with Hidden Veggies which offers similar creaminess but with added nutrition.
Variations & Substitutions for Creamy Roast Garlic and Lemon Pasta Sauce
Make It Your Own
- Herb Variations:
- Swap thyme for basil or tarragon for a different flavor profile
- Add 2 tablespoons of chopped fresh parsley at the end for freshness
- How to do it: Simply substitute equal amounts of your chosen herb for the thyme
- Protein Additions:
- Add 1 pound of cooked shrimp during the final minute of cooking
- Mix in 2 cups of shredded rotisserie chicken when combining with pasta
- Beginner tip: Make sure proteins are already cooked and still warm when adding
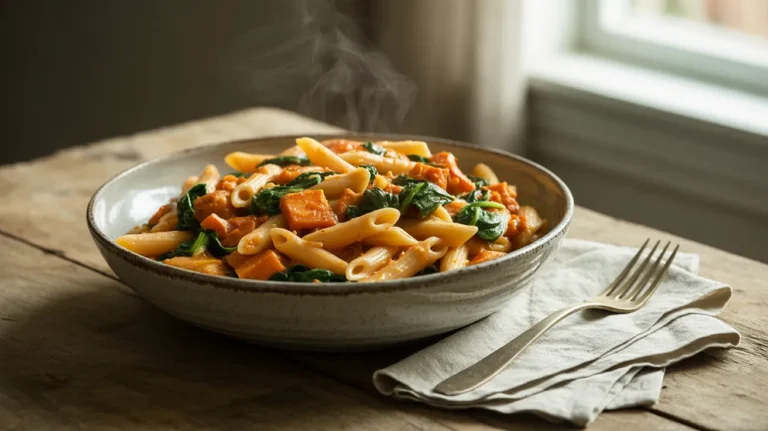
- Vegetable Boosters:
- Stir in 2 cups of baby spinach leaves until wilted
- Add 1 cup of halved cherry tomatoes in the last minute of cooking
- Mix in 1 cup of cooked green peas for sweetness and color
- How to add: Stir vegetables into the sauce just before adding the pasta
- Spicy Version:
- Double the red pepper flakes
- Add ¼ teaspoon of cayenne pepper with the seasonings
- Beginner warning: Start with less and add more to taste – you can’t take spice out!
- Lighter Option:
- Replace half the cream with chicken broth
- Use part-skim mozzarella for some of the Parmesan
- Note: The sauce will be thinner but still flavorful
Storage & Reheating Your Creamy Roast Garlic and Lemon Pasta Sauce
Keep It Fresh
Refrigerator Storage:
- Allow sauce to cool completely at room temperature (no more than 2 hours)
- Transfer to a clean, airtight container with a tight-fitting lid
- Label with the date (I use masking tape and a marker)
- Store in refrigerator for up to 3 days
- Beginner tip: Store sauce separately from pasta for best results when reheating
- Note: Sauce will thicken considerably when cold – this is normal
Freezer Storage:
- Not recommended as cream-based sauces tend to separate when frozen
- If you must freeze, expect texture changes upon thawing
Reheating Instructions:
- Stovetop Method (Best):
- Remove sauce from refrigerator and let sit at room temperature for 10 minutes
- Transfer sauce to a clean saucepan
- Place over low heat (about 2 on a dial of 10)
- Stir frequently, almost constantly, with a wooden spoon
- Beginner tip: If the sauce looks too thick or clumpy, add 1-2 tablespoons of milk or water
- Heat just until warmed through and smooth again
- Important warning: Do not allow to boil as this will cause separation
- If adding cold pasta, warm it separately first for best results
- Microwave Method (Quick):
- Place sauce in a microwave-safe container
- Cover loosely with a microwave-safe lid or paper towel
- Set microwave to 50% power (medium)
- Heat in 30-second intervals, stirring between each interval
- Beginner tip: This might take 2-4 intervals depending on your microwave
- Stop heating when sauce is just warmed through
- Stir well before using
Safety Notes & Tips for Creamy Roast Garlic and Lemon Pasta Sauce
For Best Results
Food Safety:
- Wash hands thoroughly before and during food preparation
- Keep sauce refrigerated after cooling (within 2 hours of cooking)
- Do not leave cream-based sauce at room temperature for more than 2 hours
- Always use clean utensils when serving and storing
- Beginner warning: If the sauce has been out for more than 2 hours, discard it
Pro Tips:
- Salt your pasta water generously (it should taste like sea water) for the best flavor
- Reserve more pasta water than you think you’ll need – at least 1 cup
- The sauce thickens as it cools, so make it slightly thinner than your desired final consistency
- For extra flavor, add the pasta directly from the cooking water to the sauce without rinsing
- Beginner tip: Set a timer for each step to avoid distractions and overcooking
Serving Suggestions:
- Works beautifully with long pasta like fettuccine or linguine
- For a complete meal, serve with a simple green salad and garlic bread
- A crisp white wine like Pinot Grigio or Sauvignon Blanc pairs perfectly
- Presentation tip: Serve in warmed bowls to keep the sauce from thickening too quickly
Quick Tips for Success with Creamy Roast Garlic and Lemon Pasta Sauce
- Room temperature cream incorporates better and reduces cooking time
- Always zest lemons before juicing them – it’s much easier!
- For extra richness, finish with a drizzle of good olive oil right before serving
- Fresh is best – grate your own Parmesan rather than using pre-grated
- Taste as you go and adjust seasonings to your preference
- Make ahead tip: Roast the garlic up to 3 days ahead and store in an airtight container in the refrigerator