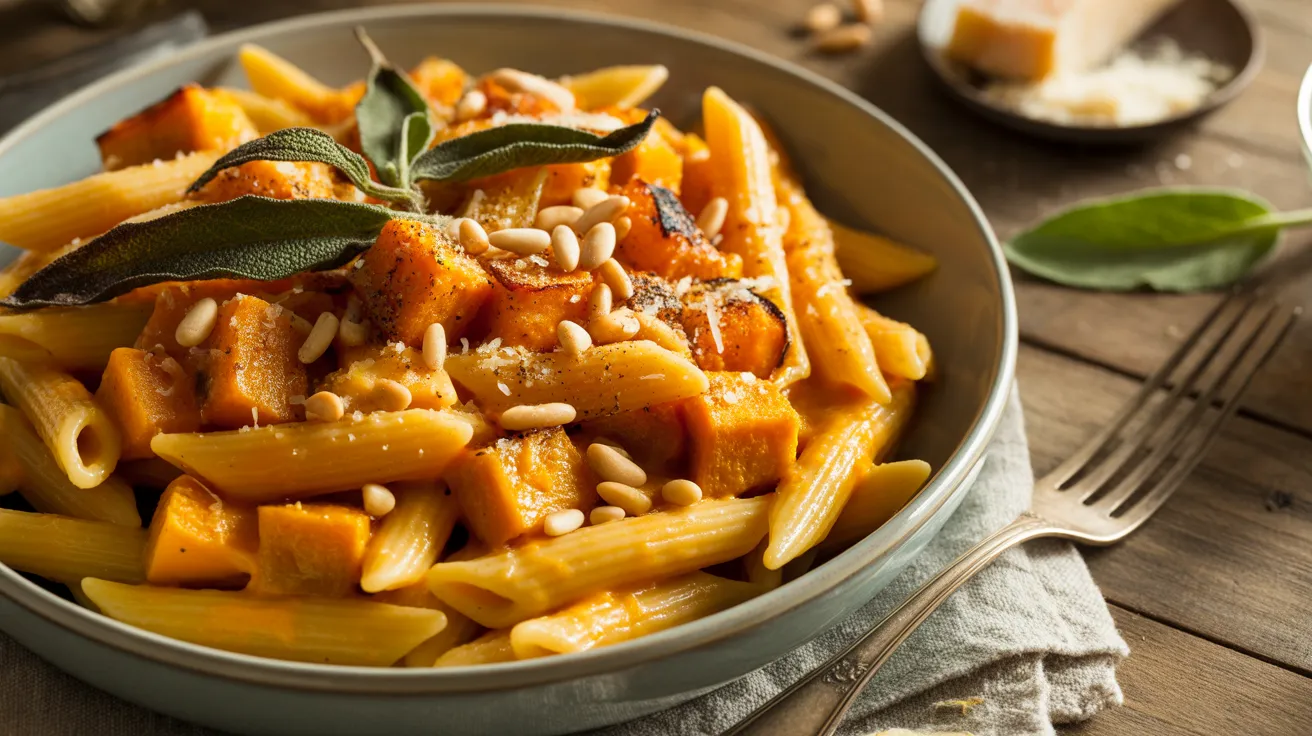
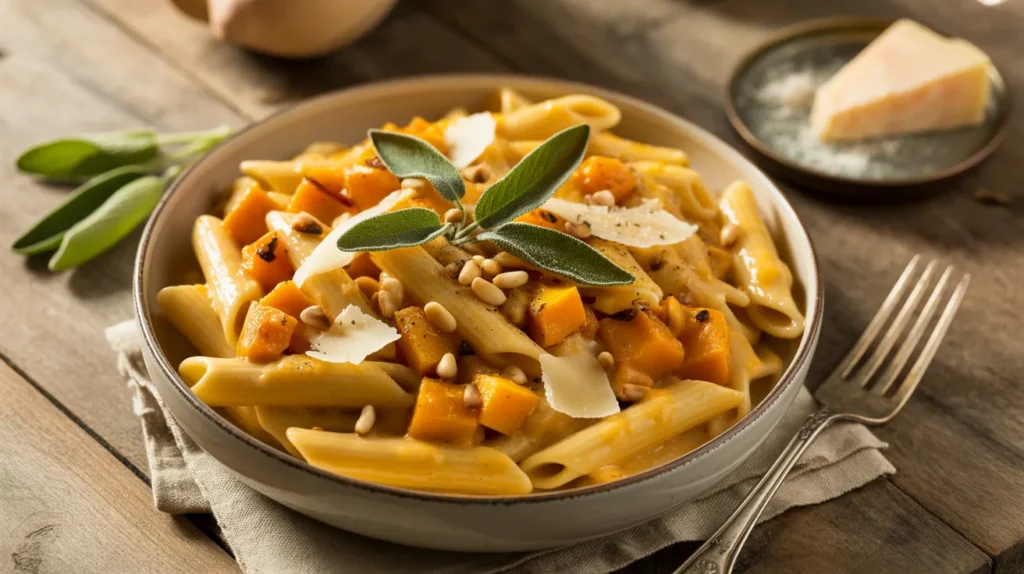
Nothing beats the velvety richness of roasted butternut squash tossed with al dente pasta in a luscious cream sauce. This creamy roasted butternut squash pasta transforms simple ingredients into restaurant-quality comfort food that’s surprisingly easy to master. The secret lies in caramelizing the squash until it’s sweet and tender, then blending it with cream and Parmesan for a sauce so good you’ll want to lick the bowl. Perfect for busy weeknights or impressive enough for dinner guests, this creamy roasted butternut squash pasta delivers maximum flavor with minimal effort.
SERVES: 4 | PREP: 20 MIN | COOK: 45 MIN | TOTAL: 65 MIN
Ingredients
For the Roasted Squash
| Ingredient | Amount |
|---|---|
| Butternut squash (peeled, cubed) | 3 cups (about 1 medium squash) |
| Olive oil | 3 tablespoons |
| Garlic cloves (whole, unpeeled) | 4 cloves |
| Fresh thyme sprigs | 3 sprigs |
| Salt | 1 teaspoon |
| Black pepper | ½ teaspoon |
For the Pasta & Sauce
| Ingredient | Amount |
|---|---|
| Pasta (penne, rigatoni, or fusilli) | 12 ounces |
| Heavy cream | 1 cup |
| Parmesan cheese (freshly grated) | 1 cup |
| Butter | 2 tablespoons |
| Fresh sage leaves | 8-10 leaves |
| Pasta cooking water (reserved) | 1 cup |
| Nutmeg (freshly grated) | ¼ teaspoon |
| Red pepper flakes | ¼ teaspoon |
For Garnish
| Ingredient | Amount |
|---|---|
| Toasted pine nuts | ¼ cup |
| Extra Parmesan cheese | ¼ cup |
| Fresh sage leaves (fried) | 6-8 leaves |
| Cracked black pepper | To taste |
Step-by-Step Instructions
Phase 1: Roasting the Squash (30 minutes)
Step 1: Heat your oven to 425°F and position the rack in the center. Line a large baking sheet with parchment paper for easy cleanup.
Step 2: Cut your butternut squash into 1-inch cubes—this size ensures they roast evenly without burning. You want them all roughly the same size so they cook at the same rate.
Step 3: Toss the squash cubes with 3 tablespoons olive oil in a large bowl until every piece is lightly coated. The oil helps caramelize the natural sugars in the squash.
Step 4: Add 1 teaspoon salt, ½ teaspoon black pepper, and the whole unpeeled garlic cloves to the bowl. Toss everything together so the seasonings stick to the oiled squash.
Step 5: Spread the squash in a single layer on your prepared baking sheet. Don’t overcrowd—the pieces should have space between them. Overcrowding creates steam instead of the caramelization we’re after.
Step 6: Nestle the thyme sprigs among the squash pieces. They’ll infuse the squash with herbaceous flavor as everything roasts.
Step 7: Roast for 25-30 minutes, flipping the squash halfway through with a spatula. You’ll know it’s done when the edges turn golden brown and a fork slides through easily. The squash should be tender but not mushy.
Step 8: Remove from oven and let cool for 5 minutes. Squeeze the roasted garlic cloves out of their skins—they should slip right out and be golden and sweet. Discard the thyme stems.
Phase 2: Cooking the Pasta (12 minutes)
Step 9: Bring a large pot of water to a rolling boil. Add 2 tablespoons salt—your pasta water should taste like the ocean. This is your only chance to season the pasta itself.
Step 10: Add 12 ounces pasta and cook according to package directions until al dente (usually 10-12 minutes). Al dente means the pasta still has a slight bite—it shouldn’t be mushy.
Step 11: Before draining, scoop out 1 cup of the starchy pasta water with a measuring cup. This liquid gold will help create a silky sauce that clings to every noodle.
Step 12: Drain the pasta but don’t rinse it. The residual starch helps the sauce stick.
Phase 3: Making the Sauce (8 minutes)
Step 13: Transfer 2 cups of the roasted squash (save the rest for garnish) and the squeezed roasted garlic to a blender. Add ½ cup heavy cream and ½ cup pasta water.
Step 14: Blend on high speed for 60-90 seconds until completely smooth and velvety. The mixture should look like orange silk. If it’s too thick, add more pasta water 2 tablespoons at a time.
Step 15: In the same large pot you cooked the pasta in, melt 2 tablespoons butter over medium heat. Add 8-10 fresh sage leaves and cook for 30-45 seconds until they’re crispy and fragrant but not burnt. The butter will foam—that’s normal.
Step 16: Pour the blended squash sauce into the pot with the sage butter. Stir in the remaining ½ cup heavy cream, 1 cup grated Parmesan, ¼ teaspoon nutmeg, and ¼ teaspoon red pepper flakes.
Phase 4: Combining & Finishing (5 minutes)
Step 17: Add the drained pasta to the sauce and toss vigorously for 2-3 minutes over medium-low heat. The pasta should absorb some sauce while the sauce thickens slightly.
Step 18: If the sauce gets too thick (it should coat the pasta like a creamy blanket, not be dry), add reserved pasta water ¼ cup at a time while tossing. The starch in the water helps emulsify the sauce.
Step 19: Taste and adjust seasoning. You might need more salt, black pepper, or even a squeeze of lemon juice to brighten the flavors.
Step 20: Divide among four bowls and top with the remaining roasted squash cubes, toasted pine nuts, fried sage leaves, extra Parmesan, and cracked black pepper. Serve immediately while hot.
Chef’s Notes
Squash Selection: Choose a butternut squash that feels heavy for its size with matte skin—shiny skin means it’s underripe. The long neck section has fewer seeds and more usable flesh, so bigger necks mean easier prep. I always buy one that’s 3-4 pounds for recipes like this creamy roasted butternut squash pasta.
Roasting Temperature: Don’t be tempted to lower the oven temperature to prevent browning. That golden caramelization adds crucial sweetness and depth. If your squash is browning too fast, your cubes are probably too small or your oven runs hot.
Sauce Consistency: The perfect creamy roasted butternut squash pasta sauce should coat the back of a spoon but still flow easily. It will thicken as it sits, so keep extra pasta water handy when serving. I always make mine slightly thinner than I want because it continues to thicken off the heat.
Pasta Shape Matters: Tubes and twists work best here because they trap the sauce inside. Avoid thin pasta like angel hair—it can’t support this rich sauce. If you’re looking for similar texture with a different vegetable base, try this butternut squash pasta sauce variation.
Nutrition Information (Per Serving)
Calories: 685 | Protein: 22g | Carbohydrates: 74g | Fat: 34g | Fiber: 5g | Sugar: 7g | Sodium: 890mg | Calcium: 385mg | Iron: 3mg
Creative Variations
Protein-Packed Version: Add 2 cups shredded rotisserie chicken or 1 pound Italian sausage (browned and crumbled) in Step 17 when combining pasta and sauce. The protein makes it more filling and adds savory contrast to the sweet squash.
Vegan Butternut Dream: Swap heavy cream for full-fat coconut milk and use nutritional yeast instead of Parmesan (use 3 tablespoons). The coconut milk adds tropical sweetness that works surprisingly well with roasted squash.
Bacon & Maple Twist: Crisp 6 strips of bacon, crumble them, and add to the finished pasta. Drizzle 1 tablespoon real maple syrup into the sauce for sweet-savory magic. The smoky bacon balances the creamy sauce beautifully.
Walnut & Sage Style: Replace pine nuts with candied walnuts and double the sage. This variation mirrors the flavors in this creamy butternut squash pasta with sage and walnuts that’s perfect for fall entertaining.
Storage & Reheating
Refrigerator Storage: Transfer cooled pasta to an airtight container and refrigerate for up to 4 days. The sauce will thicken considerably, so expect to add liquid when reheating.
Reheating on Stovetop: Place pasta in a skillet over medium-low heat with ¼ cup milk or cream per serving. Stir constantly for 5-7 minutes until heated through. This method keeps the sauce smooth and prevents the pasta from drying out.
Microwave Method: Add 2 tablespoons liquid (water, milk, or cream) per serving before microwaving. Heat in 1-minute intervals, stirring between each, until hot throughout. The liquid prevents the sauce from separating.
Freezing: I don’t recommend freezing cream-based pasta dishes because the dairy can separate and become grainy when thawed. If you must freeze, store the sauce separately from the pasta for up to 2 months. Thaw overnight in the refrigerator before reheating.
Make-Ahead Tip: Roast the squash up to 3 days ahead and store in the fridge. When ready to serve, make fresh pasta and reheat the squash before blending the sauce.
Troubleshooting Guide
Problem: Sauce is too thick and pasty
Solution: Your pasta water is your best friend here. Add it 2 tablespoons at a time while stirring over low heat until the sauce reaches a glossy, pourable consistency. The starch in the pasta water acts as a natural thickener and emulsifier. If you’ve run out of pasta water, use warm milk or cream instead.
Problem: Squash isn’t caramelizing, just steaming
Solution: You’ve overcrowded the pan. Squash needs space to release moisture and develop those sweet brown edges. Use two baking sheets if needed, and make sure your oven is fully preheated to 425°F. Don’t skip flipping at the halfway point—this ensures even browning on multiple sides.
Problem: Sauce tastes bland
Solution: Salt is likely the culprit. Butternut squash needs generous seasoning to bring out its sweetness. Add ½ teaspoon salt at a time, tasting after each addition. A squeeze of lemon juice or splash of white wine vinegar can brighten the flavors. The nutmeg should be subtle—too much makes it taste like dessert.
Problem: Sauce separates and looks oily
Solution: This happens when the sauce gets too hot too fast. Remove from heat immediately and whisk in 2-3 tablespoons cold butter or ¼ cup cold cream. The cold fat will help re-emulsify the sauce. Next time, keep the heat at medium-low when combining the sauce ingredients.
Problem: Pasta is gummy or clumpy
Solution: You either overcooked the pasta or let it sit too long after draining. Pasta continues cooking in the hot sauce, so always cook it 1-2 minutes shy of package directions. If your pasta is already clumpy, rinse it quickly under hot water to separate the noodles, then proceed with adding it to the sauce.
Equipment Essentials
- Large baking sheet (18×13 inch half-sheet pan works perfectly)
- Parchment paper (prevents sticking and makes cleanup easy)
- Large pot (at least 6-quart capacity for boiling pasta)
- High-powered blender (Vitamix or similar for ultra-smooth sauce)
- Large skillet or the pasta pot (for combining pasta and sauce)
- Sharp chef’s knife (for peeling and cubing squash safely)
- Cutting board (preferably large for squash prep)
- Measuring cups and spoons
- Spatula (for flipping squash while roasting)
- Colander (for draining pasta)
- Cheese grater (for fresh Parmesan—pre-grated doesn’t melt as smoothly)
- Ladle or measuring cup (for reserving pasta water)
Shopping List
Produce Section
- Butternut squash (1 medium, 3-4 pounds)
- Fresh garlic (1 head)
- Fresh sage (1 bunch)
- Fresh thyme (1 package)
Dairy Section
- Heavy cream (8 ounces)
- Butter (1 stick)
- Parmesan cheese block (8 ounces for grating fresh)
Dry Goods
- Pasta (12 ounces—penne, rigatoni, or fusilli)
- Pine nuts (2 ounces)
- Olive oil (if running low)
Spices & Seasonings
- Whole nutmeg (or ground if you prefer)
- Red pepper flakes
- Salt
- Black peppercorns
Success Secrets
- Roast Extra Squash: Double the squash quantity and use leftovers for soups, salads, or bowls throughout the week. Roasted squash keeps for 5 days refrigerated and saves you prep time on future meals.
- Fresh Parmesan is Non-Negotiable: Pre-grated cheese contains anti-caking agents that prevent smooth melting. Buy a block of Parmigiano-Reggiano and grate it yourself. The flavor difference is night and day, and your sauce will be silkier.
- Reserve More Pasta Water Than You Think: That starchy liquid is liquid gold for adjusting sauce consistency. I always grab 2 cups even though the recipe calls for 1 cup. You can’t add it back once the pasta is drained.
- Taste as You Go: Every butternut squash has different sweetness levels depending on size and season. Taste your sauce before adding the full amount of nutmeg and adjust the seasoning. Fall squash tends to be sweeter than winter squash.
- Serve Immediately: Cream sauces thicken as they cool, and pasta absorbs sauce over time. This creamy roasted butternut squash pasta is best served straight from the pot to the bowl. If you’re hosting, keep the sauce and pasta separate until guests arrive, then combine and serve.
This creamy roasted butternut squash pasta delivers restaurant-worthy results with simple techniques any home cook can master. The roasted squash brings natural sweetness, the cream adds luxurious richness, and the Parmesan provides that salty, umami punch. Serve it as a comforting weeknight dinner or dress it up for special occasions with extra garnishes.