- One-pot wonder that delivers restaurant-quality results with minimal cleanup
- Foolproof technique guarantees juicy chicken and perfectly creamy sauce every time
- Budget-friendly meal feeds a family of four for under $15
- Make-ahead friendly – even better as leftovers for busy weeknights
The Comfort Food Your Family Is Missing
Busy weeknights call for something special. Not another takeout meal, not another boring chicken dish.
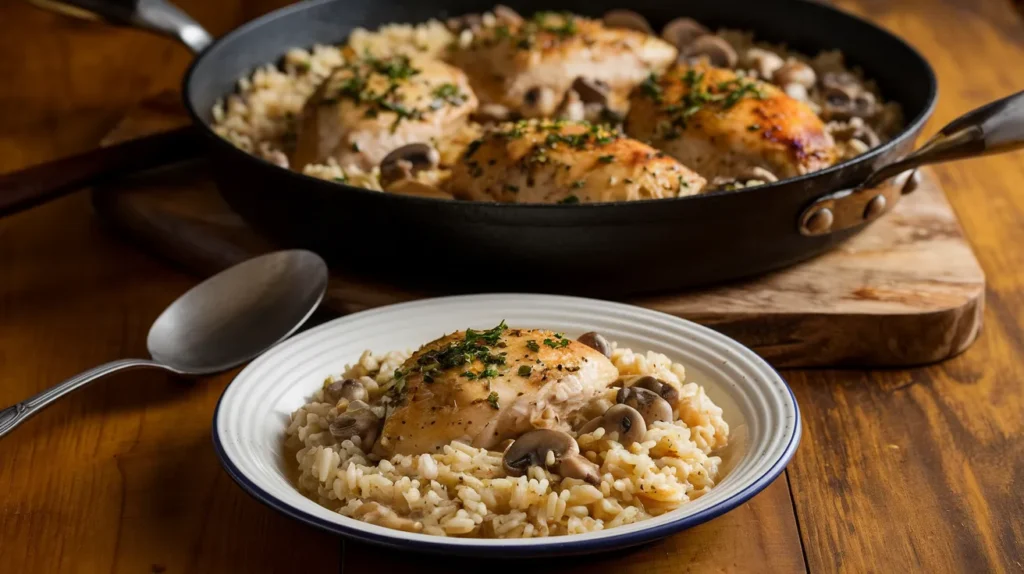
What you need is this Creamy Smothered Chicken and Rice.
This recipe transforms everyday ingredients into a meal that tastes like it simmered all day. The secret? A simple technique that creates a velvety sauce right in the same pan as your perfectly browned chicken.
In just 30 minutes, you’ll have tender chicken nestled in Creamy Smothered Chicken and Rice that will make everyone ask for seconds. If you enjoy chicken dishes with bold flavors, you might also love my Skillet Bang Bang Chicken Thighs which use a similar one-pan cooking method.
Nutrition Facts (Per Serving)
| Nutrient | Amount | % Daily Value |
|---|---|---|
| Calories | 485 | – |
| Fat | 22g | 28% |
| Saturated Fat | 9g | 45% |
| Protein | 38g | 76% |
| Carbohydrates | 32g | 11% |
| Fiber | 2g | 7% |
| Sodium | 580mg | 25% |
| Sugar | 3g | 6% |
Serving size: 1/4 of recipe (approximately 1 chicken breast and 3/4 cup rice mixture)
What You’ll Need for Creamy Smothered Chicken and Rice
Ingredients
| Ingredient | Quantity | Notes |
|---|---|---|
| Boneless, skinless chicken breasts | 4 (about 2 pounds) | Uniform thickness, about 1-inch thick |
| Salt | 1 teaspoon | Divided |
| Black pepper | 1/2 teaspoon | Freshly ground |
| Garlic powder | 1 teaspoon | – |
| Paprika | 1 teaspoon | Sweet or smoked |
| Olive oil | 2 tablespoons | – |
| Butter | 2 tablespoons | Unsalted |
| Onion | 1 medium | Diced (about 1 cup) |
| Mushrooms | 8 ounces | Sliced |
| Garlic | 3 cloves | Minced |
| All-purpose flour | 2 tablespoons | – |
| Chicken broth | 1 1/2 cups | Low-sodium preferred |
| Heavy cream | 3/4 cup | – |
| White rice | 1 cup | Long-grain, uncooked |
| Fresh thyme | 2 teaspoons | Plus extra for garnish |
| Fresh parsley | 2 tablespoons | Chopped, for garnish |
Kitchen Tools
| Tool | Purpose |
|---|---|
| Large skillet with lid | Main cooking vessel (12-inch preferred) |
| Measuring cups & spoons | For accurate measurements |
| Sharp knife | For trimming chicken and prepping vegetables |
| Cutting board | For safe food preparation |
| Tongs | For flipping chicken safely |
| Whisk | For creating smooth sauce |
| Instant-read thermometer | For checking chicken doneness |
| Timer | To track cooking time |
Ingredient Substitutions
Don’t have these ingredients? Here are some options:
- Chicken breasts: Substitute chicken thighs (adjust cooking time as needed)
- Heavy cream: Use half-and-half or whole milk mixed with 1 tablespoon of additional butter
- Fresh herbs: Replace with 1/2 teaspoon dried thyme and 2 teaspoons dried parsley
- Mushrooms: Skip or replace with diced bell peppers
- White rice: Brown rice works but will need longer cooking time (add 1/2 cup extra broth)
Dietary notes: This recipe contains dairy and can be made gluten-free by substituting cornstarch (1 tablespoon) for the flour.
Step-by-Step Instructions for Creamy Smothered Chicken and Rice
Prep time: 10 minutes
Cook time: 20 minutes
Total time: 30 minutes
Servings: 4
Preparation Phase
- Gather all ingredients and tools:
- Take out all ingredients from refrigerator and pantry.
- Place them on your counter organized by the stage they’ll be used.
- This step helps prevent forgetting an ingredient mid-recipe.
- Set out all measuring cups, spoons, and cooking tools you’ll need.
- Prepare your workspace:
- Clear and clean your countertop area.
- Have a trash bowl nearby for scraps.
- Place your cutting board on a non-slip surface.
- Fill a small bowl with water to rinse fingers between handling different ingredients.
- Prepare the chicken:
- Remove chicken breasts from packaging and place on a clean cutting board.
- Look at the chicken – if one end is much thicker than the other, you’ll need to even them out.
- If needed, place chicken between two pieces of plastic wrap.
- Using the flat side of a meat mallet (or a heavy bottomed pan), gently pound the thicker parts until each breast is an even 1-inch thickness throughout.
- Remove plastic wrap and discard.
- Using paper towels, pat both sides of each chicken breast completely dry. Press firmly but gently – this step is crucial for good browning!
- Season the chicken:
- Take out a small bowl for your seasoning mix.
- Measure and add to the bowl: 1/2 teaspoon salt, 1/4 teaspoon black pepper, 1 teaspoon garlic powder, and 1 teaspoon paprika.
- Mix thoroughly with a spoon or your fingertip.
- Sprinkle half the seasoning mixture evenly over the top side of all chicken breasts.
- Turn each chicken breast over and sprinkle the remaining seasoning on the other side.
- Use your fingertips to gently pat the seasonings into the meat.
- Wash your hands thoroughly with soap after handling raw chicken.
- Prepare the vegetables:
- Peel the onion and cut off both ends.
- Cut the onion in half from top to bottom.
- Place each half flat-side down on cutting board for stability.
- Slice each half into thin strips, then rotate and cut across the strips to create small, even pieces about 1/4-inch in size.
- Clean mushrooms by either gently wiping with a damp paper towel or rinsing very quickly under cold water and patting dry immediately.
- Remove and discard mushroom stems if they seem tough.
- Slice mushrooms into pieces about 1/8-inch thick.
- For garlic, separate 3 cloves from the head.
- Place a clove on the cutting board and place the flat side of your knife on top.
- Carefully press down with the heel of your hand to crush the clove slightly and loosen the skin.
- Remove and discard the papery skin.
- Finely chop the peeled garlic cloves into tiny pieces (the smaller, the better).
- Prepare the rice:
- Place rice in a fine-mesh strainer.
- Hold under cold running water.
- Use your fingers to gently stir the rice as the water runs through.
- Continue rinsing until water runs clear (about 30 seconds to 1 minute).
- Shake strainer well to remove excess water and set aside.
- This removes excess starch and will help prevent rice from becoming gummy.
- Final preparation step:
- Measure all remaining ingredients and place them in small bowls.
- Arrange everything in the order you’ll use them next to your cooking area.
- Read through all the cooking steps once more before turning on the heat.
Cooking Phase
- Heat your pan properly:
- Place your large skillet on the stove burner.
- Set heat to medium-high.
- Add the 2 tablespoons olive oil to the cold pan and allow both to heat together.
- Test if the pan is hot enough by carefully flicking a tiny drop of water into the pan – if it sizzles immediately, your pan is ready.
- Safety tip: Keep the pan handle turned toward the side or back of the stove to prevent accidental bumping.
- Brown the chicken (first side):
- Using tongs, carefully place each chicken breast in the hot pan.
- Position them so they don’t touch each other (overcrowding causes steaming instead of browning).
- You should hear a strong sizzling sound – this is good!
- Important: Do not move the chicken for the next 4-5 minutes. This allows a good crust to form.
- You’ll know it’s time to flip when the edges of the chicken start to look opaque and white about 1/4 inch up the side.
- Brown the chicken (second side):
- Using tongs (never a fork, which would pierce the meat and let juices escape), carefully flip each chicken breast.
- The first side should be a rich golden brown color. If it’s not, your pan wasn’t hot enough – leave the second side on a bit longer.
- Cook the second side for 3-4 minutes without moving.
- Note for beginners: The chicken will NOT be fully cooked at this point – we’re just developing flavor on the outside. It will finish cooking later.
- Remove and rest the chicken:
- Using tongs, transfer the chicken to a clean plate.
- Immediately cover loosely with aluminum foil (create a tent over the chicken, don’t wrap tightly).
- The foil traps heat but allows some steam to escape, preventing the crust from getting soggy.
- Set aside while you prepare the sauce and rice.
- Prepare the vegetable base:
- Reduce the heat to medium (this is important – too hot and your vegetables will burn).
- Add 2 tablespoons butter to the same pan without wiping it out.
- Once butter has melted (about 30 seconds), add the diced onions and sliced mushrooms.
- Stir with a wooden spoon, scraping the bottom of the pan to loosen any browned bits from the chicken.
- Tip for beginners: These browned bits are called “fond” and contain intense flavor – don’t discard them!
- Cook for 3-4 minutes, stirring occasionally, until onions become translucent and mushrooms begin to shrink and brown.
- Add garlic:
- Add the minced garlic to the pan.
- Stir continuously for exactly 30 seconds.
- Warning: Garlic burns easily and becomes bitter. Keep it moving and watch carefully!
- You’ll know it’s ready when you can smell the garlic aroma strongly.
- Create the roux (thickening base):
- Sprinkle the 2 tablespoons flour evenly over the vegetable mixture.
- Immediately begin stirring continuously with a wooden spoon or whisk.
- Keep stirring for a full minute without stopping.
- The mixture will look paste-like and slightly golden.
- This step cooks the raw flour taste out and creates the base for your sauce.
- Beginner tip: If the mixture seems too dry, add 1/2 tablespoon more butter.
- Make the sauce base:
- Take the chicken broth in one hand and a whisk in the other.
- Pour about 1/4 cup of the broth into the pan while whisking constantly.
- The mixture will sizzle and thicken almost immediately.
- Continue whisking and slowly pour in the remaining broth.
- Common mistake to avoid: Adding all the liquid at once can create lumps that are hard to remove.
- Whisk until smooth, making sure to reach the corners of the pan where lumps tend to hide.
- Add the cream:
- Slowly pour in the heavy cream while continuing to whisk.
- Once all cream is added, stir the mixture well.
- Allow the sauce to come to a gentle simmer (small bubbles around the edge of the pan).
- Let it simmer for 2 minutes, stirring occasionally, until the sauce coats the back of a spoon.
- Test for thickness: Dip a spoon in the sauce, then run your finger across the back. If it leaves a clear path that doesn’t fill in immediately, the sauce is the right consistency.
- Add the rice:
- Add the drained rice to the sauce.
- Stir gently to ensure every grain is coated with sauce.
- Add the fresh thyme leaves (strip them from the stems first).
- Add remaining 1/2 teaspoon salt and 1/4 teaspoon pepper.
- Stir once more to distribute seasonings evenly.
- Return chicken to the pan:
- Unwrap the foil from the chicken plate.
- Check if any juices have accumulated on the plate – pour these into the pan for extra flavor.
- Gently place each chicken breast on top of the rice mixture.
- Press them down slightly so they’re partially nestled into the rice, but not completely submerged.
- Cover and simmer:
- Reduce heat to low (this is crucial – too high will burn the bottom).
- Place the lid on the skillet. If your lid doesn’t fit tightly, place a sheet of aluminum foil over the pan first, then put the lid on top.
- Set a timer for 15 minutes.
- Resist the urge to peek or stir during this time – lifting the lid releases steam needed for cooking the rice.
- Beginner check: After 10 minutes, you can quickly lift the lid to check liquid levels. If rice looks completely dry, add 1/4 cup warm chicken broth or water around the edges (not directly on chicken).
- Check for doneness:
- After 15 minutes, carefully remove the lid (watch out for steam).
- Insert an instant-read thermometer into the thickest part of the largest chicken breast.
- The temperature should read 165°F (74°C). If it doesn’t, cover and cook for 2-3 more minutes, then check again.
- Test the rice by taking a small taste (careful, it’s hot!). It should be tender with no hard center.
- If rice isn’t done but chicken is, remove chicken to a plate, cover the rice, and cook 2-3 minutes more.
Finishing Touches
- Rest before serving:
- Once fully cooked, remove the pan from heat.
- Keep the lid on and let stand for 5 minutes.
- This resting period allows the rice to absorb any remaining liquid and the chicken to redistribute its juices for maximum tenderness.
- Final temperature check:
- After resting, check the chicken temperature once more with your thermometer.
- It must register at least 165°F (74°C) to be safe.
- If you don’t have a thermometer, cut into the thickest part of the chicken – it should be completely white with clear (not pink) juices.
- Garnish the dish:
- Sprinkle the chopped fresh parsley evenly over the chicken and rice.
- If desired, add a few fresh thyme leaves for extra color.
- For a professional touch, add a light sprinkle of black pepper and a tiny pinch of paprika over the top.
- Serve properly:
- For an impressive presentation, bring the entire skillet to the table on a heatproof surface.
- Alternatively, use a large serving spoon to transfer rice to plates, then top each portion with a chicken breast.
- Spoon additional sauce from the pan over each chicken breast.
- Beginner tip: Let family members know the skillet and food are hot!
Troubleshooting: Fix Common Problems with Creamy Smothered Chicken and Rice
- Rice isn’t fully cooked (hard in center):
- Cover and cook for 3-5 more minutes with an additional 1/4 cup of hot broth or water.
- Make sure your heat wasn’t too high, which can cause liquid to evaporate before rice cooks.
- Check that your lid created a proper seal.
- Rice is too wet/soupy:
- Remove lid and cook on low heat for 2-3 minutes to allow excess moisture to evaporate.
- Next time, ensure your rice was properly drained after rinsing.
- Sauce too thick:
- Stir in 2-3 tablespoons of warm broth or water, one tablespoon at a time, until desired consistency is reached.
- Mix gently to avoid breaking up the rice grains.
- Sauce too thin:
- Mix 1 teaspoon cornstarch with 1 tablespoon cold water in a small bowl until smooth.
- Stir this mixture into the sauce and simmer for 1-2 minutes until thickened.
- Chicken overcooked/dry:
- Next time, check temperature earlier.
- For now, slice the chicken thinly against the grain and mix it partially into the rice to coat with sauce.
- Add an extra tablespoon of butter to the finished dish to add moisture.
- Burning on bottom of pan:
- Your heat was too high or your pan is too thin.
- If this happens, immediately transfer contents to a new pan, leaving burnt bits behind.
- Be careful not to scrape the burnt parts into the new pan.
- Sauce is lumpy:
- Vigorously whisk the sauce to break up lumps.
- If needed, transfer just the sauce (not rice or chicken) to a blender and pulse until smooth, then return to pan.
- Next time, add liquid more slowly while whisking constantly.
Creative Variations of Creamy Smothered Chicken and Rice
Tex-Mex Twist
Add 1 teaspoon cumin, 1/2 teaspoon chili powder, and stir in 1/2 cup corn kernels and black beans with the rice. Top with chopped cilantro and lime wedges.
Mediterranean Version
Add 1/4 cup chopped sun-dried tomatoes and 1/2 teaspoon dried oregano to the sauce. Stir in 1/2 cup crumbled feta cheese and fresh spinach just before serving.
Veggie-Packed Option
Add diced bell peppers, carrots, and peas to boost the vegetable content. Add vegetables based on cooking time – harder vegetables earlier, frozen peas in the last 5 minutes.
Dairy-Free Alternative
Replace butter with olive oil and heavy cream with full-fat coconut milk for a dairy-free version with rich, creamy texture.
Asian-Inspired Variation
If you enjoy Asian flavors, try adding a tablespoon of soy sauce and a teaspoon of ginger to the sauce. For something completely different but equally delicious, you might also enjoy my Chicken Nanban recipe.
Storage & Reheating
Refrigerating
- Allow leftovers to cool completely before storing (no longer than 2 hours at room temperature).
- Store in an airtight container for up to 3 days.
- For best results, separate chicken from rice mixture if possible.
- If storing together, place chicken on top of rice to prevent it from becoming soggy.
Freezing
- Freeze in portion-sized containers for up to 2 months.
- Label containers with date and contents.
- Thaw overnight in refrigerator before reheating.
- Note: Cream sauces may separate slightly when frozen but can be stirred back together when reheated.
Reheating
- Microwave (fastest method):
- Place portion in microwave-safe container.
- Add 1 tablespoon water or broth per cup of leftovers.
- Cover with microwave-safe lid or damp paper towel.
- Heat at 70% power for 2 minutes, stir rice, then heat in 30-second intervals until hot throughout (165°F).
- Let stand 1 minute before serving.
- Stovetop (best for texture):
- Place leftovers in a non-stick skillet.
- Add 2 tablespoons water or broth per cup of leftovers.
- Cover and warm over medium-low heat for 5-7 minutes, stirring occasionally.
- If sauce seems too thick, add additional liquid 1 tablespoon at a time.
- Oven (best for larger portions):
- Preheat oven to 325°F.
- Place in oven-safe dish and add 2-3 tablespoons of liquid.
- Cover tightly with foil to prevent drying out.
- Heat for 15-20 minutes until internal temperature reaches 165°F.
- Stir rice halfway through heating time.
Safety Notes & Tips
- Food Safety:
- Never reuse the plate that held raw chicken without washing it thoroughly with hot, soapy water first.
- Always wash hands with soap for 20 seconds after handling raw chicken.
- Use separate cutting boards for meat and vegetables if possible.
- Verify chicken has reached 165°F (74°C) with a thermometer in the thickest part.
- Don’t leave leftovers at room temperature for more than 2 hours.
- Visual Doneness Check:
- Cut into the thickest part of one chicken breast to visually check – meat should be completely opaque (white) with clear juices.
- Any pinkness means it needs more cooking time.
- For crispy edges:
- After step 20, remove lid and place uncovered skillet under broiler for 2 minutes.
- Watch carefully to prevent burning.
- This creates a golden, slightly crispy top on both chicken and rice.
- Make-ahead option:
- Complete through step 16, refrigerate for up to 24 hours.
- When ready to cook, reheat mixture, add rice and continue with step 17.
- Add 5 minutes to final cooking time since ingredients will be cold.
- Serving Suggestion:
- Pair with a simple green salad dressed with lemon juice and olive oil for a complete meal.
- A side of steamed broccoli or green beans also works well.
- Cleanup Tip:
- Fill the used pan with hot water and a drop of dish soap immediately after serving to prevent food from hardening and sticking.
Bold move: Try this recipe with bone-in chicken thighs for even more flavor. Just increase initial cooking time by 5 minutes per side and final cooking time by 10 minutes.
Time-saving hack: Use pre-sliced mushrooms and microwave-ready rice to cut prep time in half.
This Creamy Smothered Chicken and Rice delivers comfort in every bite – with minimal effort and maximum flavor. It might just become your new weeknight favorite!