Prep Time: 20 minutes | Cook Time: 25 minutes | Total Time: 45 minutes | Servings: 4
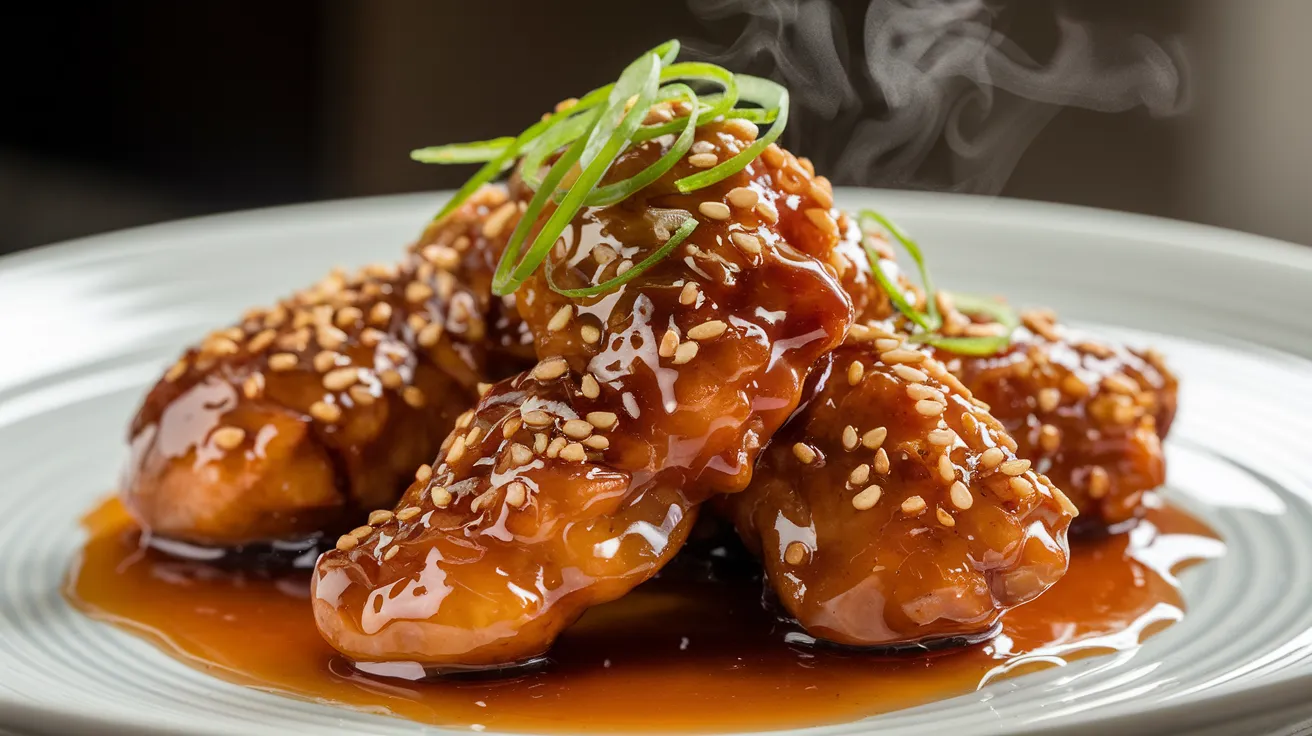
- Sweet, sticky sauce clings to perfectly crispy chicken pieces
- Ready in just 45 minutes with simple pantry ingredients
- Healthier than restaurant versions with 40% less sodium
- Perfect weeknight dinner that even picky eaters will love
Why This Crispy Chinese Honey Garlic Chicken Recipe Beats Takeout
Ever brought home Chinese takeout only to find soggy chicken swimming in sauce? So frustrating!
This Crispy Chinese Honey Garlic Chicken recipe solves that problem with a crunchy coating that stays crisp even after being tossed in the sweet-savory sauce.
The magic lies in the double-coating technique and quick stir-fry method that brings restaurant-quality results right to your kitchen table. I’ve perfected this Crispy Chinese Honey Garlic Chicken after many tries, and it rivals anything you’d get at your favorite restaurant.
The secret to this Crispy Chinese Honey Garlic Chicken is the triple-dredge method – first in cornstarch, then egg, then a seasoned flour mixture. This creates that amazingly crunchy exterior that holds up when tossed with the sticky sauce.
If you enjoy Asian-inspired dishes with the perfect balance of sweet and savory, this Crispy Chinese Honey Garlic Chicken will become your new go-to recipe. Let’s make takeout a thing of the past!
Nutrition Facts
| Nutrient | Amount Per Serving | % Daily Value |
|---|---|---|
| Calories | 425 | – |
| Total Fat | 12g | 15% |
| Saturated Fat | 2g | 10% |
| Cholesterol | 85mg | 28% |
| Sodium | 580mg | 25% |
| Total Carbohydrates | 42g | 15% |
| Dietary Fiber | 1g | 4% |
| Sugars | 28g | – |
| Protein | 35g | 70% |
What You’ll Need
Ingredients
| Ingredient | Amount | Purpose |
|---|---|---|
| Chicken thighs, boneless, skinless | 1½ pounds (cut into 1-inch pieces) | Main protein |
| Cornstarch | ½ cup | For coating and thickening |
| All-purpose flour | ¼ cup | For coating |
| Eggs | 2 large | For coating |
| Salt | 1 teaspoon | For seasoning |
| Black pepper | ½ teaspoon | For seasoning |
| Garlic powder | 1 teaspoon | For seasoning |
| Vegetable oil | ⅓ cup | For frying |
| Honey | ⅓ cup | For sauce |
| Soy sauce | ¼ cup (low-sodium) | For sauce |
| Rice vinegar | 2 tablespoons | For sauce |
| Fresh garlic | 4 cloves (minced) | For sauce |
| Fresh ginger | 1 tablespoon (grated) | For sauce |
| Red pepper flakes | ¼ teaspoon | For sauce |
| Sesame seeds | 1 tablespoon | For garnish |
| Green onions | 3 (sliced) | For garnish |
Equipment
| Tool | Purpose |
|---|---|
| Large mixing bowl | For coating chicken |
| Medium bowls (3) | For dredging stations |
| Whisk | For beating eggs |
| Large frying pan or wok | For cooking chicken |
| Small saucepan | For making sauce |
| Measuring cups and spoons | For precise measurements |
| Slotted spoon | For removing chicken |
| Paper towels | For draining excess oil |
| Cutting board and knife | For prep work |
| Heat-resistant spatula | For stir-frying |
| Meat thermometer | For checking doneness |
| Timer or clock | For tracking cooking time |
Substitutions (If Needed)
- Chicken breasts can replace thighs (reduce cooking time by 2 minutes)
- Brown sugar (¼ cup) can replace honey
- Apple cider vinegar can replace rice vinegar
- Garlic powder (1 teaspoon) can replace fresh garlic in a pinch
- Ground ginger (½ teaspoon) can replace fresh ginger
- Gluten-free flour blend can replace all-purpose flour for a gluten-free option
- Coconut aminos can replace soy sauce for a soy-free version
If you’d like a milder flavor profile similar to my Creamy Garlic Chicken, you can reduce the amount of ginger and red pepper flakes.
Step-by-Step Instructions for Beginners
Preparation Phase (10 minutes)
- Set up your cooking area
- Clear your countertop to create a comfortable working space
- Preheat your oven to 200°F (to keep cooked chicken warm between batches)
- Get all your measuring tools ready: measuring cups, measuring spoons, and a kitchen scale if you have one
- Place a sheet pan or oven-safe plate in the oven to hold cooked chicken
- Prepare the chicken
- Open the chicken package over the sink to catch any drips
- Rinse your hands with soap after handling raw chicken packaging
- Place chicken thighs on a clean cutting board (preferably plastic for easy sanitizing)
- Using a sharp knife, trim away any visible fat (the white parts)
- Cut chicken into 1-inch pieces (about the size of a game die or sugar cube)
- Try to make pieces as uniform as possible so they cook evenly
- Pat chicken pieces dry with paper towels – this is crucial for the coating to stick
- Create your dredging stations
- Station 1: Place ¼ cup cornstarch in a medium bowl
- Station 2: Crack 2 eggs into a separate medium bowl
- Discard shells and wash hands after handling raw eggs
- Beat eggs with a whisk or fork until smooth and no clear egg white remains visible
- Station 3: In a third medium bowl, whisk together:
- ¼ cup flour
- Remaining ¼ cup cornstarch
- 1 teaspoon salt
- ½ teaspoon black pepper
- 1 teaspoon garlic powder
- Arrange your stations in order (cornstarch, then egg, then seasoned flour mixture)
- Place a clean plate at the end to hold coated chicken
- Prepare the sauce ingredients
- For garlic:
- Place cloves on cutting board
- Place flat side of knife on clove and press firmly with heel of hand to crush
- Remove papery skin
- Mince the garlic by chopping it finely with a knife (pieces should be no larger than a grain of rice)
- For ginger:
- Peel a 1-inch piece of ginger using the edge of a spoon
- Grate using a microplane or the smallest holes on a box grater
- Measure 1 tablespoon (about a thumb-sized amount)
- For green onions:
- Rinse under cold water
- Trim off root ends and any wilted tops
- Slice thinly (⅛-inch rounds)
- Keep white and green parts separate by placing them in different piles
- Measure remaining sauce ingredients:
- ⅓ cup honey (spray measuring cup with cooking spray first so honey slides out easily)
- ¼ cup low-sodium soy sauce
- 2 tablespoons rice vinegar
- ¼ teaspoon red pepper flakes
- For garlic:
Coating the Chicken (10 minutes)
- Coat the chicken pieces (triple-dip method)
- Designate one hand as your “wet hand” and one as your “dry hand” to prevent coating your fingers
- Using your “dry hand”, place 5-6 chicken pieces in the cornstarch (Station 1)
- Toss gently to coat each piece entirely
- Lift each piece, shake off excess cornstarch, and place in beaten eggs (Station 2)
- With your “wet hand”, turn chicken to coat in egg
- Lift each piece, allow excess egg to drip off for 2-3 seconds
- Place in seasoned flour mixture (Station 3)
- Using your “dry hand”, toss to coat thoroughly
- Pick up each piece and place on the clean plate, allowing at least ½-inch space between pieces
- Repeat with remaining chicken in small batches
- Let the coating set
- After coating all pieces, let them rest for 5 minutes
- This helps the coating adhere better during cooking
- During this time, you can prepare for the cooking phase
Cooking Phase (25 minutes)
- Prepare for frying
- Line a large plate with a double layer of paper towels
- Have a slotted spoon or heat-resistant tongs ready
- Keep a lid nearby in case of oil splatters
- Make sure your cooking area is free from clutter
- Remove any loose clothing, roll up sleeves, and tie back long hair
- Heat the oil
- Add vegetable oil to a large frying pan or wok (oil should be ¼-inch deep)
- Heat over medium-high heat for about 3-4 minutes
- To test if oil is ready:
- Method 1: Drop a small piece of bread into the oil – it should sizzle immediately and turn golden in about 30 seconds
- Method 2: Stick the handle end of a wooden spoon into the oil – if bubbles form around it, the oil is ready
- Method 3: If you have a thermometer, oil should be 350°F
- If oil starts smoking, it’s too hot – remove pan from heat, let cool for 1-2 minutes
- Fry the chicken (first batch)
- Using tongs or your fingers, carefully place 8-10 chicken pieces into the hot oil
- Don’t drop them from a height – lower them gently to avoid splashing
- Maintain at least 1 inch of space between pieces
- Let them cook undisturbed for 2 minutes (set a timer)
- Using a slotted spoon or tongs, carefully flip each piece
- Cook for another 2 minutes until golden brown and crispy
- Check internal temperature with a meat thermometer (should read 165°F)
- If you don’t have a thermometer, cut the largest piece in half – meat should be white throughout with no pink
- Using a slotted spoon, transfer chicken to paper-towel lined plate
- Fry remaining batches
- Repeat the frying process with remaining chicken
- Allow oil to reheat for 1 minute between batches
- Monitor oil temperature – reduce heat if chicken browns too quickly
- Transfer fried pieces to the plate in the warm oven to keep hot
- Between batches, you can use a slotted spoon to remove any burnt bits from the oil
- Make the honey garlic sauce
- Set a clean small saucepan on the stove
- Add 1 teaspoon of fresh oil
- Heat over medium heat for 30 seconds
- Add minced garlic, grated ginger, and sliced white parts of green onions
- Stir continuously with a wooden spoon for exactly 30 seconds until fragrant
- Watch carefully – garlic burns quickly and becomes bitter
- Immediately add:
- ⅓ cup honey
- ¼ cup soy sauce
- 2 tablespoons rice vinegar
- ¼ teaspoon red pepper flakes
- Stir to combine
- Bring to a gentle simmer (small bubbles around the edge of the pan)
- Reduce heat to medium-low
- Cook for 3-4 minutes, stirring occasionally until slightly thickened
- The sauce should coat the back of a spoon and leave a clear path when you run your finger through it
- If sauce is too thin after 4 minutes:
- Mix 1 teaspoon cornstarch with 1 tablespoon cold water in a small bowl
- Stir mixture into sauce
- Simmer for 1 more minute
- Combine chicken and sauce
- Remove all fried chicken from the oven
- Carefully wipe out the frying pan with paper towels (or use a clean pan)
- Place the pan over medium-low heat
- Add all the fried chicken pieces to the pan
- Pour sauce evenly over the chicken
- Using a heat-resistant spatula or wooden spoon, gently toss to coat every piece
- Use a folding motion (not stirring) to preserve the crispy coating
- Cook for just 1-2 minutes until everything is hot and well-glazed
- Turn off heat
Serving Phase (5 minutes)
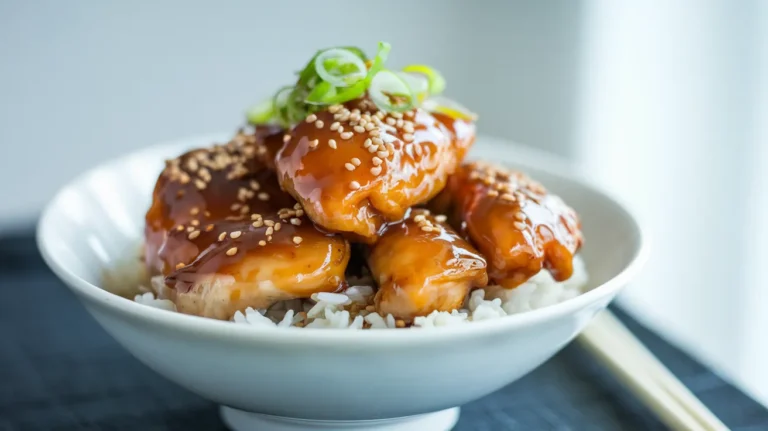
- Plate your dish
- Choose a large serving platter or individual plates
- Transfer glazed chicken from the pan
- Arrange pieces in a mound rather than spreading them out (helps retain heat)
- Pour any remaining sauce from the pan over the chicken
- Sprinkle with:
- 1 tablespoon sesame seeds (distributed evenly)
- Sliced green parts of green onions
- Serve immediately while hot and crispy
- Complete meal suggestions
- Serve with:
- Plain steamed rice (1 cup uncooked makes enough for 4 people)
- Steamed broccoli or mixed vegetables
- For a complete meal, add a simple cucumber salad:
- 1 sliced cucumber
- 2 tablespoons rice vinegar
- 1 teaspoon sugar
- Pinch of salt
- Serve with:

Troubleshooting Your Crispy Honey Garlic Chicken
| Problem | Cause | Solution |
|---|---|---|
| Coating falls off during frying | Chicken too wet before coating | Pat chicken very dry before the first dredge |
| Oil not hot enough | Make sure oil is properly heated (350°F) | |
| Turning chicken too soon | Let chicken cook undisturbed for full 2 minutes before flipping | |
| Chicken burning on outside, raw inside | Oil too hot | Reduce heat; aim for medium-high, not high |
| Chicken pieces too large | Cut chicken into smaller, more uniform pieces | |
| Soggy coating after adding sauce | Sauce too watery | Simmer sauce longer to reduce and thicken |
| Sauce too hot when added | Let sauce cool slightly before adding to chicken | |
| Sauce too thick/sticky | Overcooked | Add 1-2 tablespoons water and gently heat |
| Sauce too thin | Not simmered long enough | Add cornstarch slurry (1 tsp cornstarch + 1 tbsp water) |
| Bitter taste in sauce | Garlic burned | Keep careful watch on garlic; cook only until fragrant |
| Chicken not crispy | Oil temperature too low | Use thermometer to maintain 350°F |
| Overcrowded pan | Fry in smaller batches with space between pieces |
Variations of Honey Garlic Chicken
Spicy Honey Garlic Chicken
- Add 1-2 tablespoons sriracha to the sauce
- Increase red pepper flakes to ½ teaspoon
- Add one thinly sliced fresh chili pepper to the sauce with the garlic and ginger
- For a truly spicy experience, check out my Sweet and Spicy Chicken Wings recipe and adapt the sauce technique
Orange Honey Garlic Chicken
- Add 2 tablespoons orange juice and 1 teaspoon orange zest to the sauce
- Reduce honey to ¼ cup
- Add ½ teaspoon five-spice powder to the flour mixture
Honey Garlic Chicken Stir-Fry
- Add 2 cups mixed vegetables (bell peppers, broccoli, snap peas) during the final cooking step
- Increase sauce ingredients by 50%
- Cook vegetables separately until crisp-tender, then combine with coated chicken and sauce
Honey Garlic Chicken Bites (Lighter Version)
- Spray coated chicken with cooking spray
- Bake at 425°F for 15-18 minutes, flipping halfway
- Toss with sauce as directed in main recipe
If you enjoy unique chicken preparations, you might also like my Chicken Nanban which uses a similar frying technique with a completely different flavor profile.
Storage & Reheating
Refrigeration:
- Allow leftovers to cool completely (no more than 2 hours at room temperature)
- Store in airtight containers for up to 3 days
- For best results, store chicken and any extra sauce separately
- Refrigerate promptly – don’t leave at room temperature for extended periods
Freezing:
- Not recommended as the coating becomes soggy when thawed
- If necessary, freeze for up to 1 month in freezer-safe containers
- Thaw overnight in refrigerator before reheating
Reheating:
- Oven method (best for maintaining crispiness):
- Preheat oven to 350°F
- Place chicken pieces on a baking sheet lined with foil
- Don’t overcrowd – arrange in a single layer
- Reheat for 10-12 minutes until chicken reaches 165°F internally
- For extra crispiness, place under broiler for last 1-2 minutes (watch carefully)
- Stovetop method:
- Heat 1 tablespoon oil in a non-stick pan over medium heat
- Add chicken pieces in a single layer
- Cook for 2-3 minutes, turning occasionally, until heated through (165°F)
- If sauce has thickened too much, add 1-2 tablespoons water
- Microwave method (quick but will be less crispy):
- Place chicken on a microwave-safe plate
- Cover with a damp paper towel to preserve moisture
- Heat in 30-second intervals at 70% power
- Stir or rearrange between intervals
- Heat until internal temperature reaches 165°F (usually 1-2 minutes total)
Safety Notes & Tips
Food Safety
- Wash hands thoroughly with soap and warm water:
- Before beginning food preparation
- After handling raw chicken
- After touching your face, hair, or phone
- Prevent cross-contamination:
- Use separate cutting boards for chicken and vegetables
- Sanitize all surfaces that come in contact with raw chicken
- Never reuse plates or utensils that have touched raw chicken without washing
- Temperature safety:
- Chicken must reach internal temperature of 165°F
- Refrigerate leftovers within 2 hours
- Keep cold foods cold (below 40°F) and hot foods hot (above 140°F)
Kitchen Safety
- Oil safety:
- Never leave hot oil unattended
- Have a lid nearby to cover pan in case of fire
- Never add water to hot oil
- Fill pan no more than 1/3 full of oil
- Fire safety:
- Keep a kitchen fire extinguisher accessible
- If a small grease fire occurs, turn off heat and cover with lid
- Never pour water on a grease fire
- Burn prevention:
- Use long cooking utensils
- Keep pot handles turned inward
- Use oven mitts when handling hot pans
Success Tips
- Chicken selection: Thighs stay juicier than breasts and are more forgiving for beginners
- Coating tip: Press coating firmly onto chicken for maximum crispiness
- Frying technique: Maintain oil temperature between 325-350°F for best results
- Sauce consistency: Should be thick enough to coat the back of a spoon but still pourable
- Make-ahead strategy: Prepare the sauce up to 2 days in advance and refrigerate
- Oil reuse: Do not reuse oil that has been used to fry raw chicken
- Serving timing: This dish is best served immediately after preparation
Dietary notes: This recipe contains eggs, wheat (gluten), and soy. For a gluten-free version, substitute the flour with a gluten-free blend and use tamari instead of soy sauce.