Prep Time: 30 minutes | Cook Time: 15 minutes | Total Time: 45 minutes | Servings: 4
- Perfectly crispy exterior with tender, flaky fish inside
- Simple technique anyone can master (even first-timers!)
- Impressive presentation that looks like restaurant quality
- Ready in under an hour with basic ingredients
Why This Crispy Fried Whole Fish Will Impress Everyone
Frying a whole fish sounds scary. The splattering oil. The fear of undercooking. The worry it’ll fall apart.
But here’s the truth about Crispy Fried Whole Fish: it’s actually one of the easiest cooking methods once you know the right technique.
This Crispy Fried Whole Fish recipe takes the mystery out of whole fish frying. You’ll create a showstopping main dish with minimal effort.
The secret to perfect Crispy Fried Whole Fish lies in proper preparation and temperature control. When done right, the skin turns golden and crispy while the meat stays tender and juicy.
Unlike other cooking methods, frying whole fish seals in moisture. This means even if you’re a beginner, you can achieve restaurant-quality results on your first try.
Are you ready to master the art of Crispy Fried Whole Fish? Let’s break down the process step by step.
Nutrition Facts (Per Serving)
| Nutrient | Amount | % Daily Value |
|---|---|---|
| Calories | 310 | 15% |
| Protein | 28g | 56% |
| Fat | 18g | 23% |
| Carbs | 8g | 3% |
| Fiber | 0g | 0% |
| Sodium | 580mg | 25% |
Dietary Notes: This recipe is gluten-free if using only rice flour or cornstarch. It’s dairy-free and nut-free as prepared.
What You’ll Need for Crispy Fried Whole Fish
Ingredients
| Ingredient | Amount | Notes |
|---|---|---|
| Whole fish (tilapia, snapper, or branzino) | 2 (1-1.5 lbs each) | Scaled, gutted, fins trimmed |
| Salt | 2 teaspoons | |
| White pepper | 1 teaspoon | Black pepper works too |
| Rice flour | 1 cup | For extra crispiness |
| All-purpose flour | 1 cup | |
| Cornstarch | 2 tablespoons | Helps achieve crunch |
| Vegetable oil | 4 cups | For frying |
| Garlic | 4 cloves, minced | |
| Ginger | 2-inch piece, julienned | |
| Green onions | 4, sliced | For garnish |
| Cilantro | 1/4 cup, chopped | For garnish |
| Lime | 1, cut into wedges | For serving |
Kitchen Tools
| Tool | Purpose |
|---|---|
| Large wok or deep skillet (12-inch minimum) | For frying |
| Cooking thermometer | To monitor oil temperature |
| Paper towels | For draining |
| Sharp knife | For scoring fish |
| Tongs | For handling hot fish |
| Wire rack | For draining and cooling |
| Shallow dish | For dredging |
| Slotted spoon | For removing crispy bits |
| Timer | To track cooking time precisely |
| Kitchen scissors | For trimming fins if needed |
Ingredient Substitutions
- Fish options: Any whole white fish works (sea bass, pompano, branzino)
- Rice flour: Potato starch or more cornstarch
- Vegetable oil: Peanut or canola oil
- Fresh herbs: Use just green onions if cilantro isn’t available
- Lime: Lemon works too, though less traditional
If you’re looking for a lighter starter to pair with this main dish, my Corn and Fish Maw Soup makes a perfect first course before serving your crispy fish.
Step-by-Step Instructions for Perfect Crispy Fried Whole Fish
Preparation Phase (30 minutes)
- Set up your workspace
- Clear your kitchen counter
- Place cutting board in center
- Have trash bin nearby for fish scraps
- Line a plate with paper towels
- BEGINNER TIP: Working with whole fish can be messy, so preparation is key
- Inspect and prep your fish
- Unwrap fish from packaging
- Check if fish has been properly scaled and gutted (shiny skin without scales, empty cavity)
- If not completely cleaned, ask your fishmonger to do this or follow these steps:
- Use back of knife to scrape against scales from tail to head
- Rinse under cold water to remove loose scales
- Cut from vent to gills and remove innards
- SAFETY TIP: Wear gloves if you’re squeamish about handling raw fish
- Rinse and dry fish thoroughly
- Hold fish under cold running water
- Rinse inside cavity and outside thoroughly
- Pat completely dry with paper towels, blotting both inside and outside
- Change paper towels as needed until fish is very dry
- KEY TIP: Moisture is the enemy of crispy fish – take your time here!
- Trim any remaining fins
- Using kitchen scissors, trim dorsal (top), pectoral (side), and tail fins if they’re still attached
- Leave tail intact for presentation
- WHY THIS MATTERS: Fins can burn during frying and create bitter taste
- Score the fish precisely
- Place fish flat on cutting board
- Using a sharp knife, make 3-4 diagonal cuts across the thickest part of fish
- Cuts should be 1/4 inch deep and 1 inch apart
- Press gently to avoid cutting through to bones
- Repeat on both sides of fish
- VISUAL CUE: Cuts should look like parallel lines that don’t connect
- Season the fish properly
- Sprinkle 1/4 teaspoon salt inside cavity of each fish
- Rub gently to distribute
- Mix remaining salt and white pepper in a small bowl
- Sprinkle mixture evenly over both sides of fish, including inside cuts
- Gently pat seasoning into flesh
- Let fish rest for 10 minutes at room temperature
- WHY THIS WORKS: This brief resting time lets seasonings penetrate and helps surface dry further
- Prepare the dredging mixture
- While fish rests, find a shallow dish or pie plate
- Measure and add rice flour, all-purpose flour, and cornstarch
- Whisk together thoroughly until no lumps remain
- VISUAL CHECK: Mixture should be uniformly colored
- Set up your frying station in this order
- Heat-resistant surface for hot pan
- Space for dredging dish
- Area for seasoned fish
- Place wire rack lined with paper towels nearby
- Have a plate ready for finished fish
- SAFETY CHECK: Ensure all items are at least 12 inches from heat source
Frying Process (15 minutes)
- Add oil to pan
- Select a wok or deep skillet with high sides (at least 4 inches)
- Pour oil to a depth of 2 inches (about 4 cups in 12-inch pan)
- SAFETY RULE: Never fill pan more than 1/3 full with oil
- Leave at least 2 inches from oil surface to top of pan
- Heat oil properly
- Place pan on medium-high heat
- Clip cooking thermometer to side of pan (don’t let tip touch bottom)
- Heat until thermometer reads exactly 350°F
- VISUAL CUE: Oil will shimmer but not smoke
- NO THERMOMETER? Drop a small piece of bread in oil – it should brown in 60 seconds
- Final fish prep before frying
- While oil heats, check fish is still dry (pat again if needed)
- Place dredging mixture next to stove
- Have tongs ready
- Dredge first fish completely
- Pick up fish by head and tail
- Place in flour mixture
- Use your hands to scoop mixture over top of fish
- Flip fish and repeat to coat other side
- Gently shake off excess flour
- TECHNIQUE TIP: Use a light touch – pressing flour in will create gummy coating
- Lower fish into oil safely
- Hold fish by head with tongs
- Slowly lower tail end into oil first, away from you
- Gently lower entire fish into oil
- Step back immediately to avoid splatter
- SAFETY WARNING: Oil may bubble vigorously – this is normal
- Monitor first side carefully
- Set timer for 5 minutes
- Maintain oil temperature between 325-350°F
- If temperature drops below 325°F, increase heat slightly
- If it rises above 350°F, reduce heat
- Watch for even browning
- VISUAL PROGRESS: Coating will change from pale to golden starting at edges
- Prepare for the flip
- After 5 minutes, check color – should be golden brown
- If still pale, cook 1 minute longer
- Have two sets of tongs ready – one for head, one for tail
- Clear space on countertop before attempting flip
- Flip fish with confidence
- Grasp head of fish with one set of tongs
- Grasp tail with second set (or use slotted spatula for support)
- In one smooth motion, gently turn fish over
- If fish sticks, slide thin spatula underneath before attempting flip again
- BEGINNER TIP: The key is decisive, confident movement – hesitation can cause fish to fall apart
- Cook second side completely
- Reset timer for 5 minutes
- Continue monitoring oil temperature
- Watch for even browning on second side
- After 5 minutes, check for doneness
- DONENESS TEST: Insert fork into thickest part near head – fish should flake easily and be opaque
- Remove and drain properly
- Grasp fish with tongs at head and tail
- Lift straight up, allowing excess oil to drip back into pan
- Place fish on prepared wire rack
- Allow to drain for 3 full minutes
- WHY THIS MATTERS: Proper draining prevents sogginess
- Fry second fish
- Check oil temperature – return to 350°F if needed
- Repeat dredging and frying process with second fish
- OIL CHECK: If oil has darkened significantly or contains burnt bits, strain before frying second fish
If you’re wondering how to properly reheat any leftover fried fish later, check out my detailed guide on how to reheat fried fish without losing the crispy texture.
Finishing Touches (5 minutes)
- Prepare aromatic topping
- Find a small saucepan or skillet
- Measure 2 tablespoons of the frying oil into pan
- Heat over medium heat for 30 seconds
- Add minced garlic and julienned ginger
- Stir constantly for exactly 30 seconds until fragrant but not browned
- VISUAL CUE: Garlic should barely begin to color
- Remove from heat immediately
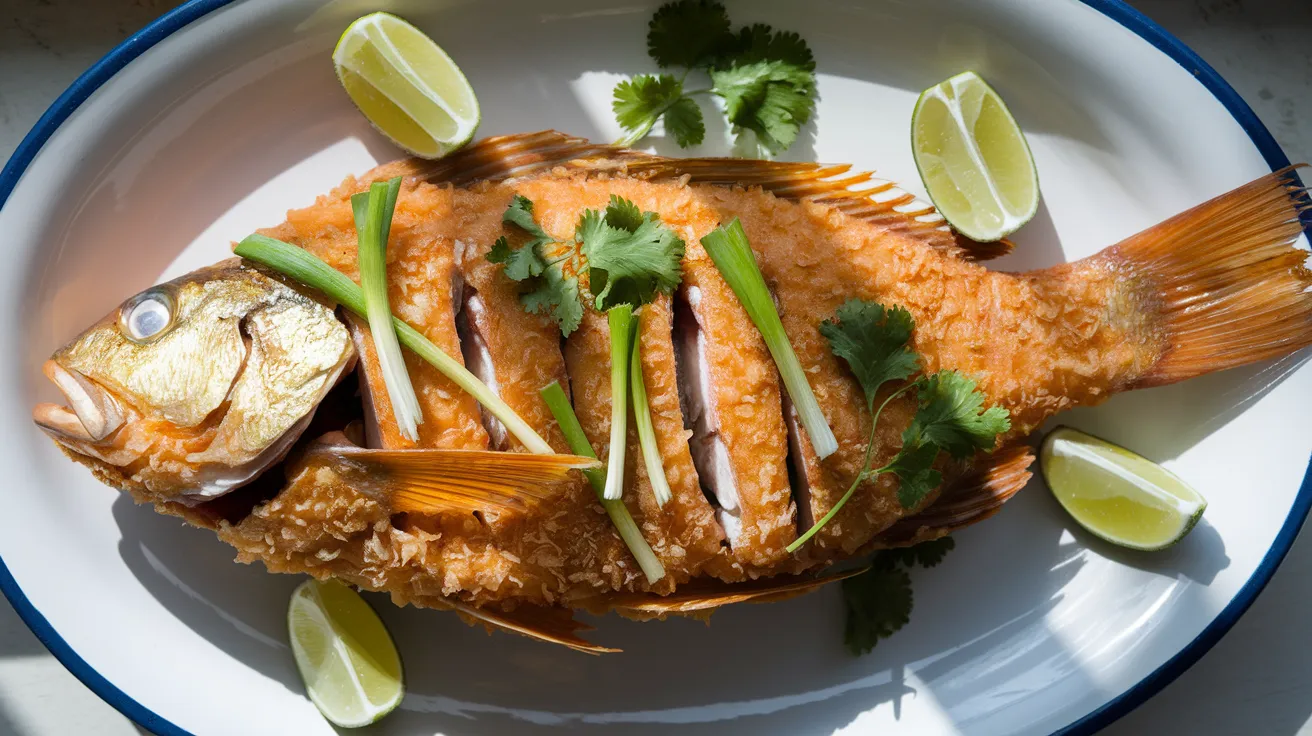
- Assemble final dish
- Select a large serving platter with rim to catch any juices
- Carefully transfer first fish to platter using two spatulas for support
- Place second fish alongside or on separate platter
- Immediately pour aromatic oil with garlic and ginger over fish
- SIZZLE TEST: You should hear a light sizzle as mixture hits hot fish
- Garnish for presentation
- Sprinkle sliced green onions over fish, covering most of surface
- Add chopped cilantro in an even layer
- Arrange lime wedges around edges of platter
- COLOR CHECK: You should see white fish, golden crust, green herbs, and yellow lime
- Serve immediately
- Bring platter to table within 5 minutes of completing garnish
- Provide serving spoon and fork for guests to portion fish
- Suggest squeezing lime over portions just before eating
- SERVING TIP: The crispy exterior will begin to soften after about 10 minutes, so timing is important

Troubleshooting Common Issues with Crispy Fried Whole Fish
Fish Sticking to the Pan
- Problem: Fish sticks and tears when flipping
- Solution: Ensure oil is hot enough before adding fish (must be 350°F) and don’t try to flip too early
- Prevention: After dredging, shake off ALL excess flour and ensure fish is completely dry before flouring
Oil Splattering Excessively
- Problem: Dangerous oil splatter when adding fish
- Solution: Make sure fish is completely dry before dredging and lower it into oil very gently
- Prevention: Use a deeper pot and wear long sleeves for protection
Soggy Instead of Crispy
- Problem: Coating turns soggy quickly
- Solution: Maintain proper oil temperature, don’t overcrowd the pan, and drain thoroughly after frying
- Prevention: Serve immediately and don’t cover hot fish (creates steam)
Undercooked Interior
- Problem: Outside is brown but inside isn’t fully cooked
- Solution: Lower heat slightly and cook longer; ensure cuts aren’t too thick
- Prevention: Choose fish that are similar in size and thickness
Burnt Exterior, Raw Interior
- Problem: Fish browns too quickly before inside cooks
- Solution: Reduce oil temperature to 325°F and extend cooking time
- Prevention: Score fish deeper to allow heat to penetrate
Coating Falls Off During Frying
- Problem: Flour coating separates from fish in oil
- Solution: Ensure fish is completely dry before dredging and handle very gently
- Prevention: Let fish rest 5 minutes after dredging before frying
Delicious Variations of Crispy Fried Whole Fish
Spicy Crispy Fish
Add 1 teaspoon cayenne pepper and 1/2 teaspoon garlic powder to the flour mixture. Serve with a spicy dipping sauce made from:
- 3 tablespoons soy sauce
- 1 tablespoon rice vinegar
- 1 teaspoon sugar
- 1 teaspoon chili oil
- 1 minced scallion
Herb-Crusted Crispy Fish
Mix these herbs into your flour mixture:
- 1 tablespoon dried thyme
- 1 tablespoon dried oregano
- 1 teaspoon garlic powder
- 1/2 teaspoon paprika
Asian-Style Sweet & Sour
After frying, drizzle with this sauce:
- 3 tablespoons soy sauce
- 2 tablespoons sugar
- 1 tablespoon rice vinegar
- 2 teaspoons sesame oil
- 1 teaspoon grated ginger
Mexican-Inspired Version
For a fun fusion twist, try using the crispy fried fish to make incredible beer-battered fish tacos with Baja sauce. Simply flake the meat from your whole fried fish and serve in warm tortillas with all the fixings.
Storing and Reheating Crispy Fried Whole Fish
Storage Instructions
- Allow fish to cool completely (about 30 minutes)
- Refrigerate leftover fish within 2 hours of cooking
- Store in an airtight container
- Place parchment paper between fish if stacking
- Keep refrigerated for up to 2 days maximum
- SAFETY NOTE: Seafood has shorter refrigeration life than other proteins
Reheating For Best Results
- Oven method (preferred):
- Preheat oven to 350°F
- Place fish on wire rack over baking sheet
- Bake for 10-12 minutes until heated through
- Finish under broiler for 1 minute to re-crisp
- Toaster oven method:
- Preheat to 325°F
- Place on foil
- Heat for 8-10 minutes
- Avoid microwave as it will make the fish soggy and rubbery
- REALITY CHECK: The fish will never be as crispy as when freshly made, but still tasty
Safety Notes & Pro Tips for Crispy Fried Whole Fish
Oil Safety
- Keep a box of baking soda nearby to extinguish oil fires
- Never leave hot oil unattended, not even for a minute
- Keep pot handle turned inward to prevent accidental bumping
- Have a lid nearby to cover the pan if oil catches fire
- Allow oil to cool completely before discarding
- DISPOSAL TIP: Pour cooled oil into a container and discard in trash, never down drain
Fish Selection Tips
- Look for clear, bright eyes (not cloudy)
- Skin should be shiny and scales intact (before cleaning)
- Gills should be bright red, not brown
- Fish should smell fresh and clean like the ocean, not “fishy”
- Flesh should be firm and spring back when pressed
- Ask your fishmonger to clean and scale the fish for you
- FRESHNESS TIP: Don’t be shy about asking when the fish arrived at the store
Perfect Timing Tips
- Prep ahead: Have all ingredients measured and ready before heating oil
- Temperature matters: Use a thermometer for precision every time
- Don’t rush: Proper draining is essential for crispiness
- TIMING SECRET: If serving multiple courses, fry fish last
Serving Suggestions
- Serve family-style for an impressive presentation
- Place on a bed of thinly sliced cucumbers and herbs
- Provide extra lime wedges and perhaps a simple dipping sauce
- Pair with steamed jasmine rice and a simple vegetable stir-fry
- BEGINNER FRIENDLY: Have a backup plan (like ordering takeout) your first time trying this recipe!
Day-Before Prep
To make this recipe less intimidating, you can:
- Clean and score fish, then wrap tightly and refrigerate
- Mix dry flour coating and store in airtight container
- Prepare all garnishes and store in damp paper towels in refrigerator
- MORNING OF: Remove fish from refrigerator 30 minutes before cooking to take chill off