Prep time: 20 minutes | Cook time: 6 hours | Total time: 6 hours 20 minutes | Servings: 4
Key Takeaways:
- Low-glycemic ingredients keep blood sugar levels stable while delivering rich flavor
- Prep in just 20 minutes then let your slow cooker do all the work
- Packed with 28g of protein per serving to keep you satisfied longer
- Make-ahead friendly – tastes even better the next day!
Why This Diabetic Slow Cooker White Chili Works
Finding satisfying meals that won’t spike your blood sugar can feel impossible. Most chili recipes hide sugar-heavy ingredients or rely on starchy beans that raise glucose levels quickly.
This Diabetic Slow Cooker White Chili solves that problem.
By combining lean protein, fiber-rich beans, and strategic seasonings, you get all the comfort of chili without the blood sugar roller coaster. The slow cooking method also means the flavors develop beautifully while you’re free to do other things.
I created this Diabetic Slow Cooker White Chili recipe after struggling to find comfort foods that didn’t send my glucose levels soaring. This recipe has become my go-to when I want something hearty yet healthy. Unlike traditional chilis that can be carb-heavy, this white chili version keeps things lighter while still delivering on flavor.
What makes this Diabetic Slow Cooker White Chili special is how the slow cooker transforms simple ingredients into something extraordinary. The chicken becomes incredibly tender, the beans maintain their texture, and all the flavors meld together perfectly. If you’ve enjoyed my Green Chili Chicken Soup, you’ll notice similar flavor profiles but with a different texture and protein content.
Nutrition Comparison
| Nutrient | Traditional White Chili | This Diabetic-Friendly Version | Benefit |
|---|---|---|---|
| Calories | 420 per serving | 325 per serving | Lower calorie content |
| Carbs | 42g | 28g | 33% fewer carbs |
| Fiber | 8g | 12g | More fiber slows digestion |
| Protein | 22g | 28g | Higher protein for satiety |
| Sugar | 6g | 2g | 67% less sugar |
| Sodium | 980mg | 560mg | 43% less sodium |
| Glycemic Load | Medium-High | Low | Better blood sugar control |
Equipment & Ingredients
Kitchen Tools
| Tool | Purpose |
|---|---|
| 6-quart slow cooker | Main cooking vessel |
| Sharp knife | For chopping vegetables |
| Cutting board | Prep surface |
| Measuring cups/spoons | Accurate measurements |
| Can opener | Opening canned items |
| Wooden spoon | Stirring ingredients |
Ingredients
| Ingredient | Amount | Diabetic Benefit |
|---|---|---|
| Boneless, skinless chicken breasts | 1 pound | Lean protein, zero carbs |
| Cannellini beans | 2 cans (15 oz each), drained and rinsed | High fiber, lower glycemic than other beans |
| Yellow onion | 1 medium, diced | Low glycemic vegetable |
| Green bell peppers | 2 medium, diced | Vitamin-rich, minimal carbs |
| Jalapeño | 1 small, seeded and minced | Adds flavor without carbs |
| Garlic | 3 cloves, minced | May help lower blood sugar |
| Low-sodium chicken broth | 3 cups | Controls sodium intake |
| Ground cumin | 1 tablespoon | Adds flavor without carbs |
| Dried oregano | 1 teaspoon | Adds flavor without carbs |
| Chili powder | 1 teaspoon | Adds flavor without carbs |
| Ground white pepper | ½ teaspoon | Gentler than black pepper |
| Salt | ½ teaspoon | Minimal amount for flavor |
| Fresh lime juice | 2 tablespoons | Brightens flavors with minimal carbs |
| Fresh cilantro | ¼ cup, chopped | Optional garnish |
| Greek yogurt | ¼ cup | Optional topping (higher protein than sour cream) |
Optional Substitutions
- Chicken: Use turkey breast for slightly leaner protein
- Cannellini beans: Great Northern beans work well (similar glycemic impact)
- Green bell peppers: Red or yellow peppers add sweetness with minimal carb difference
- Greek yogurt: Use light sour cream (slightly higher in carbs)
- Jalapeño: Canned green chiles for milder heat, similar to what you might use in a Hormel Chili Dip but with less processing
Step-by-Step Instructions for Beginners
Preparation Phase
- Set up your workspace:
- Clear your countertop to create a clean working area
- Take out your cutting board and place it on a stable surface
- Retrieve your knife, measuring cups, and measuring spoons
- Place your slow cooker on the counter and plug it in (don’t turn it on yet)
- Prepare the onion:
- Peel the outer papery skin off the onion
- Cut the onion in half from top to bottom
- Place each half flat-side down on the cutting board for stability
- Make vertical cuts about ¼-inch apart, not cutting all the way through the root end
- Make horizontal cuts across the vertical cuts, creating a grid pattern
- Slice across the grid to create small, even dice
- Transfer diced onion to a small bowl and set aside
- Prepare the bell peppers:
- Rinse peppers under cool water
- Place pepper on cutting board and cut off the top where the stem is
- Stand pepper upright and slice down one side from top to bottom
- Open the pepper and lay it flat, skin-side down
- Remove white membrane and seeds by cutting or scraping them away
- Cut the pepper into ¼-inch strips lengthwise
- Gather the strips and cut across to create ¼-inch dice
- Transfer diced peppers to the same bowl as the onion
- Prepare the jalapeño (use caution):
- Put on disposable gloves if available (prevents burning from oils)
- Rinse jalapeño under cool water
- Cut off the stem end
- Cut the jalapeño in half lengthwise
- Use a spoon to scrape out all seeds and white membrane (this is where most heat resides)
- Place halves flat on cutting board and slice into thin strips
- Gather strips and cut across to create very fine mince
- Transfer minced jalapeño to a separate small bowl
- Remove gloves and wash hands thoroughly with soap and warm water
- Warning: Avoid touching your eyes or face until after washing hands
- Prepare the garlic:
- Separate 3 cloves from the garlic head
- Place flat side of knife blade on each clove and press firmly to crush slightly
- This makes the skin easier to remove
- Peel off all papery skin from each clove
- Place peeled cloves on cutting board and mince by:
- Making thin slices
- Gathering slices and cutting across repeatedly until very fine
- Transfer minced garlic to the bowl with jalapeño
- Prepare the chicken:
- Unwrap chicken breasts and place on a clean cutting board
- Use paper towels to pat chicken dry on all sides
- Look for any visible fat (white parts) and trim these off with your knife
- Cut chicken into 1-inch cubes:
- First, slice breasts horizontally into 1-inch thick strips
- Then cut each strip into 1-inch pieces
- Transfer cubed chicken to a clean bowl
- Wash hands thoroughly with soap after handling raw chicken
- Clean cutting board with hot, soapy water or diluted bleach solution
- Prepare the beans:
- Place a colander in the sink
- Open both cans of beans using your can opener
- Pour beans into the colander
- Rinse beans thoroughly under cold running water
- Gently shake colander to remove excess water
- Set aside to continue draining while you move to the next steps
Assembly Steps for Diabetic Slow Cooker White Chili
- Begin layering in slow cooker:
- Add a tiny splash of olive oil to the bottom of your slow cooker (about 1 teaspoon)
- Use a paper towel to spread it around the bottom and lower sides
- This helps prevent sticking and makes cleanup easier
- Add vegetables to slow cooker:
- Add all diced onions to the bottom of the slow cooker
- Spread them out in an even layer
- Add all diced bell peppers on top of the onions
- Add the minced garlic and jalapeño on top of the peppers
- These aromatics on the bottom will flavor the entire dish as they cook
- Add chicken to slow cooker:
- Spread cubed chicken pieces evenly over the vegetables
- Try to arrange in a single layer if possible
- If you need to overlap pieces, that’s okay
- Add beans to slow cooker:
- Gently pour drained beans over the chicken layer
- Use a wooden spoon to spread beans evenly
- Be careful not to stir or mix layers at this point
- Add seasonings:
- Use your measuring spoons to measure each spice individually:
- 1 tablespoon ground cumin (that’s 3 teaspoons)
- 1 teaspoon dried oregano
- 1 teaspoon chili powder
- ½ teaspoon ground white pepper
- ½ teaspoon salt
- Sprinkle each seasoning evenly over the top of the beans
- Try to distribute spices across the entire surface
- Use your measuring spoons to measure each spice individually:
- Add liquid:
- Measure 3 cups of low-sodium chicken broth
- Pour broth gently around the edges of the slow cooker
- This helps avoid washing the spices off the top
- The liquid should come about ¾ of the way up the ingredients
- If needed, you can add up to ½ cup more broth
- Final preparation before cooking:
- Use your wooden spoon to very gently press ingredients down
- All ingredients should be mostly submerged in liquid
- Do not stir vigorously as this will break up the beans
- Place the lid securely on your slow cooker
Cooking Phase
- Set your slow cooker:
- For best results, set your slow cooker to LOW
- Set the timer for 6 hours
- Make note of the starting time so you know when it will be done
- If you need the meal sooner, you can cook on HIGH for 3-4 hours
- Note: HIGH setting may make chicken slightly less tender
- During cooking (hands-off time):
- Avoid opening the lid during cooking
- Each time you open the lid, you lose 20-30 minutes of cooking time
- If you must check, do so quickly and only once halfway through
- The mixture should be gently simmering, not boiling rapidly
- You should see some steam condensing on the lid
- Optional mid-cooking check (around 3-hour mark):
- If doing this check, open lid quickly
- Use a wooden spoon to gently stir once or twice
- Make sure all ingredients remain submerged in liquid
- Replace lid immediately
- Wash spoon with soap after touching partially cooked chicken
- Check for doneness:
- After 6 hours on LOW (or 3-4 hours on HIGH), turn off slow cooker
- Carefully remove lid, tilting it away from you to avoid steam burns
- Check chicken for doneness by:
- Looking for white color all the way through (no pink)
- Testing a piece with a fork (should pull apart easily)
- Using a meat thermometer if you have one (should read 165°F)
- Shred the chicken:
- Take two forks (dinner forks work fine)
- Hold one fork still in a piece of chicken
- Use the other fork to pull and shred the meat apart
- Continue until all chicken pieces are shredded
- They should pull apart very easily after slow cooking
- Final cooking adjustments:
- After shredding chicken, gently stir the entire mixture
- This will distribute the chicken throughout the chili
- If chili seems too thin:
- Leave lid off and turn to HIGH for 20-30 minutes
- This allows excess liquid to evaporate
- If chili seems too thick:
- Add ¼ cup additional broth and stir gently
Finishing Steps
- Add final fresh ingredients:
- Cut a lime in half and squeeze to extract juice
- Measure 2 tablespoons of fresh lime juice
- Add lime juice to the chili and stir gently
- This brightens the flavors and adds freshness, similar to how Sweet Chili Sauce adds a brightness to dishes
- Taste and adjust seasoning:
- Use a clean spoon to taste a small amount of chili
- If needed, add any of the following:
- A pinch more salt if flavors seem flat
- Another squeeze of lime for brightness
- A dash more chili powder for heat
- Stir after each addition and taste again
- Allow chili to rest:
- Turn slow cooker to WARM setting if available
- Let chili rest uncovered for 5-10 minutes
- This allows flavors to meld and chili to thicken slightly
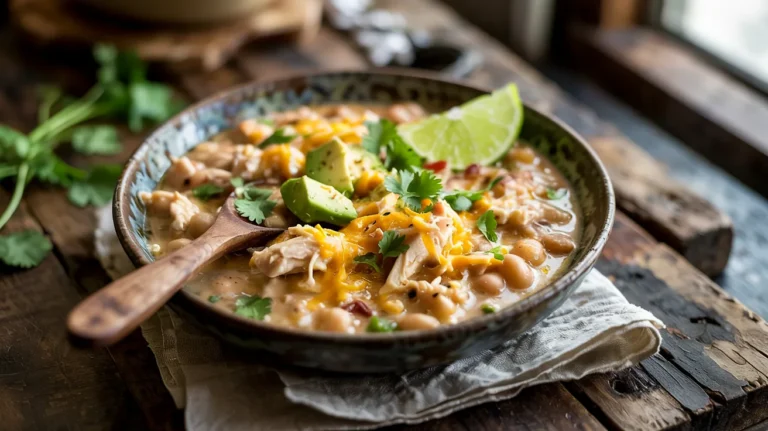
- Prepare garnishes:
- While chili rests, prepare optional garnishes:
- Wash and dry fresh cilantro
- Remove leaves from stems
- Finely chop cilantro leaves
- Measure out Greek yogurt for topping
- While chili rests, prepare optional garnishes:
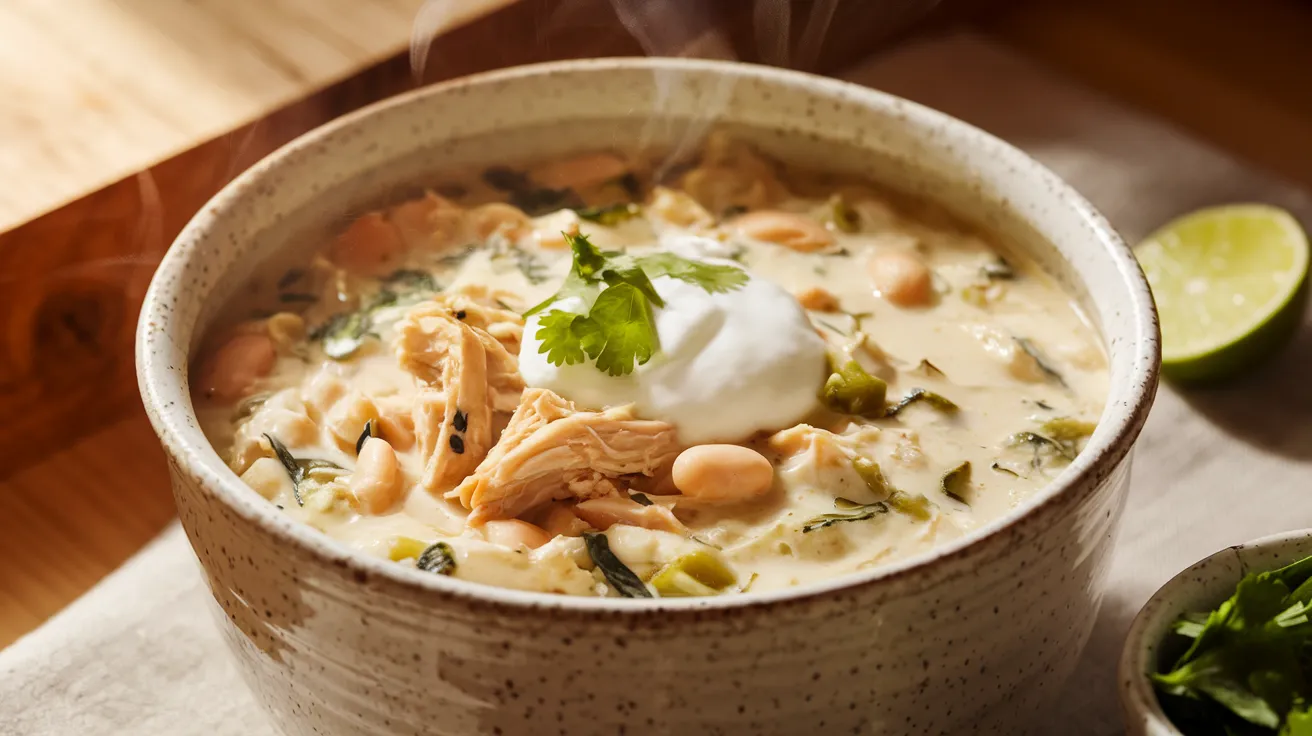
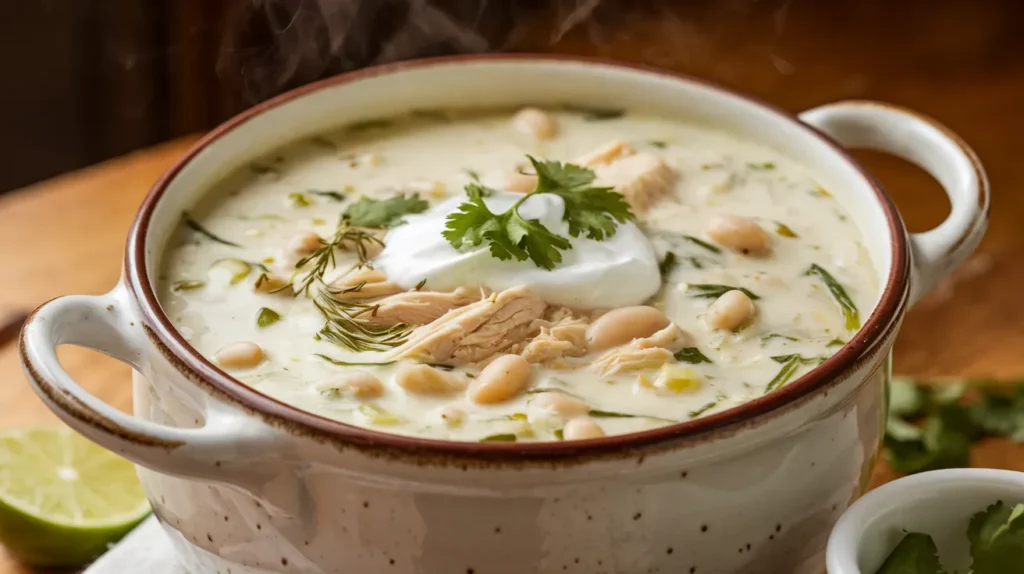
- Serve properly:
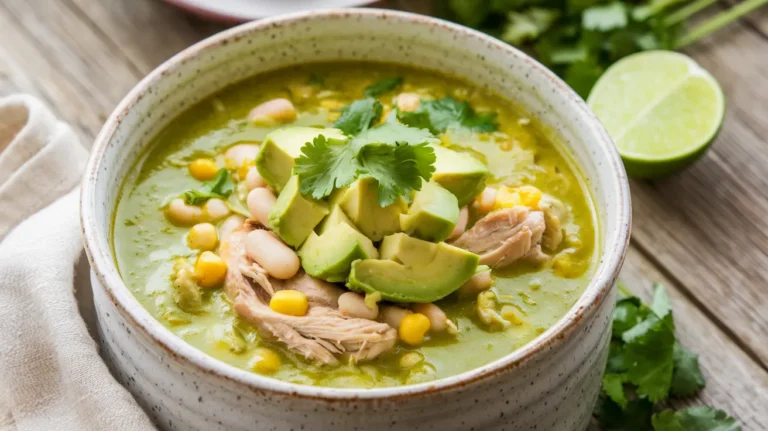
- Use a ladle to portion chili into bowls
- A proper serving is approximately 1½ cups per person
- Add a small sprinkle of chopped cilantro on top (about 1 tablespoon)
- Add a dollop of Greek yogurt (about 1 tablespoon) if desired
- Serve immediately while hot
Troubleshooting Your Diabetic Slow Cooker White Chili
| Problem | Possible Cause | Solution |
|---|---|---|
| Chili too thin | Too much liquid or short cooking time | Remove lid and cook on HIGH for 20-30 minutes to reduce |
| Chicken too dry | Overcooked or pieces too small | Next time, cut larger pieces or reduce cooking time by 30 minutes |
| Not enough flavor | Underseasoned or needs brightness | Add more spices, a dash of salt, or extra lime juice |
| Beans too firm | Older beans or insufficient cooking time | Cook for additional 30-60 minutes on LOW |
| Too spicy | Jalapeño heat varies | Add a tablespoon of Greek yogurt to each serving to temper heat |
| Burned edges | Cooking too long or hot spots | Add ¼ cup broth and reduce heat; stir gently to incorporate |
| Chicken won’t shred | Undercooked | Continue cooking for 30-60 minutes more on LOW |
| Vegetables still crunchy | Pieces cut too large | Next time, dice vegetables smaller; for now, continue cooking |
| Bland flavor | Insufficient seasoning | Add ¼ teaspoon more of each spice and ¼ teaspoon salt |
Variations & Substitutions
Lower Carb Diabetic Slow Cooker White Chili
- Reduce beans to 1 can and increase chicken to 1.5 pounds
- Add 1 cup diced zucchini for bulk without carbs
- Nutritional impact: Reduces to approximately 18g carbs per serving
Vegetarian Adaptation
- Replace chicken with 1 pound extra-firm tofu, pressed and cubed
- Use vegetable broth instead of chicken broth
- Add ½ teaspoon smoked paprika for depth
- Note: Check that blood sugar response remains stable, as individual responses vary
Spice Variations
- For smokier flavor: Add ½ teaspoon chipotle powder
- For herb-forward flavor: Add 1 teaspoon dried thyme and 1 bay leaf
- For citrus brightness: Add 1 teaspoon lime zest with the juice
Quick Cooking Adaptation
- If you’re short on time:
- Use rotisserie chicken, shredded (about 3 cups)
- Cook vegetables on HIGH for 2 hours
- Add beans and pre-cooked chicken for final 1 hour
- This reduces total cooking time to 3 hours
Storage & Reheating
Refrigeration
- Allow chili to cool completely before refrigerating (no more than 2 hours at room temperature)
- Transfer cooled chili to airtight plastic or glass containers
- Fill containers to within 1 inch of the top
- Seal containers tightly with lids
- Store in refrigerator for up to 4 days
- The flavors will improve after 24 hours as ingredients meld together
Freezing
- Portion completely cooled chili into individual freezer-safe containers
- Leave ½-inch headspace at the top of each container for expansion
- Label containers with:
- Contents (“Diabetic Slow Cooker White Chili”)
- Date prepared
- Use-by date (3 months from preparation)
- Seal containers tightly
- Place in freezer where they can freeze quickly
- Store for up to 3 months
Reheating from Refrigerated
- Microwave method:
- Place a single serving in a microwave-safe bowl
- Cover loosely with a paper towel or microwave-safe lid
- Heat on HIGH for 1 minute
- Stir thoroughly
- Heat for another 1-2 minutes until internal temperature reaches 165°F
- Let stand for 1 minute before serving
- Stovetop method:
- Place desired amount in a saucepan
- Add 1-2 tablespoons of water or broth per cup of chili
- Heat over medium-low heat, stirring occasionally
- Bring to a gentle simmer
- Heat until internal temperature reaches 165°F (about 5-7 minutes)
Reheating from Frozen
- Thaw first method (safest):
- Transfer frozen container to refrigerator
- Allow to thaw overnight (about 24 hours)
- Reheat using refrigerated methods above
- Direct reheat method:
- Place frozen block in a saucepan
- Add ¼ cup water or broth to the pan
- Cover and heat on low, stirring occasionally as it thaws
- Once thawed enough to break apart, stir more frequently
- Heat until internal temperature reaches 165°F
- Add additional liquid if needed
Safety Notes & Tips
Food Safety
- Never place frozen chicken directly in slow cooker (dangerous bacterial growth zone)
- Always wash hands for 20 seconds with soap after handling raw chicken
- Use separate cutting boards for meat and vegetables
- Ensure chicken reaches internal temperature of 165°F (74°C)
- Don’t leave cooked chili at room temperature for more than 2 hours
- When reheating, always ensure internal temperature reaches 165°F
Diabetic Considerations
- Monitor your response: Test blood glucose before and 2 hours after eating
- Portion control is key: Stick to 1½ cup serving size
- Balance your meal: Pair with small side salad for additional fiber
- Watch toppings: Limit high-fat additions like cheese or avocado
- Individual responses vary: Keep a food journal to track how this recipe affects your blood sugar
Preparation Tips
- Prep ahead: Chop all vegetables the night before and refrigerate in sealed containers
- Make in bulk: Double recipe for meal prep (freeze half in individual portions)
- Time-saving tip: Use pre-cut fresh or frozen vegetables (no need to thaw frozen ones)
- Spice storage: Check that your spices are fresh (no more than 1 year old) for best flavor
- Prevent burning: Avoid opening slow cooker frequently which extends cooking time
- Easy cleanup: Use a slow cooker liner for nearly effortless cleanup
Helpful Beginner Tips
- First time with jalapeños? Wear disposable gloves when handling and wash hands thoroughly after
- Don’t have measuring spoons? A regular teaspoon is roughly equivalent to a measuring teaspoon
- Quick bean rinse: Place beans in a fine mesh strainer for easiest rinsing
- No lime juicer? Roll lime firmly on counter before cutting to release more juice
- Even cooking: If your slow cooker has known hot spots, rotate the crock halfway through cooking
- Testing doneness: If you don’t have a thermometer, chicken is done when it’s white throughout and pulls apart easily
This satisfying Diabetic Slow Cooker White Chili offers deep flavor and hearty texture while keeping your blood sugar steady. The combination of lean protein, fiber-rich beans, and strategic seasoning creates a meal you’ll want to make again and again.
By cooking low and slow, the ingredients have time to develop rich flavors without requiring added sugars or fats—making this an ideal meal for diabetic meal plans without sacrificing taste.