Key Takeaways:
- Master authentic Ear Shaped Pasta with just 3 simple ingredients
- Learn the traditional thumb-rolling technique Italian grandmothers use
- Perfect for catching chunky sauces with its unique cup shape
- Make fresh pasta for 4 people in under 30 minutes
Why You Need This Ear Shaped Pasta Recipe in Your Life
Ever tasted store-bought orecchiette and felt something was missing? The difference between packaged and homemade Ear Shaped Pasta is night and day.
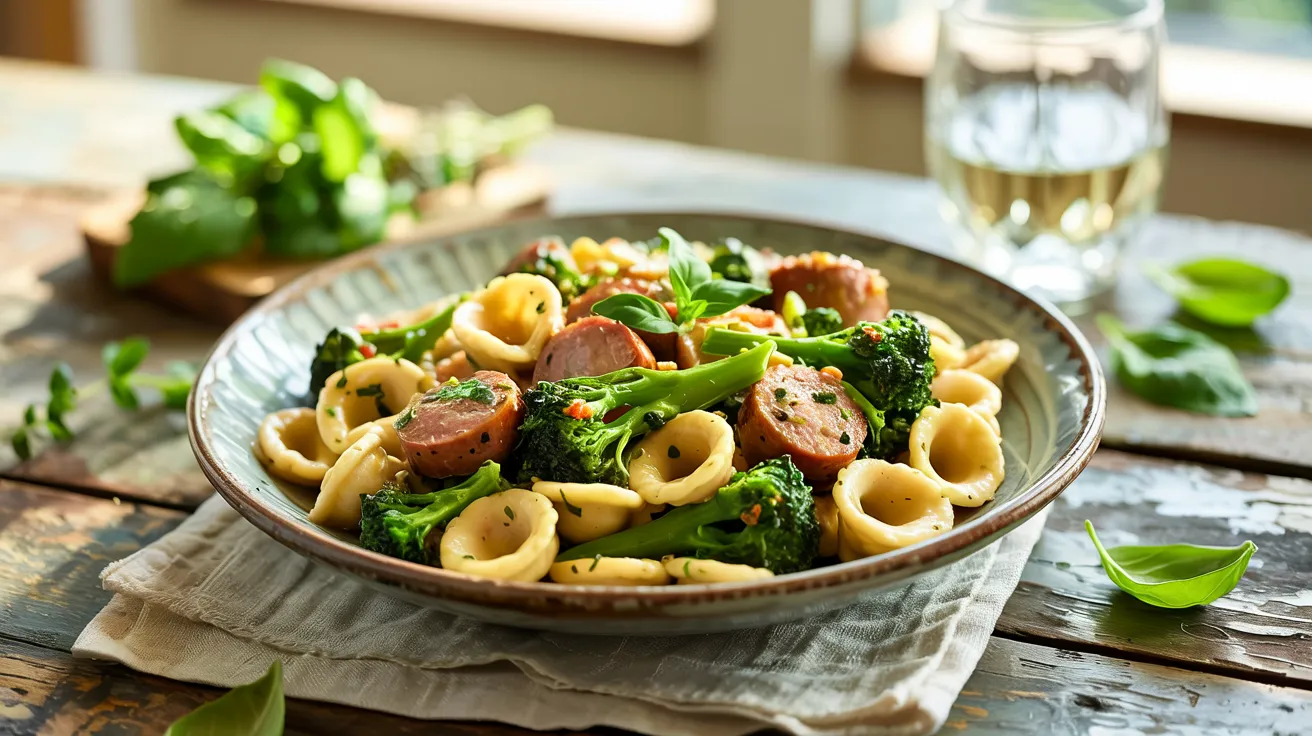
This Ear Shaped Pasta recipe brings the authentic taste of Southern Italian cuisine right to your kitchen. Orecchiette (meaning “little ears” in Italian) has a distinct cup shape that’s built to hold chunky sauces like nothing else.
The best part? You only need flour, water, and salt to create this pasta magic. If you’ve enjoyed other pasta varieties like ditali pasta, you’ll find that making Ear Shaped Pasta is just as rewarding but with its own unique charm. Let’s get started!
Nutrition Information
| Nutrient | Amount Per Serving |
|---|---|
| Calories | 210 |
| Carbohydrates | 42g |
| Protein | 7g |
| Fat | 1g |
| Sodium | 75mg |
| Fiber | 2g |
Serving size: 1 cup cooked pasta (about 2 oz dry)
What You’ll Need
Ingredients
| Ingredient | Measurement | Notes |
|---|---|---|
| Semolina flour | 2 cups | Traditional choice, creates best texture |
| All-purpose flour | 1 cup | Helps with elasticity |
| Warm water | ¾ to 1 cup | Temperature matters – not hot, just warm |
| Sea salt | 1 teaspoon | Fine grain works best |
Kitchen Equipment
| Tool | Purpose |
|---|---|
| Large mixing bowl | For forming the dough |
| Clean work surface | Wooden board is traditional but not required |
| Bench scraper | For cutting dough portions |
| Kitchen scale (optional) | For precise measurements |
| Knife | For cutting dough portions |
| Baking sheet | For holding finished pasta |
Ingredient Substitutions
Can’t find semolina? Use all-purpose flour for the entire recipe. The texture will be slightly different but still good.
For a gluten-free version, try:
- 2 cups gluten-free all-purpose flour blend
- ½ cup tapioca starch
- Xanthan gum (follow package instructions)
Step-by-Step Instructions
Prep Time: 20 minutes Cook Time: 2-3 minutes Total Time: 25 minutes Servings: 4 people
Preparation Phase
- Set up your workspace
- Find a clean, flat surface with enough room to roll out dough (at least 2 feet by 2 feet)
- If using a wooden surface, make sure it’s clean and dry
- If using a countertop, ensure it’s wiped clean of any cleaning products
- Keep a damp cloth nearby for cleaning your hands as you work
- Have a dry kitchen towel ready to cover dough when resting
- Place all ingredients within easy reach
- Beginner tip: If possible, work at a counter height that’s comfortable for you to apply pressure with your hands
- Measure your ingredients precisely
- Use measuring cups to scoop the semolina flour, then level off with a knife
- Do the same with the all-purpose flour
- Combine both flours in a bowl temporarily
- Fill a measuring cup with warm water (about 95-100°F or warm to the touch but not hot)
- Important for beginners: Having too little water makes tough pasta; too much makes it sticky
- Place salt in a small dish so it’s ready to add
Making the Dough
- Create the flour mixture
- Transfer the combined flours to a large, wide mixing bowl
- Add 1 teaspoon salt to the flours
- Use a fork or whisk to thoroughly combine, stirring for at least 30 seconds
- Visual cue: The mixture should look uniform in color with no visible salt crystals
- Beginner tip: Don’t skip the mixing step – even salt distribution is key to good pasta
- Form a well in the center
- Use your fist or the bottom of a measuring cup to create a deep depression in the center
- The well should be about 3-4 inches wide
- Press down firmly so the sides of the well are at least 1 inch high
- The well needs to be deep enough to hold about ¼ cup of water without spilling
- Common mistake to avoid: If the well is too shallow, water will spill out and make a mess
- Add water gradually
- Pour exactly ¼ cup of the warm water into the well
- Hold a fork in your dominant hand
- Start gently stirring the water in a circular motion
- As you stir, gradually incorporate a little flour from the inner walls of the well
- Continue this slow stirring and incorporating for about 1-2 minutes
- The mixture will start to look like a thick paste
- Add another 2 tablespoons of water and continue the process
- Keep adding water 2 tablespoons at a time, working it in gradually
- Visual cue for beginners: Stop adding water when the mixture starts forming shaggy clumps
- Texture check: The dough should start to come together but still look somewhat rough and not completely smooth
- Begin kneading the dough
- Once most of the flour is incorporated and a shaggy dough forms, dust your hands with flour
- Use your hands to bring the dough together in the bowl
- It will still look rough and may have some dry bits – this is normal
- If there’s still a lot of dry flour that won’t incorporate, add 1 teaspoon of water at a time
- Press the dough together firmly with your palms
- Beginner check: When squeezed, the dough should mostly hold together with maybe a few crumbles
- Transfer and knead thoroughly
- Lightly dust your work surface with a mix of semolina and all-purpose flour
- Transfer the dough ball to the dusted surface
- Begin kneading by pressing the dough away from you with the heel of your hand
- Fold the dough in half toward you
- Give it a quarter turn
- Repeat this press-fold-turn motion rhythmically
- Detailed kneading technique for beginners:
- Press firmly with your palm, leaning your body weight into it
- Fold by lifting the far edge and bringing it toward you
- Turn the dough 90 degrees (a quarter turn) clockwise each time
- Repeat this sequence for a full 8-10 minutes without shortcuts
- What’s happening: This develops the gluten structure needed for proper pasta
- Visual transformation: The dough will gradually become smoother and more elastic
- Physical check: After 5 minutes, the dough should start to feel more springy when pressed
- Final texture: After full kneading, dough should be firm but pliable – not sticky and not cracking
- Beginner tip: If dough sticks to your hands, dust with a tiny amount of flour
- If too dry: If dough feels too firm or cracks, wet your hands very slightly and continue kneading
- Rest the dough properly
- Shape the kneaded dough into a smooth ball
- Use your palms to rotate it in circular motions, creating tension on the surface
- Wrap the dough completely in the damp (not wet) kitchen towel
- Alternatively, place in a bowl and cover with plastic wrap, ensuring no air can reach the dough
- Let rest for exactly 10 minutes at room temperature
- Science behind resting: This allows the gluten to relax and makes shaping easier
- Beginner warning: Don’t skip the resting step or your pasta will be tough and hard to shape
Shaping the Ear Shaped Pasta
- Prepare and divide the dough
- Lightly dust your work surface again with a 50/50 mix of the flours
- Unwrap the rested dough
- Press it gently with your fingertips – it should feel slightly softer
- Use a bench scraper or knife to cut the dough into 4 equal pieces
- For beginners, a kitchen scale helps ensure equal portions (each should weigh approximately 3-3.5 oz)
- Immediately cover 3 portions with the damp towel to prevent drying
- Keep the towel completely covering the unused dough
- Roll the perfect dough rope
- Take one portion of dough and place it on your work surface
- Place both palms on the dough
- Roll forward and backward, applying even pressure
- Gradually work your way outward from the center
- Keep rolling until you have a uniform rope that’s exactly ½-inch thick (about the diameter of a pencil)
- The rope should be approximately 18-20 inches long
- Beginner check: If the rope isn’t evenly thick throughout, continue rolling, focusing on the thicker areas
- Texture issue: If the dough feels too elastic and springs back, let it rest another 1-2 minutes
- Slice the rope precisely
- Using a knife or bench scraper, cut the rope into small discs
- Each disc should be approximately ¼-inch thick (about the width of a pencil eraser)
- Try to make all pieces the same size for even cooking
- A slight angle in your cut helps with the shaping step that follows
- Visual check for beginners: Cut one piece first, then use it as a visual guide for the rest
- Lightly dust the cut pieces if they begin to stick together
- Shape the Ear Shaped Pasta (traditional method)
- Take one disc of dough and place it on your work surface
- Hold it in place with your non-dominant index finger
- With your dominant thumb, press firmly into the center of the disc
- As you press, drag your thumb toward you slightly (about ¼ inch)
- This creates a thin center and thicker edge
- Then, using the tip of your thumb, flip the disc inside out over your thumb
- The motion should create a cup shape that resembles a small ear
- For beginners – detailed thumb positioning:
- Press with the flat part of your thumb, not the tip
- Apply firm, even pressure
- The dragging motion should be smooth and controlled
- Visual success check: The outside should be smooth, the inside slightly rough with a clear indentation
- Common beginner mistake: Pressing too hard can tear the dough; too lightly won’t create the proper shape
- Alternative beginner-friendly shaping method
- Place a disc on your lightly floured work surface
- Press the disc with your thumb against the work surface
- Use a slightly floured thumb to prevent sticking
- Drag it about ¼ inch toward you, creating a curved shape
- Use your fingertip to pop the pasta inside out
- This creates the characteristic cup shape
- Beginner recommendation: Practice on 5-10 pieces until you get the hang of it
- Visual guide: Your first few pieces may look irregular – that’s okay! Traditional Ear Shaped Pasta aren’t perfectly uniform
- Proper placement of finished pasta
- Sprinkle a baking sheet generously with semolina flour
- Arrange each shaped orecchiette on the sheet with at least ¼ inch between pieces
- Place them with the curved side up, cup side down
- If you need to create a second layer, place a piece of parchment paper between layers and dust with more semolina
- Critical beginner warning: Do not stack them directly on top of each other or they will stick and lose their shape
- Visual arrangement: The pasta should look like little rows of upside-down cups
Cooking the Fresh Ear Shaped Pasta
- Prepare the cooking water properly
- Select a pot that holds at least 4 quarts of water
- Fill it about ¾ full (approximately 3 quarts of water)
- Add exactly 1 tablespoon of salt (fresh pasta needs well-salted water)
- Place on high heat and bring to a full, rolling boil
- Visual cue for beginners: Wait until you see large, constant bubbles breaking the surface
- Beginner tip: Never add oil to pasta water – it prevents sauce from adhering later
- Cook the pasta with care
- Once water is at a full boil, reduce heat slightly to a gentle boil
- Using a slotted spoon or your hands, carefully add orecchiette to water
- Add them in small batches of about 8-10 pieces at a time to prevent sticking
- Stir very gently with a wooden spoon once all pasta is added
- Important timing note: Begin timing as soon as the last piece enters the water
- For fresh pasta, set a timer for exactly 2 minutes
- Visual cooking cue: The pasta will float to the surface as it cooks
- Temperature warning for beginners: Be careful of steam and splashing hot water
- Test for perfect doneness
- After 2 minutes, use a slotted spoon to remove one piece of pasta
- Run it under cool water for 2 seconds
- Cut it in half with a knife
- Look at the center – it should have no raw-looking dough
- Taste it – it should be tender but still have some firmness (al dente)
- If needed, cook for 30 more seconds and test again
- Beginner texture description: The pasta should offer slight resistance when bitten but shouldn’t be hard or crunchy
- Common mistake: Overcooking fresh pasta turns it mushy – err on the side of undercooking
- Drain the pasta correctly
- Place a colander in the sink
- Carefully pour the pasta and water into the colander
- Give the colander one gentle shake to remove excess water
- Critical warning: Never rinse fresh pasta after cooking!
- The starch on the surface helps sauce adhere to the pasta
- If not using immediately, toss with a small amount of olive oil to prevent sticking
- Finish with your sauce
- Return the drained pasta to the warm pot (off the heat)
- Add your prepared sauce (about 2 cups of sauce for 4 servings)
- Gently toss using tongs or two large spoons
- The cup shape of Ear Shaped Pasta will catch small bits of sauce and ingredients
- Let the pasta rest in the sauce for 30 seconds before serving
- Beginner serving tip: Warm your serving bowls by filling them with hot water, then emptying before adding pasta
- For a delicious garlic-forward option, try pairing with a variation of garlic chilli cacio e pepe
Troubleshooting
| Problem | Cause | Solution |
|---|---|---|
| Dough too sticky | Too much water added | Add small amounts of flour (1 tbsp at a time), kneading after each addition until workable |
| Dough cracking at edges | Too dry | Add a few drops of water to fingers, knead to incorporate evenly |
| Dough too hard to knead | Not enough water | Add ½ teaspoon water at a time, knead thoroughly after each addition |
| Pasta losing shape when cooking | Dough too soft or thin centers | Let dough rest longer (15 min); make slightly thicker centers when shaping |
| Ear Shaped Pasta sticking together | Overcrowding the pot | Cook in smaller batches; stir more gently while cooking |
| Uneven cooking | Inconsistent thickness | Practice making uniform shapes; maintain even thickness around edges |
| Pasta falling apart when shaped | Gluten not developed enough | Knead the dough longer (2-3 extra minutes) to develop more strength |
| Dough springy and hard to roll | Gluten too tight | Let dough rest longer (15-20 min) before rolling and shaping |
Variations & Substitutions
Flavor Additions
Try adding these to your dough for extra flavor:
- 1 teaspoon dried herbs (basil, oregano, or thyme)
- ½ teaspoon garlic powder
- 2 tablespoons finely chopped fresh herbs
- 1 teaspoon cracked black pepper
- ¼ teaspoon turmeric for yellow pasta
Sauce Pairings
Ear Shaped Pasta works best with chunky sauces that can nestle in the “ear”:
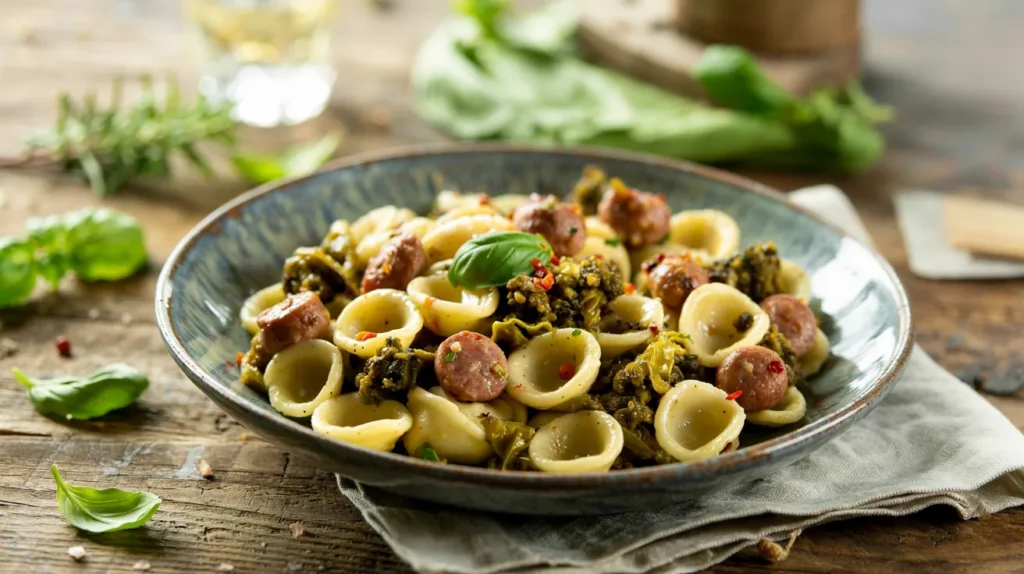
- Classic pairing: Broccoli rabe and Italian sausage with garlic and red pepper flakes
- Light option: Cherry tomatoes, fresh basil, and dollops of ricotta cheese
- Vegetarian favorite: Sautéed wild mushrooms with peas and cream
- Family friendly: Traditional pesto with pine nuts and fresh grated parmesan
- Winter comfort: Brown butter with roasted butternut squash and sage
If you’re looking for other unique pasta shapes to try after mastering orecchiette, consider exploring candele pasta for a completely different shape and texture experience.
Storage & Reheating
Fresh Uncooked Ear Shaped Pasta
- Air dry completely before storing (about 1-2 hours on the baking sheet)
- Once dry, store in a single layer in an airtight container
- Place parchment paper between layers if stacking is necessary
- Keep in refrigerator for up to 2 days
- For longer storage, freeze on the baking sheet until solid (about 1 hour)
- Transfer frozen pasta to freezer bags, removing as much air as possible
- Label with date – frozen pasta keeps for up to 3 months
- Do not thaw before cooking – add frozen pasta directly to boiling water
- Increase cooking time by 1 minute for frozen pasta
Cooked Ear Shaped Pasta
- Cool completely before storing (but don’t rinse)
- Toss with a small amount of olive oil to prevent sticking
- Refrigerate in an airtight container for up to 3 days
- To reheat:
- Stovetop method: Place in simmering water for 30-45 seconds, then drain
- Microwave method: Sprinkle with a few drops of water, cover, and heat on 50% power for 1 minute
- Sauce method: Reheat gently in warm sauce over low heat for 1-2 minutes
Safety Notes & Tips
- Wash hands thoroughly before handling dough
- Keep raw flour away from ready-to-eat foods to prevent cross-contamination
- Always check pasta for doneness before serving
- Keep raw dough away from small children as it poses a choking hazard
- Use caution when handling boiling water and hot cookware
- If making ahead for guests, slightly undercook pasta by 30 seconds, then finish in sauce
Pro tip: The slight indentation in Ear Shaped Pasta is perfect for catching small bits of vegetables and meat – make your sauce chunky to take advantage of this feature!
Secret to success: The difference between good and great Ear Shaped Pasta is in the thickness – aim for thinner in the center, slightly thicker at the edges for the perfect bite.
Traditional serving suggestion: In Puglia, Italy (where orecchiette originated), this pasta is traditionally served with a sauce of broccoli rabe and sausage, and finished with a sprinkle of pecorino cheese.
Happy pasta making!