Prep Time: 15 minutes | Cook Time: 12 minutes | Total Time: 27 minutes | Servings: 4
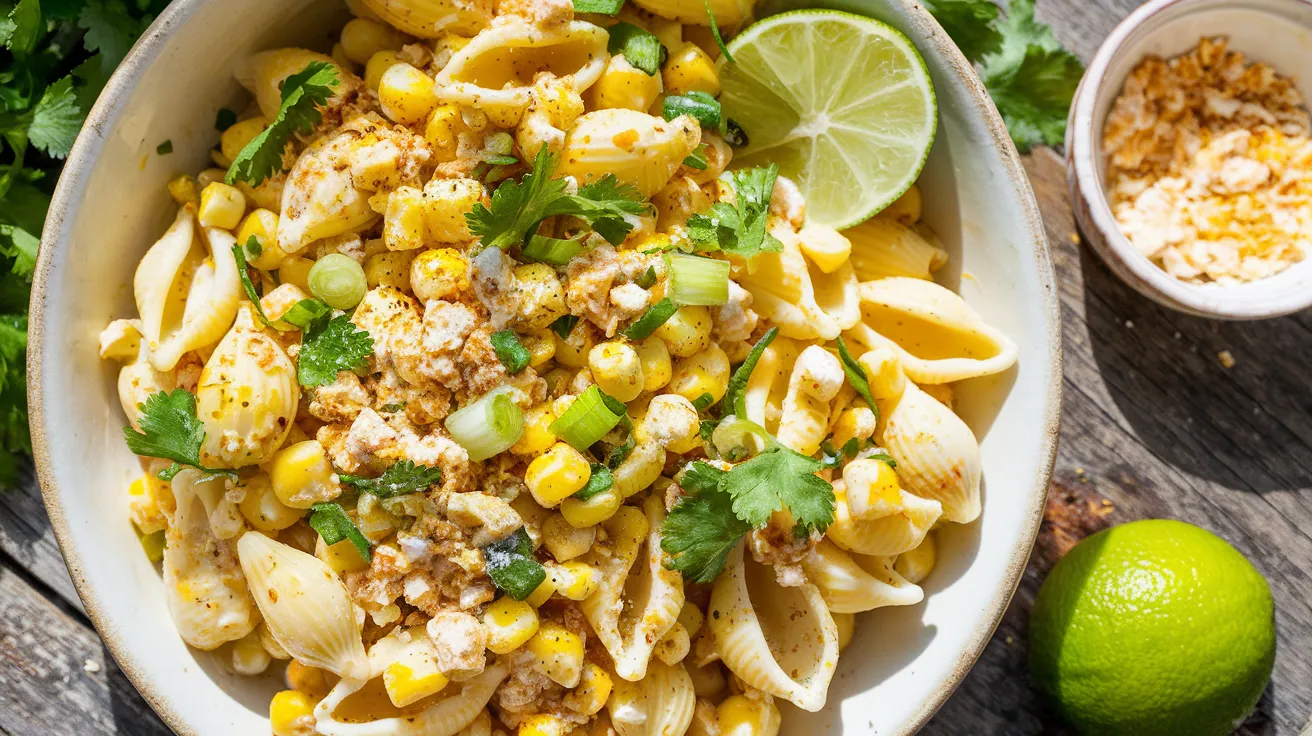
- This Mexican-inspired Elote Pasta Salad combines street corn flavors with pasta for the perfect summer side
- Ready in under 30 minutes with minimal cleanup required
- Make ahead friendly – stays fresh in the fridge for up to 3 days
- Customizable with add-ins like black beans, avocado, or grilled chicken
Why You Need This Elote Pasta Salad Recipe
Summer gatherings call for dishes that are both impressive and easy. This Elote Pasta Salad delivers exactly that.
Traditional Mexican street corn (elote) gets a twist by combining those same beloved flavors with pasta. The result? A crowd-pleasing side that pairs perfectly with anything off the grill, similar to how garlic and chili elevate a classic cacio e pepe.
The Elote Pasta Salad recipe strikes the perfect balance between simple and spectacular. With just a handful of ingredients, you’ll create a dish that guests will rave about all summer long.
Whether you’re new to cooking or just looking for something fresh, this pasta salad will become your new go-to for potlucks and backyard barbecues.
Nutrition Information
| Nutrient | Amount per Serving |
|---|---|
| Calories | 385 |
| Protein | 12g |
| Carbohydrates | 52g |
| Fat | 15g |
| Fiber | 5g |
| Sodium | 580mg |
What You’ll Need
Ingredients for Elote Pasta Salad
| Ingredient | Amount | Notes |
|---|---|---|
| Medium shell pasta | 8 oz (about 2 cups dry) | Rotini or bowties work too |
| Corn kernels | 3 cups (about 4 ears) | Fresh or frozen |
| Mayonnaise | 1/3 cup | Full-fat recommended |
| Cotija cheese | 1/2 cup, crumbled | Plus extra for garnish |
| Fresh lime juice | 2 tablespoons (about 1 lime) | Fresh is best |
| Sour cream | 1/4 cup | Greek yogurt works as substitute |
| Chili powder | 1 teaspoon | Adjust to taste |
| Garlic powder | 1/2 teaspoon | |
| Fresh cilantro | 1/4 cup, chopped | Plus more for garnish |
| Green onions | 3, thinly sliced | Both white and green parts |
| Salt | 1/2 teaspoon | Kosher preferred |
| Black pepper | 1/4 teaspoon | Freshly ground |
Kitchen Tools
| Tool | Purpose |
|---|---|
| Large pot | For boiling pasta |
| Skillet | For charring corn |
| Colander | Draining pasta |
| Large mixing bowl | Combining ingredients |
| Cutting board | Prep work |
| Sharp knife | Chopping herbs and veggies |
| Measuring cups & spoons | Accurate measurements |
| Wooden spoon or spatula | Mixing |
| Citrus juicer | Optional but helpful |
Possible Substitutions
- Cotija cheese: Feta or parmesan make good alternatives
- Sour cream: Greek yogurt for a tangier, lighter option
- Fresh corn: Frozen corn works well (no need to thaw)
- Mayonnaise: Avocado oil mayo for a healthier fat option
- Cilantro: Parsley if you’re in the cilantro-tastes-like-soap camp
Step-by-Step Instructions for Elote Pasta Salad
Preparation Phase
- Set up your workspace
- Clear your countertop so you have enough room to work
- Place your cutting board on a stable surface
- Set out all your measuring cups and spoons
- Have a small bowl ready for food scraps
- Wash your hands thoroughly with soap and water
- Gather all ingredients
- Take everything out of the refrigerator and pantry
- Place all ingredients on your counter
- Check that you have everything listed in the ingredients section
- Allow refrigerated items like cheese to come to room temperature (about 10 minutes)
- Measure and prep each ingredient
- Place your measuring cups on a flat surface for accurate measurements
- For dry ingredients like pasta, fill the measuring cup and level off with a knife
- For liquids, place measuring cup on a flat surface and bend down to check at eye level
- Pre-measure all ingredients into small bowls if that helps you stay organized
- Prepare fresh corn (if using)
- Place ear of corn on cutting board, holding it upright
- Use a sharp knife to cut downward, close to the cob, to remove kernels
- Rotate corn and continue cutting until all kernels are removed
- Repeat with remaining ears
- Each ear yields about 3/4 cup of kernels
- Beginner tip: Place a small bowl upside down inside a larger bowl, stand corn on small bowl, and cut downward so kernels fall into larger bowl
- Prepare cilantro and green onions
- Rinse cilantro and green onions under cold water
- Pat dry with paper towels or use a salad spinner
- For cilantro: pick leaves from stems, gather in a pile, and chop with a rocking motion
- For green onions: trim off root ends and 1/4 inch from the top
- Slice green onions thinly (about 1/8 inch thick)
- Keep white and green parts separate (they’ll be used at different times)
- Safety tip: Always cut away from your body, keeping fingertips curled under
- Prepare lime
- Roll lime on countertop while pressing down firmly (this helps release juice)
- Cut lime in half through the equator (not from end to end)
- Use a citrus juicer or squeeze by hand while catching seeds with your other hand
- Measure 2 tablespoons of juice (you may need more than one lime)
- Beginner tip: Microwave lime for 10 seconds before juicing to get more juice
Cooking the Pasta
- Boil water for pasta
- Fill large pot about 2/3 full with cold water (about 4 quarts/16 cups)
- Place on stove and turn heat to high
- Add 1 tablespoon of salt (the water should taste salty like the ocean)
- Cover pot with lid to help water boil faster
- Beginner tip: The pot is large enough if the water level is at least 3 inches below the rim
- Cook the pasta properly
- Once water reaches a rolling boil (large bubbles that don’t disappear when stirred), add pasta
- Immediately stir with a wooden spoon to prevent sticking
- Set a timer for the time indicated on pasta package (usually 8-10 minutes)
- Stir occasionally during cooking
- Test pasta 1 minute before timer ends by taking a piece out, running under cold water, and tasting
- Pasta should be “al dente” – tender but still slightly firm when bitten
- Common mistake: Don’t add oil to pasta water; it prevents sauce from sticking later
- Drain pasta correctly
- Place colander in sink (be careful of steam)
- Carefully pour pasta and water into colander
- Give colander a gentle shake to remove excess water
- Rinse pasta briefly with cold water to stop cooking (about 30 seconds)
- Shake colander again 5-6 times to remove as much water as possible
- Transfer pasta to large mixing bowl right away
- Beginner tip: If pasta sits too long in colander, it may stick together
Preparing the Corn
- Heat pan for charring corn
- Place skillet on stove over medium-high heat
- Let pan heat up for 2-3 minutes (test by sprinkling a few drops of water – they should sizzle immediately)
- Add 1 teaspoon oil and swirl to coat bottom of pan
- Safety tip: Handle hot pans with oven mitts or dry kitchen towels
- Char the corn for best flavor
- Add corn kernels to hot skillet in a single layer
- Let corn sit undisturbed for 2-3 minutes (resist the urge to stir!)
- Look for browning on bottom layer of kernels
- Stir corn with wooden spoon or heat-resistant spatula
- Let sit another 2-3 minutes until about 30% of kernels have brown spots
- Visual cue: Corn is ready when it has brown spots but isn’t burnt (golden-brown color)
- Cool the corn properly
- Remove pan from heat
- Transfer corn to a plate or bowl to cool faster
- Let cool for 5 minutes, stirring occasionally to release heat
- Beginner tip: Never add hot corn directly to mayo-based dressing or it will separate
Assembling the Elote Pasta Salad
- Make the dressing from scratch
- In a medium bowl, add mayonnaise and sour cream
- Add measured lime juice
- Add chili powder and garlic powder
- Add salt and pepper
- Whisk everything together until completely smooth with no streaks
- Taste and adjust seasoning if needed (add more lime juice for tanginess or salt if it tastes bland)
- Texture tip: Dressing should be thick but pourable, like pancake batter
- Combine all ingredients carefully
- Check that pasta has cooled to room temperature
- Add charred corn to pasta bowl
- Add white parts of green onions
- Pour 3/4 of the dressing over mixture (reserve some in case needed later)
- Add 1/3 cup cotija cheese
- Add chopped cilantro (reserve 1 tablespoon for garnish)
- Using two large spoons or spatulas, gently fold ingredients together with a scooping motion
- Fold 10-12 times until everything is evenly coated
- If mixture seems dry, add remaining dressing
- Technique tip: Fold gently from bottom to top rather than stirring to avoid breaking pasta
- Final presentation touches
- Transfer salad to a serving bowl with a wide rim
- Sprinkle remaining cotija cheese evenly over the top
- Sprinkle reserved green parts of onions
- Sprinkle reserved cilantro
- Optional: dust lightly with a pinch of additional chili powder for color
- Visual tip: Sprinkle garnishes in a circular pattern from outside to center
- Properly rest the salad before serving
- Cover with plastic wrap
- Let sit at room temperature for 15 minutes for flavors to meld
- Gently stir once more before serving
- Flavor tip: Like most pasta salads, this Elote Pasta Salad tastes even better after sitting for a bit

Troubleshooting Your Elote Pasta Salad
| Problem | Solution |
|---|---|
| Pasta is too dry | Add 1-2 tablespoons of mayo or sour cream and a squeeze of lime juice |
| Too spicy | Add more sour cream to balance the heat |
| Not enough flavor | Add more lime juice, salt, or a pinch more chili powder |
| Pasta stuck together | Drizzle with a bit of olive oil and gently separate with fork |
| Soggy pasta | Next time, don’t rinse as long and make sure to drain thoroughly |
| Dressing too thick | Add 1 teaspoon of water or lime juice at a time until desired consistency |
| Dressing separated | Whisk vigorously or blend briefly with immersion blender |
| Corn not charring | Make sure pan is hot enough before adding corn; don’t overcrowd the pan |
Variations & Substitutions
Make It a Meal
Add protein to transform this side into a main dish:
- Grilled chicken breast, diced
- Black beans (1 can, drained and rinsed)
- Grilled shrimp (for a twist similar to camarones al ajillo pasta)
Dietary Adaptations
- Vegetarian: Already vegetarian!
- Gluten-free: Use gluten-free pasta
- Dairy-free: Substitute vegan mayo for sour cream and skip the cheese or use a dairy-free alternative
- Vegan: Use vegan mayo, skip sour cream and cheese (or use plant-based versions)
Flavor Twists
- Add 1/2 teaspoon smoked paprika for a smoky flavor
- Mix in 1 diced avocado just before serving
- Add 1 small diced red bell pepper for color and crunch
- Include 1/4 teaspoon cayenne for extra heat, similar to the kick in creamy chipotle shrimp pasta
Storage & Reheating
Storage
- Refrigerator: Store in airtight container for up to 3 days
- Freezing: Not recommended as mayo-based dressings separate when thawed
Make Ahead Tips
- Prepare up to 24 hours in advance
- If making ahead, reserve half the dressing and add just before serving
- Add an extra squeeze of lime juice and stir well before serving to refresh flavors
Serving After Refrigeration
- Remove from refrigerator 15-20 minutes before serving
- Stir well to redistribute dressing
- If needed, add a small splash of lime juice to brighten flavors
Safety Notes & Tips
Food Safety
- Keep cold after serving; don’t leave out more than 2 hours (1 hour in hot weather)
- Always rinse fresh produce thoroughly
- Use separate cutting boards for produce and other ingredients
- Make sure to wash hands before and after handling raw ingredients
- If bringing to a potluck, transport in cooler with ice packs
Pro Tips for Success
- Perfect pasta: Salt your pasta water generously – it should taste like sea water
- Best corn char: Don’t stir corn too frequently when charring – let it sit to develop color
- Make it creamier: Reserve 2 tablespoons of pasta cooking water and mix with dressing
- Prep ahead: Chop veggies and make dressing up to 2 days ahead
- Serving tip: This Elote Pasta Salad tastes even better at room temperature than cold
Perfect Pairings
Serve this Elote Pasta Salad alongside:
- Grilled chicken, steak, or fish
- Burgers or hot dogs
- Tacos or fajitas
- As part of a summer potluck spread
Allergy Warning: Contains dairy and may contain gluten depending on pasta choice.