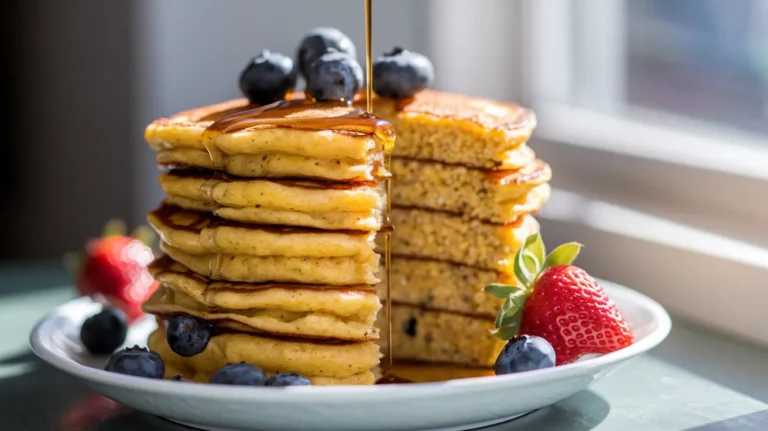
Craving pancakes but want to skip the flour? These flourless protein pancakes deliver all the fluffy, satisfying goodness you love with a powerful protein boost. Made with simple pantry staples, this flourless protein pancakes recipe transforms your breakfast routine into a nutrient-dense meal that keeps you energized for hours. Perfect for fitness enthusiasts, busy families, or anyone seeking a healthier pancake alternative.
SERVES: 4 | PREP: 10 MIN | COOK: 8 MIN | TOTAL: 18 MIN
Ingredients
Wet Ingredients
| Ingredient | Amount |
|---|---|
| Large eggs | 4 whole |
| Greek yogurt (plain) | 1/2 cup |
| Vanilla extract | 1 teaspoon |
| Milk of choice | 2 tablespoons |
Dry Ingredients
| Ingredient | Amount |
|---|---|
| Protein powder (vanilla) | 1 scoop (30g) |
| Rolled oats | 1/2 cup |
| Baking powder | 1 teaspoon |
| Ground cinnamon | 1/2 teaspoon |
| Salt | 1/4 teaspoon |
For Cooking
| Ingredient | Amount |
|---|---|
| Coconut oil or butter | 2 tablespoons |
Step-by-Step Instructions
Phase 1: Batter Preparation (5 minutes)
Step 1: Place rolled oats in a blender or food processor. Pulse for 30-45 seconds until you achieve a fine flour-like consistency. This creates your oat flour base – it should feel powdery between your fingers, not chunky.
Step 2: Add protein powder, baking powder, cinnamon, and salt to the oat flour in the blender. Pulse 2-3 times just to combine. Don’t over-mix at this stage.
Step 3: Crack eggs into a medium bowl and whisk vigorously for 30 seconds until frothy. This extra air incorporation helps create fluffier flourless protein pancakes.
Step 4: Add Greek yogurt, vanilla extract, and milk to the whisked eggs. Stir gently with a fork until just combined. The mixture should look slightly lumpy – this is perfect.
Step 5: Pour the wet ingredients into the blender with dry ingredients. Blend on medium speed for 45-60 seconds until smooth. The batter should be thick but pourable, similar to regular pancake batter.
Step 6: Let batter rest for 3 minutes. This allows the oats to absorb moisture and the baking powder to activate, ensuring your pancakes rise properly.
Phase 2: Cooking Process (8 minutes)
Step 7: Heat a large non-stick skillet or griddle over medium-low heat. Add 1 tablespoon coconut oil and swirl to coat evenly. The pan is ready when a drop of water sizzles gently – not aggressively.
Step 8: Pour 1/4 cup batter per pancake onto the heated surface, leaving 2 inches between each pancake. These flourless protein pancakes spread less than traditional ones, so they’ll hold their shape well.
Step 9: Cook for 2-3 minutes on the first side. Look for small bubbles forming around the edges and the bottom turning golden brown. The surface should look slightly set but still moist.
Step 10: Carefully flip using a thin spatula. The pancakes may be more delicate than flour-based versions, so slide the spatula fully underneath before flipping in one smooth motion.
Step 11: Cook the second side for 1-2 minutes until golden brown. Press gently with the spatula – the pancake should spring back when done.
Step 12: Transfer cooked pancakes to a warm plate and cover loosely with foil. Add remaining oil to the pan and repeat with remaining batter.
Phase 3: Final Assembly (2 minutes)
Step 13: Stack pancakes on individual plates, allowing 2-3 per person for a satisfying serving.
Step 14: Serve immediately while warm for the best texture and flavor experience.
Chef’s Notes
Protein Powder Selection: Vanilla protein powder works best for these flourless protein pancakes, but unflavored works too. Avoid chocolate protein powder as it can make the batter too dense.
Oat Grinding Tip: If you don’t have a high-powered blender, grind oats in small batches for more consistent flour texture. Sift through a fine mesh strainer if needed.
Temperature Control: Keep heat at medium-low throughout cooking. High heat will burn the outside while leaving the center raw due to the protein content.
Batter Consistency: If your flourless protein pancakes batter seems too thick, add milk one tablespoon at a time until it reaches the right consistency.
Nutrition Information (Per Serving)
- Calories: 185
- Protein: 16g
- Carbohydrates: 14g
- Fat: 8g
- Fiber: 3g
- Sugar: 4g
Creative Variations
Berry Blast Flourless Protein Pancakes
Add 1/3 cup fresh blueberries or chopped strawberries to the batter before cooking. The natural sweetness complements the protein powder beautifully.
Chocolate Chip Delight
Fold in 2 tablespoons mini dark chocolate chips after the batter has rested. This creates pockets of melted chocolate throughout.
Tropical Twist
Replace vanilla extract with coconut extract and add 2 tablespoons unsweetened shredded coconut to the dry ingredients. This variation pairs perfectly with other tropical breakfast treats like our Dutch poffertjes pancakes.
Autumn Spice
Add 1/4 teaspoon nutmeg and increase cinnamon to 3/4 teaspoon. This creates a warming spice blend similar to what you’ll find in our fluffy pumpkin pancakes.
Storage & Reheating
Refrigerator Storage: Store leftover flourless protein pancakes in an airtight container for up to 3 days. Place parchment paper between pancakes to prevent sticking.
Freezer Storage: Wrap individual pancakes in plastic wrap, then place in a freezer bag for up to 2 months. Label with date and contents.
Reheating Methods:
- Toaster: Toast frozen pancakes directly for 1-2 minutes until heated through
- Microwave: Heat refrigerated pancakes for 30-45 seconds on medium power
- Oven: Reheat at 350°F for 5-7 minutes wrapped in foil
Troubleshooting Common Issues
Problem 1: Pancakes Fall Apart When Flipping Solution: Let them cook longer on the first side until edges are completely set. Use a thin, wide spatula and flip with confidence in one smooth motion.
Problem 2: Dense, Heavy Texture Solution: Don’t overmix the batter after adding wet ingredients. Overmixing develops the protein and creates tough pancakes. Blend just until smooth.
Problem 3: Pancakes Burn on Outside, Raw Inside Solution: Lower your heat to medium-low or low. Protein-based batters need gentle, slower cooking to cook through evenly.
Problem 4: Batter Too Thick or Thin Solution: For thick batter, add milk 1 tablespoon at a time. For thin batter, add more oat flour or let rest 5 extra minutes for absorption.
Problem 5: Lack of Flavor Solution: Ensure your protein powder isn’t expired – old protein powder loses flavor. Add an extra 1/4 teaspoon vanilla extract or a pinch of salt to enhance taste.
Equipment Essentials
- High-powered blender or food processor (for grinding oats)
- Large non-stick skillet or griddle
- Thin, wide spatula (essential for delicate flipping)
- Medium mixing bowls
- Measuring cups and spoons
- Wire whisk
Shopping List
Dairy Section
- Large eggs
- Plain Greek yogurt
- Milk (dairy or non-dairy)
Pantry Aisle
- Rolled oats (old-fashioned work best)
- Vanilla protein powder
- Baking powder
- Ground cinnamon
- Salt
- Vanilla extract
Oils/Fats Section
- Coconut oil or butter
Success Secrets
- Grind oats to fine flour consistency – Chunky oats create lumpy, uneven pancakes that won’t hold together properly.
- Rest the batter for 3-5 minutes – This allows the oat flour to hydrate and creates more cohesive flourless protein pancakes.
- Use medium-low heat throughout – High heat will create tough, rubbery pancakes due to the high protein content.
- Don’t flip too early – Wait until bubbles form at edges and the surface looks set before attempting to flip these delicate pancakes.
- Serve immediately – These flourless protein pancakes taste best when served warm and fresh from the pan.