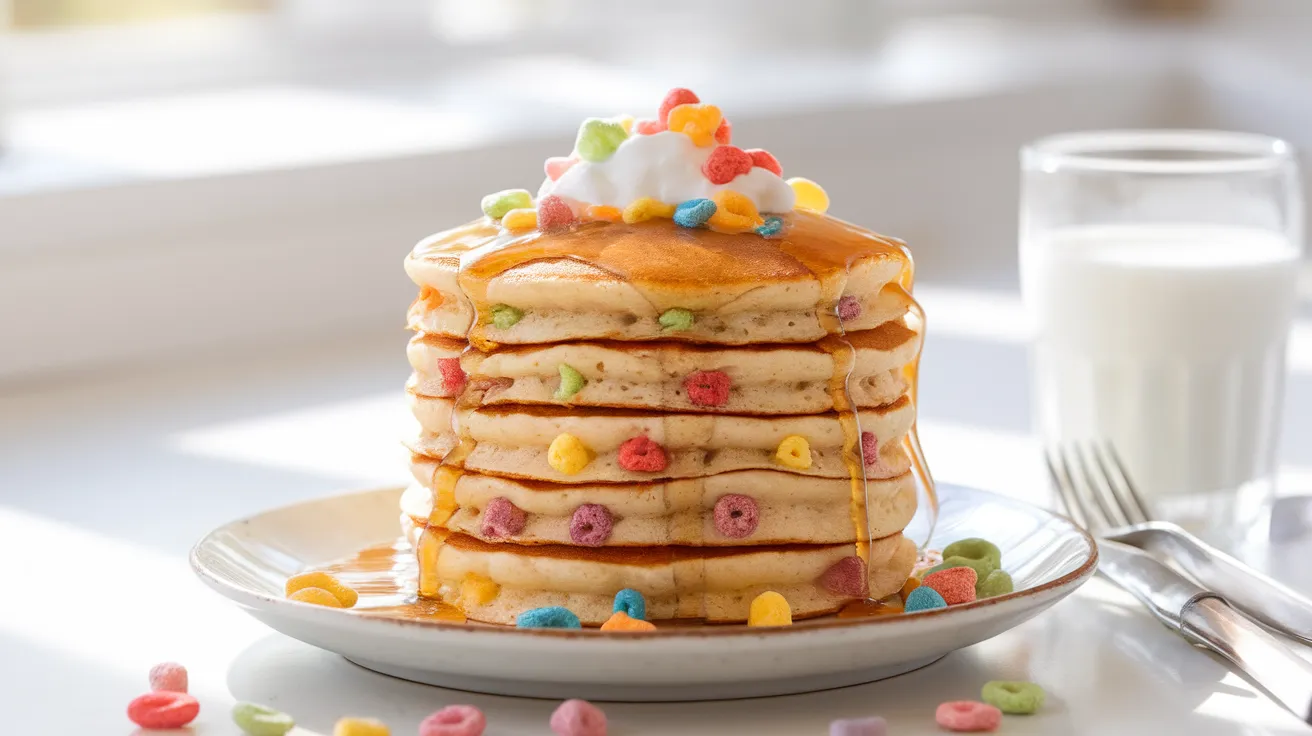
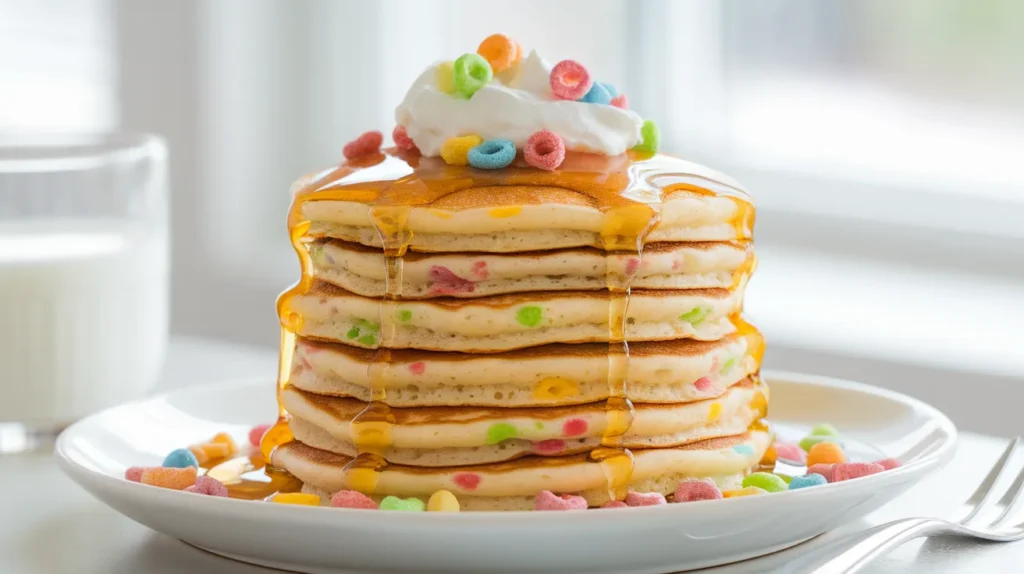
These colorful fruity pebble pancakes transform your ordinary breakfast into an exciting rainbow adventure that brings out the kid in everyone. With their perfect balance of fluffy texture and crunchy cereal surprises, these fruity pebble pancakes deliver nostalgic flavors that make weekend mornings absolutely magical for the whole family.
SERVES: 4 | PREP: 20 MIN | COOK: 25 MIN | TOTAL: 45 MIN
Ingredients
Dry Mix
| Ingredient | Amount |
|---|---|
| All-purpose flour | 2 cups |
| Granulated sugar | 3 tablespoons |
| Baking powder | 2 teaspoons |
| Salt | 1/2 teaspoon |
| Fruity Pebbles cereal | 1 cup (divided) |
Wet Ingredients
| Ingredient | Amount |
|---|---|
| Whole milk | 1 3/4 cups |
| Large eggs | 2 |
| Unsalted butter (melted) | 4 tablespoons |
| Vanilla extract | 1 teaspoon |
For Serving
- Additional Fruity Pebbles cereal (1/2 cup)
- Pure maple syrup
- Whipped cream (optional)
- Fresh berries (optional)
Complete Step-by-Step Instructions for Fruity Pebble Pancakes
Phase 1: Setting Up Your Kitchen (8 minutes)
1. Prepare Your Cooking Surface Start by setting up your griddle or large skillet. If using an electric griddle, plug it in and set the temperature to 350°F. For stovetop cooking, place your largest non-stick skillet or cast-iron pan over medium heat. Why this matters: A properly heated surface ensures even cooking and prevents your fruity pebble pancakes from sticking or cooking unevenly.
2. Organize All Ingredients Lay out every ingredient on your counter in the order you’ll use them. This technique, called “mise en place,” prevents mistakes and makes cooking smoother. Remove eggs and milk from the refrigerator now – they mix better at room temperature. Beginner tip: Cold ingredients can cause the melted butter to solidify in clumps.
3. Prepare Your Cereal Components Measure out 1 1/2 cups of Fruity Pebbles cereal total. Pour 1 cup into a medium bowl – this goes into your batter. Set aside the remaining 1/2 cup in a small dish for garnishing your finished pancakes. Visual cue: You want enough cereal so every bite has colorful crunch.
4. Crush the Cereal Strategically Take 3/4 cup of your measured cereal and gently crush it using the back of a large spoon or bottom of a measuring cup. Press down and twist to break the pieces into smaller bits, but don’t powder them completely. Leave about 1/4 of the pieces whole for texture contrast. What you’re looking for: A mix that’s half small pieces and half whole cereal bits.
Phase 2: Creating the Perfect Batter (10 minutes)
5. Combine All Dry Ingredients In your largest mixing bowl, add the flour, sugar, baking powder, and salt. Use a whisk to stir them together for 30 seconds until evenly distributed. Push this mixture toward the edges of the bowl, creating a shallow well in the center. Why this step matters: The well helps you incorporate wet ingredients without overmixing.
6. Melt Your Butter Properly Cut the butter into small cubes and melt in the microwave in 15-second intervals, stirring between each interval. Total time should be 45-60 seconds. Let it cool for 2 minutes before using – hot butter will cook your eggs. Safety tip: Hot butter can splatter, so use a microwave-safe bowl that’s larger than you think you need.
7. Mix Wet Ingredients Thoroughly In a separate medium bowl, crack both eggs and whisk them until the yolks and whites are completely combined – no streaks of white should remain. Add the milk, cooled melted butter, and vanilla extract. Whisk everything together for 1 full minute until smooth and slightly frothy. Beginner checkpoint: The mixture should look uniform with no lumps of egg visible.
8. Combine Wet and Dry – The Critical Step Pour the wet ingredient mixture into the well you created in the dry ingredients. Using a wooden spoon or rubber spatula, gently stir from the center outward, making about 15-20 slow, deliberate strokes. Stop stirring as soon as you can’t see dry flour – the batter should look lumpy and rough, not smooth. Most important rule: Lumpy batter makes fluffy pancakes; smooth batter makes tough pancakes.
9. Fold in Your Fruity Pebbles Add your crushed cereal mixture to the batter. Using a gentle folding motion, lift batter from the bottom and fold it over the cereal. Do this 8-10 times until the cereal is distributed throughout. Folding technique: Slide your spatula down one side of the bowl, scoop under the batter, and fold it over the top. Rotate the bowl and repeat.
Phase 3: Testing and Adjusting (5 minutes)
10. Test Your Griddle Temperature Sprinkle 3-4 drops of water onto your cooking surface. If they dance and sizzle before evaporating within 2 seconds, your temperature is perfect. If they sit there doing nothing, increase the heat. If they immediately disappear in a violent hiss, reduce the heat slightly. Perfect temperature sign: The water droplets should bounce and dance around before evaporating.
11. Prepare Your Cooking Station Place a stick of butter and paper towels next to your cooking surface for greasing. Set up a large plate or baking sheet near the stove to hold finished pancakes. If you want to keep them warm, preheat your oven to 200°F and place a baking sheet inside. Organization tip: Having everything within arm’s reach makes the cooking process much smoother.
Phase 4: Cooking Your Fruity Pebble Pancakes (15 minutes)
12. Grease the Surface Properly Take a small piece of butter on a paper towel and lightly grease your cooking surface. You want just enough to prevent sticking – too much butter creates uneven browning and can make your fruity pebble pancakes greasy. Wipe away any excess with a clean paper towel. Visual guide: The surface should look barely shiny, not pooling with fat.
13. Pour Your First Batch Using a 1/4 cup measuring cup, scoop up batter and pour it onto the griddle, spacing pancakes about 3 inches apart. Don’t spread the batter with your spoon – let it spread naturally into 4-inch circles. Batch size tip: Don’t overcrowd your cooking surface; 3-4 pancakes at a time work best for most home griddles.
14. Watch for the First Visual Cues After 2 minutes, you’ll start seeing small bubbles forming on the surface of your pancakes. Don’t flip yet! Wait until you see bubbles appearing all across the surface and the edges of the pancakes look set and slightly dry, not wet and shiny. Timing note: This usually takes 3-4 minutes for the first side.
15. The Perfect Flip Moment Your fruity pebble pancakes are ready to flip when bubbles form across the entire surface, pop, and don’t immediately fill back in. The edges should look matte rather than shiny. Slide a wide spatula completely under each pancake and flip it in one confident motion. Confidence tip: Hesitant flipping often leads to folded or broken pancakes.
16. Cook the Second Side The second side cooks much faster – typically 1-2 minutes. Look for golden brown color with visible colorful cereal pieces throughout. Press gently with your spatula; the pancake should spring back when done. Doneness test: The pancake should feel firm, not squishy, when gently pressed.
17. Keep Pancakes Warm Transfer finished pancakes to your warming plate or oven-heated baking sheet. Cover loosely with aluminum foil to retain heat and moisture while you cook the remaining batches. Temperature tip: Keeping them at 200°F prevents them from drying out or getting soggy.
18. Clean Your Griddle Between Batches After each batch, use a paper towel to wipe away any burnt cereal bits or excess grease. These can create bitter flavors and uneven cooking for your next batch of fruity pebble pancakes. Maintenance tip: A clean cooking surface ensures consistent results throughout your cooking session.
Expert Chef’s Notes for Perfect Fruity Pebble Pancakes
Cereal Selection: Fresh Fruity Pebbles work best for these colorful pancakes. Stale cereal loses its crunch and vibrant colors, resulting in less impressive fruity pebble pancakes.
Batter Consistency: The ideal batter should ribbon off your spoon but not be completely runny. If it’s too thick to pour easily, add milk one tablespoon at a time until it reaches the right consistency.
Temperature Mastery: Consistent medium heat prevents the cereal pieces from burning while ensuring the pancake centers cook through completely. This balance is crucial for successful fruity pebble pancakes.
Timing Strategy: Mix your batter just before cooking for maximum fluffiness. The longer the batter sits, the tougher your pancakes will become as the gluten develops.
Nutrition Information (Per Serving)
- Calories: 385
- Protein: 12g
- Carbohydrates: 58g
- Fat: 12g
- Fiber: 2g
- Sugar: 18g
Creative Fruity Pebble Pancakes Variations
Rainbow Swirl Style
Create stunning visual effects by leaving some sections of batter plain, then gently swirling with a knife before cooking. This technique creates beautiful color patterns that make your fruity pebble pancakes even more Instagram-worthy.
Extra Crunch Version
Double the texture by adding mini marshmallows alongside your cereal. The marshmallows create delightful pockets of sweetness that complement the crunchy cereal perfectly.
Holiday-Themed Approach
Switch up the cereal colors seasonally – this same technique works wonderfully for creating themed breakfast treats like Grinch pancakes during Christmas using red and green cereals.
Healthier Alternative
Substitute half the all-purpose flour with whole wheat flour and add a scoop of vanilla protein powder for a more nutritious version that still delivers all the fun of traditional fruity pebble pancakes. For those avoiding wheat entirely, try the technique used in cornmeal pancakes no flour as inspiration for gluten-free adaptations.
Storage & Reheating Your Fruity Pebble Pancakes
Short-Term Storage
Store leftover pancakes in the refrigerator for up to 3 days. Layer them between sheets of parchment paper to prevent the cereal from sticking and losing its crunch.
Freezer Storage Method
For longer storage, freeze pancakes individually on a baking sheet for 2 hours, then transfer to freezer bags. Properly stored fruity pebble pancakes maintain their quality for up to 3 months.
Best Reheating Techniques
Toaster Method: Place frozen pancakes directly in your toaster and toast on medium setting for 2-3 cycles until heated through and slightly crispy on the edges. Oven Method: Reheat at 350°F for 8-10 minutes, flipping once halfway through for even warming.
Troubleshooting Common Fruity Pebble Pancakes Problems
Dense, Heavy Pancakes
Cause: Overmixing the batter or using old baking powder. Solution: Mix just until ingredients combine and test baking powder freshness by adding a teaspoon to hot water – it should bubble vigorously.
Burnt Cereal Pieces
Cause: Cooking temperature too high or cereal pieces too large. Solution: Reduce heat to medium-low and crush cereal into smaller, more uniform pieces before adding to batter.
Batter Too Thick to Pour
Cause: Flour measurement errors or eggs that were too cold. Solution: Gradually add milk, one tablespoon at a time, until batter flows smoothly from your measuring cup.
Faded Colors
Cause: Old cereal or overcooking. Solution: Use fresh cereal and cook at proper temperature. Fresh Fruity Pebbles maintain their vibrant colors better in your finished pancakes.
Sticking to Pan
Cause: Insufficient greasing or incorrect temperature. Solution: Ensure proper preheating and light, even greasing. Clean the pan between batches to remove any burnt bits.
Essential Equipment for Making Fruity Pebble Pancakes
- Large mixing bowl (at least 3-quart capacity)
- Medium mixing bowl for wet ingredients
- Balloon whisk for smooth mixing
- 1/4 cup dry measuring cup for consistent pancake sizes
- Wide, thin spatula for easy flipping
- Non-stick griddle or large skillet (10-inch minimum)
- Paper towels for greasing and cleanup
Complete Shopping List
Dairy Section
- Whole milk (need 1 3/4 cups)
- Large eggs (need 2)
- Unsalted butter (need 4 tablespoons)
Baking Aisle
- All-purpose flour
- Granulated sugar
- Baking powder (check expiration date)
- Salt
- Pure vanilla extract
Cereal Aisle
- Fruity Pebbles cereal (1 large box)
- Pure maple syrup
Optional Garnishes
- Heavy whipping cream for fresh whipped cream
- Fresh berries for serving
Five Success Secrets for Perfect Results
1. Temperature consistency is everything – maintain steady medium heat throughout cooking to prevent burning the colorful cereal pieces while ensuring fluffy centers.
2. Fresh ingredients make a dramatic difference – use recently purchased cereal and check that your baking powder is less than 6 months old for maximum rise.
3. Gentle mixing creates tender pancakes – stop stirring the moment you can’t see dry flour, even if the batter looks lumpy.
4. Proper timing on the flip – wait for bubbles across the entire surface before turning to ensure even cooking and golden color.
5. Immediate serving preserves the signature crunch – serve your fruity pebble pancakes right off the griddle when the cereal is at its crunchiest and colors are most vibrant.
These detailed instructions ensure your first attempt at fruity pebble pancakes will be absolutely perfect. The combination of careful technique and playful ingredients creates breakfast magic that transforms ordinary mornings into colorful celebrations everyone will remember.