Key Takeaways
- Ready in just 25 minutes with minimal ingredients you likely have right now
- Five simple ingredients transform into a restaurant-quality pasta dish
- No cream needed – the secret is in the pasta water technique
- Perfect heat level that enhances rather than overwhelms the cheese
The Problem With Regular Cacio e Pepe (And How We Fixed It)
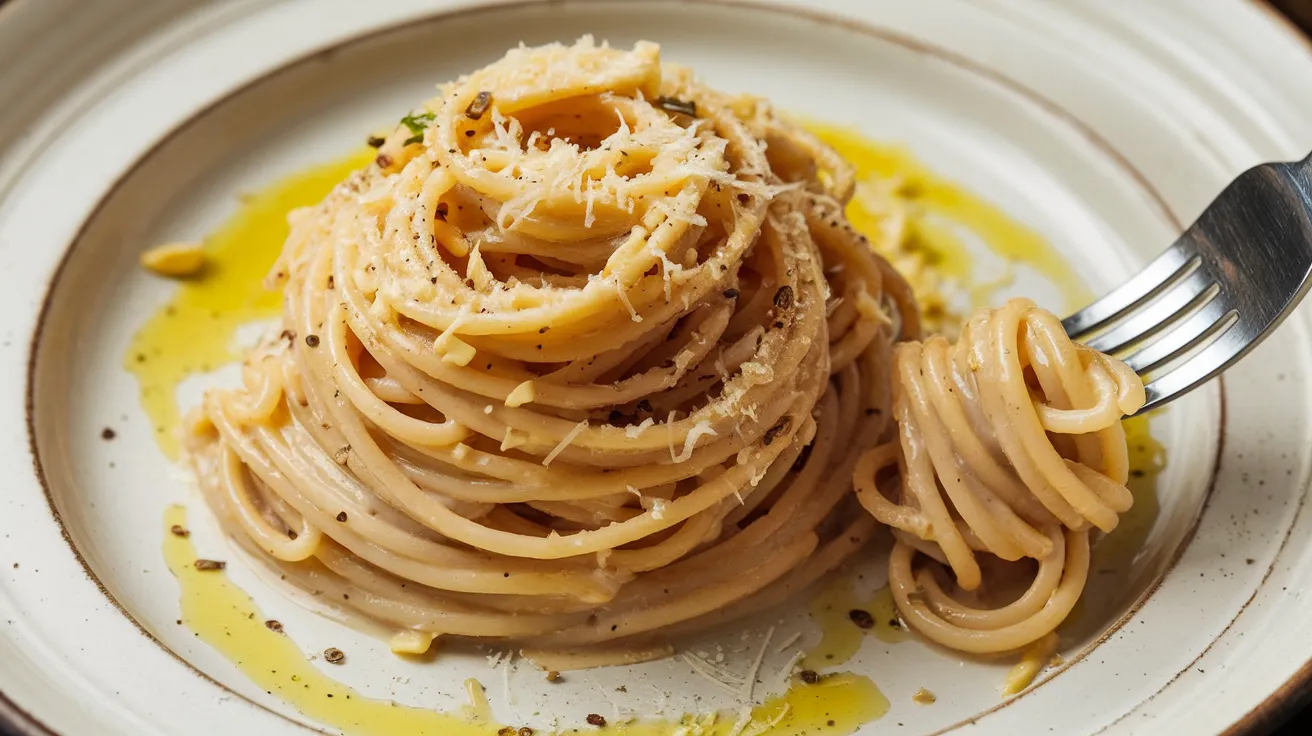
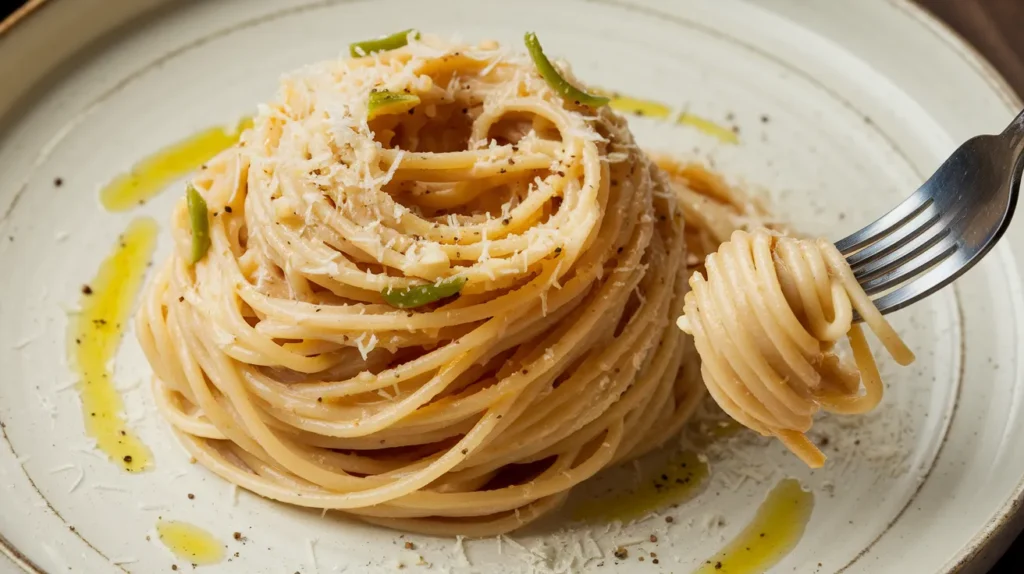
Traditional cacio e pepe is magical in its simplicity. But sometimes, you crave that extra kick.
Our Garlic Chilli Cacio e Pepe recipe takes the classic to new heights without losing what makes it special. The garlic adds depth while red pepper flakes bring just enough heat to wake up your taste buds.
Best part? You can make this elevated Garlic Chilli Cacio e Pepe in under 30 minutes with ingredients already in your pantry. If you’ve mastered simpler pasta dishes like angel hair pasta with alfredo sauce, this recipe offers a perfect next step with its exciting flavor profile.
The creamy, peppery goodness of classic cacio e pepe combined with the aromatic punch of garlic and spicy chili makes this Garlic Chilli Cacio e Pepe a weeknight dinner game-changer. You’ll wonder why you haven’t been making it this way all along!
Nutrition Facts Per Serving
| Nutrient | Amount | % Daily Value |
|---|---|---|
| Calories | 480 | – |
| Total Fat | 18g | 23% |
| Saturated Fat | 10g | 50% |
| Cholesterol | 45mg | 15% |
| Sodium | 750mg | 33% |
| Total Carbohydrates | 58g | 21% |
| Dietary Fiber | 3g | 11% |
| Sugars | 2g | – |
| Protein | 20g | 40% |
What You’ll Need
Ingredients
| Ingredient | Amount | Notes |
|---|---|---|
| Spaghetti or bucatini | 1 pound (454g) | Traditional choice, but any long pasta works |
| Pecorino Romano cheese | 2 cups (200g), freshly grated | Parmigiano-Reggiano works in a pinch |
| Black pepper | 2 tablespoons, freshly cracked | Not pre-ground! |
| Garlic cloves | 4 large, thinly sliced | About 2 tablespoons |
| Red pepper flakes | 1-2 teaspoons | Adjust to your heat preference |
| Extra virgin olive oil | 3 tablespoons | Use good quality oil |
| Salt | 2 tablespoons (for pasta water) | Diamond Crystal kosher salt preferred |
| Reserved pasta water | 1½ cups | The secret ingredient! |
Kitchen Equipment
| Tool | Purpose |
|---|---|
| Large pot | For boiling pasta |
| Large skillet/pan (12-inch) | For sauce preparation |
| Tongs | For handling and mixing pasta |
| Grater | For freshly grating cheese |
| Measuring cups and spoons | For precise measurements |
| Sharp knife | For slicing garlic |
Possible Substitutions
- Cheese: Parmesan can replace Pecorino (will be less tangy)
- Pasta: Any long pasta works (linguine, fettuccine, etc.)
- Heat: Calabrian chilis instead of red pepper flakes
- Garlic: Garlic powder (1 teaspoon) if fresh is unavailable
Preparation Timeline
- Prep Time: 10 minutes
- Cook Time: 15 minutes
- Total Time: 25 minutes
- Servings: 4 persons
Step-by-Step Instructions for Garlic Chilli Cacio e Pepe
Preparation Phase
- Gather all ingredients and equipment
- Take out all ingredients and place them on your counter
- Check that you have enough of everything before starting
- Place your large pot on one burner and skillet on another
- Get your cheese grater, measuring cups, knife, and cutting board ready
- Prepare the cheese
- Take out the block of Pecorino Romano cheese
- Using the fine side of your grater, grate 2 cups (200g) of cheese
- Place grated cheese in a bowl and let it come to room temperature while you prepare other ingredients
- BEGINNER TIP: Room temperature cheese melts more smoothly than cold cheese
- Prepare the black pepper
- Place whole peppercorns in a pepper mill or grinder
- Grind 2 tablespoons of black pepper into a small bowl
- BEGINNER TIP: If you only have pre-ground pepper, use 1½ tablespoons instead
- You want visible specks of pepper – this is a key flavor element of Garlic Chilli Cacio e Pepe!
- Prepare the garlic
- Peel 4 large garlic cloves
- Place a clove on your cutting board and hold it steady with your fingertips curled under (to protect them)
- Using a sharp knife, slice each clove as thinly as possible (aim for paper-thin slices)
- Place sliced garlic in a small bowl
- BEGINNER TIP: The thinner you slice the garlic, the more flavor it will release without becoming too harsh
- Measure remaining ingredients
- Measure 3 tablespoons olive oil into a small bowl or measuring cup
- Measure 1-2 teaspoons red pepper flakes into another small bowl
- Place 2 tablespoons salt near your pasta pot
- BEGINNER TIP: Having everything measured before cooking is called “mise en place” and makes the cooking process much smoother
Cooking Phase
- Boil the water
- Fill your large pot about ¾ full with cold water (about 4-5 quarts/liters)
- Place on high heat and bring to a rolling boil
- BEGINNER TIP: A rolling boil means large bubbles are constantly breaking the surface
- This will take 8-10 minutes, so you can prepare other things during this time
- Salt the water
- Once water is boiling, add 2 tablespoons salt
- CAUTION: Stand back when adding salt as water may bubble up aggressively
- Stir to dissolve salt
- BEGINNER TIP: Pasta water should taste salty like seawater – this seasons the pasta from within
- Cook the pasta
- Add 1 pound of pasta to the boiling water
- Stir immediately with tongs to prevent sticking
- Check the package directions for cooking time, then subtract 2 minutes (for al dente)
- Set a timer for this adjusted time
- Stir occasionally while pasta cooks
- BEGINNER TIP: “Al dente” means the pasta has a slight firmness when bitten – it will continue cooking in the sauce
- Prepare the water measuring cup
- While pasta cooks, place a heatproof measuring cup near the pasta pot
- You’ll use this to reserve pasta water before draining
- BEGINNER TIP: Pasta water is starchy and helps create a silky sauce without cream
- Make the garlic-chili oil
- While pasta is cooking, place your large skillet on another burner over medium heat
- Add 3 tablespoons olive oil and let it warm for 30 seconds
- Add sliced garlic and 1 teaspoon red pepper flakes (start with less if sensitive to heat)
- WATCH CAREFULLY: Stir constantly with a wooden spoon or heat-resistant spatula
- Cook for 2-3 minutes until garlic turns light golden (not brown or dark!)
- If garlic starts browning too quickly, immediately remove pan from heat
- BEGINNER TIP: Burnt garlic tastes bitter and will ruin your dish, so monitor closely
- Reserve pasta water
- When pasta is 1-2 minutes from being done, dip your measuring cup into the pot
- Carefully scoop out at least 2 cups of the starchy pasta water
- Set aside 1½ cups for the recipe and keep the extra in case you need more
- BEGINNER TIP: The starchy water is key to creating the creamy sauce without adding cream
- Create the sauce base
- Add 1 cup of the reserved hot pasta water to the skillet with garlic-chili oil
- Be careful as it may spatter when water hits oil
- Add 1½ tablespoons of your freshly cracked black pepper
- Stir to combine and bring to a gentle simmer
- Let simmer for 1-2 minutes to slightly reduce and infuse flavors
- BEGINNER TIP: This creates a flavor-infused base that will coat every strand of pasta
- Drain the pasta
- When your timer goes off, check pasta by taking one strand and biting it
- It should have slight resistance in the center (al dente)
- DON’T DUMP INTO A COLANDER – you’ll transfer pasta directly to sauce
- If pasta isn’t ready yet, continue testing every 30 seconds
- Combine pasta and sauce
- Using tongs, grab pasta directly from water and transfer to skillet with sauce
- BEGINNER TIP: It’s okay if some pasta water comes along with it
- Keep heat at medium-low
- Toss continuously using tongs, lifting and turning pasta to coat every strand
- Do this for 1-2 minutes until pasta absorbs some sauce and finishes cooking
- If mixture looks dry, add more pasta water, 2 tablespoons at a time
- Add the cheese – CRITICAL STEP
- IMPORTANT: Remove skillet from heat completely
- Wait 10 seconds to let the temperature drop slightly
- Sprinkle half the grated cheese (1 cup) over pasta
- Using tongs, toss vigorously until cheese melts and creates a creamy coating
- BEGINNER TIP: If you add cheese when the pan is too hot, it will clump instead of melt
- Gradually add remaining cheese while continuing to toss
- Keep tossing until all cheese is melted and sauce is smooth and creamy
- TROUBLESHOOTING: If sauce seems too thick, add more pasta water 1 tablespoon at a time
- If sauce seems too watery, add a bit more cheese and continue tossing
- Final adjustments
- Taste a strand of pasta
- If needed, add more black pepper, red pepper flakes, or a pinch of salt
- If cheese isn’t fully melted, return to very low heat for 30 seconds while tossing constantly
- The final sauce should cling to pasta without pooling in the bottom of the pan
- BEGINNER TIP: The sauce will thicken as it cools, so it’s better to have it slightly loose when serving
Serving Phase
- Plate immediately
- Garlic Chilli Cacio e Pepe is best served right away when the sauce is at its creamiest
- Warm your plates by running them under hot water and drying them (optional but recommended)
- Use tongs to create a nest of pasta on each plate by twirling in a circular motion
- Divide pasta equally among 4 plates
- BEGINNER TIP: Warmed plates keep the sauce creamy longer
- Finish the dish
- Sprinkle each plate with a little more freshly cracked black pepper
- Add a very small pinch of red pepper flakes on top for color and extra heat (optional)
- For an extra touch of richness, drizzle a tiny amount of high-quality olive oil on each plate
- Serve immediately
- BEGINNER TIP: Have forks ready and encourage everyone to eat while it’s hot!
Troubleshooting Your Garlic Chilli Cacio e Pepe
Cheese Clumping
- Problem: Cheese forms into sticky clumps instead of smooth sauce
- Fix: Remove pan from heat before adding cheese and make sure pasta water is still hot but not boiling
- Prevention: Always take the pan off heat before adding cheese and add cheese in small batches while tossing constantly
Sauce Too Thin
- Problem: Sauce isn’t clinging to pasta
- Fix: Add more cheese and continue tossing over low heat
- Prevention: Don’t add too much pasta water at once; add in small increments
Sauce Too Thick
- Problem: Sauce is gummy or sticky
- Fix: Add more hot pasta water, 1 tablespoon at a time, while tossing
- Prevention: Keep extra pasta water handy and don’t let the pasta sit too long before serving
Garlic Burning
- Problem: Garlic turns dark brown or black
- Fix: Lower heat immediately and start over if severely burnt (bitter taste will ruin dish)
- Prevention: Use medium-low heat and stir constantly while garlic cooks
Pasta Too Soft
- Problem: Pasta is mushy instead of al dente
- Fix: Unfortunately, this can’t be fixed once it happens
- Prevention: Set a timer and cook pasta 2 minutes less than package instructions
Delicious Variations of Garlic Chilli Cacio e Pepe
Lemon Garlic Chilli Cacio e Pepe
- Add zest of 1 lemon and 1 tablespoon fresh lemon juice at the end
- Adds brightness that balances the rich cheese and heat
Herbed Garlic Chilli Cacio e Pepe
- Stir in 2 tablespoons fresh chopped parsley or basil before serving
- Adds color and fresh flavor that complements the spice
Mushroom Garlic Chilli Cacio e Pepe
- Before starting the recipe, sauté 8 ounces sliced mushrooms in 1 tablespoon olive oil until golden
- Set aside, then add back in when combining pasta with sauce
- Adds earthy flavor and meaty texture
Seafood Garlic Chilli Cacio e Pepe
- For seafood lovers, you might enjoy adding some quick-cooking shrimp similar to a shrimp scampi with fettuccine
- Add 1 pound of peeled, deveined shrimp to the garlic-chili oil and cook until just pink before proceeding
- The spicy garlic oil complements the sweet shrimp beautifully
Storage & Reheating Your Garlic Chilli Cacio e Pepe
Refrigerator Storage
- Allow leftovers to cool completely (but no more than 1 hour at room temperature)
- Store in an airtight container for up to 3 days
- Note: Pasta will absorb sauce and become less creamy while stored
Reheating Method
- Take portion of pasta out of refrigerator
- Place in microwave-safe bowl
- Add 2 tablespoons water per portion
- Cover loosely with microwave-safe lid or paper towel
- Heat in microwave at 50% power for 1 minute
- Stir gently with a fork
- Continue heating at 50% power in 30-second intervals until warm
- Alternative method for better results:
- Place portion in small skillet
- Add 3 tablespoons water per portion
- Cover and heat over medium-low heat
- Stir frequently until heated through (about 3-4 minutes)
- Add a sprinkle of fresh grated cheese if desired
Safety Notes & Tips for Perfect Garlic Chilli Cacio e Pepe
- Heat management: Never leave the stove unattended when making the garlic-chili oil
- Hot water caution: Be careful when working with boiling water and draining pasta
- Tasting safely: Use a clean spoon each time you taste to adjust seasonings
- Cheese safety: Pecorino made with pasteurized milk is safest for those with compromised immunity
- Timing tip: For best results, time the pasta to finish cooking just as your garlic-chili oil is ready
- Temperature management: Too high heat can break the sauce, so keep to medium-low when in doubt
- Tasting caution: Taste carefully when adjusting heat level with red pepper flakes – add in very small increments
Special Dietary Notes
- Gluten-free option: Use gluten-free pasta (cooking times may vary, check package instructions)
- Vegetarian: This Garlic Chilli Cacio e Pepe recipe is vegetarian as written
- Not vegan: Contains cheese – no recommended vegan substitute that maintains authentic flavor
- Low-carb option: Serve smaller portion with large side salad
- Pregnancy consideration: Safe if cheese is made from pasteurized milk
Remember: The secret to perfect Garlic Chilli Cacio e Pepe is balancing heat with cheese. Start with less chili and add more after tasting. The heat should complement, not overpower, the peppery cheese flavor that makes this dish special.