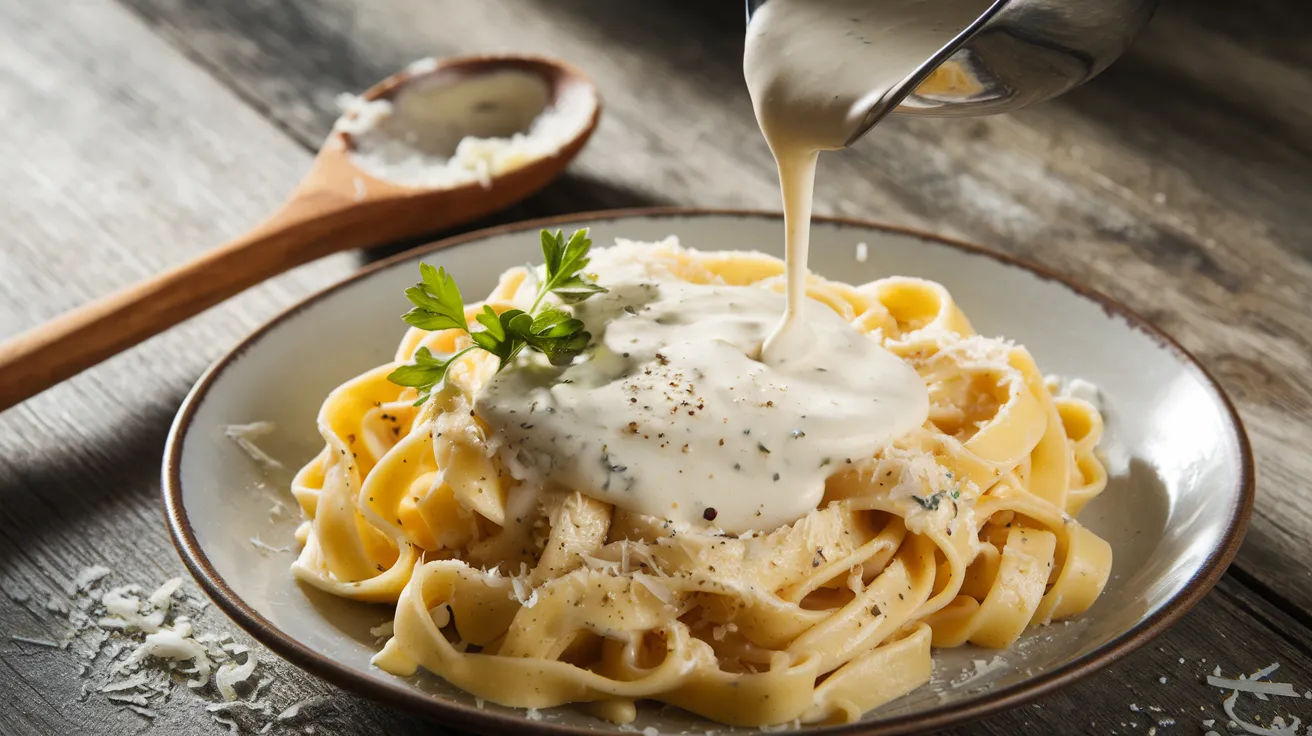
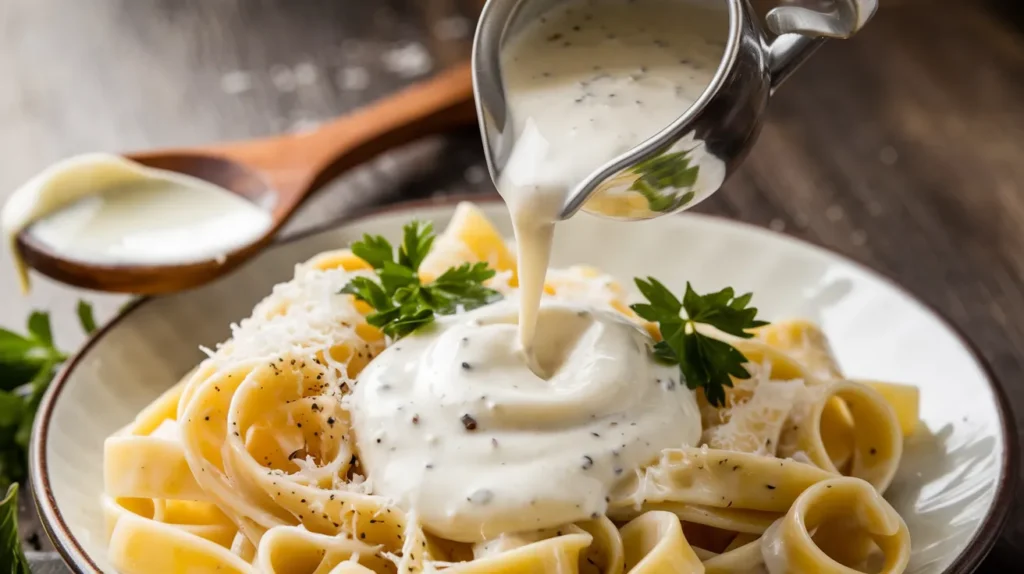
- Silky smooth texture with no lumps – even for first-time sauce makers
- Rich flavor combo of fresh garlic and aged Parmesan that elevates any pasta dish
- Quick 15-minute prep that beats any store-bought sauce
- Versatile base for pasta, pizza, chicken, or dipping sauce
Prep time: 5 minutes | Cook time: 10 minutes | Total time: 15 minutes | Serves: 4 persons
Never Settle for Bland Pasta Again
Tired of the same boring pasta night? We’ve all been there. Opening another jar of store-bought sauce just doesn’t cut it anymore.
The solution is simpler than you think. This garlic Parmesan white sauce transforms ordinary pasta into restaurant-quality meals in just minutes. The creamy texture and bold garlic Parmesan flavor will make everyone think you spent hours in the kitchen. If you love exploring different cream-based options, check out my guide to creamy and dairy-based sauces for more inspiration.
Nutrition Facts
| Nutrient | Amount per Serving |
|---|---|
| Calories | 320 |
| Total Fat | 28g |
| Saturated Fat | 17g |
| Cholesterol | 85mg |
| Sodium | 490mg |
| Total Carbohydrates | 8g |
| Protein | 9g |
| Calcium | 25% DV |
| Vitamin A | 20% DV |
What You’ll Need
Ingredients
| Ingredient | Amount | Notes |
|---|---|---|
| Butter | 4 tablespoons | Unsalted |
| Fresh garlic | 4-5 cloves | Minced |
| All-purpose flour | 3 tablespoons | For thickening |
| Heavy cream | 1 cup | Room temperature |
| Whole milk | 1 cup | Room temperature |
| Parmesan cheese | 1 cup | Freshly grated |
| Salt | 1/2 teaspoon | To taste |
| Black pepper | 1/4 teaspoon | Freshly ground |
| Italian seasoning | 1/2 teaspoon | Optional |
| Fresh parsley | 2 tablespoons | Chopped, for garnish |
Kitchen Tools
| Tool | Purpose |
|---|---|
| Medium saucepan | For cooking the sauce |
| Wooden spoon | For stirring |
| Whisk | For mixing flour and preventing lumps |
| Measuring cups | For precise measurements |
| Measuring spoons | For spices and smaller amounts |
| Cheese grater | For freshly grating Parmesan |
| Garlic press | Optional, for mincing garlic |
Possible Substitutions
- Heavy cream: Half-and-half (sauce will be slightly less rich)
- Fresh garlic: 1 teaspoon garlic powder (less flavor depth but works in a pinch)
- Parmesan cheese: Pecorino Romano or Asiago cheese
- Whole milk: 2% milk (slightly less creamy result)
- Butter: Vegan butter for dairy-sensitive diets
- All-purpose flour: Gluten-free flour blend for gluten-free diets
Step-by-Step Instructions
Preparation Phase (5 minutes)
- Set up your workspace:
- Clear your countertop and have all tools within reach.
- Place a damp kitchen towel under your cutting board to prevent slipping.
- Position your recipe where you can easily read it.
- Bring dairy to room temperature:
- Take heavy cream and milk out of the refrigerator 15-20 minutes before starting.
- Why? Cold dairy can cause the sauce to curdle or become lumpy when added to hot ingredients.
- If you’re short on time, microwave each liquid for 10-15 seconds (not until warm, just to take the chill off).
- Prepare the garlic:
- Separate 4-5 cloves from a head of garlic.
- Using the flat side of a knife, gently press down on each clove to loosen the skin.
- Peel away and discard the papery skin.
- For a fine mince: Slice each clove thinly, then run your knife through the slices in multiple directions until finely chopped.
- Alternatively, use a garlic press if you have one.
- Transfer minced garlic to a small bowl and set aside.
- Grate the Parmesan cheese:
- If using a block of Parmesan (recommended for best flavor and melting):
- Use the small holes of a box grater or a microplane grater.
- Grate directly onto a plate or piece of parchment paper for easy transfer.
- You need 1 cup (about 100g) of grated cheese – this is approximately a 3-inch cube of Parmesan.
- Pre-measure remaining ingredients:
- Measure 4 tablespoons butter and place on a small plate.
- Measure 3 tablespoons flour into a small bowl.
- Measure 1 cup milk and 1 cup heavy cream into separate measuring cups or put together in one larger measuring cup.
- Measure salt, pepper, and optional Italian seasoning into tiny bowls or place directly on a small plate.
- Prep your herbs:
- If using fresh parsley, rinse thoroughly under cold water.
- Pat dry with paper towels.
- Remove leaves from stems.
- Gather leaves into a small pile and chop with a sharp knife until you have 2 tablespoons.
- Set aside for garnish.
Creating the Base (7 minutes)
- Heat the pan:
- Place your medium saucepan on the stove.
- Turn the heat to medium (not medium-high, which could burn the butter).
- Allow the pan to heat for 30 seconds before adding butter.
- Melt the butter:
- Add all 4 tablespoons of butter to the pan.
- Watch carefully as it melts.
- Gently swirl the pan occasionally to ensure even melting.
- The butter should melt completely but not brown – if you see it starting to brown, immediately reduce heat.
- You’ll know it’s ready when it’s completely liquid and starts to gently bubble.
- Cook the garlic:
- Once butter is melted, add all your minced garlic to the pan.
- Immediately begin stirring with your wooden spoon.
- Keep stirring constantly for 30-45 seconds.
- Watch for the garlic to become fragrant and slightly translucent.
- IMPORTANT: Never let the garlic brown or burn – it will taste bitter. If it starts to brown, immediately proceed to the next step.
- You’ll know it’s ready when your kitchen smells wonderfully of garlic and the pieces are softened.
- Create the roux (thickening base):
- Reduce heat to medium-low.
- Grab your flour and whisk.
- While continuously whisking the garlic-butter mixture, gradually sprinkle in about 1 tablespoon of flour.
- Whisk until completely incorporated with no dry spots.
- Add the second tablespoon of flour while whisking.
- Incorporate completely.
- Add the final tablespoon of flour.
- Whisk vigorously until the mixture forms a smooth paste.
- Keep whisking for 1-2 minutes more.
- The mixture should look like a thick, pale yellow paste.
- It should smell slightly nutty, not raw or floury.
- This cooking time is crucial as it removes the raw flour taste.
Adding the Liquids (5 minutes)
- Begin adding the dairy:
- Keep the heat on medium-low.
- Have your whisk ready in one hand and your measured dairy in the other.
- Pour approximately 1/4 cup of the milk (not cream yet) into the pan very slowly while whisking constantly.
- The mixture will immediately thicken and look almost paste-like – this is normal!
- Keep whisking until completely smooth with no lumps.
- Gradually add more liquid:
- Once the first addition is smooth, add another 1/4 cup of milk.
- Whisk constantly until incorporated and smooth.
- Continue this process, adding 1/4 cup at a time, until all the milk has been added.
- The sauce will gradually become thinner with each addition.
- Add the cream:
- Now begin adding the heavy cream using the same method.
- Add 1/4 cup at a time, whisking constantly between additions.
- Continue until all cream has been incorporated.
- Your sauce should now be smooth but still fairly thin – it will thicken as it cooks and cools.
- Bring to proper temperature:
- Increase heat slightly to medium.
- Stir constantly with the whisk or wooden spoon.
- Watch for small bubbles to form around the edges of the pan.
- When you see these small bubbles (after about 3-5 minutes), you’ve reached a gentle simmer.
- IMPORTANT: Never allow the sauce to reach a rolling boil – this can cause separation.
- If larger bubbles start forming rapidly, immediately reduce heat.
Finishing the Sauce (5 minutes)
- Season the sauce:
- Reduce heat to low once the sauce reaches a simmer.
- Add 1/2 teaspoon salt, 1/4 teaspoon black pepper, and 1/2 teaspoon Italian seasoning (if using).
- Stir gently to incorporate.
- Add the Parmesan cheese:
- Make sure the sauce is at a very gentle simmer (barely bubbling).
- Take a small handful (about 1/4 cup) of the grated Parmesan.
- Sprinkle it over the surface of the sauce while stirring.
- Stir continuously until the cheese melts completely and is incorporated.
- Repeat with another 1/4 cup of cheese.
- Continue this process until all cheese has been added and melted.
- IMPORTANT: Never dump all the cheese in at once as this can cause clumping.
- Check consistency:
- The sauce should now be noticeably thicker.
- Dip a wooden spoon into the sauce, then run your finger across the back of the spoon.
- If the sauce holds a clear line where your finger traced, it’s at the right consistency.
- If it’s still too thin, continue cooking on low heat for 1-2 more minutes, stirring constantly.
- Remember that the sauce will thicken further as it cools.
- Final adjustments:
- Turn off the heat.
- Add the chopped parsley (if using) and stir gently to incorporate.
- Taste the sauce carefully (it’s hot!).
- If needed, add a pinch more salt or pepper.
- For extra richness, you can stir in an additional tablespoon of butter.
- Serving:
- Use the sauce immediately for best texture and flavor.
- Pour directly over cooked pasta and toss to coat.
- Or transfer to a serving bowl if using as a dipping sauce.
- Garnish with additional Parmesan and parsley if desired.
Troubleshooting
Sauce Is Too Thick
- Gradually add more milk, 1 tablespoon at a time, while whisking until desired consistency is reached.
- Always add cold liquid to hot sauce, not the other way around.
- After each addition, give the sauce 30 seconds to incorporate before deciding if you need more.
Sauce Is Too Thin
- Continue cooking for 2-3 more minutes on low heat, stirring constantly.
- The sauce will naturally thicken as moisture evaporates.
- If it’s still too thin, make a quick slurry: Mix 1 teaspoon of cornstarch with 1 tablespoon cold water in a separate small bowl until completely smooth.
- Slowly drizzle the slurry into the sauce while whisking.
- Simmer for 1 minute to activate the thickening power of the cornstarch.
Sauce Has Lumps
- Stop adding any more ingredients.
- Increase heat slightly to medium-low.
- Whisk vigorously for 1-2 minutes focusing on breaking up the lumps.
- If lumps persist, remove from heat and pour the sauce through a fine-mesh strainer into another pot.
- Press the lumpy parts through the strainer with a rubber spatula.
- Return strained sauce to heat and continue with recipe.
Sauce Has Separated or Curdled
- Remove from heat immediately.
- Add 1-2 tablespoons of cold heavy cream.
- Whisk vigorously until the sauce begins to come back together.
- If severely separated, you may need to start over with a new roux:
- In a clean pan, make a new roux with 2 tablespoons butter and 2 tablespoons flour.
- Once the roux is cooked (1-2 minutes), slowly whisk in the separated sauce, a little at a time.
Cheese Won’t Melt Properly
- Make sure you’re using freshly grated cheese, not pre-packaged (which contains anti-caking agents).
- Check that your sauce isn’t too hot when adding cheese (should be barely simmering).
- Remove from heat completely and let cool for 1 minute before adding more cheese.
- Add a tiny splash (1/4 teaspoon) of lemon juice to help break down the cheese proteins.
- Make sure you’re adding the cheese gradually, not all at once.
Variations & Substitutions
Garlic Parmesan Chicken Pasta
- Cook 1 pound of boneless chicken breasts or thighs until internal temperature reaches 165°F (74°C).
- Cut into bite-sized pieces.
- Fold into the finished sauce.
- Toss with 12 oz of cooked fettuccine, penne, or your favorite pasta.
Roasted Garlic White Sauce
- Cut the top off a whole garlic bulb to expose cloves.
- Drizzle with olive oil, wrap in foil.
- Roast at 400°F (200°C) for 30-35 minutes until soft and golden.
- Squeeze the roasted cloves out and mash with a fork.
- Use this instead of fresh garlic in the recipe (no need to sauté).
Herb Garlic Parmesan Sauce
- Add 1 tablespoon each of fresh chopped basil and thyme along with the parsley.
- For dried herbs, use 1 teaspoon each and add them with the salt and pepper.
Spicy Garlic Parmesan Sauce
- Add 1/4 teaspoon of red pepper flakes when cooking the garlic.
- Or add a dash of hot sauce at the end.
- Start with less heat – you can always add more to taste.
Lighter Version
- Use all milk instead of cream.
- Reduce butter to 2 tablespoons.
- Increase flour to 4 tablespoons to maintain thickness.
- Use part-skim mozzarella for 1/4 of the cheese amount.
Storage & Reheating
Refrigerating
- Allow sauce to cool completely at room temperature (no more than 1 hour).
- Transfer to an airtight container with a lid.
- Press a piece of plastic wrap directly onto the surface of the sauce before closing the container (this prevents a skin from forming).
- Store in the refrigerator for up to 3 days.
Freezing
- Not recommended as dairy-based sauces typically separate when frozen and thawed.
- If you must freeze, expect texture changes when reheating.
- If freezing, cool completely, place in freezer-safe container leaving 1/2-inch headspace.
- Can be frozen for up to 1 month.
- Thaw overnight in refrigerator before reheating.
Reheating
- Transfer refrigerated sauce to a clean saucepan.
- Place over low heat – never medium or high.
- Whisk constantly while reheating to prevent separation and burning.
- If the sauce seems too thick after refrigeration, add 1-2 tablespoons of milk and whisk to incorporate.
- Heat only until just warmed through (about 165°F/74°C) – do not boil.
- Microwave method (less ideal but possible):
- Transfer sauce to a microwave-safe container.
- Cover with a paper towel to prevent splattering.
- Heat at 50% power for 30 seconds.
- Stir thoroughly.
- Continue heating in 30-second intervals at 50% power, stirring between each, until just warmed through.
Safety Notes & Tips
Food Safety
- Cream-based sauces should not sit at room temperature for more than 2 hours.
- Always use a clean spoon when tasting the sauce to prevent contamination.
- If sauce has been left out longer than 2 hours, discard it – bacteria grows rapidly between 40°F and 140°F (4°C and 60°C).
- Always wash hands thoroughly before handling ingredients.
Cooking Safety
- Turn pot handles inward to prevent accidental spills or bumps.
- Use oven mitts when handling hot pans.
- The sauce can splatter when simmering, so keep a splatter guard handy or wear an apron.
- Be especially careful when whisking hot liquids – they can splash and cause burns.
- Keep a kitchen towel nearby for quick spill cleanup.
Pro Tips
- Pre-measure all ingredients before starting and arrange them in the order you’ll use them (mise en place).
- Room temperature dairy is essential – cold dairy hitting a hot roux is the primary cause of lumpy sauce.
- Lower the heat when adding cheese – excessive heat can make cheese clump and separate from the oils.
- Taste as you go – seasoning preferences vary widely, and it’s easier to add more than to correct over-seasoning.
- Fresh is best – especially for the garlic and Parmesan. Pre-grated cheese contains anti-caking agents that can make your sauce grainy.
- Don’t rush the roux – those 1-2 minutes of cooking the flour mixture eliminate the raw flour taste.
- Consider your pasta – thinner sauces work better with angel hair or spaghetti, while thicker sauces pair well with penne or fettuccine.
- Reserved pasta water can be used instead of milk to thin the sauce if needed – the starch helps maintain creaminess.