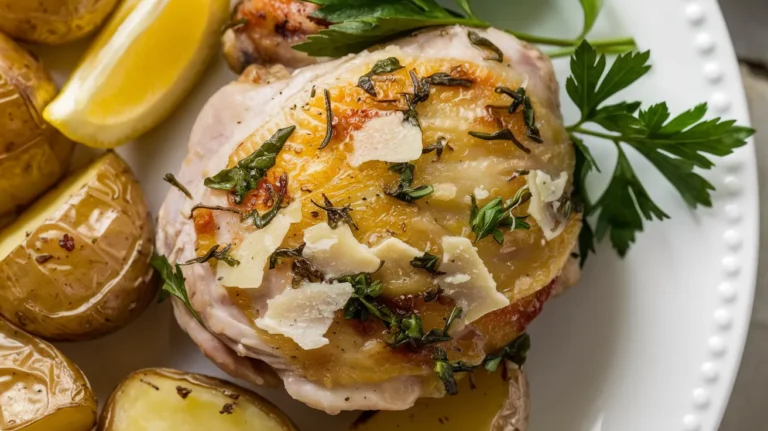
These garlic parmesan roasted chicken thighs deliver restaurant-quality flavor with minimal effort. The crispy, golden skin gives way to incredibly juicy meat infused with aromatic garlic and rich parmesan cheese. Perfect for busy weeknights when you want something special without the fuss – these garlic parmesan roasted chicken thighs will become your new go-to dinner solution.
SERVES: 4 | PREP: 15 MIN | COOK: 35 MIN | TOTAL: 50 MIN
Ingredients
Main Components
| Ingredient | Amount |
|---|---|
| Bone-in, skin-on chicken thighs | 8 pieces (about 3 lbs) |
| Fresh garlic cloves | 6 cloves, minced |
| Grated Parmesan cheese | 1/2 cup |
| Olive oil | 3 tablespoons |
| Fresh lemon juice | 2 tablespoons |
Seasoning Blend
| Ingredient | Amount |
|---|---|
| Kosher salt | 1 teaspoon |
| Black pepper | 1/2 teaspoon |
| Dried oregano | 1 teaspoon |
| Paprika | 1/2 teaspoon |
| Garlic powder | 1/2 teaspoon |
Finishing Touches
| Ingredient | Amount |
|---|---|
| Fresh parsley | 2 tablespoons, chopped |
| Lemon wedges | For serving |
| Extra Parmesan | For garnish |
Step-by-Step Instructions
Phase 1: Preparation (10 minutes)
Step 1: Preheat your oven to 425°F (220°C). This high temperature is crucial for getting that crispy skin we’re after. Place the oven rack in the middle position to ensure even cooking.
Step 2: Pat the chicken thighs completely dry with paper towels. This is super important – any moisture will prevent the skin from crisping up properly. Don’t rush this step; really make sure they’re dry.
Step 3: In a large mixing bowl, combine the minced garlic, grated Parmesan, olive oil, and lemon juice. Whisk these together until you have a thick, fragrant paste. The mixture should coat the back of a spoon.
Step 4: In a small bowl, mix together all the seasoning ingredients: salt, pepper, oregano, paprika, and garlic powder. This seasoning blend will create layers of flavor.
Phase 2: Seasoning and Setup (5 minutes)
Step 5: Season both sides of the chicken thighs generously with the spice blend. Don’t be shy here – chicken thighs can handle bold seasoning. Rub the spices into the skin for better adhesion.
Step 6: Add the seasoned chicken thighs to the bowl with the garlic-Parmesan mixture. Using your hands (wash them first!), massage the mixture all over each thigh, making sure to get under the skin where possible.
Step 7: Line a large rimmed baking sheet with parchment paper. Arrange the chicken thighs skin-side up, leaving space between each piece. Overcrowding will steam the chicken instead of roasting it.
Phase 3: Roasting (35 minutes)
Step 8: Roast the garlic parmesan roasted chicken thighs for 20 minutes without opening the oven door. This initial blast of heat starts the crisping process.
Step 9: After 20 minutes, check if the skin is starting to turn golden. If it’s browning too quickly, reduce the temperature to 400°F. If it’s not browning enough, leave it at 425°F.
Step 10: Continue roasting for another 10-15 minutes until the internal temperature reaches 165°F when measured at the thickest part of the thigh (avoid touching the bone).
Step 11: The skin should be deep golden brown and crispy. If you tap it gently with a spoon, it should sound hollow – that’s your cue that it’s perfectly crispy.
Phase 4: Finishing (5 minutes)
Step 12: Remove from the oven and let the chicken rest for 5 minutes. This allows the juices to redistribute throughout the meat, ensuring every bite is moist.
Step 13: While resting, sprinkle with fresh chopped parsley and additional grated Parmesan if desired. The residual heat will slightly melt the cheese.
Step 14: Serve immediately with lemon wedges on the side. The bright acidity cuts through the rich flavors beautifully.
Chef’s Notes
Skin Secret: For extra-crispy skin, place the seasoned thighs uncovered in the refrigerator for 30 minutes before roasting. This air-dries the surface even more.
Garlic Tip: Don’t let the minced garlic burn. If you notice it browning too quickly, tent the thighs loosely with foil for the last 10 minutes of cooking.
Parmesan Power: Use freshly grated Parmesan for the best flavor and melting quality. Pre-grated cheese won’t adhere as well to the chicken.
Temperature Matters: Always use a meat thermometer. Chicken thighs are forgiving, but you want to hit that perfect 165°F sweet spot for food safety and optimal texture.
Nutrition Information (Per Serving)
- Calories: 385
- Protein: 32g
- Carbohydrates: 3g
- Fat: 26g
- Fiber: 0g
- Sodium: 520mg
Delicious Variations
Mediterranean Style: Replace oregano with dried thyme and add chopped sun-dried tomatoes to the garlic mixture. This creates a bright, herb-forward flavor profile.
Spicy Kick: Add 1/4 teaspoon red pepper flakes to the seasoning blend and use hot paprika instead of regular. Perfect for those who like a little heat with their comfort food.
Herb Garden: Mix in fresh rosemary and sage with the parsley for an aromatic finish. For more herb-crusted inspiration, try these lemon herb roasted chicken thighs for a citrusy twist.
Smoky Depth: Substitute smoked paprika for regular paprika and add a pinch of chipotle powder. If you love smoky flavors, these smoky paprika roasted chicken thighs are absolutely incredible.
Storage & Reheating Guide
Refrigerator Storage: Store leftover garlic parmesan roasted chicken thighs in an airtight container for up to 4 days. Let them cool completely before refrigerating.
Freezer Storage: Wrap individual thighs in plastic wrap, then place in freezer bags. They’ll keep for up to 3 months frozen.
Reheating Method: For crispy skin, reheat in a 375°F oven for 10-12 minutes. Avoid the microwave, which makes the skin soggy.
Make-Ahead Tip: You can season and marinate the thighs up to 24 hours ahead. Just cover and refrigerate, then roast when ready.

Troubleshooting Common Issues
Problem 1: Soggy Skin – This usually happens when the chicken isn’t dried properly or the oven temperature is too low. Always pat dry and use high heat initially.
Problem 2: Burnt Garlic – If the garlic is browning too fast, cover loosely with foil for the last 10 minutes. Next time, try mixing the garlic with more oil.
Problem 3: Dry Meat – Overcooking is the culprit. Use a meat thermometer and remove at exactly 165°F. The carryover heat will finish cooking it.
Problem 4: Uneven Cooking – Make sure all thighs are similar in size and don’t overcrowd the pan. Rotate the pan halfway through cooking if your oven has hot spots.
Problem 5: Bland Flavor – Season generously and let the chicken sit with the seasoning for at least 15 minutes before cooking. Don’t skimp on the salt.
Equipment Essentials
- Large rimmed baking sheet
- Parchment paper
- Instant-read meat thermometer
- Large mixing bowl
- Sharp chef’s knife
- Cutting board
- Small mixing bowl for spices
- Measuring spoons and cups
Shopping List
Meat Counter
- 8 bone-in, skin-on chicken thighs (about 3 lbs)
Produce Section
- Fresh garlic (1 bulb)
- Fresh lemons (2 lemons)
- Fresh parsley (1 bunch)
Dairy Section
- Parmesan cheese block (for grating)
Pantry Items
- Extra virgin olive oil
- Kosher salt
- Black pepper
- Dried oregano
- Paprika
- Garlic powder
Success Secrets
1. Temperature Control: Start high (425°F) for crispy skin, then adjust if needed. This initial blast is crucial for texture.
2. Dry Surface: Pat the chicken completely dry and let it air-dry for maximum crispiness. Moisture is the enemy of crispy skin.
3. Even Spacing: Don’t overcrowd the pan. Each thigh needs breathing room to roast properly, not steam.
4. Rest Period: Always let the meat rest for 5 minutes after cooking. This keeps the juices locked in for tender, moist chicken.
5. Fresh Ingredients: Use freshly grated Parmesan and fresh garlic for the most vibrant flavors. The difference is remarkable compared to pre-processed alternatives.