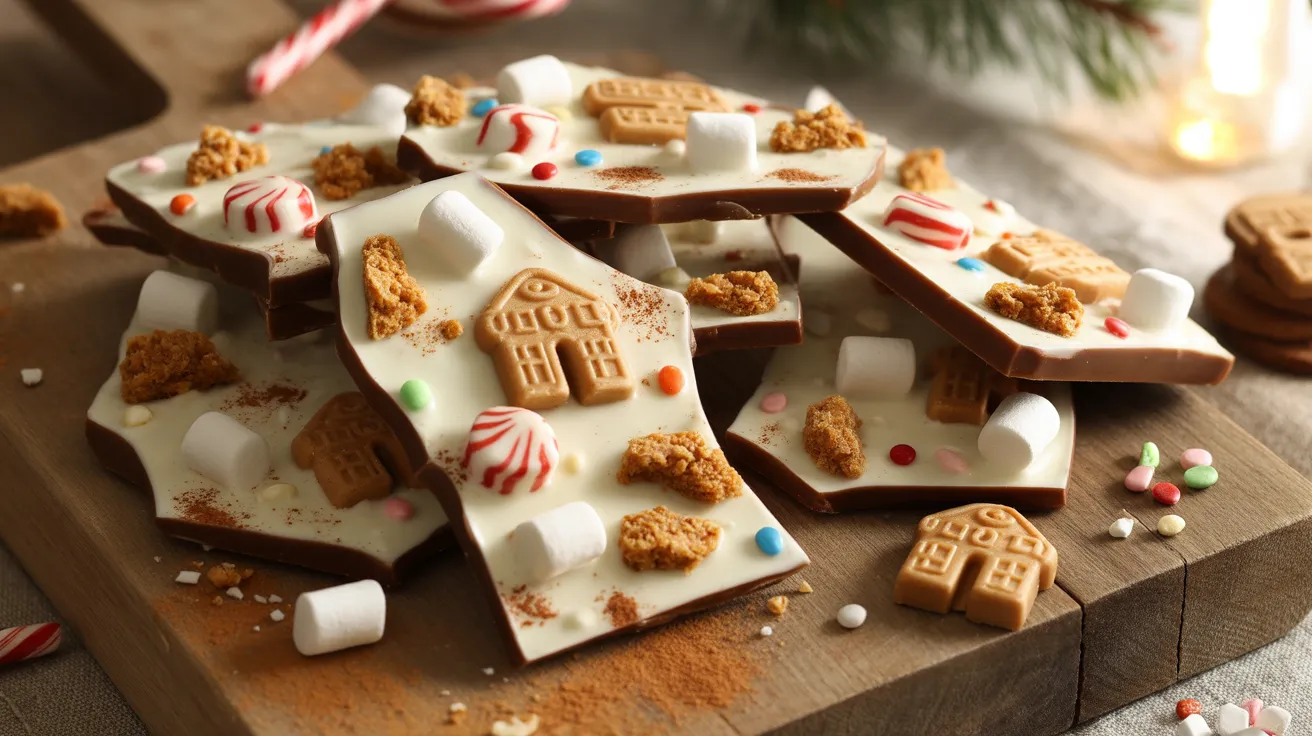
This gingerbread house white chocolate bark transforms classic holiday flavors into a stunning no-bake treat that tastes like Christmas morning. With crushed gingerbread cookies, white chocolate, and festive decorations, this gingerbread house white chocolate bark delivers all the charm of building a gingerbread house without the construction stress.
SERVES: 4 | PREP: 15 MIN | COOK: 5 MIN | TOTAL: 2 HR 20 MIN (includes chilling)
Ingredients
| White Chocolate Base | Gingerbread Elements |
|---|---|
| 16 oz white chocolate chips | 1 cup crushed gingerbread cookies |
| 1 tbsp coconut oil | 1/2 cup mini gingerbread house candies |
| Decorative Toppings | Finishing Touches |
|---|---|
| 1/4 cup crushed candy canes | 2 tbsp holiday sprinkles |
| 1/4 cup mini marshmallows | 1 tsp ground cinnamon |
| 2 tbsp white nonpareils | Pinch edible glitter (optional) |
Step-by-Step Instructions
Phase 1: Prep Work (5 minutes)
Step 1: Line a 9×13-inch baking sheet with parchment paper, letting the edges hang over the sides by about 2 inches. This overhang becomes your handles for easy bark removal later. Press the parchment flat against the pan bottom to prevent wrinkles that create uneven chocolate thickness.
Step 2: Place your gingerbread cookies in a heavy-duty zip-top bag and seal it completely. Use a rolling pin to crush the cookies into pea-sized pieces and smaller crumbs. You want variety in texture here—some fine powder mixed with chunky bits creates better visual interest and crunch.
Step 3: Arrange all your toppings in small bowls within arm’s reach of your work surface. Once the white chocolate melts, you’ll need to work quickly before it sets. Having everything ready prevents the chocolate from hardening while you search for ingredients.
Phase 2: Melting the Chocolate (3-4 minutes)
Step 4: Combine white chocolate chips and coconut oil in a microwave-safe bowl. The coconut oil helps thin the chocolate slightly, making it easier to spread evenly across your pan.
Step 5: Microwave on 50% power for 30 seconds, then stir vigorously with a silicone spatula. Repeat this process 3-4 times until the chocolate reaches a smooth, glossy consistency. Never microwave white chocolate on full power—it scorches instantly and becomes grainy and unusable.
Step 6: Check the temperature by touching the bowl bottom. It should feel warm but not hot to your touch. If the chocolate feels burning hot, let it cool for 2 minutes before proceeding. Overheated white chocolate won’t set properly and develops an unpleasant waxy texture.
Phase 3: Creating the Base Layer (2 minutes)
Step 7: Pour the melted white chocolate onto your prepared baking sheet. Start in the center and let gravity help spread it naturally. Use an offset spatula to push the chocolate toward the edges, creating a layer about 1/4-inch thick. Work in sweeping motions from center to edges.
Step 8: Tap the baking sheet firmly on your counter 5-6 times. This releases air bubbles trapped in the chocolate and creates a smoother, more professional-looking surface. You should see small bubbles pop as they reach the surface.
Phase 4: Adding Gingerbread Elements (3 minutes)
Step 9: Sprinkle 3/4 cup of the crushed gingerbread cookies evenly across the white chocolate surface. Work quickly but don’t rush—you have about 2-3 minutes before the chocolate starts setting. Press the cookie pieces gently into the chocolate with clean fingertips.
Step 10: Scatter the mini gingerbread house candies across the bark, spacing them about 1 inch apart. Think of it like decorating a real gingerbread house—you want visual balance, not clustering. Press each candy piece down until it’s halfway embedded in the chocolate.
Phase 5: Decorative Toppings (4 minutes)
Step 11: Distribute crushed candy canes in random clusters across the surface. The peppermint flavor complements the gingerbread spices beautifully. For a similar festive treat with different flavors, try this milk and cookies candy bark that uses chocolate sandwich cookies instead.
Step 12: Add mini marshmallows in small groups of 2-3 pieces each, creating little “snowdrift” effects. Press them gently so they stick but still maintain their puffy appearance above the chocolate surface.
Step 13: Sprinkle holiday sprinkles and white nonpareils over everything. Hold your hand about 8 inches above the pan and let them fall naturally—this creates better distribution than trying to place them individually.
Step 14: Dust the entire surface with ground cinnamon using a fine-mesh strainer. This adds authentic gingerbread aroma and a subtle spice flavor. Use gentle tapping motions on the strainer side for even coverage.
Step 15: If using edible glitter, add it now as your final touch. A little goes a long way—think light dusting, not full coverage.
Phase 6: Setting and Breaking (2 hours + 2 minutes)
Step 16: Transfer the baking sheet to your refrigerator. Place it on a flat shelf where it won’t get bumped or tilted. Let the gingerbread house white chocolate bark chill for 2 hours minimum or until completely firm throughout. The edges will set first, but the center needs full chilling time.
Step 17: Remove the pan from the refrigerator. Lift the parchment paper by the overhanging edges, transferring the entire bark slab to a cutting board. Let it sit at room temperature for 2 minutes to prevent shattering when you break it.
Step 18: Break the bark into irregular pieces by hand, creating rustic 2-3 inch shards. The jagged edges look more artisanal than knife-cut squares. If the bark feels too hard to break, let it warm up for another 1-2 minutes.
Chef’s Notes
Temperature Control: White chocolate melts at a lower temperature than dark chocolate (110°F vs 115°F), so gentle heat prevents seizing. If your chocolate becomes thick and grainy, stir in 1/2 teaspoon of coconut oil at a time until smooth.
Cookie Freshness: Use gingerbread cookies within 2 days of opening the package. Stale cookies lose their snap and won’t provide the crispy texture contrast that makes this gingerbread house white chocolate bark special.
Candy Selection: Choose mini gingerbread house candies that are completely solid (not hollow). Hollow candies float off the chocolate surface during chilling and create gaps in your finished bark.
Make-Ahead Strategy: Prepare this bark up to 1 week before serving for stress-free holiday entertaining. The flavors actually improve after 2-3 days as the spices from the cookies infuse into the white chocolate.
Nutrition Information (Per Serving)
Calories: 425 | Protein: 4g | Carbohydrates: 52g | Fat: 23g | Saturated Fat: 14g | Sugar: 41g | Fiber: 1g | Sodium: 115mg
Creative Variations
Dark Chocolate Gingerbread Bark: Replace white chocolate with 12 oz dark chocolate (60% cacao) for a less sweet version. The bitter notes complement the spicy gingerbread cookies beautifully. Reduce coconut oil to 1/2 tablespoon since dark chocolate melts thinner.
Peppermint Swirl Version: Melt 8 oz white chocolate and 8 oz peppermint-flavored white chocolate separately. Pour both onto the pan and swirl with a butter knife for a marbled effect. For more swirl inspiration, check out this mint chocolate swirl bark technique.
Nutty Gingerbread Bark: Add 1/3 cup toasted pecans or walnuts chopped into pea-sized pieces. Sprinkle them on after the gingerbread cookies in Step 9. The nutty richness adds depth to the sweet white chocolate base.
Espresso-Spiced Version: Stir 1 teaspoon instant espresso powder into the melted white chocolate before spreading. The coffee flavor amplifies the warm spices in the gingerbread cookies and creates a sophisticated adult treat.
Storage & Reheating
Store your gingerbread house white chocolate bark in an airtight container with parchment paper between layers. Keep it refrigerated for up to 2 weeks or frozen for up to 3 months. The chocolate stays firm and the cookies maintain their crunch when properly sealed.
Never store at room temperature for more than 4 hours. White chocolate has a low melting point around 80°F, so warm kitchens cause softening and potential bloom (white streaks) on the surface.
When ready to serve, remove from refrigeration 10 minutes before eating. This brief warming period allows the chocolate to soften slightly, making it easier to bite through without shattering all over your counter.
For frozen bark, transfer to the refrigerator the night before serving. Let it thaw slowly over 8 hours to prevent condensation forming on the chocolate surface, which can make toppings soggy.
Troubleshooting Common Problems
Problem: White chocolate seized and became grainy
Solution: You overheated it or got water in the bowl. Start fresh with new chocolate, making sure all bowls and utensils are completely dry. Melt at 50% power in short 30-second bursts, stirring between each interval.
Problem: Toppings sink into the chocolate
Solution: You added them while the chocolate was too hot and fluid. Let the melted chocolate sit for 90 seconds after spreading it on the pan. It should look slightly less glossy before you add toppings. Press decorations gently rather than pushing them down hard.
Problem: Bark won’t release from parchment paper
Solution: The chocolate didn’t fully set. Return it to the refrigerator for another 30 minutes. If it’s still stuck, place the pan bottom-side on a warm towel for 10 seconds—this releases the chocolate without melting it.
Problem: Gingerbread cookies taste stale in finished bark
Solution: Cookie moisture absorbs into the chocolate during storage. Use the freshest cookies possible and crush them just before making the bark. Add 1/4 teaspoon extra cinnamon to the melted chocolate to boost the gingerbread flavor.
Problem: White chocolate developed white streaks (bloom)
Solution: This happens from temperature fluctuations during storage. The chocolate is still safe to eat. Prevent bloom by maintaining consistent refrigerator temperature and wrapping bark tightly in plastic wrap before placing in containers.
Equipment Essentials

- 9×13-inch rimmed baking sheet (must have edges to contain chocolate)
- Parchment paper (wax paper won’t work—it sticks)
- Microwave-safe mixing bowl (glass or ceramic, never metal)
- Silicone spatula (heat-resistant for stirring hot chocolate)
- Offset spatula (for smooth, even chocolate spreading)
- Heavy-duty zip-top bag (for crushing cookies without mess)
- Rolling pin (or heavy can for crushing cookies)
- Small prep bowls (4-5 bowls for organizing toppings)
- Fine-mesh strainer (for dusting cinnamon evenly)
Shopping List
Baking Aisle
- White chocolate chips (16 oz bag)
- Holiday sprinkles
- White nonpareils
- Ground cinnamon
- Edible glitter (optional)
Cookie Aisle
- Gingerbread cookies (1 package for 1 cup crushed)
- Mini gingerbread house candies (1/2 cup)
Candy Aisle
- Candy canes (2 standard-sized for 1/4 cup crushed)
Baking Supplies Section
- Parchment paper roll
- Coconut oil (1 tablespoon)
Marshmallow Section
- Mini marshmallows (small bag for 1/4 cup)
Success Secrets
1. Quality White Chocolate Matters: Invest in good white chocolate chips like Ghirardelli or Guittard. Cheap brands contain vegetable oil instead of cocoa butter, which prevents proper setting and creates waxy texture. Read the ingredient list—cocoa butter should be listed before any oils.
2. Crush Cookies to Order: Don’t use pre-crushed gingerbread cookie crumbs from a can. Freshly crushed cookies retain essential oils and spices that dissipate quickly after crushing. Aim for variety in your crush sizes—some fine powder, some chunky pieces.
3. Work in a Cool Kitchen: White chocolate sets up fast in temperatures below 70°F. If your kitchen runs warm, chill your baking sheet in the freezer for 5 minutes before adding the chocolate. This gives you extra working time for decorating.
4. Layer Your Flavors: Add the crushed cookies first, then candies, then finishing touches. This creates depth where each bite contains multiple flavor elements. Random scattering looks better than organized rows—embrace the rustic charm.
5. Break Don’t Cut: Hand-breaking creates authentic artisanal bark pieces with rustic edges. Using a knife creates too-perfect squares that look mass-produced. Let the natural break lines guide you for the most attractive presentation.
This gingerbread house white chocolate bark brings all the festive fun of holiday baking without heating your oven. Perfect for cookie exchanges, holiday parties, or gift-giving, each piece delivers that nostalgic gingerbread house flavor in convenient bark form.