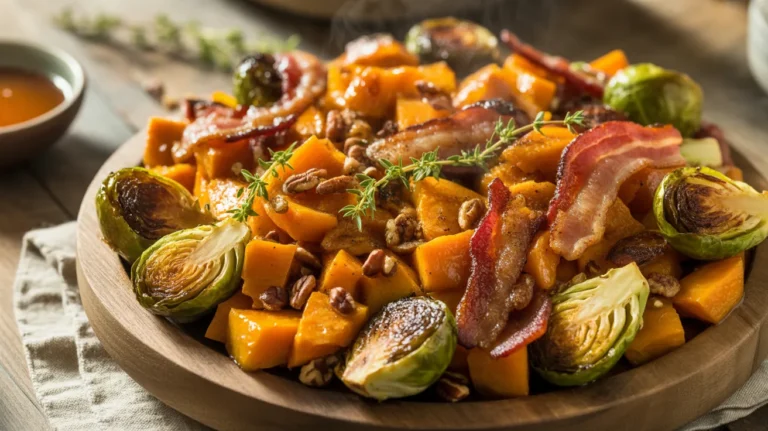
These glazed sweet potato bites are the perfect balance of caramelized edges and tender centers, coated in a glossy maple-butter glaze that makes them completely irresistible. Whether you’re hosting a dinner party or need a show-stopping side dish, these glazed sweet potato bites deliver restaurant-quality results with surprisingly simple techniques.
SERVES: 4 | PREP: 15 MIN | COOK: 35 MIN | TOTAL: 50 MIN
Ingredients
For the Sweet Potato Bites
| Ingredient | Amount |
|---|---|
| Sweet potatoes (medium-sized) | 2 lbs (about 3-4) |
| Olive oil | 2 tablespoons |
| Sea salt | 1 teaspoon |
| Black pepper | ½ teaspoon |
| Garlic powder | ½ teaspoon |
For the Glaze
| Ingredient | Amount |
|---|---|
| Unsalted butter | 3 tablespoons |
| Pure maple syrup | ¼ cup |
| Brown sugar | 2 tablespoons |
| Cinnamon | ½ teaspoon |
| Fresh thyme leaves | 1 tablespoon (optional) |
| Smoked paprika | ¼ teaspoon |
For Finishing
| Ingredient | Amount |
|---|---|
| Flaky sea salt | Pinch |
| Fresh parsley (chopped) | 2 tablespoons |
| Toasted pecans (optional) | ¼ cup, roughly chopped |
Step-by-Step Instructions
Phase 1: Preparing the Sweet Potatoes (10 minutes)
Step 1: Set your oven to 425°F and position the rack in the center. Why this temperature matters: High heat creates crispy edges while keeping the insides creamy. Lower temperatures will make your bites mushy rather than caramelized.
Step 2: Line a large rimmed baking sheet with parchment paper or aluminum foil. Beginner tip: Don’t skip this step! The glaze gets sticky, and lining prevents a messy cleanup situation.
Step 3: Scrub the sweet potatoes under cold running water with a vegetable brush. You don’t need to peel them—the skin adds texture and nutrients. Just make sure they’re clean.
Step 4: Pat the sweet potatoes completely dry with paper towels or a clean kitchen towel. Critical step: Moisture is the enemy of crispiness. Dry potatoes = better browning.
Step 5: Cut each sweet potato into 1-inch cubes using a sharp chef’s knife. Visual guide: Think dice-sized pieces, all roughly the same size so they cook evenly. If some pieces are bigger, they’ll be raw when the small ones burn.
Step 6: Place all the cubed sweet potatoes in a large mixing bowl.
Phase 2: First Roast (15 minutes)
Step 7: Drizzle the olive oil over the sweet potato cubes, then add the sea salt, black pepper, and garlic powder. Use your hands to toss everything together—this ensures every single piece gets coated. Don’t be shy; get in there and massage those seasonings in.
Step 8: Spread the seasoned sweet potato bites in a single layer on your prepared baking sheet. Common mistake to avoid: Don’t crowd them! Leave space between each piece. Overcrowding creates steam, which makes them soggy instead of crispy.
Step 9: Slide the baking sheet into your preheated oven and roast for 15 minutes. Set a timer! You’ll be checking them soon.
Phase 3: Making the Glaze (5 minutes)
Step 10: While the sweet potatoes roast, melt the butter in a small saucepan over medium-low heat. Watch carefully: Butter can go from melted to burned quickly. Keep the heat gentle.
Step 11: Once the butter melts completely, stir in the maple syrup, brown sugar, cinnamon, and smoked paprika. What you’re looking for: The mixture will bubble gently. Keep stirring until the sugar dissolves completely—about 2 minutes. You’ll know it’s ready when the glaze looks smooth and glossy.
Step 12: Remove the glaze from heat and stir in the fresh thyme leaves if using. Set aside while your sweet potatoes finish their first roast.
Phase 4: Glazing and Final Roast (20 minutes)
Step 13: After 15 minutes, remove the baking sheet from the oven (use oven mitts!). Visual check: The edges should just be starting to turn golden. If they’re not showing any color yet, give them 3-5 more minutes.
Step 14: Pour the warm glaze over the partially-roasted sweet potato bites. Use a spatula or large spoon to toss the pieces, coating every side with that gorgeous glaze.
Step 15: Spread the glazed sweet potato bites back into a single layer on the baking sheet.
Step 16: Return to the oven and roast for another 15-20 minutes, stirring halfway through. Timing tip: At the 10-minute mark, open the oven and give everything a quick stir with your spatula. This prevents burning and ensures even caramelization.
Step 17: Watch for the glaze to bubble and thicken, creating a shiny coating on each bite. Perfect doneness looks like: Deep golden-brown edges, a glossy coating, and when you pierce a piece with a fork, it slides in easily but the bite still holds its shape.
Step 18: Remove from the oven when the glaze has caramelized and the sweet potatoes are fork-tender with crispy edges.
Phase 5: Finishing Touches (2 minutes)
Step 19: Let the glazed sweet potato bites cool on the baking sheet for 3-4 minutes. Important: The glaze needs this time to set slightly. If you transfer them immediately, they’ll stick together in a clump.
Step 20: Transfer to a serving platter, sprinkle with flaky sea salt, fresh parsley, and toasted pecans if desired. Serve immediately while they’re still warm and the glaze is perfectly sticky.
Chef’s Notes
Tip 1: Choose sweet potatoes that are similar in size for even cooking. The glossy, firm ones with smooth skin work best for glazed sweet potato bites.
Tip 2: Don’t rush the roasting process. The initial 15-minute roast without glaze allows the natural sugars to caramelize before adding the maple coating, creating layers of flavor.
Tip 3: If your glaze seems too thick, add a teaspoon of water and reheat gently. Too thin? Let it simmer for another minute to reduce and concentrate the flavors.
Tip 4: Make a double batch of these glazed sweet potato bites—they disappear fast! They’re perfect alongside classic broccoli salad for a complete meal.
Nutrition Information (Per Serving)
Calories: 285
Protein: 3g
Carbohydrates: 48g
Fat: 11g
Fiber: 6g
Sugar: 22g
Sodium: 620mg
Creative Variations
Spicy Honey Variation
Swap the maple syrup for honey and add ½ teaspoon of cayenne pepper to the glaze. The heat balances the sweetness perfectly.
Savory Herb Version
Skip the cinnamon and brown sugar. Instead, use 2 tablespoons of fresh rosemary and a tablespoon of balsamic vinegar in the glaze for a sophisticated side dish.
Orange-Pecan Glazed Bites
Add 2 tablespoons of fresh orange juice and 1 teaspoon of orange zest to your glaze. Top with extra toasted pecans. These pair beautifully with creamy pumpkin gnocchi for a fall-inspired feast.
Coconut-Lime Twist
Replace the butter with coconut oil and add 1 tablespoon of fresh lime juice to the glaze. Sprinkle with toasted coconut flakes before serving.
Storage & Reheating
Refrigerator Storage: Store leftover glazed sweet potato bites in an airtight container for up to 4 days. The glaze will firm up when cold but softens when reheated.
Reheating: Spread on a baking sheet and warm in a 375°F oven for 8-10 minutes until heated through. Avoid the microwave—it makes them mushy and ruins that crispy texture you worked hard to achieve.
Freezing: These freeze well for up to 2 months. Cool completely, freeze on a baking sheet until solid, then transfer to a freezer bag. Reheat from frozen at 400°F for 15-18 minutes.
Make-Ahead Tip: Cut and season the sweet potatoes up to 24 hours ahead. Store in the fridge, then let them come to room temperature for 15 minutes before roasting.
Troubleshooting Common Problems
Problem 1: My sweet potato bites are mushy instead of crispy
Solution: You either crowded the pan or didn’t use high enough heat. Make sure there’s space between each piece and your oven is fully preheated to 425°F. Also, check that you dried the potatoes thoroughly before tossing with oil.
Problem 2: The glaze burned on the pan
Solution: Your oven temperature was too high or you skipped stirring halfway through. Next time, line the pan properly and set that halfway-point timer. If it starts smoking, lower the temperature to 400°F.
Problem 3: The sweet potatoes are hard in the center
Solution: Your pieces were cut too large or unevenly. Stick to 1-inch cubes, all roughly the same size. If you notice uneven cooking, the bigger pieces need more time—give them an extra 5 minutes.
Problem 4: The glaze won’t stick or looks runny
Solution: You added the glaze too early or didn’t let the sugar dissolve properly. Make sure the glaze simmers long enough to thicken slightly, and only add it after the initial 15-minute roast when the sweet potatoes have started to dry out.
Problem 5: Everything tastes bland
Solution: Don’t be timid with seasoning! These glazed sweet potato bites need that initial salt, pepper, and garlic powder layer, plus the finishing flaky salt. Taste your glaze before adding it—it should be intensely flavored since it’ll coat the neutral sweet potatoes.
Equipment Essentials

- Large rimmed baking sheet (minimum 13×18 inches)
- Parchment paper or aluminum foil
- Sharp chef’s knife
- Cutting board
- Large mixing bowl
- Small saucepan for the glaze
- Wooden spoon or whisk
- Measuring cups and spoons
- Spatula or large spoon for tossing
- Oven mitts
- Vegetable brush (for cleaning)
Shopping List
Produce Section
- Sweet potatoes (2 lbs)
- Fresh thyme (optional)
- Fresh parsley
Pantry/Baking Aisle
- Olive oil
- Pure maple syrup
- Brown sugar
- Sea salt
- Flaky sea salt (finishing)
- Black pepper
- Garlic powder
- Cinnamon
- Smoked paprika
Refrigerated Section
- Unsalted butter
Optional Add-Ons
- Pecans (for toasting)
Success Secrets
1. Uniform Cutting Is Everything
Take your time cutting those sweet potatoes into same-sized pieces. Consistency means everything cooks at the same rate, preventing some bites from being burnt while others are raw.
2. Don’t Skip the First Roast
That initial 15-minute roast without glaze is where the magic starts. It dehydrates the surface slightly, creating the perfect foundation for the glaze to grip onto instead of sliding off.
3. Temperature Matters
Use an oven thermometer to verify your oven actually reaches 425°F. Many home ovens run 25 degrees cooler than the dial suggests, which ruins the crispy-tender balance these glazed sweet potato bites need.
4. The Flip Technique
When you stir at the halfway mark, use a metal spatula to scrape under each piece. This prevents sticking and ensures the glaze redistributes evenly for that restaurant-quality finish.
5. Serve Immediately for Best Results
These glazed sweet potato bites are at their absolute peak when served within 10 minutes of leaving the oven. The glaze is still slightly tacky, the edges are maximum crispy, and the centers are cloud-like. They’re still good later, but that first bite while warm? That’s when you’ll understand why this recipe is a keeper.
Recipe yields 4 generous servings as a side dish. Can be easily doubled for larger gatherings or meal prep throughout the week.