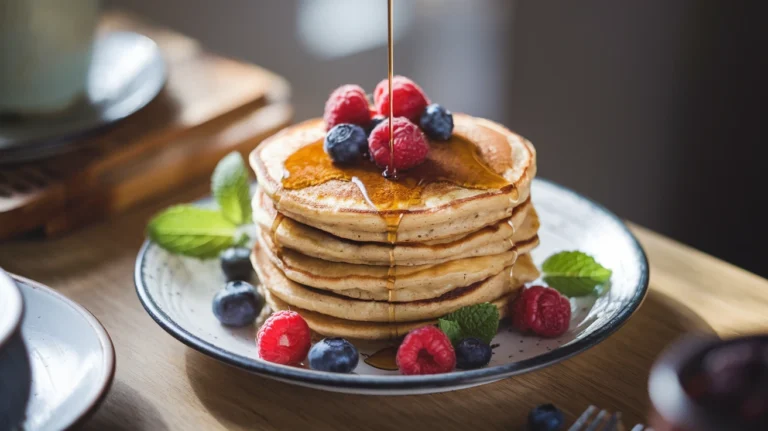
Perfect festive breakfast for St. Patrick’s Day or any special morningOnly 7 ingredients needed for the fluffiest green pancakes everReady in under 30 minutes from mixing bowl to tableKid-approved fun twist on classic pancakes
Why These Green Pistachio Pancakes Will Change Breakfast Forever
Tired of the same boring pancakes every weekend? These vibrant green pistachio pudding pancakes bring excitement back to your breakfast table. The secret? A box of instant pistachio pudding mix that transforms ordinary pancake batter into something truly special. If you’re looking for more ways to elevate your breakfast game, check out these unique breakfast recipes for inspiration.
These bright, festive pancakes deliver a nutty pistachio flavor that pairs perfectly with maple syrup. Best of all, they’re quick enough for busy mornings but impressive enough for guests.
Nutrition Facts (Per Serving – 3 Pancakes)
Nutrient Amount % Daily Value Calories 320 – Total Fat 9g 12% Saturated Fat 5g 25% Cholesterol 65mg 22% Sodium 540mg 23% Total Carbohydrate 52g 19% Dietary Fiber 1g 4% Total Sugars 22g – Protein 8g 16% Vitamin D 1mcg 6% Calcium 200mg 15% Iron 1.8mg 10% Potassium 220mg 5%
What You’ll Need
Ingredients (Serves 4)
Ingredient Measurement All-purpose flour 2 cups Instant pistachio pudding mix 1 (3.4 oz) package Baking powder 1 tablespoon Salt ¼ teaspoon Milk 1½ cups Eggs 2 large Unsalted butter 3 tablespoons, melted, plus more for cooking Chopped pistachios ¼ cup (for garnish) Maple syrup For serving Whipped cream Optional, for serving
Kitchen Equipment
Tool Purpose Large mixing bowl For dry ingredients Medium mixing bowl For wet ingredients Whisk For mixing batter Measuring cups For accurate measurements Measuring spoons For smaller ingredients ¼ cup measuring cup For portioning batter Non-stick skillet or griddle For cooking pancakes Spatula For flipping pancakes Serving plate For finished pancakes
Possible Substitutions
Milk : Substitute with almond milk, oat milk, or any non-dairy milkAll-purpose flour : Use 1:1 gluten-free flour blend for gluten-free optionEggs : Replace with ½ cup unsweetened applesauce for egg-free versionButter : Substitute with coconut oil for dairy-free optionNo pistachio pudding mix? Use vanilla pudding mix + 1 tsp almond extract + green food coloring
Super-Detailed Step-by-Step Instructions for Beginners
Prep Time: 10 minutesCook Time: 15 minutesTotal Time: 25 minutesDifficulty Level: EasyServes: 4 (makes about 12 pancakes)
Preparation Phase
Set up your workspace
Clear off your countertop to give yourself plenty of room to work
Read through the entire recipe once before starting
Wash your hands thoroughly with soap and warm water
Place all needed equipment within easy reach
Measure and prepare ingredients
Take out butter (3 tablespoons) from refrigerator and melt in microwave for 30-45 seconds
Set butter aside to cool slightly while you prepare other ingredients
Take out 2 eggs from refrigerator and let them sit at room temperature
Measure 2 cups of all-purpose flour using the “spoon and level” method:
Stir flour in its container to loosen it
Spoon flour into measuring cup without packing it down
Level off the top with the straight edge of a knife
Open your 3.4 oz package of pistachio pudding mix
Measure 1 tablespoon of baking powder
Measure ¼ teaspoon of salt
Measure 1½ cups of milk
Mix dry ingredients properly
Place your large mixing bowl on the counter
Add the 2 cups of measured flour to the bowl
Pour in the entire package of pistachio pudding mix
Add 1 tablespoon baking powder
Add ¼ teaspoon salt
Take your whisk and gently mix these dry ingredients together
Be thorough – whisk for about 30 seconds, making sure to reach the bottom of the bowl
The mixture should be a uniform light green color with no streaks of white flour
Set this bowl aside
Mix wet ingredients thoroughly
Place your medium mixing bowl on the counter
Crack each egg on a flat surface (not the bowl’s edge)
Open eggs one at a time into the bowl
Check for any eggshell pieces and remove them if needed
Take your whisk and beat the eggs until they’re well mixed (about 20 seconds)
Pour in the 1½ cups of milk
Add the 3 tablespoons of melted (but not hot) butter
Whisk everything together for about 30-40 seconds until completely blended
The mixture should look uniform with no separate streaks of egg
Mixing and Cooking Phase
Combine wet and dry ingredients properly
Hold your bowl of wet ingredients in one hand
Pour the wet ingredients into the bowl with dry ingredients all at once
Set the empty bowl aside
Using your whisk or a rubber spatula, stir the mixture with broad, gentle strokes
VERY IMPORTANT FOR BEGINNERS: Only stir until the dry ingredients are just moistenedCount your strokes – aim for no more than 10-12 stirs
Stop stirring even if you still see small lumps – this is correct!
Overmixing will make your pancakes tough
The batter should look slightly lumpy but with no large patches of dry flour
Let the batter rest for 5 minutes (set a timer) – this allows the gluten to relax and the baking powder to activate
Prepare your cooking surface properly
While batter is resting, place your non-stick skillet or griddle on the stove
Set heat to medium (not high, not low)
Let the pan heat up for 3-4 minutes
Add a small pat of butter (about ½ tablespoon) to the pan
Swirl the pan to spread the butter evenly as it melts
Test for readiness: Sprinkle a few drops of water on the panIf they sizzle and dance across the surface, your pan is ready
If they evaporate instantly, your pan is too hot – lower heat slightly
If they just sit there, wait longer or increase heat slightly
Pour and cook first pancake (test pancake)
Stir batter gently once or twice with your spatula (don’t overmix!)
Take your ¼ cup measuring cup and dip it into the batter
Fill it completely, but don’t pack the batter down
Hold the measuring cup just above the center of the pan (about 1 inch above)
Pour batter in a steady stream to form a circle
Watch as the batter spreads naturally – don’t spread it with your spatula
This is your test pancake to check temperature – don’t worry if it’s not perfect
Learn to identify when to flip (very important for beginners)
Set a timer for 2 minutes but don’t rely only on time
Watch for these visual clues that it’s time to flip:
Bubbles form on the surface of the pancake
The bubbles begin to pop and stay open
The edges of the pancake look set and slightly dry
The very edge of the pancake begins to look matte instead of shiny
All these signs should appear after about 2-3 minutes
Master the art of flipping
Slide your spatula completely under the pancake from one side
Make sure the spatula is fully under the pancake
In one quick, confident motion, lift and turn the pancake over
If you hesitate or move too slowly, the pancake might fold or break
Don’t pat or press down on the pancake – this deflates it
Cook the second side for about 1-2 minutes until golden brown
The second side cooks faster than the first side
Adjust and cook remaining pancakes
Remove test pancake to a plate
Check if it’s cooked through – cut into the center to make sure it’s not raw
Adjust heat if needed based on your test pancake:
If too dark on outside but undercooked inside – lower heat
If taking too long to cook – raise heat slightly
Add another small pat of butter to the pan
Pour the next batch of pancakes, leaving at least 1 inch between them
Cook 2-3 pancakes at a time, depending on your pan size
Repeat the process, adding a small amount of butter between each batch
TIP: If your pan starts smoking, it’s too hot – remove from heat briefly, lower temperature, and then continue
Keep pancakes warm while cooking remaining batches
Heat oven to 200°F
Place cooked pancakes on an oven-safe plate
Keep in warm oven while cooking remaining pancakes
Don’t stack too many pancakes on top of each other or they’ll get soggy
If you don’t have an oven, cover pancakes loosely with foil
Serving Phase
Prepare for serving
While cooking your last batch of pancakes, gather your serving items:
Warm serving plates (run under hot water and dry, or place in warm oven for 1 minute)
Chop pistachios if not already chopped
Pour maple syrup into a small pitcher or bowl
Prepare whipped cream if using
Plate your pancakes beautifully
Place 3 pancakes on each warmed plate
Stack them neatly in the center of the plate
Sprinkle about 1 tablespoon of chopped pistachios over each stack
Drizzle about 2 tablespoons of maple syrup over each stack
If using whipped cream, add a dollop (about 2 tablespoons) on top
Serve immediately while hot
Troubleshooting Guide
Problem Cause Solution Pancakes too thin Too much liquid Add 1-2 tablespoons more flour Pancakes too thick Too little liquid Add 1-2 tablespoons more milk Pancakes not cooking through Heat too high Lower heat to medium-low Uneven cooking Uneven heat distribution Rotate pan or move pancakes to different spots Batter too lumpy Inadequate mixing Whisk a few more times, but don’t overmix Not green enough Variation in pudding mix Add a drop of green food coloring if desired Pancakes stick to pan Pan not hot enough or not enough butter Make sure pan is properly heated and buttered before adding batter Pancakes burning Heat too high Reduce heat; butter may be burning Pancakes don’t rise Old baking powder or overmixing Check expiration date on baking powder; mix less next time First side won’t brown Pan not hot enough Let pan heat longer before adding batter
Variations & Substitutions
Sweet Variations
Chocolate Chip Pistachio Pancakes
Add ½ cup mini chocolate chips to the batter
Fold in gently after wet and dry ingredients are combined
White Chocolate Pistachio Pancakes
Add ⅓ cup white chocolate chips to the batter
Top with extra white chocolate chips after cooking
Berry Pistachio Pancakes
Top with 1 cup fresh strawberries or blueberries
Add berries after cooking – don’t cook berries in the pancakes
For a fruity twist, try pairing these with my Double Strawberry Pancakes recipe for a colorful breakfast spread
Cinnamon Pistachio Pancakes
Add 1 teaspoon ground cinnamon to dry ingredients
Top with cinnamon sugar (2 tablespoons sugar mixed with ½ teaspoon cinnamon)
Dietary Adaptations
Gluten-Free Version
Replace all-purpose flour with gluten-free 1:1 baking flour
Check that your pudding mix is gluten-free
Add ¼ teaspoon xanthan gum if your blend doesn’t include it
Dairy-Free Version
Use almond milk instead of regular milk
Use coconut oil instead of butter
Check pudding mix ingredients for dairy
Lower Sugar Option
Use sugar-free pudding mix
Top with fresh fruit instead of syrup
Use a small amount of pure maple syrup instead of regular pancake syrup
Storage & Reheating Instructions
Storage
Refrigerator:
Allow pancakes to cool completely (about 30 minutes)
Place in an airtight container with parchment paper between layers
Label with date
Store for up to 3 days
Freezer:
Allow pancakes to cool completely
Lay pancakes in a single layer on a baking sheet
Freeze until solid (about 1 hour)
Transfer to a freezer-safe zip-top bag
Place parchment paper between layers to prevent sticking
Remove as much air as possible before sealing
Label with date
Store for up to 2 months
Reheating
Microwave Method:
Place 1-2 pancakes on a microwave-safe plate
Cover with a slightly damp paper towel
Heat for 20-30 seconds for refrigerated pancakes
Heat for 45-60 seconds for frozen pancakes
Check temperature and heat in additional 10-second increments if needed
Toaster Method:
Place frozen pancakes directly in the toaster
Use low setting
May need to toast twice for complete warming
Oven Method:
Preheat oven to 350°F
Place pancakes on a baking sheet
Cover with aluminum foil
Heat for 5-7 minutes (refrigerated) or 8-10 minutes (frozen)
Check that they’re heated through
Skillet Method:
Heat skillet over medium-low heat
Add a small amount of butter
Add pancakes to the skillet
Heat for 1 minute on each side until warm
Safety Notes & Tips
Safety First
Raw Egg Warning:
The batter contains raw eggs
Don’t taste the batter before cooking
Wash hands after handling raw eggs
Hot Surface Caution:
Keep pan handles turned away from the edge of the stove
Use potholders when handling hot pans
Keep children at a safe distance from the cooking area
Food Allergies:
These pancakes contain dairy, eggs, and nuts
For allergies to these ingredients, see substitution sections
Keep in mind cross-contamination if serving to guests with allergies
Pro Tips for Beginner Success
For extra fluffiness:
Separate eggs, beat whites until stiff peaks form
Mix yolks with other wet ingredients
Fold beaten whites gently into the final batter last
Make ahead option:
Combine all dry ingredients in a container the night before
Store in an airtight container
In the morning, just add wet ingredients
Perfect texture:
Let batter rest for exactly 5 minutes (set a timer!)
This allows the flour to absorb liquid and the baking powder to activate
The result will be lighter, fluffier pancakes
Color boost:
For a more vibrant green (great for holidays), add a tiny drop of green food coloring
Add it to the wet ingredients before combining with dry
Quick shortcut:
Use 2 cups complete pancake mix + pistachio pudding powder
Follow package directions for the additional liquid ingredients
Portion control:
Use the same measuring cup for all pancakes for uniform size
A ¼ cup measure or ice cream scoop with a release lever works perfectly
Temperature tip:
If your hand held 1 inch above the pan feels uncomfortably hot after 5 seconds, your pan is ready
If you don’t have a thermometer, this hand test is reliable
Cleaning tip:
Soak your mixing bowls in cool water right away to prevent batter from drying and sticking
Clean your pan after it has cooled – never run a hot pan under cold water