The secret to perfect grilled butterflied whole chicken with barbecue sauce is butterflying (or spatchcocking) the bird so it cooks evenly on the grill, staying juicy inside while developing that irresistible charred exterior. This grilled butterflied whole chicken with barbecue sauce recipe feeds four people and takes the intimidation out of grilling whole poultry.
SERVES: 4 | PREP: 20 MIN | COOK: 45 MIN | TOTAL: 65 MIN
Ingredients
For the Chicken
| Ingredient | Amount |
|---|---|
| Whole chicken | 1 (4-5 lbs) |
| Olive oil | 2 tablespoons |
| Kosher salt | 2 teaspoons |
| Black pepper | 1 teaspoon |
| Garlic powder | 1 teaspoon |
| Smoked paprika | 1 teaspoon |
| Onion powder | ½ teaspoon |
For the Homemade Barbecue Sauce
| Ingredient | Amount |
|---|---|
| Ketchup | 1 cup |
| Apple cider vinegar | ¼ cup |
| Brown sugar | 3 tablespoons |
| Worcestershire sauce | 2 tablespoons |
| Molasses | 1 tablespoon |
| Dijon mustard | 1 tablespoon |
| Smoked paprika | 1 teaspoon |
| Garlic powder | ½ teaspoon |
| Onion powder | ½ teaspoon |
| Cayenne pepper | ¼ teaspoon |
| Salt | ½ teaspoon |
Step-by-Step Instructions
Phase 1: Butterfly the Chicken (10 minutes)
Step 1: Remove the chicken from packaging and pat completely dry with paper towels. Place the bird breast-side down on a cutting board.
Step 2: Locate the backbone running down the center of the chicken. Using sharp kitchen shears, cut along one side of the backbone from tail to neck. You’ll feel the shears cutting through small rib bones – this is normal and requires firm, steady pressure.
Step 3: Cut along the other side of the backbone to remove it completely. Save the backbone for making stock later if you’d like.
Step 4: Flip the chicken over so it’s breast-side up. Press down firmly on the breastbone with the heels of both hands until you hear a crack. The chicken should now lie flat. This technique is called butterflying or spatchcocking, and it allows the bird to cook evenly because all parts are the same distance from the heat.
Step 5: Tuck the wing tips behind the breast portions. This prevents them from burning during grilling.
Phase 2: Season and Prepare (5 minutes)
Step 6: Rub the entire chicken with 2 tablespoons olive oil, coating both sides. The oil helps the seasonings stick and promotes crispy, golden skin.
Step 7: In a small bowl, mix together salt, pepper, garlic powder, smoked paprika, and onion powder. Sprinkle this seasoning blend evenly over both sides of the chicken, making sure to get into all the crevices around the thighs and wings.
Step 8: Let the seasoned chicken rest at room temperature for 15-20 minutes while you prepare the grill and make the sauce. This brings the meat to room temperature for more even cooking.
Phase 3: Make the Barbecue Sauce (10 minutes)
Step 9: In a medium saucepan, combine ketchup, apple cider vinegar, brown sugar, Worcestershire sauce, molasses, and Dijon mustard. Whisk until the brown sugar dissolves completely.
Step 10: Add smoked paprika, garlic powder, onion powder, cayenne pepper, and salt to the sauce. Whisk to combine all ingredients thoroughly.
Step 11: Place the saucepan over medium heat and bring to a gentle simmer. Reduce heat to low and cook for 8-10 minutes, stirring occasionally. The sauce should thicken slightly and the flavors will meld together. You’ll know it’s ready when it coats the back of a spoon.
Step 12: Remove from heat and set aside. You’ll use this sauce in two stages: during the last few minutes of grilling and for serving at the table.
Phase 4: Grill the Chicken (45 minutes)
Step 13: Preheat your grill to medium heat (350-375°F). Set up a two-zone cooking area: place all hot coals or turn burners on one side only. This creates direct heat on one side and indirect heat on the other.
Step 14: Place the butterflied chicken skin-side up on the indirect heat side of the grill (the cooler side). Close the lid and let it cook for 30 minutes without opening the grill. This initial cooking period uses gentle, indirect heat to cook the chicken through without burning the outside.
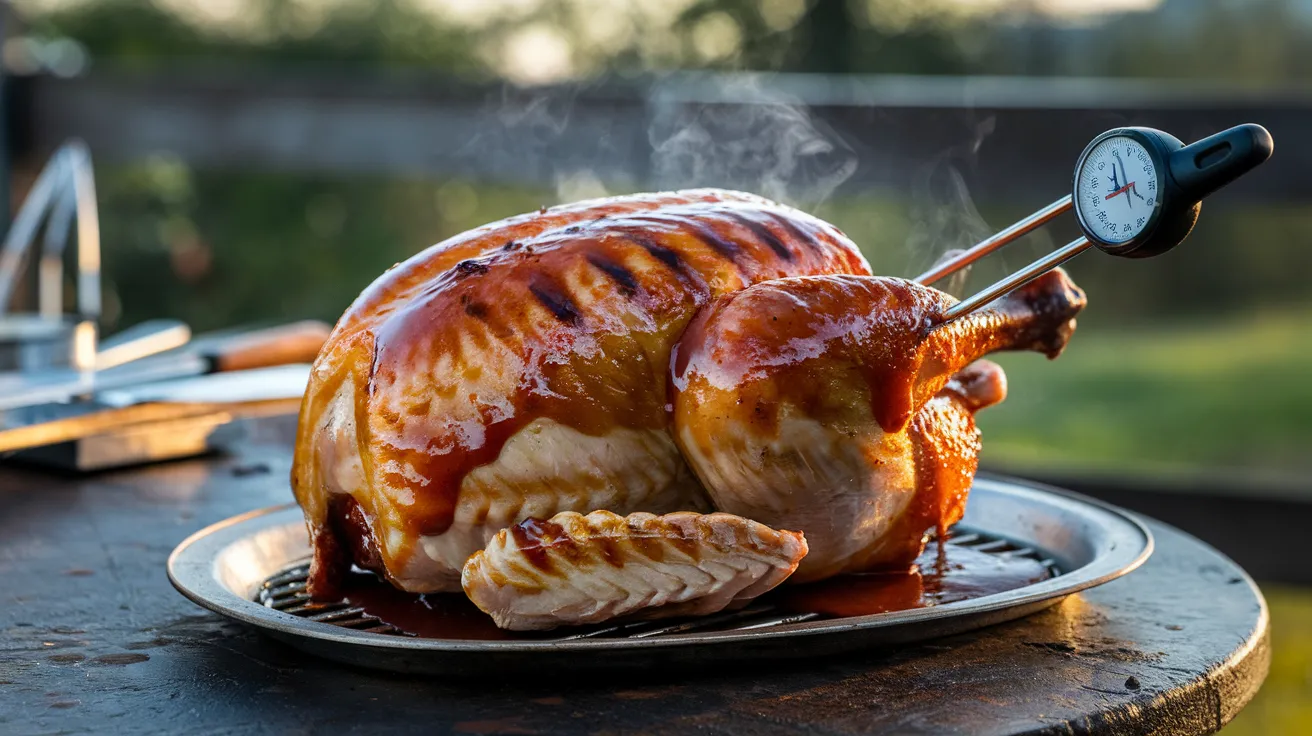
Step 15: After 30 minutes, check the internal temperature using an instant-read thermometer inserted into the thickest part of the thigh (avoid touching bone). You’re looking for 160°F at this stage.
Step 16: Move the chicken to the direct heat side of the grill, still skin-side up. Close the lid and cook for 5-7 minutes. This creates beautiful grill marks and begins crisping the skin.
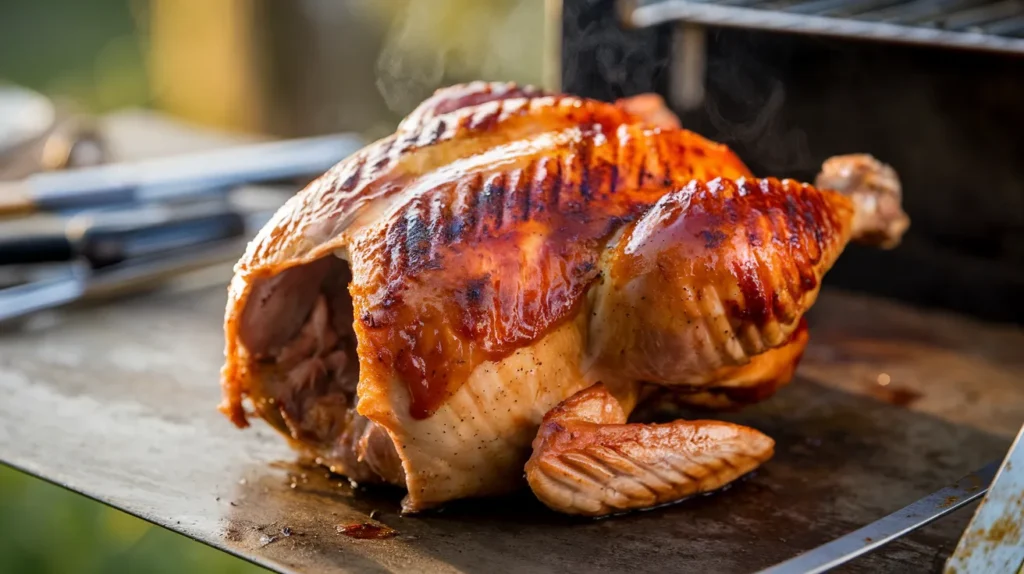
Step 17: Flip the chicken carefully using two large spatulas or grill tongs so it’s now skin-side down over direct heat. Grill for 5-7 minutes until the skin becomes golden brown and crispy with char marks. Watch carefully to prevent burning.
Step 18: During the last 3 minutes of grilling, brush the chicken generously with your homemade barbecue sauce on both sides. The sauce will caramelize and create a sticky, flavorful glaze. Avoid brushing sauce earlier because the sugars can burn.
Step 19: Check the final internal temperature. The chicken is done when the thickest part of the thigh reaches 165°F and the breast reaches 160°F. The juices should run clear when you pierce the meat.
Step 20: Transfer the grilled butterflied whole chicken with barbecue sauce to a cutting board and tent loosely with foil. Let it rest for 10 minutes. This resting period allows the juices to redistribute throughout the meat, ensuring every bite is moist and tender.
Chef’s Notes
Butterflying Benefits: Butterflying reduces cooking time by nearly half compared to roasting a whole bird. The flattened shape ensures the breasts and thighs finish cooking at the same time.
Sauce Timing: Always apply barbecue sauce during the final minutes of grilling. Applying it too early causes the sugars to burn and creates a bitter taste instead of a caramelized glaze.
Temperature Zones: The thighs can handle slightly higher temperatures than breast meat. Check multiple spots with your thermometer to ensure everything reaches safe temperatures without overcooking the breast.
Crispy Skin Secret: Starting with completely dry skin is crucial. Pat the chicken multiple times with paper towels and let it air-dry in the refrigerator uncovered for an hour if you have time. When making grilled butterflied whole chicken with barbecue sauce, moisture is the enemy of crispy skin.
Nutrition Information (Per Serving)
Calories: 520 | Protein: 48g | Carbohydrates: 22g | Fat: 26g | Saturated Fat: 7g | Cholesterol: 165mg | Sodium: 980mg | Fiber: 0g | Sugar: 18g
Delicious Variations
Spicy Chipotle Version: Replace the cayenne pepper in the barbecue sauce with 2 tablespoons of chopped chipotle peppers in adobo sauce. This creates a smoky, spicy kick that pairs beautifully with the sweet molasses base.
Sweet Peach Glazed Chicken: Swap the homemade barbecue sauce for a peach grilling sauce during the last few minutes of cooking. The fruity sweetness complements the savory, smoky grilled chicken perfectly.
Asian-Inspired Teriyaki Style: Replace the barbecue sauce seasoning with a mixture of soy sauce, honey, ginger, and garlic. Grill using the same technique but brush with this Asian-style glaze instead for a completely different flavor profile.
Carolina Mustard Style: Make a tangy mustard-based sauce by combining yellow mustard, apple cider vinegar, honey, and a touch of hot sauce. If you’re exploring different BBQ and grilling sauces, this regional variation offers a sharp, tangy alternative to the traditional tomato-based version.
Storage & Reheating
Refrigerator Storage: Let the grilled chicken cool to room temperature within 2 hours of cooking. Cut into pieces and store in an airtight container for up to 4 days. Keep the extra barbecue sauce in a separate container for up to 1 week.
Freezer Storage: Wrap individual chicken pieces tightly in plastic wrap, then place in freezer bags. Freeze for up to 3 months. Thaw overnight in the refrigerator before reheating.
Oven Method (Preferred for Crispy Skin): Preheat oven to 325°F. Place chicken pieces in a baking dish and add 2 tablespoons chicken broth or water to the dish. Cover tightly with foil and heat for 15-20 minutes until the internal temperature reaches 165°F. For crispy skin, remove the foil for the last 5 minutes.
Microwave Method (Quick Option): Place chicken pieces on a microwave-safe plate and cover with a damp paper towel. Heat on 60% power in 30-second intervals, rotating and rearranging pieces between intervals. Check the temperature after 2 minutes total and let stand 1 minute before serving.
Grill Reheating (Best Flavor): Bring chicken to room temperature (15 minutes). Preheat the grill to medium-low (300°F). Brush chicken lightly with oil and heat over indirect heat for 5-7 minutes per side. Brush with fresh sauce during the last minute.
Pro Tip: Slice refrigerated chicken before reheating for faster, more even heating throughout the meat.
Troubleshooting Common Problems
Problem 1: Chicken Burns on Outside But Raw Inside This happens when the grill is too hot or you’re cooking over direct heat the entire time. Always use the two-zone method with indirect heat for the first 30 minutes. Keep the grill temperature between 350-375°F and resist the urge to peek under the lid frequently.
Problem 2: Dry, Overcooked Breast Meat Chicken breast dries out quickly above 165°F. Pull the chicken from the grill when the breast reaches 160°F (it will climb to 165°F during resting). The thighs can handle slightly higher temperatures, but monitoring the breast closely prevents this issue.
Problem 3: Sauce Burns and Tastes Bitter Barbecue sauce contains sugars that caramelize quickly over high heat. Only apply sauce during the final 3 minutes of grilling. If your sauce still burns, try thinning it with a tablespoon of water or apple cider vinegar.
Problem 4: Uneven Cooking with Some Parts Raw This occurs if the chicken isn’t completely flattened or if the grill has hot spots. After butterflying, press down hard on the breastbone to ensure the bird is uniformly flat. Rotate the chicken 180 degrees halfway through the indirect cooking phase.
Problem 5: Skin Won’t Crisp Up Moisture is the enemy of crispy skin. Make sure to pat the chicken completely dry before seasoning. If possible, leave the seasoned chicken uncovered in the refrigerator for 1-2 hours before grilling. The dry air helps remove surface moisture.
Equipment Essentials
Kitchen Shears or Poultry Scissors: Heavy-duty shears make cutting through the backbone much easier than using a knife. Look for shears with serrated edges.
Instant-Read Thermometer: This is non-negotiable for food safety and perfect doneness. Digital thermometers give readings in 2-3 seconds.
Two-Zone Grill Setup: Whether using charcoal or gas, you need both hot and cool zones. For charcoal, push coals to one side. For gas, turn on only half the burners.
Large Spatulas or Grill Tongs: You’ll need sturdy tools to flip a whole butterflied chicken. Two spatulas work better than tongs because they support the entire bird.
Basting Brush: A silicone brush withstands high heat better than natural bristles and won’t leave hairs on your food.
Cutting Board with Juice Groove: The resting chicken releases juices, so a board with a groove prevents mess on your counter.
Shopping List (Organized by Store Section)
Meat Department:
- 1 whole chicken (4-5 lbs)
Produce Section:
- None needed (unless garnishing with fresh herbs)
Condiment Aisle:
- Ketchup (1 cup)
- Apple cider vinegar (¼ cup)
- Worcestershire sauce (2 tablespoons)
- Dijon mustard (1 tablespoon)
Baking Aisle:
- Brown sugar (3 tablespoons)
- Molasses (1 tablespoon)
Spice Aisle:
- Kosher salt
- Black pepper
- Garlic powder
- Smoked paprika
- Onion powder
- Cayenne pepper
Oil & Vinegar Aisle:
- Olive oil (2 tablespoons)
Success Secrets
1. Perfect Flattening Technique: After removing the backbone, place a heavy skillet or pot on top of the butterflied chicken for 5 minutes. This ensures complete flattening and guarantees even cooking across all parts of the bird.
2. Double-Sauce Method: Reserve half the barbecue sauce before it touches raw chicken. Use one portion for basting during grilling and serve the untouched portion at the table for extra flavor and food safety.
3. Stabilize Your Temperature: Avoid opening the grill lid during the first 30 minutes of cooking. Each time you lift the lid, the temperature drops by 50-75°F and extends cooking time by several minutes.
4. Rest Before Slicing: Always let the grilled butterflied whole chicken with barbecue sauce rest for 10 minutes after grilling. Cutting immediately causes all the juices to run out onto the cutting board instead of staying in the meat where they belong.
5. Practice the Press Test: Experienced grillers can tell when chicken is done by pressing the thickest part of the thigh. It should feel firm but still have some spring. This skill takes practice but provides a quick check between thermometer readings.
This grilled butterflied whole chicken with barbecue sauce recipe delivers restaurant-quality results in your own backyard. The butterflying technique ensures juicy, evenly cooked meat with crispy skin, while the homemade barbecue sauce adds that perfect sweet-and-tangy finish.