Prep Time: 15 minutes | Cook Time: 15 minutes | Total Time: 30 minutes | Servings: 4
Key Takeaways
- Combines two classics into one amazing Ground Beef Grilled Cheese Sandwich that even picky eaters love
- Ready in just 30 minutes for a quick weeknight dinner
- Works with any cheese you have on hand – perfect for using leftovers
- Simple to customize with different meats and cheeses
The Best of Both Worlds
Ever stood in your kitchen, hungry and stuck between making a cheeseburger or grilled cheese? I’ve been there too.
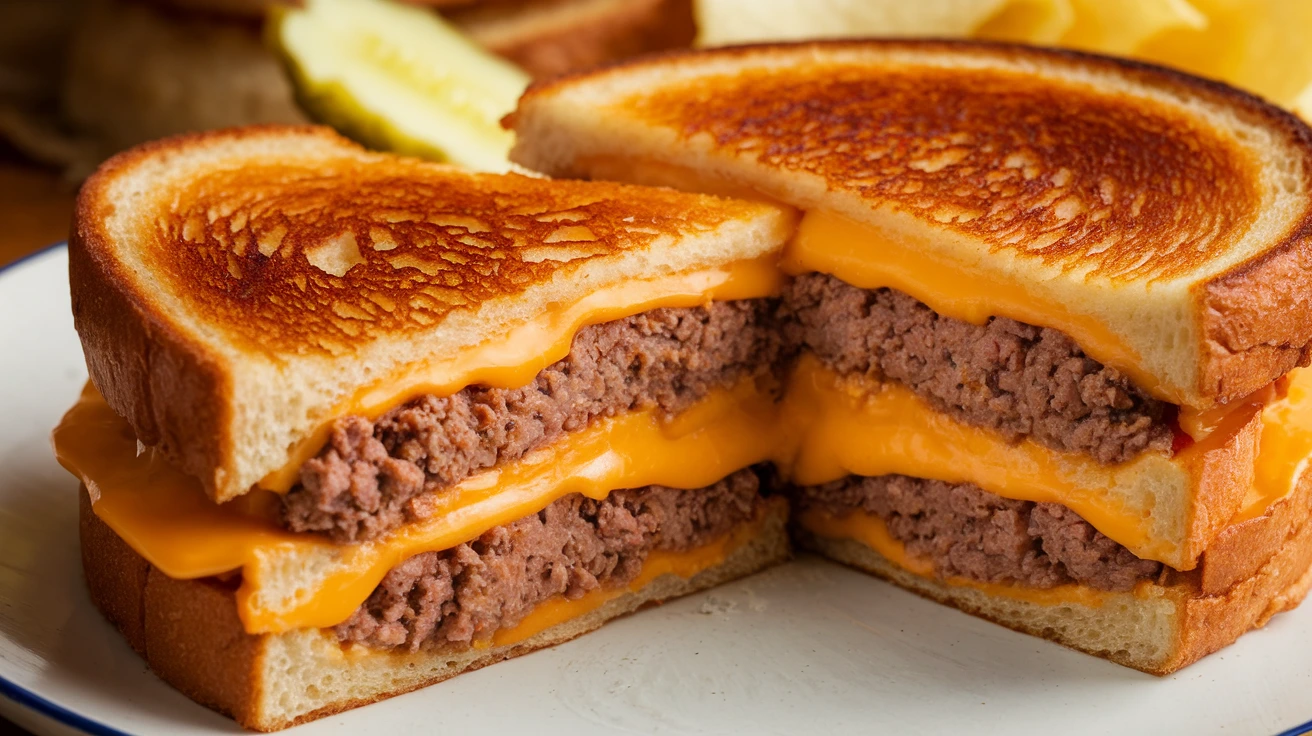
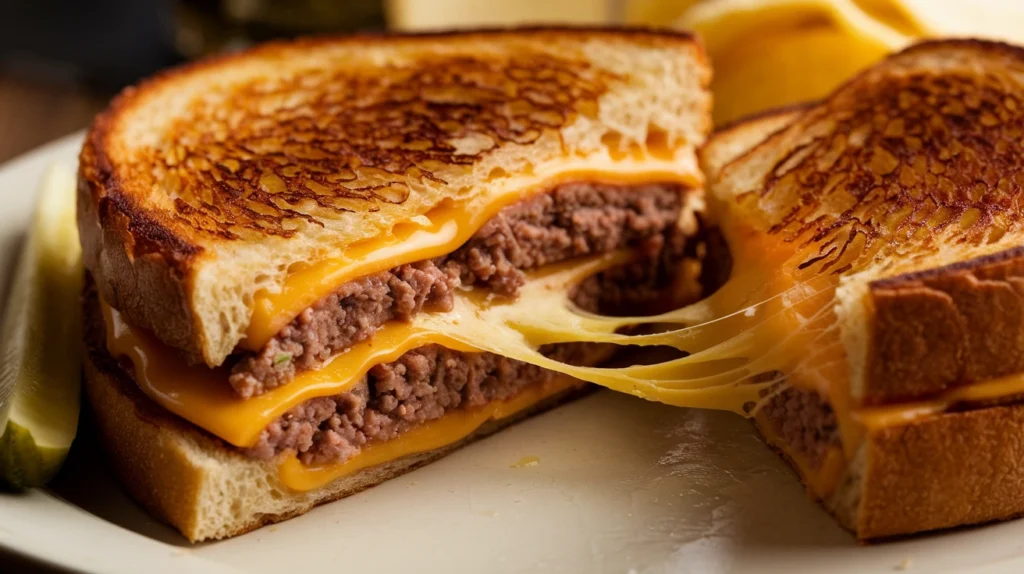
The Ground Beef Grilled Cheese Sandwich solves this problem. It combines juicy ground beef with melty cheese between crispy, buttery bread slices.
This recipe makes 4 Ground Beef Grilled Cheese Sandwiches – perfect for a family dinner. And it’s ready in just 30 minutes!
I’ll walk you through making this comfort food mashup step by step. Once you try this Ground Beef Grilled Cheese Sandwich, it’ll become your new go-to quick meal when you want something hearty but don’t have hours to cook.
Nutrition Facts
| Nutrient | Amount per Serving |
|---|---|
| Calories | 520 |
| Total Fat | 32g |
| Saturated Fat | 15g |
| Cholesterol | 110mg |
| Sodium | 760mg |
| Total Carbs | 28g |
| Dietary Fiber | 1g |
| Sugars | 3g |
| Protein | 30g |
What You’ll Need
Ingredients
| Ingredient | Amount | Notes |
|---|---|---|
| Ground beef (80/20) | 1 pound | Room temperature |
| White bread | 8 slices | Thick-cut preferred |
| American cheese | 4 slices | Or cheddar |
| Butter | 4 tablespoons | Softened |
| Onion | 1/2 medium | Finely diced |
| Garlic | 2 cloves | Minced |
| Worcestershire sauce | 1 tablespoon | |
| Salt | 1/2 teaspoon | |
| Black pepper | 1/4 teaspoon | |
| Vegetable oil | 1 tablespoon | For cooking beef |
Kitchen Tools
| Tool | Purpose |
|---|---|
| Large skillet | For cooking beef |
| Spatula | For flipping sandwiches |
| Cutting board | For prep work |
| Sharp knife | For chopping onions |
| Measuring spoons | For accuracy |
| Mixing bowl | For seasoning beef |
Ingredient Substitutions
- Ground beef: Use ground turkey or plant-based beef for a lighter option
- White bread: Sourdough or whole wheat work great too
- American cheese: Try cheddar, pepper jack, or Swiss
- Butter: Mayonnaise creates a crispy crust too
- Onion: Onion powder (1 teaspoon) works in a pinch
- Garlic: Substitute 1/2 teaspoon garlic powder
Super-Detailed Step-by-Step Instructions for Beginners
Preparation Phase (5 minutes)
- Set up your workspace
- Clear your counter of any clutter
- Wash your hands thoroughly with soap and water
- Place a cutting board in your work area
- Take out all ingredients from the refrigerator and pantry
- Get your measuring spoons ready
- Bring beef to room temperature
- Take the ground beef out of the refrigerator
- Remove it from packaging and place in a mixing bowl
- Let it sit on the counter for 15 minutes
- WHY THIS MATTERS: Room temperature beef cooks more evenly
- Prepare your vegetables
- Place the onion on your cutting board
- Cut the onion in half from top to bottom
- Peel off the outer skin layer
- Place one half flat-side down (save the other half for another recipe)
- Cut thin slices from top to bottom
- Rotate and cut across the slices to create small diced pieces
- Aim for pieces about 1/4 inch in size
- Transfer diced onion to a small bowl
- Prepare the garlic
- Take 2 garlic cloves from the head
- Press firmly with the flat side of your knife to crush each clove
- Remove and discard the papery skin
- Chop the garlic into very small pieces (mince)
- Keep chopping until pieces are tiny (about 1/16 inch)
- Transfer minced garlic to a separate small bowl
- Set up your assembly station
- Place the bread on a plate
- Take butter out to soften if it’s not already soft
- Unwrap cheese slices and have them ready on a plate
- TIP: If butter is too hard, microwave for 5-10 seconds until softened but not melted
Seasoning and Cooking the Beef (10 minutes)
- Season the ground beef
- In your mixing bowl with the ground beef, add:
- 1/2 teaspoon salt (sprinkle evenly across the meat)
- 1/4 teaspoon black pepper (sprinkle evenly)
- 1 tablespoon Worcestershire sauce (drizzle over meat)
- Using clean hands or a fork, gently mix everything together
- Mix just until combined – don’t overwork the meat
- BEGINNER TIP: Overworking makes tough beef. Stop mixing as soon as ingredients are distributed
- In your mixing bowl with the ground beef, add:
- Prepare your skillet
- Place a large skillet on the stove
- Turn the heat to medium-high
- Add 1 tablespoon vegetable oil
- Tilt the pan to spread oil across the entire surface
- Let the pan heat for about 1 minute
- HOW TO CHECK IF PAN IS HOT: Sprinkle a few drops of water – they should sizzle immediately
- Cook the onions
- Add your diced onions to the hot pan
- Using a spatula or wooden spoon, spread them out
- Stir occasionally to prevent burning
- Cook for 2-3 minutes until they become translucent (see-through) and slightly soft
- WHAT TO WATCH FOR: Onions will soften and become less white, more transparent
- Add the garlic
- Add minced garlic to the onions
- Stir continuously for 30 seconds
- IMPORTANT: Garlic burns easily! Keep it moving and don’t leave it unattended
- You’ll smell a strong garlic aroma when it’s ready
- Cook the ground beef
- Add your seasoned ground beef to the pan with onions and garlic
- Break it apart with your spatula into small crumbles
- Spread the meat across the entire pan
- Let it cook for 1 minute without stirring
- After 1 minute, stir and break up any large chunks
- Continue cooking for 5-6 more minutes, stirring occasionally
- HOW TO KNOW IT’S DONE: Beef will turn from pink/red to brown with no pink pieces visible
- Check for doneness
- Take a larger piece of beef and cut it in half to ensure no pink remains
- If you see any pink, continue cooking for another 1-2 minutes
- FOOD SAFETY: Ground beef must reach 160°F internal temperature to be safe
- Drain excess fat (if needed)
- If there’s a lot of liquid/fat in the pan:
- Turn off heat
- Carefully tilt pan to one side to pool the fat
- Use a spoon to remove excess fat into a heat-safe container
- Alternatively, line a colander with paper towels, place over a bowl, and drain beef
- Return beef to pan after draining
- SAFETY TIP: Never pour hot fat down the drain – it will solidify and clog pipes
- If there’s a lot of liquid/fat in the pan:
- Keep beef warm
- Reduce heat to low
- Stir occasionally while you prepare the bread
- If you want extra cheesy beef, try mixing in a few tablespoons of beef queso mac and cheese sauce for an amazing flavor boost
Sandwich Assembly (5 minutes)
- Prepare the bread
- Place all 8 bread slices on a clean work surface
- Take your softened butter (should be soft enough to spread easily)
- Using a butter knife or spoon:
- Scoop about 1/2 tablespoon butter for each slice
- Spread butter evenly to cover one side of each bread slice
- Make sure to butter all the way to the edges
- VISUAL CUE: Butter should be thin and even, no bare spots
- Clean and heat your skillet
- If using the same skillet from the beef:
- Turn off heat
- Carefully wipe out with paper towels
- Be careful as pan may still be hot
- Turn heat to medium (not high, not low)
- Give the pan about 1 minute to reach temperature
- If using the same skillet from the beef:
- Start the sandwiches
- Place 4 slices of bread in the skillet, butter-side DOWN
- COMMON MISTAKE: Make sure the buttered side is touching the pan!
- Leave some space between each slice for easier flipping
- If all 4 slices don’t fit comfortably, work in batches of 2
- Layer the cheese
- While bread is cooking on first side:
- Place 1 slice of cheese on each bread slice in the pan
- Center the cheese on the bread
- TIP: Tear cheese in half if needed to ensure even coverage
- While bread is cooking on first side:
- Add the beef
- Using a spoon, place about 1/4 cup of the cooked beef mixture on top of each cheese slice
- Spread beef to cover the cheese evenly
- Don’t pile too high or the sandwich might fall apart
- VISUAL CHECK: Leave a small margin around the edges with no beef
- Complete the sandwich
- Take the remaining 4 bread slices
- Place each one on top of a beef-covered slice, butter-side UP
- Gently press down with your spatula to compact the sandwich
- REMEMBER: The second slice of bread should have its buttered side facing up/outward
Cooking the Sandwiches (10 minutes)
- Cook first side completely
- Let sandwiches cook undisturbed for 2-3 minutes
- HOW TO CHECK: Carefully lift an edge with spatula to peek at the color
- Bottom should be golden brown, not pale or burned
- If browning too quickly, reduce heat slightly
- If not browning enough, increase heat slightly
- Prepare for the flip
- Use a wide spatula that can support the whole sandwich
- Slide spatula completely under first sandwich
- Hold top of sandwich gently with your other hand or another utensil
- BEGINNER TIP: The flip is the trickiest part – take your time!
- Flip each sandwich
- In one smooth motion, flip the sandwich over
- If any filling falls out, just tuck it back in with your spatula
- Repeat for all sandwiches
- AFTER FLIPPING: Press down gently on each sandwich with spatula to help seal
- Cook second side
- Cook for another 2-3 minutes
- Check for even browning by peeking under a corner
- CHEESE CHECK: Cheese should be beginning to melt – if not, cook a bit longer
- If bread is browning too fast but cheese isn’t melted, lower heat
- Final cheese melting technique
- If cheese needs more melting but bread is perfectly browned:
- Reduce heat to low
- Cover pan with a lid for 1 minute
- The trapped heat will help melt the cheese without burning the bread
- NO LID?: You can cover with aluminum foil instead
- If cheese needs more melting but bread is perfectly browned:
- Check for doneness
- Perfect sandwich will have:
- Golden brown color on both sides
- Cheese completely melted
- Bread crisp but not burned
- Beef heated through
- If one sandwich is done before others, remove it and continue cooking the rest
- Perfect sandwich will have:
- Rest before serving
- Remove sandwiches to cutting board or plates
- Let rest for 1 minute before cutting
- WHY REST?: Allows cheese to set slightly so it doesn’t all ooze out when cut
- Slice and serve
- Using a sharp knife, cut each sandwich diagonally
- Clean knife between cuts if needed
- Transfer to plates
- Serve immediately while hot
Serving Suggestions
- Accompaniments
- Serve with a pickle spear on the side
- Add a small handful of potato chips
- For a complete meal, pair with:
- Simple green salad with light dressing
- Cup of tomato soup for dipping
- Fresh vegetable sticks
- If you loved this recipe, you might also enjoy Mediterranean ground beef stir fry for another quick dinner option
- Presentation
- Place sandwich halves with cut sides facing up to show the layers
- If cheese is oozing out, that’s perfect!
- Garnish plate with a sprinkle of herbs if desired
Troubleshooting
| Problem | Solution |
|---|---|
| Sandwich burning too quickly | Lower heat to medium-low and watch closely |
| Cheese not melting | Cover pan with lid for 1 minute to trap heat |
| Filling falling out when flipping | Let beef cool slightly before assembly and don’t overfill |
| Bread too soggy | Make sure to cook beef until excess moisture evaporates |
| Uneven browning | Rotate pan halfway through cooking if your stove has hot spots |
| Butter burning in pan | Your heat is too high – clean pan and start again with lower heat |
| Sandwich falls apart when flipping | Use a wider spatula and support the top with your hand |
Variations & Substitutions
Cheese Options
- Spicy version: Use pepper jack cheese and add jalapeños
- Extra cheesy: Use a combination of American and sharp cheddar
- Gourmet twist: Try Gruyère or Gouda for deeper flavor
Meat Alternatives
- Lighter option: Use ground turkey or chicken (cook to 165°F)
- Vegetarian version: Substitute with plant-based ground “beef”
- Different flavor: Try ground lamb with feta cheese
Flavor Boosts
- Add bacon: Cook and crumble 4 strips of bacon with the beef
- BBQ style: Mix in 2 tablespoons BBQ sauce with the cooked beef
- Stuffed bread option: For an enclosed version, try my cheesy ground beef stuffed bread roll which uses similar ingredients with a different presentation
Storage & Reheating
Storing Leftovers
- Refrigerator:
- Let sandwiches cool completely
- Wrap each sandwich individually in aluminum foil
- Store in refrigerator up to 2 days
- Freezer: Not recommended – bread texture suffers and can become soggy
Reheating Methods
- Skillet (best method):
- Heat skillet over medium-low heat
- Unwrap sandwich completely
- Place sandwich in skillet
- Cook 2 minutes per side until heated through
- TIP: Add a tiny bit of butter to pan for extra crispiness
- Oven:
- Preheat to 350°F
- Keep sandwich wrapped in foil
- Place on baking sheet
- Heat for 10 minutes
- For crispier bread, unwrap and heat for final 2 minutes
- Avoid microwave:
- Not recommended as bread becomes soggy
- If you must, use at 50% power for 30-second intervals
- Remove when just heated through
Safety Notes & Tips
Food Safety
- Always cook ground beef to an internal temperature of 160°F
- Don’t leave assembled sandwiches at room temperature for more than 2 hours
- Wash hands with soap and water after handling raw meat
- Clean all surfaces that contacted raw meat with hot, soapy water
Pro Tips
- Perfect bread: Slightly stale bread makes better grilled cheese – it holds up better
- Even butter: Softened butter (not melted) spreads more evenly without tearing bread
- Beef texture: Don’t overwork the meat when cooking – it becomes tough
- Low and slow: Lower heat gives more time for cheese to melt completely
- Handle with care: Use two hands when flipping – one for the spatula, one to guide the top
Final Thoughts
This Ground Beef Grilled Cheese Sandwich recipe brings together two comfort food classics in one amazing meal. It’s perfect for busy weeknights when you want something filling that doesn’t take hours to make.
The beauty of this recipe is its flexibility. Use whatever cheese you have on hand, swap in different meats, or add extra seasonings to make it your own.
Next time you’re torn between a burger and grilled cheese, remember you can have both in one delicious sandwich!