Key Takeaways:
- This wholesome porridge provides 8g of fiber and 10g of protein per serving
- Prep in just 5 minutes, cook in 10 minutes
- Customize with your favorite toppings for endless variety
- Make ahead and reheat for busy mornings
Say Goodbye to Boring Breakfast
Ever find yourself rushing out the door, skipping the most important meal of the day?
I’ve been there too. That’s why I created this healthy breakfast porridge recipe that’s not only quick but packed with nutrients to fuel your morning.
This whole oat porridge has become my go-to breakfast for good reason. It’s simple, uses everyday ingredients, and can be customized in countless ways.
Nutrition Facts
| Nutrient | Amount Per Serving |
|---|---|
| Calories | 320 |
| Protein | 10g |
| Fiber | 8g |
| Fat | 7g |
| Carbohydrates | 56g |
| Sugar | 12g (naturally occurring) |
What You’ll Need
Ingredients (Serves 4)
| Ingredient | Amount |
|---|---|
| Rolled oats | 2 cups |
| Water | 2 cups |
| Milk (dairy or plant-based) | 2 cups |
| Salt | ¼ teaspoon |
| Honey or maple syrup | 2 tablespoons |
| Cinnamon | 1 teaspoon |
| Vanilla extract | ½ teaspoon |
| Fresh fruit for topping | 1 cup |
| Nuts or seeds | ¼ cup |
Kitchen Tools
| Tool | Purpose |
|---|---|
| Medium saucepan | For cooking the porridge |
| Measuring cups and spoons | For accurate measurements |
| Wooden spoon | For stirring |
| Bowls for serving | For individual portions |
Ingredient Substitutions
- Oats: Steel-cut oats work too (increase cooking time to 20 minutes)
- Milk: Any dairy or plant milk works (oat milk creates extra creamy porridge)
- Sweetener: Replace honey/maple syrup with mashed banana for natural sweetness
- Toppings: Use frozen fruit when fresh isn’t available
Step-by-Step Instructions for Beginners
Preparation Phase (5 minutes)
- Set up your workspace:
- Clear your kitchen counter to have enough space to work
- Place your medium saucepan on the stovetop (don’t turn it on yet)
- Arrange all ingredients on the counter so they’re within easy reach
- Measure your dry ingredients:
- Take your measuring cups and scoop 2 cups of rolled oats
- Level off each cup with the back of a knife for accuracy
- Set the measured oats aside in a small bowl
- Measure your liquids:
- Pour exactly 2 cups of water into a measuring cup
- Measure 2 cups of your preferred milk (dairy or plant-based)
- Have these ready next to your stove
- Prepare your seasonings:
- Use a ¼ teaspoon to measure the salt
- Measure 1 teaspoon of cinnamon and place in a small dish
- Measure ½ teaspoon of vanilla extract (keep in the bottle until needed)
- Measure 2 tablespoons of honey or maple syrup (keep in the container until needed)
- Prepare your toppings:
- Wash any fresh fruit you plan to use
- Cut larger fruits like strawberries, bananas, or apples into bite-sized pieces
- Measure ¼ cup of nuts or seeds and roughly chop larger nuts if desired
- Set all toppings aside in small bowls
Cooking Phase (10 minutes)
- Heat your liquids:
- Place your saucepan on the stovetop
- Pour the 2 cups of water and 2 cups of milk into the pan
- Add the ¼ teaspoon of salt and stir once
- Turn the heat to medium (not high, as milk can burn easily)
- Stay by the stove and watch for small bubbles forming around the edges of the liquid
- Check for boiling:
- Look for small bubbles that start to form around the edges of the pan
- When these bubbles become more active and move toward the center, your liquid is ready
- This should take approximately 3-4 minutes
- Important: Do not let it reach a rolling boil or it might bubble over
- Add the oats carefully:
- Once you see the small bubbles across the surface, it’s time to add the oats
- Hold your bowl of oats close to the pan surface to avoid splashing
- Pour the oats slowly into the liquid while stirring with your wooden spoon
- Stir immediately in a figure-eight motion to prevent clumps from forming
- Reduce the heat:
- As soon as the oats are mixed in, turn the heat down to low
- You want to see tiny bubbles occasionally breaking the surface, not a constant boil
- If it’s bubbling too much, lower the heat further
- Stir consistently:
- Set a timer for 5 minutes
- Stir the porridge every 30 seconds to prevent it from sticking to the bottom
- Use your wooden spoon to scrape the bottom of the pan as you stir
- The porridge will gradually thicken – this is exactly what you want
- Check the consistency:
- After 5 minutes of cooking, check if the porridge has thickened
- Dip your wooden spoon into the porridge and lift it
- The porridge should coat the back of the spoon but still be a bit fluid
- If it’s too thin, cook for another 2 minutes, continuing to stir
- If it’s too thick, add 2 tablespoons of milk at a time until you reach your desired consistency
- Test for doneness:
- Take a small taste (be careful, it’s hot!)
- The oats should be soft but still have a slight chew
- If the oats are still too firm, cook for another 1-2 minutes
- Add flavorings:
- Once the consistency is right, turn off the heat
- Add the 1 teaspoon of cinnamon and stir well
- Add the ½ teaspoon of vanilla extract and stir
- Add the 2 tablespoons of honey or maple syrup and stir until everything is well combined
- Let the porridge sit in the pan for 1 minute to allow the flavors to meld
Serving Phase (2 minutes)
- Prepare your serving bowls:
- Place your 4 serving bowls on the counter
- If the bowls are cold, you can warm them briefly in the microwave for 10 seconds (optional but nice for keeping porridge hot longer)
- Portion the porridge:
- Use a ladle or large spoon to divide the porridge evenly among the four bowls
- Aim for approximately 1 cup of porridge per bowl
- Be careful as the porridge is very hot
- Add your toppings:
- Allow the porridge to cool slightly for 1 minute before adding toppings
- Sprinkle ¼ cup of your prepared fresh fruit on top of each bowl
- Add 1 tablespoon of nuts or seeds to each bowl
- If desired, drizzle an additional teaspoon of honey or maple syrup over each serving
- Serve immediately:
- The porridge will continue to thicken as it cools
- Provide spoons and napkins
- Enjoy while warm!
Troubleshooting
| Problem | Solution |
|---|---|
| Porridge too thick | Add more milk, 2 tablespoons at a time, stir well after each addition |
| Porridge too thin | Cook 1-2 minutes longer or add 2 tablespoons more oats and cook for 2 more minutes |
| Oats still chewy | Continue cooking with extra liquid until tender, sometimes an extra 2-3 minutes is needed |
| Porridge sticking to pan | Immediately lower heat, add 2 tablespoons more liquid, and stir constantly, scraping the bottom |
| Bland taste | Add a pinch more salt (enhances sweetness) and extra cinnamon or a dash of nutmeg |
| Lumpy porridge | Next time, stir more vigorously when adding oats and continue stirring frequently |
Variations & Substitutions
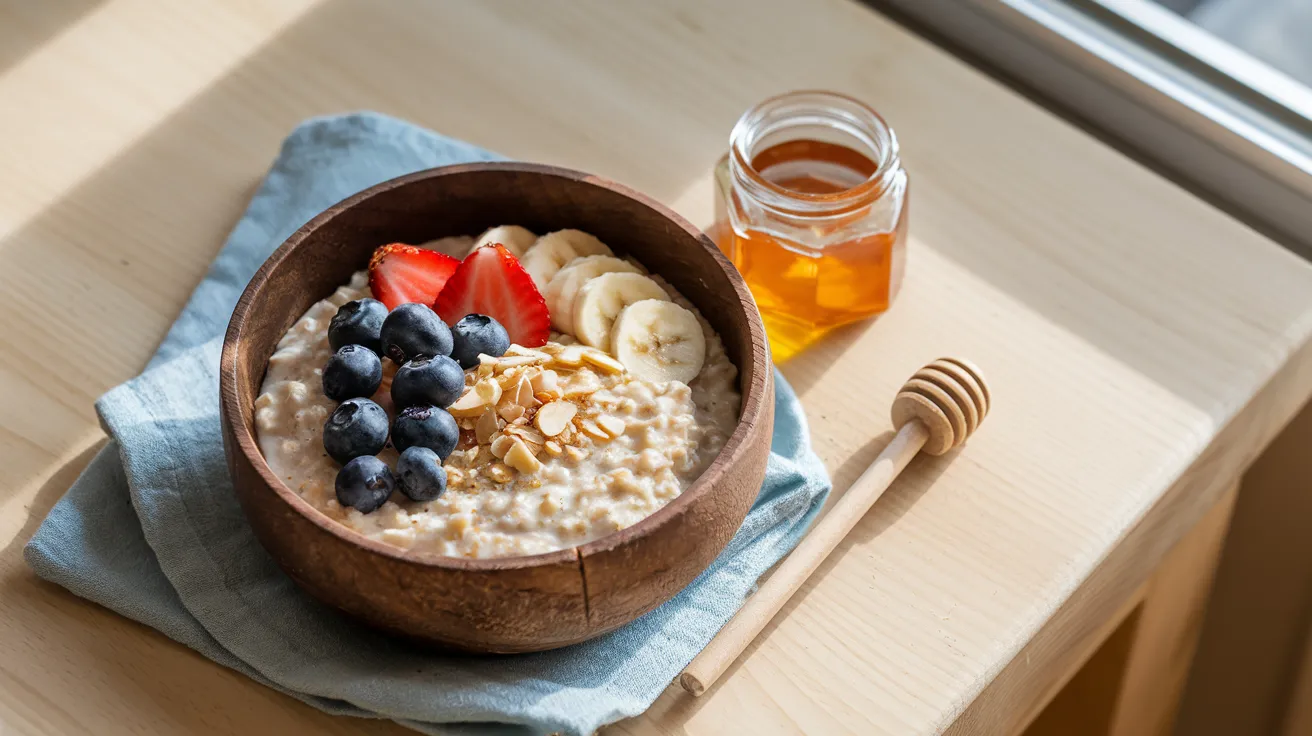
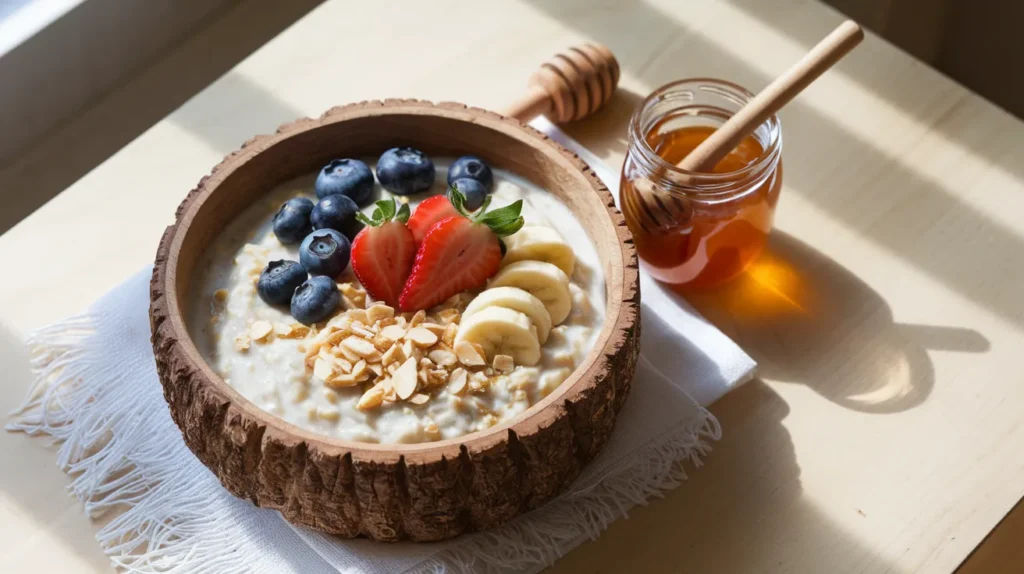
Fruit & Nut Bowl
Add sliced banana, strawberries, and chopped almonds
Chocolate Lover’s Porridge
Stir in 1 tablespoon cocoa powder and top with dark chocolate chips
Savory Porridge
Skip the sweetener and top with a poached egg, avocado, and a sprinkle of salt and pepper
Apple Pie Porridge
Add diced apple while cooking and top with toasted walnuts
Storage & Reheating
Refrigerator Storage:
- Let porridge cool completely before storing (no more than 2 hours at room temperature)
- Store leftover porridge in an airtight container
- Keeps fresh for up to 3 days in the fridge
- Will thicken when cold – this is normal
Reheating Instructions:
- Take the container from the refrigerator
- Add 2-3 tablespoons of milk to cold porridge and stir
- Microwave: Place in a microwave-safe bowl, cover loosely, heat for 1 minute, stir, then heat for another 30 seconds
- Stovetop: Place porridge in a small saucepan with 3-4 tablespoons of additional milk, heat on low while stirring until hot (about 3-4 minutes)
- Check temperature before eating, as hot spots can develop
Make-Ahead Option:
- Prepare a large batch on Sunday for quick weekday breakfasts
- Store individual portions in small containers
- Add a little extra milk when preparing for storage to account for thickening
Safety Notes & Tips
- Hot Surfaces Warning: The porridge and saucepan get very hot – always use pot holders when handling the pan and be careful of steam
- First-Time Cook Tip: Start with exactly the recommended liquid-to-oat ratio (1:1 ratio of oats to liquid)
- Dietary Notes:
- For gluten-free, use certified gluten-free oats (regular oats may have cross-contamination)
- For dairy-free, use any plant milk (oat, almond, or coconut milk work well)
- For vegan, use maple syrup instead of honey
- For nut allergies, use seeds like pumpkin or sunflower instead
- Common Mistakes to Avoid:
- Don’t use high heat (causes sticking and burning)
- Don’t skip the salt (it enhances flavor and doesn’t make the porridge taste salty)
- Don’t leave unattended (can boil over quickly, especially when milk is involved)
- Don’t add all toppings during cooking (many lose their texture and nutrition)
This healthy breakfast porridge recipe has become my morning ritual. It’s warming, nutritious, and keeps me full until lunch. The best part? You can make it your own with whatever toppings you love!
What’s your favorite way to top your porridge? Try this recipe and let me know in the comments!
Prep Time: 5 minutes | Cook Time: 10 minutes | Total Time: 15 minutes | Serves: 4