Prep Time: 15 minutes | Cook Time: 15 minutes | Total Time: 30 minutes | Servings: 4
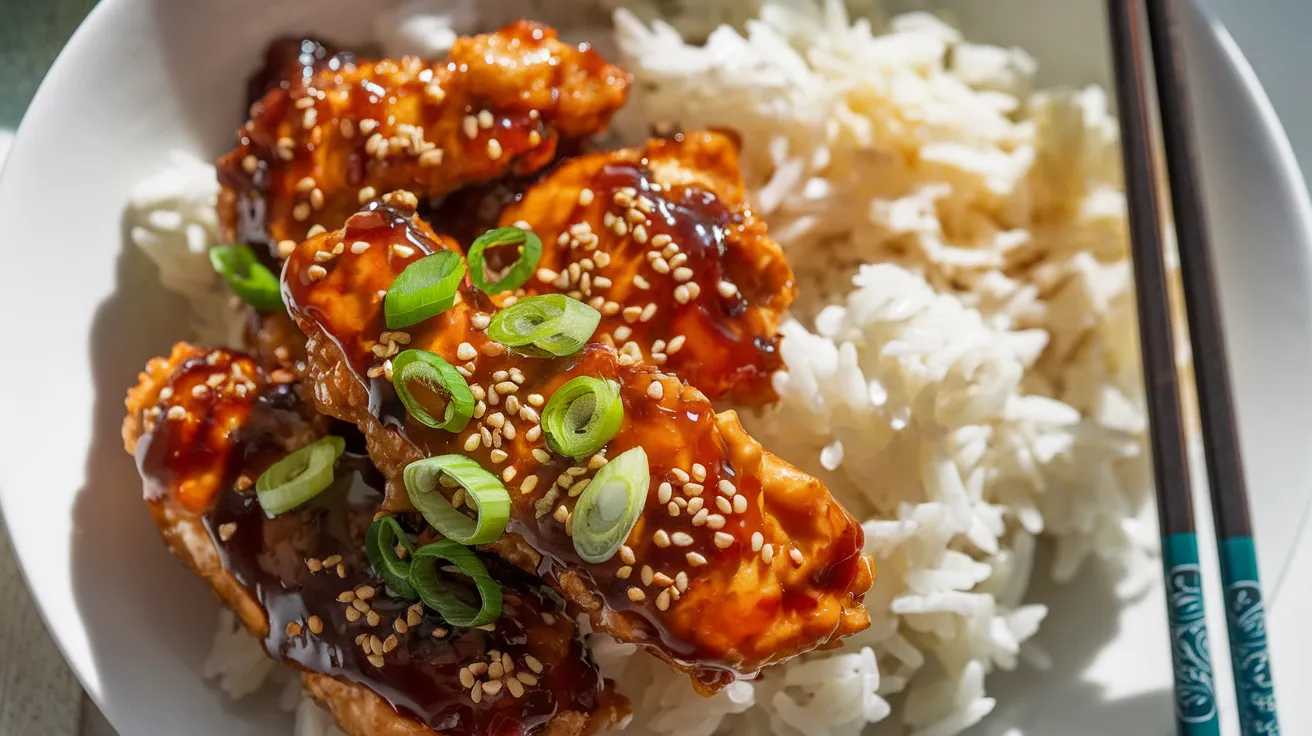
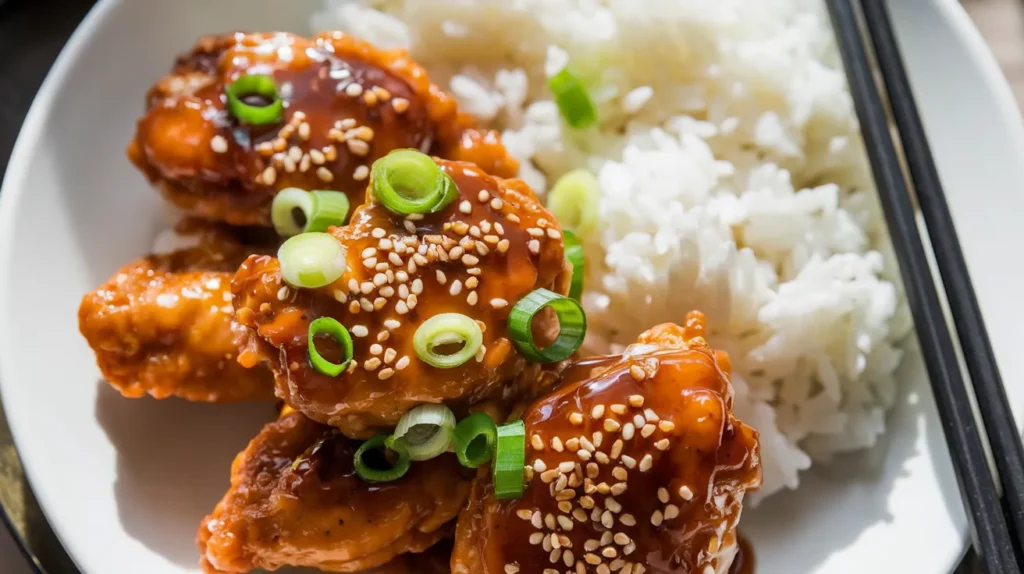
- Crispy chicken pieces coated in a sweet and tangy honey sesame sauce
- Ready in just 30 minutes – faster than ordering takeout
- Uses pantry staples you likely already have at home
- Kid-friendly recipe that’s still packed with flavor
Why Make Honey Sesame Chicken at Home?
Let’s face it – takeout bills add up fast. Making Honey Sesame Chicken at home not only saves money but gives you control over the ingredients.
This recipe delivers that perfect balance of sweet, tangy, and savory flavors with crispy chicken and a glossy sauce. Best part? It’s on the table in just 30 minutes. If you enjoy Chinese-inspired chicken dishes, you’ll also love this Sticky Honey Chicken that uses a similar sweet glaze technique.
Nutrition Facts
| Nutrient | Amount per Serving | % Daily Value |
|---|---|---|
| Calories | 420 | – |
| Protein | 32g | 64% |
| Carbohydrates | 38g | 13% |
| Fat | 16g | 20% |
| Fiber | 1g | 4% |
| Sugar | 23g | 46% |
| Sodium | 680mg | 30% |
What You’ll Need
Ingredients
| Ingredient | Amount | Notes |
|---|---|---|
| For the Chicken | ||
| Boneless, skinless chicken thighs | 1½ pounds | Cut into 1-inch pieces |
| Cornstarch | ½ cup | For coating |
| Salt | ½ teaspoon | |
| Black pepper | ¼ teaspoon | |
| Vegetable oil | ¼ cup | For frying |
| For the Sauce | ||
| Honey | ⅓ cup | |
| Soy sauce | ¼ cup | Low-sodium preferred |
| Rice vinegar | 2 tablespoons | |
| Sesame oil | 1 tablespoon | |
| Garlic | 3 cloves | Minced |
| Ginger | 1 tablespoon | Freshly grated |
| Red pepper flakes | ¼ teaspoon | Optional, for heat |
| Cornstarch | 1 tablespoon | For thickening |
| Water | 2 tablespoons | For cornstarch slurry |
| For Garnish | ||
| Sesame seeds | 2 tablespoons | Toasted |
| Green onions | 3 | Thinly sliced |
| Steamed rice | 4 cups | For serving |
Kitchen Tools
| Tool | Purpose |
|---|---|
| Large skillet or wok | For frying chicken and making sauce |
| Medium bowl | For coating chicken |
| Small bowl | For mixing sauce ingredients |
| Whisk | For stirring sauce |
| Measuring cups and spoons | For precise measurements |
| Cutting board | For prepping ingredients |
| Sharp knife | For cutting chicken |
| Tongs | For flipping chicken pieces |
| Wooden spoon | For stirring |
| Paper towels | For draining excess oil |
Ingredient Substitutions
- Chicken thighs: Substitute with chicken breast for a leaner option (reduce cooking time by 1-2 minutes)
- Honey: Use maple syrup or brown sugar (reduce to ¼ cup if using brown sugar)
- Soy sauce: Use tamari or coconut aminos for gluten-free options
- Rice vinegar: Apple cider vinegar works in a pinch
- Vegetable oil: Any neutral oil like canola or peanut oil
- Fresh ginger: Substitute with ½ teaspoon ground ginger if needed
Step-by-Step Instructions
Preparation Phase
- Gather all ingredients and tools
- Take all ingredients out of the refrigerator and pantry
- Arrange them on your counter by category (chicken, coating, sauce ingredients, garnishes)
- This makes the cooking process much smoother
- Check that you have all tools ready and clean
- Prepare the rice
- Rinse 2 cups of rice in a fine mesh strainer until water runs clear
- Add to rice cooker or pot with 3½ cups water
- Start cooking so it’s ready when the chicken is done
- If using a stovetop: bring to boil, reduce to simmer, cover, and cook for 15-20 minutes
- Prepare the chicken
- Unwrap chicken thighs and place on cutting board
- Pat each piece completely dry with paper towels (this is important for crispiness!)
- Using a sharp knife, trim off any excess fat
- Cut into 1-inch pieces by slicing first into strips, then cutting crosswise
- Try to make pieces roughly the same size so they cook evenly
- Place cut chicken in a medium bowl
- Make the coating mixture
- Measure ½ cup cornstarch and add to bowl with chicken
- Add ½ teaspoon salt and ¼ teaspoon black pepper
- Use your hands or tongs to toss everything together, making sure each piece of chicken is thoroughly coated with cornstarch
- The coating should look even and white on all sides
- Let sit for 5 minutes to help coating adhere to the chicken
- The chicken might look dry and powdery – this is normal
- Prepare the sauce components
- Peel garlic cloves and mince finely (about the size of grains of rice)
- Peel ginger using the edge of a spoon to scrape off skin
- Grate ginger using a microplane or the smallest holes on a box grater
- In a small bowl, combine:
- ⅓ cup honey (measure by spraying measuring cup with cooking spray first so honey slides out easily)
- ¼ cup soy sauce
- 2 tablespoons rice vinegar
- 1 tablespoon sesame oil
- Minced garlic
- Grated ginger
- ¼ teaspoon red pepper flakes (optional)
- Whisk together until completely combined
- The mixture should look uniform with no separate layers
- Make cornstarch slurry
- In a separate small bowl, add 1 tablespoon cornstarch
- Add 2 tablespoons cold water
- Stir with a fork or small whisk until completely smooth
- Make sure there are no lumps – rub any lumps between your fingers to dissolve them
- Set aside within easy reach of your cooking area
- Prepare garnishes
- Place a small skillet over medium heat (no oil needed)
- Add 2 tablespoons sesame seeds to dry pan
- Stir constantly with a wooden spoon for 2-3 minutes
- Watch carefully – they burn quickly!
- Seeds are done when light golden brown and fragrant
- Immediately transfer to a small plate to cool
- Rinse green onions under cold water
- Pat dry with paper towels
- Trim off root ends and any wilted green parts
- Slice thinly (about ⅛-inch thick) on a diagonal
- Keep white and green parts separate (white parts are for cooking, green for garnish)
Cooking Phase for Perfect Honey Sesame Chicken
- Heat oil for frying
- Place large skillet or wok on stove over medium-high heat
- Add ¼ cup vegetable oil
- Allow oil to heat for 2-3 minutes
- Test readiness by sprinkling a tiny bit of cornstarch into oil
- If it sizzles immediately and floats to the top, the oil is ready
- If it sinks without sizzling, wait another minute and test again
- If it browns immediately, oil is too hot – reduce heat slightly
- This technique is similar to what we use in our Chicken Nanban recipe for achieving the perfect crispy exterior
- Fry the chicken (first batch)
- Carefully add half the chicken pieces to hot oil one by one
- Do not dump them all in at once – this will cause oil to splatter
- Arrange pieces so they aren’t touching (overcrowding causes steaming instead of frying)
- Let cook undisturbed for 3 minutes until golden brown on bottom
- Using tongs, flip each piece over carefully to avoid splashing
- Cook another 3 minutes until second side is golden
- Check by cutting into a larger piece – it should be white throughout with no pink
- Using a slotted spoon or tongs, transfer to a paper towel-lined plate
- The paper towels will absorb excess oil
- Fry the chicken (second batch)
- Make sure oil is still hot (test again if needed)
- Repeat the process with remaining chicken
- Add a little more oil if needed (1-2 tablespoons)
- Cook exactly as you did the first batch
- Transfer to paper towel-lined plate with first batch
- The coating should be crispy and golden brown
- Prepare the pan for sauce
- Carefully pour out excess oil from pan into a heat-safe container
- Leave about 1 tablespoon of oil in the pan
- Return pan to stove and reduce heat to medium
- Allow pan to cool slightly (about 30 seconds)
- Cook the sauce
- Add white parts of sliced green onions to pan
- Stir for 30 seconds until fragrant
- Whisk sauce mixture one more time to recombine
- Pour sauce mixture into pan slowly
- It will bubble vigorously – this is normal!
- Allow to simmer for 1 minute, stirring constantly
- Keep face away from pan as steam will rise
- Thicken the sauce
- Stir cornstarch slurry again with fork (it separates while sitting)
- Pour slurry into sauce slowly while whisking constantly
- Continue stirring as sauce thickens, about 1 minute
- Sauce is ready when it coats the back of a spoon
- Run your finger through sauce on spoon – if line stays clear, it’s thick enough
- If sauce becomes too thick, add 1 tablespoon water and stir
- Combine chicken and sauce
- Add all fried chicken pieces back to pan
- Using a wooden spoon or tongs, gently toss to coat each piece completely
- Be careful not to break the crispy coating
- Cook for 1 more minute, stirring gently
- The sauce should be clinging to the chicken, glossy and thick
Finishing Steps
- Add final touches
- Turn off heat
- Sprinkle toasted sesame seeds over chicken
- Add half of the green parts of sliced green onions
- Toss very gently once or twice to distribute
- Save remaining green onions for serving
- Check seasoning
- Taste a small piece (be careful, it’s hot!)
- If needed, add a pinch more salt or a drizzle of honey
- Stir gently to incorporate any additions
- Serve
- Check that rice is cooked and fluffy
- Fluff rice with a fork
- Scoop 1 cup cooked rice onto each plate
- Spoon honey sesame chicken over or beside rice
- Garnish with remaining sliced green onions
- Sprinkle with additional sesame seeds if desired
- Serve immediately while hot and crispy
Troubleshooting
Common Issues & Solutions
- Sauce too thin?
- Mix another teaspoon of cornstarch with a tablespoon of cold water
- Stir until smooth, then add to sauce while simmering
- Continue stirring until thickened
- Sauce too thick?
- Add 1 tablespoon of water at a time
- Stir after each addition until reaching desired consistency
- Up to 3 tablespoons may be added
- Chicken not crisping?
- Make sure chicken pieces are completely dry before coating
- Check that oil is hot enough before adding chicken
- Don’t overcrowd the pan – fry in smaller batches if needed
- Let coated chicken sit for 5-10 minutes before frying
- Sauce too sweet?
- Add 1 tablespoon of rice vinegar
- Or add a squeeze of fresh lemon juice (about 1 teaspoon)
- Stir and taste, adding more if needed
- Not enough flavor?
- Add an extra teaspoon of grated ginger
- Add an extra garlic clove, minced
- Add ½ teaspoon more sesame oil
- A pinch of salt can enhance all flavors
- Chicken burning too quickly?
- Lower heat to medium
- Make sure chicken pieces aren’t too small (they cook faster)
- Add a tablespoon more oil to prevent sticking
Variations & Substitutions for Honey Sesame Chicken
Make It Your Own
Spicy Honey Sesame Chicken
- Add 1-2 tablespoons of sriracha to the sauce
- Or add 1 teaspoon of gochujang paste
- Or include ¼-½ teaspoon of crushed red pepper flakes
- For a completely different spicy chicken experience, try our Black Pepper Chicken with Mushrooms which offers a more savory flavor profile
Honey Sesame Vegetables
- Add 2 cups of mixed vegetables:
- Broccoli florets (1 cup)
- Bell peppers, sliced (½ cup)
- Snow peas or snap peas (½ cup)
- Steam vegetables separately for 2-3 minutes until bright but still crisp
- Add to pan when returning chicken to sauce
Orange Honey Sesame Chicken
- Add 2 tablespoons of fresh orange juice to the sauce
- Include 1 teaspoon of orange zest
- Reduce honey to ¼ cup to balance sweetness
Gluten-Free Option
- Use tamari instead of soy sauce (check label to ensure it’s gluten-free)
- Verify cornstarch is certified gluten-free (most brands are, but some may have cross-contamination)
- Serve with cooked rice noodles or cauliflower rice instead of regular rice
Healthier Version
- Use chicken breast instead of thighs
- Bake coated chicken instead of frying:
- Preheat oven to 425°F
- Line baking sheet with parchment paper
- Spray coated chicken with cooking spray
- Bake for 15 minutes, flipping halfway
- Reduce honey to ¼ cup
- Add 1 tablespoon water to sauce to maintain volume
Storage & Reheating
Keep It Fresh
Refrigerator Storage:
- Allow chicken and sauce to cool completely (no more than 2 hours at room temperature)
- Transfer to airtight containers
- Store chicken and sauce separate from rice for best results
- Refrigerate for up to 3 days
- Label container with date made
Freezer Storage:
- Cool chicken and sauce completely
- Place in freezer-safe container or heavy-duty freezer bag
- Remove as much air as possible
- Freeze for up to 2 months
- Label with contents and date
- Thaw overnight in refrigerator before reheating
- Do not freeze rice (make fresh when serving leftovers)
Reheating Methods:
- Stovetop (Best Method):
- Place a non-stick skillet over medium heat
- Add 1 tablespoon water to pan
- Add chicken and sauce
- Cover with lid to create steam
- Heat for 3-4 minutes, stirring occasionally
- Check temperature is at least 165°F throughout
- If sauce is too thick, add a splash of water
- Microwave:
- Place in microwave-safe dish
- Cover with a damp paper towel
- Heat at 70% power for 1 minute
- Stir gently
- Continue heating in 30-second intervals, stirring between each
- Heat until internal temperature reaches 165°F
- Note: The chicken won’t be as crispy when reheated in the microwave
- Oven:
- Preheat oven to 350°F
- Place chicken in an oven-safe dish
- Add 1-2 tablespoons of water or chicken broth
- Cover tightly with foil
- Heat for 10-15 minutes until hot throughout
- Remove foil for last 2 minutes to help crisp up coating
Safety Notes & Tips
Kitchen Success
- Raw Chicken Safety:
- Wash hands with soap and warm water for 20 seconds after handling raw chicken
- Use separate cutting boards for chicken and vegetables (color-coded boards help)
- Clean all surfaces that come in contact with raw chicken using hot, soapy water
- Use paper towels to clean up raw chicken juices, not sponges or cloth towels
- Do not rinse raw chicken in sink (spreads bacteria)
- Oil Temperature:
- If oil starts smoking, it’s too hot – remove from heat briefly
- Never leave hot oil unattended
- Keep a lid nearby to cover pan in case of flare-ups
- Have baking soda available for grease fires (never use water)
- Keep a heat-resistant oven mitt or glove nearby
- Time-Saving Tips:
- Cut chicken and prepare sauce ingredients the night before
- Store cut chicken in refrigerator in sealed container
- Store prepared sauce ingredients in refrigerator in separate sealed container
- Toast sesame seeds in advance and store in airtight container at room temperature
- Use pre-minced garlic and ginger to save on prep time
- Best Practices:
- Taste and adjust sauce before adding chicken back in
- For extra crunch, toss chicken in sauce right before serving
- Serve with steamed broccoli for a complete meal
- Use chopsticks for authentic presentation
- Leftover sauce makes great dipping sauce for vegetables
- Making Ahead:
- Prepare sauce up to 3 days ahead and refrigerate
- Cut chicken up to 1 day ahead and refrigerate
- Cook rice up to 1 day ahead, refrigerate, and reheat
- Complete final assembly just before serving for best texture and flavor