- Ready in just 30 minutes – perfect for busy weeknights when time is tight
- One-pot wonder – everything cooks together for maximum flavor with minimal cleanup
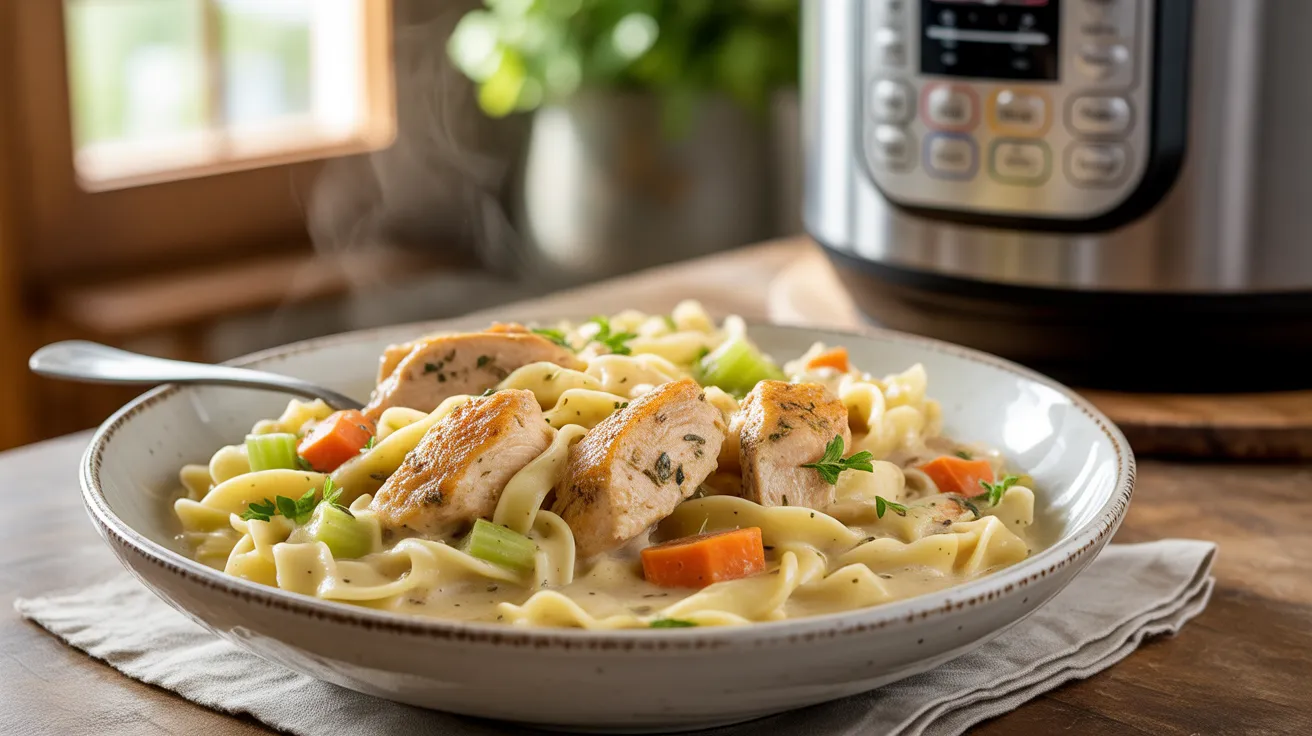
- Kid-approved comfort food – tender chicken and soft egg noodles in a creamy sauce
- Freezer-friendly – make now, enjoy later when you need a quick meal solution
Why This Instant Pot Chicken And Noodles Recipe Works
Ever find yourself staring into the fridge at 5 PM with hungry family members circling? We’ve all been there.
This Instant Pot Chicken And Noodles recipe is your new secret weapon. It transforms simple ingredients into a hearty, homemade meal in just 30 minutes.
The Instant Pot works its magic by infusing the noodles with rich chicken flavor while keeping the meat perfectly tender. No more juggling multiple pots and pans or watching the clock! If you enjoy chicken-based meals, you might also like these chicken tenders and fries for another family-friendly option.
Nutrition Information for Instant Pot Chicken And Noodles
| Nutrient | Amount per Serving |
|---|---|
| Calories | 425 |
| Protein | 32g |
| Carbohydrates | 42g |
| Fat | 14g |
| Fiber | 2g |
| Sodium | 680mg |
| Serving Size | 1½ cups |
Equipment & Ingredients
Kitchen Tools
| Equipment | Purpose |
|---|---|
| 6-quart Instant Pot | Main cooking vessel |
| Measuring cups and spoons | Accurate measurements |
| Sharp knife | Cutting chicken and vegetables |
| Cutting board | Food preparation surface |
| Wooden spoon | Stirring and scraping bottom |
| Tongs | Handling hot chicken pieces |
Ingredients List for Instant Pot Chicken And Noodles
| Ingredient | Amount | Notes |
|---|---|---|
| Boneless, skinless chicken breasts | 1½ pounds | Cut into 1-inch pieces |
| Wide egg noodles | 8 ounces (about 4 cups) | Uncooked |
| Chicken broth | 3 cups | Low-sodium recommended |
| Cream of chicken soup | 1 (10.5 oz) can | Condensed |
| Butter | 3 tablespoons | Unsalted |
| Onion | 1 medium | Diced (about 1 cup) |
| Carrots | 2 medium | Diced (about 1 cup) |
| Celery | 2 stalks | Diced (about ½ cup) |
| Garlic | 3 cloves | Minced |
| Dried thyme | 1 teaspoon | |
| Dried parsley | 1 teaspoon | |
| Salt | 1 teaspoon | Or to taste |
| Black pepper | ½ teaspoon | Freshly ground |
| Heavy cream | ½ cup | Added after cooking |
| Fresh parsley | 2 tablespoons | Chopped, for garnish |
Substitution Options
- Chicken thighs: Swap for chicken breasts for juicier meat
- Gluten-free noodles: Use instead of egg noodles (reduce cook time by 1 minute)
- Vegetable broth: Replace chicken broth for a different flavor profile
- Greek yogurt: Substitute for heavy cream for a tangier, lighter sauce
- Frozen mixed vegetables: Replace fresh vegetables (2 cups) for convenience
Prep Time & Planning
- Prep Time: 10 minutes
- Cook Time: 20 minutes
- Total Time: 30 minutes
- Servings: 4 people
Step-by-Step Instructions for Instant Pot Chicken And Noodles
Preparation Phase
- Gather all ingredients
- Before starting, place all ingredients on your counter
- This “mise en place” (everything in its place) technique helps prevent missing ingredients
- Check that you have everything listed in the ingredients section above
- Prep the chicken
- Take your chicken breasts out of the package and place on a clean cutting board
- If chicken is wet, pat it dry with paper towels (this helps with even cutting)
- Using a sharp knife, cut the chicken into 1-inch cubes (about the size of a dice)
- Beginner tip: Partially frozen chicken (15 minutes in freezer) is easier to cut evenly
- Place cut chicken in a clean bowl
- Sprinkle with ½ teaspoon salt and ¼ teaspoon black pepper, tossing to coat evenly
- Wash hands thoroughly with soap after handling raw chicken
- Prepare the vegetables
- Place a clean cutting board on your counter (use a different one than for the chicken)
- For the onion:
- Cut off both ends of the onion
- Remove the outer papery skin
- Cut the onion in half from top to bottom
- Place each half flat-side down on the board
- Make vertical cuts, then horizontal cuts to dice (aim for pieces about ¼-inch)
- For the carrots:
- Wash carrots under cool running water
- Peel carrots using a vegetable peeler
- Cut off the ends
- Slice each carrot lengthwise into quarters
- Cut across to make small, even pieces (about ¼-inch)
- For the celery:
- Wash celery stalks under cool running water
- Cut off the leafy tops and the white bottom ends
- Slice each stalk lengthwise into thirds
- Cut across to make small, even pieces (about ¼-inch)
- For the garlic:
- Separate 3 cloves from the garlic head
- Place flat side of knife on each clove and press firmly to crush slightly
- Remove and discard the papery skin
- Finely chop the garlic cloves (or use a garlic press)
- Beginner tip: Let garlic rest for 5-10 minutes after chopping to enhance flavor
- Measure remaining ingredients
- Measure 3 cups chicken broth using a liquid measuring cup
- Open 1 can of condensed cream of chicken soup (no need to dilute)
- Measure 3 tablespoons of butter and place on a small plate
- Measure 1 teaspoon each of dried thyme and dried parsley into small containers
- Measure ½ cup heavy cream and return to refrigerator until needed
- Measure 4 cups (8 ounces) egg noodles
Cooking Phase
- Set up your Instant Pot
- Place your Instant Pot on a clean, flat, heat-resistant surface
- Make sure the inner pot is clean and dry before starting
- Plug in the Instant Pot
- Beginner tip: Familiarize yourself with the control panel before starting
- Sauté the base
- Press the SAUTÉ button on your Instant Pot
- The display should read “ON” (some models allow you to adjust heat – use “Normal”)
- Wait 1-2 minutes for the pot to heat up
- Add 3 tablespoons butter to the pot and allow it to melt completely
- Add diced onion, carrots, and celery to the melted butter
- Using a wooden spoon, stir the vegetables to coat them with butter
- Cook for 3-4 minutes, stirring occasionally, until vegetables begin to soften
- You’ll know they’re ready when the onions become translucent (see-through)
- Add minced garlic and stir continuously for 30 seconds
- Warning: Garlic burns easily! Watch carefully and keep stirring
- Press CANCEL to stop the sautéing function
- Beginner tip: The pot will remain hot for a while after canceling
- Add protein and seasonings
- Add your seasoned chicken pieces to the pot with the vegetables
- Sprinkle with 1 teaspoon dried thyme, 1 teaspoon dried parsley, remaining ½ teaspoon salt, and ¼ teaspoon black pepper
- Using your wooden spoon, stir everything together to combine and coat the chicken with seasonings
- Beginner tip: The chicken does not need to be fully cooked at this stage
- Add liquids and deglaze
- Pour in 3 cups chicken broth
- IMPORTANT STEP: Using your wooden spoon, scrape the bottom of the pot thoroughly to remove any stuck bits
- This deglazing step is crucial to prevent the “BURN” notice on your Instant Pot
- Add the condensed cream of chicken soup (the entire can)
- Stir well to combine the soup with the broth
- Make sure nothing is stuck to the bottom of the pot
- Beginner tip: Take your time with this step – it’s essential for success!
- Add noodles
- Add 8 ounces (4 cups) uncooked egg noodles to the pot
- Using your wooden spoon, gently press down on the noodles to ensure they’re all submerged in the liquid
- IMPORTANT: Do NOT stir at this point – just ensure noodles are submerged
- Stirring might cause noodles to stick to the bottom and trigger the “BURN” notice
- Prepare for pressure cooking
- Check that the sealing ring (the rubber gasket) is properly seated inside the Instant Pot lid
- Look around the edge of the lid to make sure the ring is even all the way around
- Make sure the float valve and steam release valve are clean and not obstructed
- Beginner tip: If the sealing ring smells strongly of previous meals, soak it in vinegar and water solution
- Pressure cook
- Place the lid on the Instant Pot and turn clockwise until it locks in place
- You should hear a chime or feel it click into position
- Turn the steam release valve to the SEALING position (some newer models seal automatically)
- Press the PRESSURE COOK button (some models label this as MANUAL)
- Use the + or – buttons to set the time to 3 minutes
- Make sure the pressure level is set to HIGH (some models require you to press a separate button for this)
- The display will change to “ON” while the pot comes to pressure
- Beginner tip: It will take about 10 minutes for the pot to come to pressure before the 3-minute countdown begins
- This is normal! The total cook time includes both pressurization time and the displayed cooking time
- Release pressure safely
- When the cooking cycle finishes, the Instant Pot will beep
- The display will change to “L0:00” and start counting up
- Allow the Instant Pot to sit untouched for 5 minutes (this is called natural release)
- Cover the steam release valve with a kitchen towel (to prevent splatter)
- After 5 minutes, carefully turn the steam release valve to the VENTING position
- CAUTION: Keep hands, arms, and face away from the valve as hot steam will forcefully escape
- Wait until the pressure pin (small metal pin near the valve) drops completely
- This indicates all pressure has been released and it’s safe to open
- Beginner tip: If any liquid starts spraying out with the steam, turn the valve back to SEALING for 30 seconds, then try again
Finishing Steps
- Open the lid safely
- Once the pressure pin has dropped, press the lid release button (if your model has one)
- Turn the lid counterclockwise and lift straight up
- Tilt the lid away from you as you open to direct any remaining steam away from your face
- Place the lid upside down on the counter or use a lid rest if you have one
- Final touches
- The noodles and chicken should now be fully cooked
- Check that the chicken has reached 165°F using a meat thermometer if you have one
- Take your ½ cup heavy cream from the refrigerator and pour it into the pot
- Gently stir everything together with your wooden spoon
- Let the mixture stand for 3-5 minutes to thicken
- Beginner tip: The sauce will continue to thicken as it cools, so don’t worry if it seems slightly thin at first
- Taste and adjust
- Carefully taste a small spoonful (be careful, it’s hot!)
- If needed, add more salt and pepper to your preference
- If the sauce is too thick, add a splash of milk or broth
- If the sauce is too thin, press SAUTÉ and simmer for 1-2 minutes while stirring
- Serve and garnish
- Ladle the Instant Pot Chicken And Noodles into bowls (about 1½ cups per serving)
- Sprinkle each bowl with some of the chopped fresh parsley
- Beginner tip: Fresh herbs add bright flavor and color, don’t skip this step!
- Serve immediately while hot

Troubleshooting Common Issues with Instant Pot Chicken And Noodles
Problem: “BURN” Notice on Instant Pot
- Cause: Food stuck to the bottom of the pot or sauce too thick
- Solution:
- Cancel the cooking program immediately
- Release pressure completely following safety protocols
- Open the lid and add ½ cup more liquid
- Scrape the bottom of the pot thoroughly with a wooden spoon
- Restart the cooking process
Problem: Noodles Too Firm
- Cause: Undercooked noodles or certain brands need longer cooking time
- Solution:
- If noodles aren’t tender enough after cooking, select SAUTÉ mode
- Add ¼ cup more broth or water
- Simmer for 1-2 minutes, stirring frequently
- Check texture every 30 seconds to avoid overcooking
Problem: Sauce Too Thin
- Cause: Not enough reduction or variation in ingredient water content
- Solution:
- After adding cream, use SAUTÉ mode for 1-2 minutes
- Stir frequently to prevent sticking
- For immediate thickening, mix 1 tablespoon cornstarch with 1 tablespoon cold water
- Stir cornstarch slurry into the hot mixture
Problem: Sauce Too Thick
- Cause: Too much liquid evaporation or noodles absorbed excess liquid
- Solution:
- Add ¼ cup hot chicken broth or milk
- Stir gently to incorporate
- Add more liquid in small increments until reaching desired consistency
Problem: Chicken Seems Undercooked
- Cause: Cut pieces too large or uneven in size
- Solution:
- Use SAUTÉ function to continue cooking
- Stir frequently and check with meat thermometer
- Chicken must reach 165°F (74°C) to be safe
- Next time, ensure chicken pieces are cut to uniform 1-inch size
Variations & Customizations for Instant Pot Chicken And Noodles
Creamy Garlic Parmesan Version
- Add ½ cup grated Parmesan cheese and 1 extra clove of garlic
- Stir in cheese after adding the heavy cream
- Let stand until cheese melts completely
Mushroom Herb Version
- Add 8 ounces sliced mushrooms during the sautéing step with other vegetables
- Include ½ teaspoon dried rosemary along with other herbs
- Tip: Mushrooms release water as they cook, so you may need less liquid
Lemon Pepper Version
- Add zest of 1 lemon and increase black pepper to 1 teaspoon with other seasonings
- Stir in 1 tablespoon fresh lemon juice after cooking
- Tip: Add lemon juice at the very end to maintain bright flavor
Spicy Southwest Version
- Add 1 diced bell pepper with other vegetables
- Include 1 teaspoon chili powder and ½ teaspoon cumin with other seasonings
- Stir in ¼ cup chopped cilantro instead of parsley
- Optional: Add ¼ teaspoon cayenne pepper for extra heat
If you’re a fan of spicy chicken dishes, be sure to try these mango habanero chicken wings for another flavorful option.
Storage & Reheating Instructions
Refrigerator Storage
- Allow leftovers to cool completely before storing (no more than 2 hours at room temperature)
- Transfer to airtight containers with lids
- Store in refrigerator for up to 3 days
- Beginner tip: The noodles will absorb sauce as they sit, making the dish thicker when cold
Freezer Storage
- For longer storage, freeze in freezer-safe containers for up to 2 months
- Allow 1-inch headspace for expansion when freezing
- Label containers with date and contents
- Beginner tip: Portion into individual servings before freezing for easier reheating
Reheating From Refrigerated
- Microwave Method:
- Place a single portion in a microwave-safe bowl
- Add 1-2 tablespoons of milk or broth
- Cover with a microwave-safe lid or paper towel
- Heat on HIGH for 1 minute
- Stir thoroughly
- Continue heating in 30-second intervals until hot throughout (165°F)
- Stir between intervals
- Stovetop Method:
- Place desired amount in a saucepan
- Add 2-3 tablespoons of milk or broth per cup of leftovers
- Heat over medium-low heat
- Stir frequently to prevent sticking
- Heat until steaming hot throughout (165°F), about 5-7 minutes
Reheating From Frozen
- Recommended Method – Thaw overnight in refrigerator:
- Move frozen container to refrigerator 24 hours before needed
- Once thawed, follow the refrigerated reheating instructions above
- Quick Thaw Method:
- Run sealed container under warm water for 1-2 minutes to loosen edges
- Transfer to a microwave-safe container
- Use microwave’s defrost setting for 5-7 minutes per cup of food
- Stir and check progress halfway through defrosting
- Once partially thawed, follow refrigerated reheating instructions
Safety Notes & Tips
Food Safety
- Chicken must reach internal temperature of 165°F (74°C) to be safe
- Use separate cutting boards for raw chicken and vegetables
- Wash hands thoroughly with soap after handling raw chicken
- Do not leave finished dish at room temperature for more than 2 hours
- Refrigerate leftovers promptly
- Always use clean utensils when serving
Instant Pot Safety
- Read your Instant Pot manual before first use
- Ensure sealing ring is properly installed before every use
- Keep hands, face, and body away from steam release valve when releasing pressure
- Use a long-handled spoon or tongs to turn the pressure release valve
- Never place the Instant Pot under cabinets when releasing pressure
- Never fill Instant Pot more than ⅔ full (½ full for foods that expand like rice or beans)
- Always check that the lid is properly locked before pressure cooking
Pro Tips for Instant Pot Chicken And Noodles
- Cutting chicken: Slightly freeze chicken (15 minutes) for easier, even cutting
- Even cooking: Cut all vegetables the same size for uniform cooking
- Testing doneness: Cut into a piece of chicken to ensure it’s no longer pink inside
- Sauce thickness: The sauce thickens as it cools, so it’s okay if it seems slightly thin initially
- Deglazing: Always scrape the bottom of the pot thoroughly after sautéing to prevent burning
- Quick prep: Chop vegetables and chicken the night before and refrigerate for even faster assembly
- Taste as you go: Always taste (safely) and adjust seasonings to your preference
- Pressure cooking tip: The cooking time starts AFTER the pot comes to pressure
- Cleaning tip: Soak the inner pot immediately after serving for easier cleanup
Looking for more ways to enjoy chicken? Try this grilled chicken asparagus pesto pasta for a delicious alternative to this Instant Pot Chicken And Noodles recipe.