There’s something magical about a perfectly baked jacket potato with its crispy, golden skin and fluffy interior. This classic British comfort food transforms a simple potato into a satisfying meal that’s crispy on the outside and impossibly fluffy inside, and I’m going to show you exactly how to achieve restaurant-quality results at home every time you make this jacket potato.
SERVES: 4 | PREP: 10 MIN | COOK: 75 MIN | TOTAL: 85 MIN
Ingredients
Main Components
| Ingredient | Amount |
|---|---|
| Large baking potatoes (Russet or Maris Piper) | 4 (about 10-12 oz each) |
| Olive oil or vegetable oil | 2 tablespoons |
| Sea salt (coarse) | 2 teaspoons |
| Butter (unsalted) | 4 tablespoons |
Optional Toppings Bar
| Topping | Amount |
|---|---|
| Sour cream | 1 cup |
| Shredded cheddar cheese | 1 cup |
| Chives (chopped) | 3 tablespoons |
| Bacon bits | ½ cup |
| Black pepper | To taste |
Step-by-Step Instructions
Phase 1: Preparation (10 minutes)
Step 1: Preheat your oven to 425°F (220°C) and position the rack in the center. This high temperature is crucial for achieving that crispy skin we’re after. While the oven heats, the air circulation will become perfectly even, which matters for uniform cooking.
Step 2: Scrub each potato thoroughly under cold running water using a vegetable brush. You’re eating the skin, so remove all dirt and any eyes or blemishes. Pat completely dry with paper towels because any moisture will create steam instead of crispy skin.
Step 3: Pierce each potato 6-8 times all over with a fork, going about ½ inch deep. This allows steam to escape during baking and prevents the potato from exploding in your oven. Space the holes evenly around each potato for consistent cooking.
Step 4: Rub each potato all over with ½ tablespoon of oil, making sure every bit of skin is coated. The oil conducts heat and helps the salt stick, creating that restaurant-quality crispy exterior. Don’t skip this step or you’ll end up with tough, leathery skin instead of crispy perfection.
Step 5: Sprinkle ½ teaspoon of coarse sea salt over each oiled potato, rolling it to coat all sides. The coarse salt creates little pockets of flavor and adds to the textural contrast. Regular table salt works but won’t give you the same satisfying crunch.
Phase 2: Initial Baking (60 minutes)
Step 6: Place potatoes directly on the oven rack with a baking sheet on the rack below to catch any drips. This method allows hot air to circulate completely around each potato for even crisping. If you place them on a baking sheet, the bottoms will steam and stay soft.
Step 7: Bake for 60 minutes without opening the oven door. The high, consistent heat is transforming the starch inside into fluffy clouds while the skin crisps. Opening the door drops the temperature and interrupts this process.
Step 8: After 60 minutes, test doneness by inserting a knife or skewer into the thickest part. It should slide through easily with no resistance. If you feel any firmness, continue baking and check every 5 minutes.
Phase 3: Finishing for Maximum Crispiness (15 minutes)
Step 9: Once tender inside, increase oven temperature to 450°F (230°C). This final blast of high heat takes the skin from crispy to incredibly crunchy. You’ll hear the skin crackling if you listen closely.
Step 10: Bake for an additional 10-15 minutes until the skin is deeply golden and crispy all over. The potato will feel firm when gently squeezed with an oven mitt, and the skin will have a satisfying resistance.
Step 11: Remove from oven and let rest for 2-3 minutes. This brief resting period allows the steam inside to redistribute, making the interior even fluffier. The skin will continue crisping as it cools slightly.
Phase 4: Serving (5 minutes)
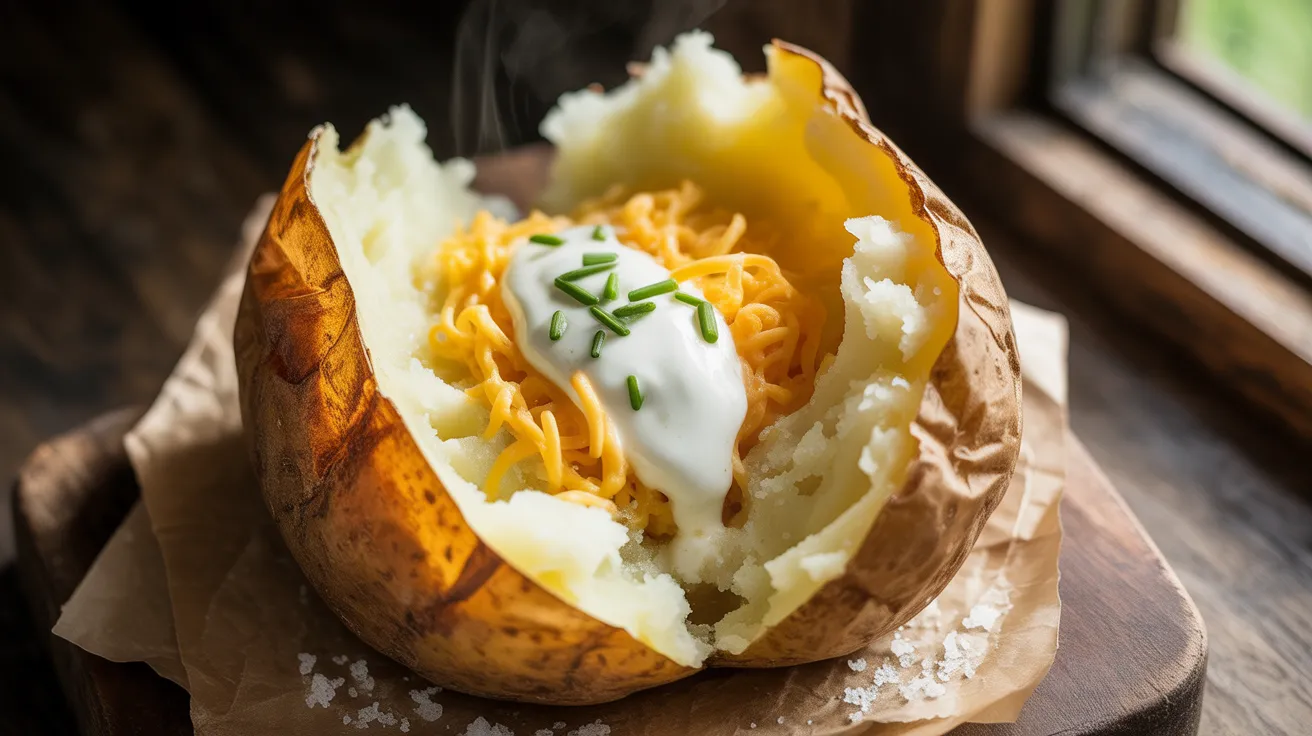
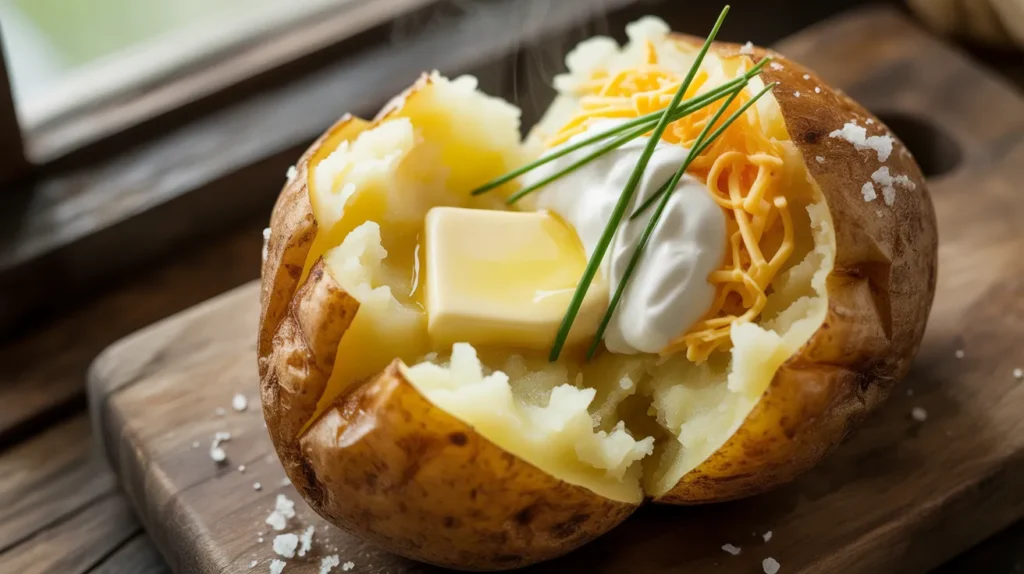
Step 12: Using a sharp knife, cut a deep cross into the top of each potato, going about ¾ of the way through. The steam will escape with a satisfying whoosh, and you’ll see the fluffy interior puffing up.
Step 13: Gently squeeze the ends of each potato toward the center to open up the cross and expose maximum fluffy interior. The potato should burst open like a flower, creating the perfect vessel for toppings.
Step 14: Place 1 tablespoon of butter into each opened potato immediately. The residual heat will melt it into every crevice. Watch it disappear into the fluffy interior.
Step 15: Add your choice of toppings and serve immediately while piping hot. The contrast between the crispy skin and the fluffy, buttery interior is at its absolute peak right now.
Chef’s Notes
Oil Selection Matters: While any neutral oil works, I prefer olive oil for its flavor contribution and ability to withstand high heat. The oil should coat evenly without pooling anywhere, creating a barrier that crisps rather than fries the skin.
Potato Variety is Critical: Russet potatoes are ideal because their high starch content creates the fluffiest interior. Waxy potatoes like red or fingerlings will never achieve the same cloud-like texture no matter how long you bake them.
Salt Creates Texture: The coarse salt draws moisture from the skin’s surface during baking, which is what creates that incredible crunchiness. Fine salt dissolves too quickly and doesn’t provide the same textural benefit when making your perfect jacket potato.
Direct Rack Placement: Placing potatoes directly on the oven rack instead of a baking sheet is the professional secret to all-around crispy skin. The hot air circulation transforms every surface equally, eliminating any soft spots.
Nutrition Information (Per Serving)
- Calories: 385
- Protein: 7g
- Carbohydrates: 58g
- Fat: 15g
- Fiber: 6g
- Sodium: 615mg
- Potassium: 1,240mg
Creative Variations
Mediterranean Jacket Potato
Top with crumbled feta cheese, chopped sun-dried tomatoes, kalamata olives, and fresh oregano. The salty, tangy flavors transform this into a Greek-inspired meal that pairs beautifully with an orzo side dish for a complete Mediterranean feast.
BBQ Pulled Pork Loaded Potato
Fill with slow-cooked pulled pork, BBQ sauce, coleslaw, and pickled jalapeños. This creates a complete meal that’s perfect for game day or casual entertaining when you want something hearty and satisfying.
Breakfast Jacket Potato
Top with scrambled eggs, crispy bacon, shredded cheese, and green onions for a morning twist. This protein-packed version makes an excellent brunch option that keeps you satisfied for hours.
Caramelized Onion & Mushroom
Sauté mushrooms and caramelized onions with garlic, then top with gruyere cheese and fresh thyme. This vegetarian option is so rich and satisfying that even meat-lovers request it regularly at my table.
Storage & Reheating
Storing Baked Potatoes
Wrap cooled potatoes individually in aluminum foil and refrigerate for up to 4 days. Make sure they’ve cooled completely before wrapping to prevent condensation, which makes the skin soggy.
The foil protects the skin from drying out in the refrigerator’s low humidity environment.
Reheating for Best Results
Remove foil and place potatoes directly on the oven rack at 375°F (190°C) for 15-20 minutes. This method re-crisps the skin while heating the interior thoroughly.
Avoid microwaving if possible, as it steams rather than crisps.
Freezing Option
I don’t recommend freezing whole baked potatoes because the texture becomes grainy and unpleasant. If you must freeze, scoop out the flesh, mash it, and freeze for up to 2 months for use in other recipes like potato soup or shepherd’s pie.
The skin won’t recover its texture after freezing regardless of reheating method.
Troubleshooting Common Problems
Problem 1: Skin is Tough Instead of Crispy
Solution: You likely didn’t use enough oil or the oven temperature was too low. The oil must coat every surface completely, and the high heat (425°F+) is non-negotiable for proper crisping. Next time, be generous with oil and resist lowering the temperature even if worried about burning.
Problem 2: Interior is Dense and Gluey
Solution: This happens when potatoes are underbaked or the wrong variety was used. Always choose high-starch potatoes like Russets, and ensure the knife slides through with zero resistance before removing from the oven. Dense texture means the starch granules haven’t fully gelatinized yet.
Problem 3: Potatoes Split or Explode
Solution: You didn’t pierce them enough times before baking. Steam needs multiple escape routes or it builds pressure until the potato bursts. Always pierce 6-8 times minimum, going deep enough to reach the center of the potato.
Problem 4: Skin is Burnt But Inside is Raw
Solution: Your oven runs hot or the potatoes were too large. Use an oven thermometer to verify temperature accuracy, and stick with potatoes in the 10-12 oz range. Larger potatoes need longer cooking at the same temperature, not higher heat.
Problem 5: Bottom is Soggy
Solution: The potato sat on a baking sheet instead of the oven rack. That contact point traps steam and prevents crisping. Always place potatoes directly on the rack with a sheet pan below to catch drips, ensuring 360-degree hot air circulation.
Equipment Essentials
- Vegetable brush for scrubbing skins clean
- Fork for piercing potatoes
- Baking sheet to place under rack and catch drips
- Oven mitt for testing doneness safely
- Sharp knife for cutting cross pattern
- Pastry brush (optional, for applying oil evenly)
- Oven thermometer to verify accurate temperature
Shopping List
Produce Section
- Large Russet or Maris Piper potatoes (4)
- Fresh chives (1 bunch)
Dairy Section
- Unsalted butter (1 stick)
- Sour cream (8 oz container)
- Shredded cheddar cheese (8 oz bag)
Pantry/Oils Section
- Olive oil or vegetable oil
- Coarse sea salt
- Black pepper
Meat Section (Optional)
- Bacon bits or cook fresh bacon
Success Secrets
1. Choose potatoes that are uniform in size so they all finish cooking at exactly the same time, preventing the frustration of some being done while others need more time.
2. Don’t wrap potatoes in foil during baking because it traps steam and creates soft, braised skin instead of the crispy jacket potato exterior you’re working so hard to achieve.
3. Let your oven preheat for a full 15 minutes before adding potatoes, ensuring the temperature is stable and accurate throughout the entire baking time.
4. Resist cutting into potatoes immediately after removing from the oven because that 2-3 minute rest allows the interior texture to set perfectly and become impossibly fluffy.
5. Serve the jacket potato immediately after opening and adding butter because the temperature drops quickly, and cold butter won’t melt into every delicious crevice the way hot butter does.