Prep Time: 5 minutes | Cook Time: 10 minutes | Total Time: 15 minutes | Serves: 4 people
Key Takeaways:
- This umami-rich sauce transforms ordinary dishes into restaurant-quality meals
- Ready in just 15 minutes with easily sourced ingredients
- Perfect for steak, fish, roasted vegetables, or as a marinade
- Stores well for up to two weeks in the refrigerator
Introduction
Ever tasted something at a restaurant that left you wondering, “How did they make this taste so good?” That’s the magic of black garlic miso sauce. This deeply savory sauce adds incredible depth to any dish it touches.
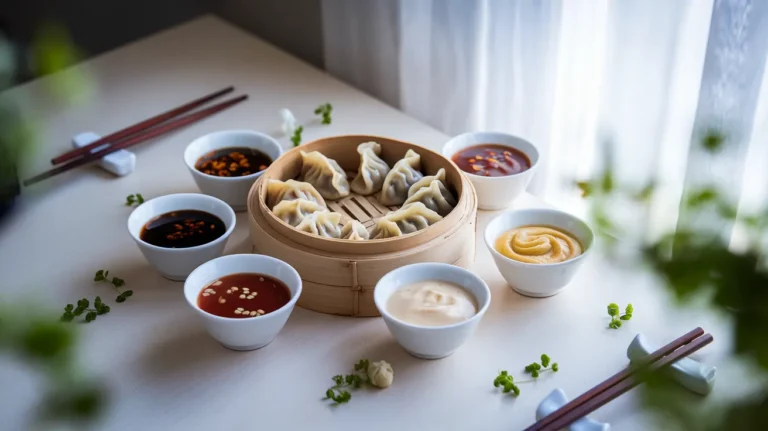
The combination of fermented black garlic and miso creates a flavor that’s impossible to resist. This sauce belongs in your collection of Authentic Asian Sauces for Any Dish for its incredible versatility. Best of all, you can make this restaurant-quality sauce at home in just 15 minutes.
Let’s make this miso black garlic sauce that will become your new secret weapon in the kitchen.
Nutrition Comparison
| Nutrient | Per Serving (2 Tbsp) | Daily Value % |
|---|---|---|
| Calories | 75 | – |
| Fat | 5g | 6% |
| Sodium | 450mg | 20% |
| Carbohydrates | 6g | 2% |
| Sugar | 2g | 4% |
| Protein | 2g | 4% |
Equipment & Ingredients
Kitchen Tools
| Tool | Purpose |
|---|---|
| Small saucepan | For cooking the sauce |
| Whisk | For mixing ingredients smoothly |
| Measuring spoons | For precise measurements |
| Measuring cups | For liquid ingredients |
| Glass jar | For storage |
| Fork | For mashing black garlic |
| Small bowl | For preparing garlic |
| Fine grater | For ginger |
| Heat-safe bowl | For cooling sauce |
Ingredients (Serves 4)
| Ingredient | Amount | Notes |
|---|---|---|
| Black garlic cloves | 6-8 cloves | Peeled |
| White miso paste | 3 tablespoons | Yellow miso works too |
| Rice vinegar | 2 tablespoons | Unseasoned preferred |
| Honey | 1 tablespoon | Or maple syrup |
| Soy sauce | 2 tablespoons | Low-sodium option available |
| Sesame oil | 1 tablespoon | Toasted preferred |
| Water | ¼ cup | More if needed for consistency |
| Unsalted butter | 2 tablespoons | For richness |
| Fresh ginger | 1 teaspoon | Finely grated |
Optional Substitutions
- No black garlic? Use 2 heads of roasted garlic + 1 teaspoon balsamic vinegar
- Gluten-free option: Replace soy sauce with tamari
- Vegan version: Use maple syrup instead of honey and olive oil instead of butter
- Lower sodium: Reduce miso and soy sauce by half
Super-Detailed Step-by-Step Instructions
Preparation Phase
- Set up your workspace
- Clear your countertop to create a clean cooking area
- Place your saucepan on the stovetop (don’t turn it on yet)
- Keep a clean dish towel nearby for any spills
- Have a heat-resistant spatula or wooden spoon ready
- BEGINNER TIP: Read through the entire recipe once before starting
- Gather and organize all ingredients
- Place all ingredients on your countertop in the order you’ll use them
- Group ingredients by when they’ll be added to the recipe
- Keep refrigerated items (like butter) out only when you’re ready to use them
- BEGINNER TIP: Pre-measuring ingredients into small bowls can help reduce stress while cooking
- Prepare your measuring tools
- Set out your measuring spoons (1 teaspoon, 1 tablespoon)
- Set out your measuring cups (¼ cup, 1 cup for potential additions)
- Have an extra spoon ready for taste testing later
- BEGINNER WARNING: Always double-check measurements before adding to mixture
- Prepare the black garlic
- Take 6-8 cloves of black garlic and place them on a cutting board
- If not already peeled, gently peel away the skin (it should come off easily)
- Place peeled cloves in a small bowl
- Using a fork, mash the garlic into a paste-like consistency
- Some small lumps are perfectly fine – they’ll break down during cooking
- BEGINNER TIP: Black garlic is very soft and shouldn’t require much force to mash
- Prepare the fresh ginger
- Take a small piece of fresh ginger (about 1-inch long)
- Use the edge of a spoon to scrape away the thin skin
- Hold your fine grater over a small dish
- Grate ginger until you have 1 teaspoon worth
- BEGINNER TIP: Freeze ginger for 10 minutes before grating for easier handling
Assembly Steps
- Start combining base ingredients
- Place your saucepan on the counter (not on heat yet)
- Add the mashed black garlic to your saucepan first
- Use a silicone spatula to scrape all garlic from the bowl
- BEGINNER TIP: Working off the heat first allows for easier mixing
- Add the miso paste
- Measure 3 tablespoons of white miso paste using a measuring spoon
- Add to the saucepan with the black garlic
- Use your whisk to begin combining these thick ingredients
- BEGINNER WARNING: Miso paste can be sticky, so use a separate spoon to push it off your measuring spoon
- Add sweetener and seasonings
- Measure 1 tablespoon of honey using a clean measuring spoon
- Pour honey into the saucepan (rinse measuring spoon immediately to prevent stickiness)
- Add the 1 teaspoon of grated ginger
- Measure and add 2 tablespoons of soy sauce
- Whisk mixture thoroughly – at this stage it will be very thick and paste-like
- BEGINNER TIP: If honey is too thick, warm measuring spoon under hot water first
- Add liquids gradually
- Pour in 2 tablespoons of rice vinegar
- Whisk immediately to incorporate
- Add 1 tablespoon of sesame oil
- Whisk again until combined
- BEGINNER TIP: Sesame oil has a strong flavor – be precise with this measurement
- Add water and final mixing
- Measure ¼ cup of water
- Pour water into the saucepan
- Whisk vigorously until all ingredients are well incorporated
- The mixture should now be much smoother but still have some texture
- BEGINNER TIP: If you see any large lumps of miso or garlic, press them against the side of the pan with your whisk to break them down
Cooking Phase
- Position saucepan on stovetop
- Place your saucepan on a burner that matches its size
- Keep your whisk and an extra tablespoon of water nearby
- Have your butter ready but keep refrigerated until needed
- BEGINNER WARNING: Use a burner toward the back of the stove if you have children around
- Begin heating the mixture
- Turn heat to MEDIUM-LOW (this is typically level 3-4 on most stoves)
- Do NOT walk away from the stove at this point
- Begin whisking immediately and continuously
- BEGINNER WARNING: This sauce can burn easily because of the sugars in honey and miso
- Watch for simmering signs
- After 2-3 minutes, you’ll see small bubbles forming around the edges
- This is the beginning of a simmer – exactly what you want
- Keep whisking constantly
- If bubbles become large or rapid, immediately reduce heat
- BEGINNER TIP: The sauce should make a very gentle “psst” sound, not a rolling boil sound
- Continue cooking to thicken
- Maintain the gentle simmer for 3-4 minutes
- Whisk continuously in a figure-eight pattern to prevent sticking
- You’ll notice the sauce starting to thicken slightly
- It should coat the back of a spoon when ready
- BEGINNER TEST: Dip a spoon in the sauce and run your finger through it – the line should stay clear
- Check and adjust consistency
- If too thick: Add 1 tablespoon water at a time
- If too thin: Continue simmering for 1-2 more minutes
- Perfect consistency: Should pour like warm honey
- BEGINNER WARNING: Never add cold water to the hot sauce – use room temperature water
- Add the butter finish
- Reduce heat to LOW (typically level 1-2 on most stoves)
- Cut 2 tablespoons cold butter into 4 small pieces
- Add one piece at a time, whisking until completely melted before adding the next
- This creates a glossy, rich finish
- BEGINNER TIP: Cold butter melts slowly, giving you more control over the emulsion
- Final cooking check
- Once all butter is incorporated, whisk for exactly 30 more seconds
- Look for a smooth, glossy appearance
- The sauce should be thick enough to coat a spoon but still pourable
- BEGINNER SUCCESS SIGN: Sauce will leave a clear path when you drag your whisk through it
Cooling/Finishing Steps
- Remove from heat
- Turn off the stove completely
- Move saucepan to a cool burner or heat-resistant surface
- Continue whisking gently for another 30 seconds off heat
- BEGINNER WARNING: The pan will remain hot! Use pot holders or oven mitts
- Transfer to cooling container
- Carefully pour sauce into a heat-safe bowl
- Use a silicone spatula to scrape the saucepan clean – don’t waste any sauce!
- Allow to cool for 5-10 minutes, uncovered
- BEGINNER TIP: Place a paper towel over the bowl to prevent dust while cooling
- Perform taste test
- Take a clean spoon and taste a small amount of the cooled sauce
- The flavor should be savory, slightly sweet, with complex garlic notes
- BEGINNER GUIDE: The perfect balance feels savory first, then slightly sweet, ending with umami richness
- Make final adjustments
- Too salty? Add ½ teaspoon honey and whisk
- Not enough depth? Add ½ teaspoon more soy sauce
- Want more tang? Add ¼ teaspoon rice vinegar
- Too thick? Add 1 tablespoon water and whisk thoroughly
- BEGINNER TIP: Make only one adjustment at a time, then taste again
Troubleshooting
Common Issues and Solutions
Problem: Sauce is burning on the bottom
- Solution: Immediately remove from heat, transfer to a new pan, and reduce heat level when returning to stove
- Prevention: Never stop whisking and use a heavy-bottomed pan if available
Problem: Sauce is too thick
- Solution: Add water 1 tablespoon at a time while whisking
- Test: Sauce should slowly drip off a spoon, not cling to it
Problem: Sauce is too thin
- Solution: Return to heat and simmer for 2-3 more minutes, whisking constantly
- Test: Sauce should coat the back of a spoon without immediately running off
Problem: Sauce tastes too salty
- Solution: Add 1 teaspoon honey and a splash of water
- Prevention: Start with less miso and soy sauce if you’re sensitive to salt
Problem: Miso has clumps
- Solution: Press clumps against side of pan with spoon or whisk vigorously
- Prevention: Mix miso with a small amount of warm water before adding to recipe
Problem: Sauce separated (looks oily)
- Solution: Whisk vigorously off heat until recombined
- Prevention: Add butter slowly and keep whisking continuously
Variations & Substitutions
Spicy Version
- Add 1 teaspoon gochujang or sriracha
- Include ¼ teaspoon red pepper flakes
- BEGINNER TIP: Add spicy elements gradually – you can always add more!
Herbal Version
- Add 1 tablespoon finely chopped scallions
- Include 1 teaspoon fresh thyme leaves
- BEGINNER TIP: Add herbs at the very end after removing from heat to preserve flavor
Citrus Infusion
- Add 1 teaspoon lemon or lime zest
- Include 1 tablespoon fresh citrus juice
- BEGINNER WARNING: Add citrus juice after removing from heat to prevent curdling
Storage & Reheating
Storage Instructions
- Allow sauce to cool completely (about 30 minutes)
- Transfer to a clean glass jar with tight-fitting lid
- Label with date made (very important!)
- Refrigerate for up to 2 weeks
- Freeze in ice cube trays for up to 3 months
- BEGINNER TIP: Silicone ice trays work best for easy removal
Reheating Guidelines
- Remove from refrigerator 15 minutes before using
- For cold applications: Stir well before using
- For warm applications: Microwave method:
- Place 2-4 tablespoons in a microwave-safe bowl
- Heat in 10-second intervals, stirring between each
- Stop when just warm to touch
- For warm applications: Stovetop method:
- Place desired amount in small saucepan
- Add 1 teaspoon water per 2 tablespoons sauce
- Heat on LOW, stirring constantly until just warm
- BEGINNER WARNING: Never boil the sauce when reheating – it will separate
Safety Notes & Tips
Food Safety
- Always wash hands before preparing sauce
- Never leave sauce at room temperature for more than 2 hours
- Always use clean utensils when dipping into stored sauce
- If sauce smells off or shows signs of mold, discard immediately
- BEGINNER WARNING: If sauce has been open for more than 2 weeks, discard regardless of appearance
Pro Tips
- Make ahead: Sauce tastes even better after flavors meld overnight
- Portion control: Freeze in small portions for quick meal additions
- Flavor boost: Add a dollop to soups or stews in the last few minutes of cooking
- Dipping sauce: Mix with a bit of mayo for an incredible dipping sauce
- Bulk prep: Double the recipe but cook for the same amount of time
Serving Ideas
This versatile black garlic miso sauce works wonderfully with:
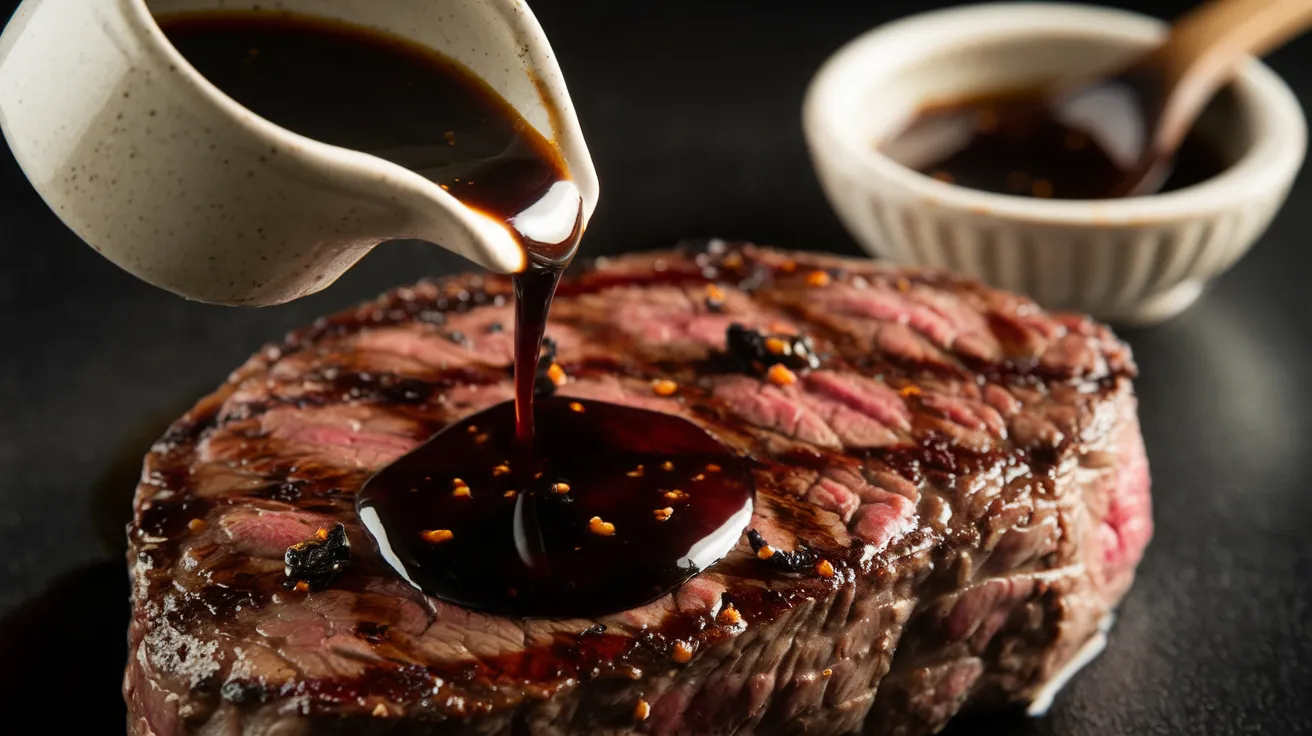
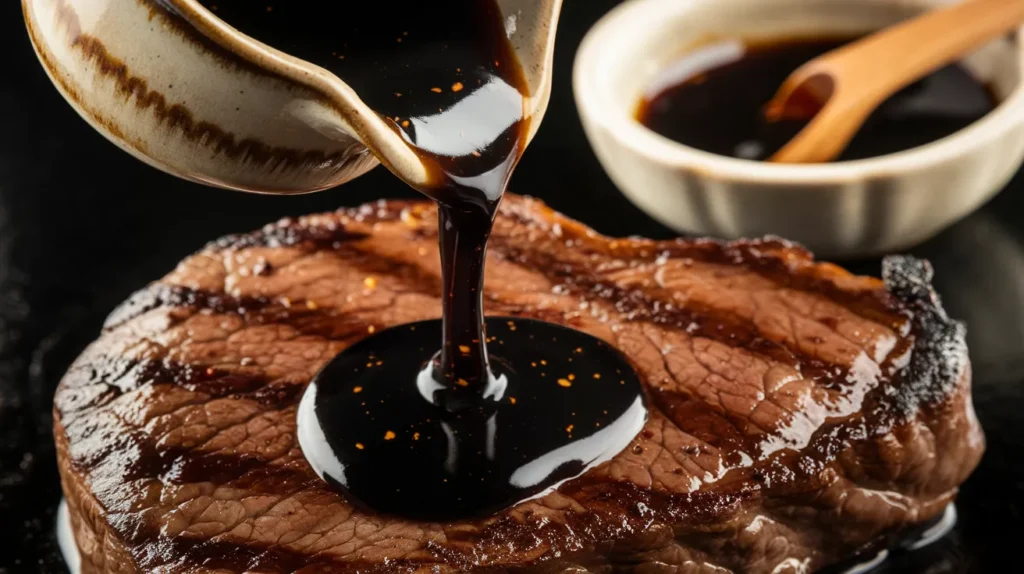
- Drizzled over grilled steak (1 tablespoon per serving)
- Brushed onto chicken in the last 5 minutes of cooking
- Spooned over pan-seared salmon or cod (2 teaspoons per fillet)
- Tossed with roasted vegetables, especially mushrooms and brussels sprouts
- Mixed into warm rice or noodles (1 tablespoon per cup)
- As a marinade for tofu or tempeh (let sit for at least 30 minutes)
- Swirled into mashed potatoes for an umami kick
- Used as an alternative to homemade teriyaki sauce when you want a more complex flavor profile