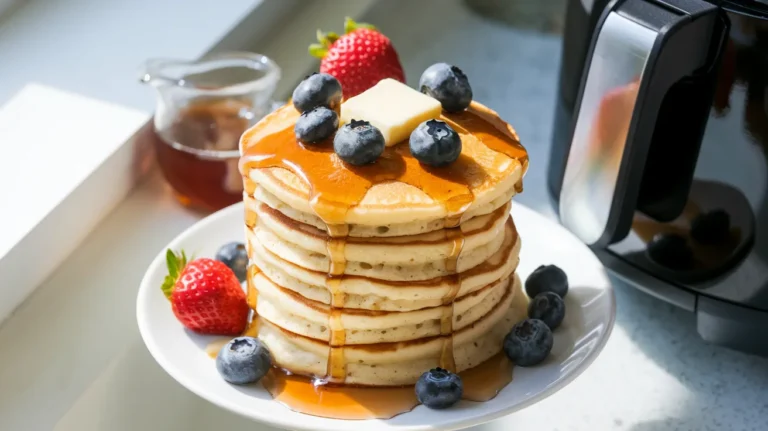
Prep Time: 15 minutes | Cook Time: 20 minutes | Total Time: 35 minutes | Serves: 4 persons
Key Takeaways
- Create restaurant-quality Oreo pancakes with just 10 minutes of prep work
- Perfect balance of chocolate cookie crumbs and sweet cream filling in every bite
- Master the technique for keeping Oreo chunks from burning during cooking
- Learn the secret to fluffy texture even with cookie mix-ins
The Pancake Challenge You’ve Been Waiting For
Making pancakes from scratch can feel tricky. Adding crushed Oreos makes it even trickier.
But what if you could make Oreo-studded pancakes that taste better than any chain restaurant version?
This Oreo Pancake Mix recipe solves both problems. You’ll get perfectly fluffy pancakes packed with chocolate cookie goodness and sweet cream flavor in every bite. If you’re looking for more creative morning inspiration, check out my collection of delicious pancake ideas for your next breakfast adventure.
Nutrition Comparison
| Nutrition (per serving) | Homemade Oreo Pancakes | Store-Bought Mix | Restaurant Version |
|---|---|---|---|
| Calories | 420 | 520 | 680 |
| Fat | 16g | 19g | 28g |
| Carbs | 63g | 78g | 94g |
| Protein | 8g | 6g | 7g |
| Sugar | 28g | 38g | 46g |
| Cost per serving | $1.20 | $1.80 | $8.95 |
Equipment & Ingredients
Kitchen Tools You’ll Need
| Tool | Purpose |
|---|---|
| Large mixing bowl | For pancake batter |
| Medium mixing bowl | For crushing Oreos |
| Measuring cups and spoons | For accurate measurements |
| Whisk | For mixing batter |
| Non-stick skillet or griddle | For cooking pancakes |
| Spatula | For flipping pancakes |
| Ziploc bag | For crushing Oreos (optional) |
| Cooking spray | To grease the pan |
Ingredients List (Serves 4)
| Ingredient | Amount | Purpose |
|---|---|---|
| All-purpose flour | 1½ cups | Base structure |
| Granulated sugar | 3 tablespoons | Sweetness |
| Baking powder | 1 tablespoon | Leavening |
| Salt | ¼ teaspoon | Flavor balance |
| Milk | 1¼ cups | Moisture |
| Eggs | 2 large | Structure |
| Unsalted butter | 3 tablespoons, melted | Richness |
| Vanilla extract | 1 teaspoon | Flavor |
| Oreo cookies | 12 cookies | Flavor and texture |
| Whipped cream | For topping | Optional |
| Chocolate syrup | For drizzling | Optional |
Substitution Options
- Milk: Use almond, soy, or oat milk for dairy-free option
- Flour: Substitute 1:1 gluten-free flour blend for gluten-free version
- Eggs: Replace with ½ cup applesauce or 2 tablespoons ground flaxseed mixed with 6 tablespoons water
- Oreos: Any cream-filled chocolate cookie works
Step-by-Step Instructions
Preparation Phase (15 minutes)
- Gather all ingredients and tools
- Take out all your measuring tools and place them on the counter
- Place all ingredients on your workspace so everything is within reach
- Check that you have all items listed in the ingredients section
- Beginner tip: Read through the entire recipe once before starting
- Bring ingredients to proper temperature
- Take eggs and milk out of the refrigerator 10 minutes before starting
- Room temperature ingredients mix better and create fluffier pancakes
- Why this matters: Cold ingredients can cause the melted butter to solidify
- Melt the butter properly
- Place 3 tablespoons of unsalted butter in a microwave-safe bowl
- Microwave in 15-second intervals, stirring between each interval
- Stop when the butter is fully melted but not boiling hot
- Set aside to cool slightly while you prepare other ingredients
- Beginner tip: Watch carefully to prevent butter from exploding in microwave
- Prepare the Oreo cookies
- Count out 12 Oreo cookies from the package
- Set aside 4 whole cookies for topping later
- Place 8 Oreos in a zip-top plastic bag and seal it, removing excess air
- Place the bag on a flat surface or cutting board
- Using a rolling pin, gently press and roll over the cookies to crush them
- Aim for chunks about the size of chocolate chips, not fine powder
- Visual guide: Pieces should be around ¼-inch in size – imagine broken chocolate chips
- Beginner tip: If you don’t have a rolling pin, use a heavy cup or can
- Heat your cooking surface
- Place your non-stick skillet or griddle on the stove
- Set heat to medium (if your stove has numbers, aim for 4-5 out of 10)
- Allow the pan to heat for 3-5 minutes before testing
- Testing the heat: Sprinkle a few drops of water on the surface
- If water droplets sizzle and “dance” but don’t immediately disappear, your pan is ready
- If water instantly evaporates with a loud sizzle, the pan is too hot
- If water sits without sizzling, the pan needs more heating time
- Beginner tip: Proper heat is crucial – too hot will burn cookies, too cool will make soggy pancakes
Mixing the Batter (10 minutes)
- Mix dry ingredients
- Place a large mixing bowl on the counter
- Add 1½ cups of all-purpose flour (spoon flour into measuring cup, then level with knife)
- Add 3 tablespoons of granulated sugar
- Add 1 tablespoon of baking powder (make sure it’s not expired)
- Add ¼ teaspoon of salt
- Take a whisk and stir all dry ingredients together for 30 seconds
- Make a well (a depression) in the center of the dry ingredients
- Beginner tip: Mixing dry ingredients separately ensures even distribution of leavening agents
- Mix wet ingredients
- In a separate medium bowl, crack 2 eggs (check for shells)
- Whisk the eggs vigorously for 30 seconds until frothy and light yellow
- Pour in 1¼ cups of milk
- Add 1 teaspoon of vanilla extract
- Pour in the slightly cooled melted butter
- Whisk everything together for 1 minute until well combined
- Beginner tip: If butter starts to solidify, it’s too cold – microwave the mixture for 5-10 seconds
- Combine wet and dry ingredients
- Pour the wet ingredient mixture into the well you created in the dry ingredients
- Using your whisk, gently stir in a circular motion from the center outward
- Stir just until flour disappears – about 10-15 stirs
- The batter should look lumpy, not smooth
- IMPORTANT BEGINNER WARNING: Stop mixing when you still see small lumps! Overmixing activates gluten and makes tough pancakes
- Visual guide: Your batter should be thick enough to pour slowly, but not runny like water
- Add the Oreo cookie pieces
- Open the zip-top bag with your crushed Oreo pieces
- Gently pour the Oreo pieces into the batter
- Using a rubber spatula (not the whisk), fold the Oreo pieces into the batter
- Use a gentle lifting and folding motion, not stirring
- Make just 5-6 folds to distribute cookies – some streaks are okay
- Set aside a small portion (about 2 tablespoons) of crushed Oreos for topping
- Let the batter rest for 5 minutes (this allows the baking powder to activate)
- Beginner tip: Folding means to cut down through the center with the spatula, scrape across the bottom, and lift up along the side of the bowl
Cooking Phase (20 minutes)
- Prepare the cooking surface
- Check that your pan or griddle is at medium heat
- Hold the cooking spray can 6-8 inches away from the surface
- Spray a thin, even coating of cooking spray on the pan
- If using butter instead, add ½ tablespoon and swirl to coat
- Safety tip: Keep spray away from open flame
- Pour your first test pancake
- Stir the batter gently one more time with the spatula
- Use a ¼ cup measuring cup to scoop batter
- Hold the measuring cup about 1 inch above the pan surface
- Pour the batter in one spot (don’t spread it with the cup)
- The batter should spread into a circle about 4 inches wide
- Beginner tip: The first pancake is your test pancake – use it to judge cooking time and heat level
- Watch for cooking indicators
- Let the pancake cook undisturbed for 2-3 minutes
- Look for these signs that it’s ready to flip:
- Bubbles form on the surface of the pancake
- The bubbles begin to pop and stay open
- The edges start to look set and slightly dry
- The very edge of the pancake looks slightly golden
- Visual guide: About 75% of the surface should have bubbles before flipping
- Beginner warning: Resist the urge to press down on the pancake or check underneath repeatedly
- Master the perfect flip
- Slide a wide spatula completely under the pancake
- Lift it about 1 inch off the pan
- In one confident motion, flip the pancake over
- If some batter splashes, don’t worry – it happens!
- Let the second side cook for 1-2 minutes (it cooks faster than the first side)
- Beginner tip: If you’re nervous about flipping, try lifting just the edge first to check doneness
- Troubleshooting: If Oreo pieces are burning, your heat is too high – lower it to medium-low
- Check for doneness
- The second side is done when it’s golden brown (you can peek with your spatula)
- Gently press the center of the pancake with your spatula – it should spring back
- If it leaves an indentation, it needs more cooking time
- Safety tip: The internal temperature should reach 165°F if you have a food thermometer
- Continue cooking the batch
- Transfer the first pancake to a plate
- Re-spray the pan with cooking spray between each pancake
- Repeat the process with the remaining batter
- You should get about 12 pancakes total (3 per person)
- Adjust heat down if pancakes are browning too quickly
- Beginner tip: Keep cooked pancakes warm by covering with a clean kitchen towel
- For large batches: Place finished pancakes on a baking sheet in oven set to 200°F
Finishing Touches (5 minutes)
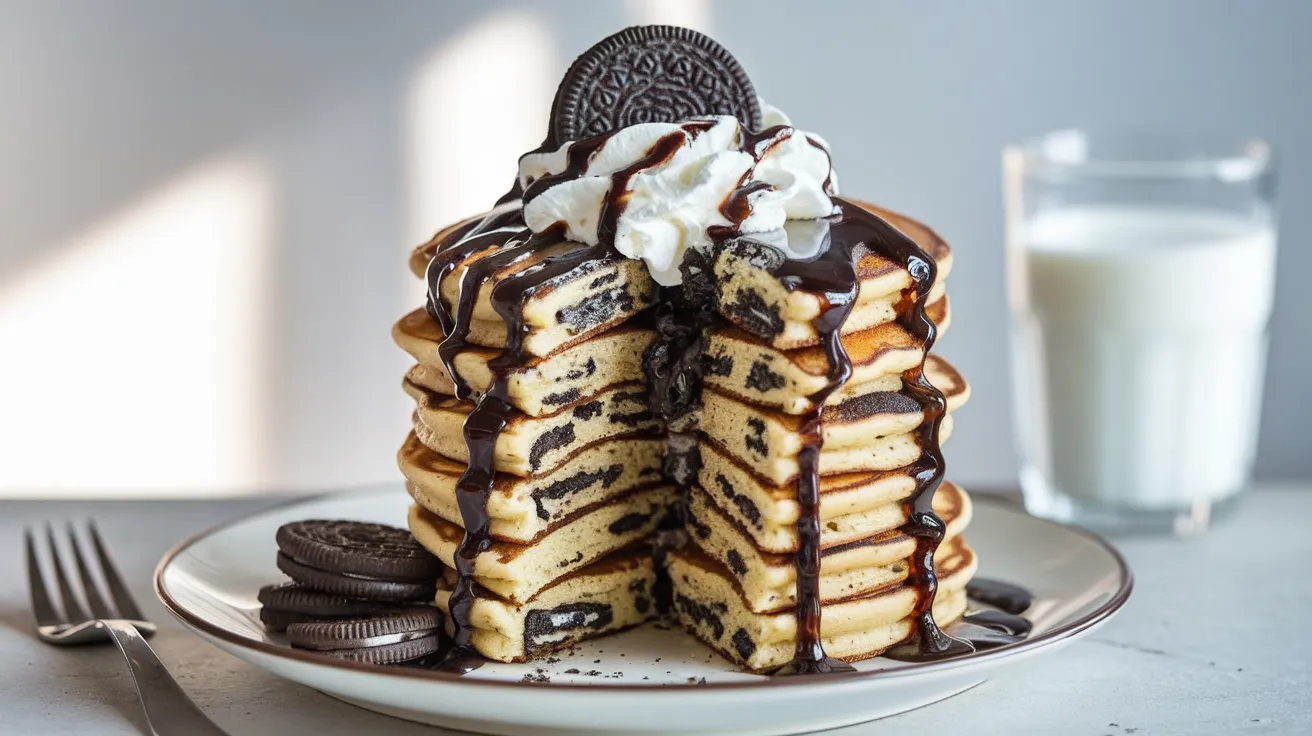
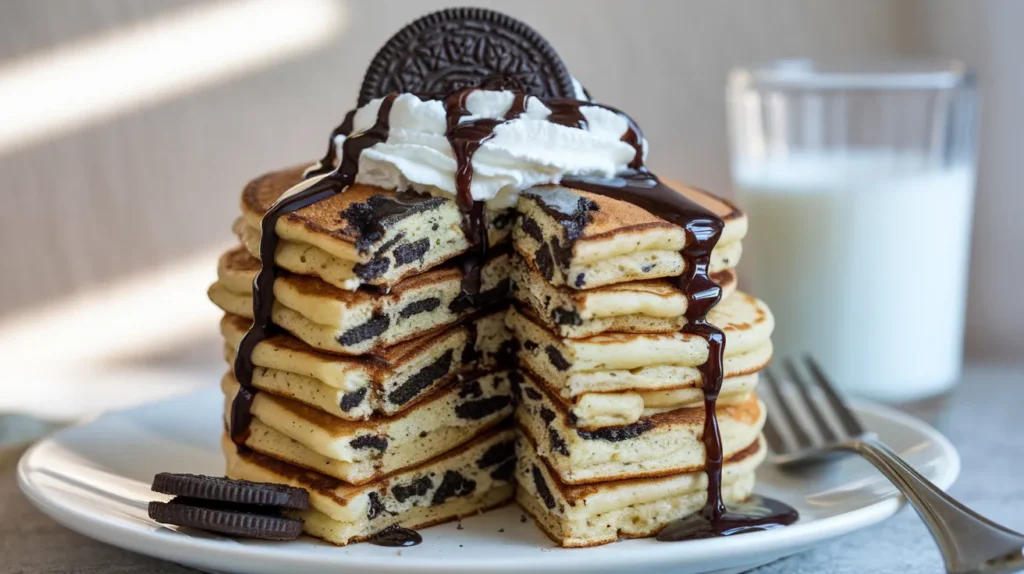
- Create the perfect stack
- Place 3 pancakes per serving on each plate
- Immediately add toppings while pancakes are still hot
- Take your reserved crushed Oreo pieces and sprinkle evenly over each stack
- Presentation tip: Stack pancakes slightly off-center for a more appealing look
- Add optional toppings
- Shake the chocolate syrup bottle well
- Hold bottle 3-4 inches above the pancakes
- Drizzle chocolate syrup in a zigzag pattern across the top
- Add a dollop of whipped cream in the center
- Press one of your reserved whole Oreo cookies into the whipped cream
- Beginner tip: If using canned whipped cream, shake well and hold can upright
- Serve immediately
- Provide napkins – Oreo pancakes can be deliciously messy!
- Have forks and knives ready
- Tip: Pancakes taste best when hot – don’t let them sit too long
Troubleshooting
Common Problems and Solutions
Problem: Pancakes are burning on the outside but raw inside
- Solution: Your heat is too high. Lower to medium-low and cook longer. The Oreo cookie pieces burn more easily than regular pancake batter.
- Prevention tip: Always make a test pancake to check your heat level.
Problem: Batter is too thick and pancakes are doughy in the middle
- Solution: Add 1-2 tablespoons of milk at a time, gently folding until you reach a pourable consistency.
- Visual guide: Proper batter should ribbon off the spoon, not glob in chunks.
Problem: Pancakes aren’t fluffy
- Solution #1: Check if your baking powder is fresh (test by putting a spoonful in warm water – it should bubble vigorously)
- Solution #2: You may have overmixed the batter. Next time, count your stirs and stop at 15.
- Solution #3: Your pan might not be hot enough. Medium heat is key for rise.
Problem: Oreos become soggy in the batter
- Solution: Wait to fold in the Oreo pieces until just before cooking each batch.
- Alternate approach: Sprinkle some Oreo pieces directly onto pancakes as they cook on the first side.
Problem: Pancakes stick to the pan
- Solution: Make sure to apply fresh cooking spray before each pancake.
- Pan check: If your non-stick surface is scratched or old, it may need replacement.
Variations & Substitutions
Golden Oreo Pancakes
Replace regular Oreos with Golden Oreos and add ½ teaspoon of almond extract to the batter for a vanilla-forward flavor profile.
Double Chocolate Oreo Pancakes
Add 2 tablespoons of cocoa powder to the dry ingredients. Sift the cocoa powder first to avoid lumps. Add an extra tablespoon of sugar to balance the bitterness.
Birthday Cake Oreo Pancakes
Use Birthday Cake Oreos and add 2 tablespoons of rainbow sprinkles to the batter. Add ¼ teaspoon of almond extract for that classic birthday cake flavor.
Mint Oreo Pancakes
Use Mint Oreos and add ¼ teaspoon of mint extract to the batter. For a festive touch, add a drop of green food coloring.
Storage & Reheating
Storing Leftovers
- Refrigerator:
- Allow pancakes to cool completely (about 30 minutes)
- Place sheets of parchment paper between each pancake to prevent sticking
- Store in an airtight container
- Refrigerate for up to 3 days
- Beginner tip: Date the container so you know when they were made
- Freezer:
- Cool pancakes completely
- Place pancakes in a single layer on a baking sheet
- Freeze for 1 hour until solid
- Transfer to a freezer bag or container with parchment between layers
- Remove as much air as possible
- Freeze for up to 2 months
- Beginner tip: Label the bag with contents and date
Reheating Instructions
- Microwave:
- Place 1-2 pancakes on a microwave-safe plate
- Cover with a damp paper towel to prevent drying
- Heat for 15-20 seconds per pancake
- Check the center is warm before serving
- Toaster:
- Works best with completely frozen pancakes
- Insert pancake in toaster slot
- Use a low setting (1-2) to prevent burning
- You may need a second cycle for thorough heating
- Oven:
- Preheat oven to 350°F
- Place pancakes in a single layer on a baking sheet
- Cover loosely with foil to prevent drying
- Heat for 5-10 minutes until warm throughout
- Beginner tip: This method works best for reheating multiple servings
Safety Notes & Tips
Important Safety Considerations
- Always wash hands with soap and water before and after handling raw eggs
- Keep electric griddles away from water sources
- Supervise children around hot cooking surfaces
- Use proper oven mitts when handling hot pans
- Never leave cooking pancakes unattended
- Ensure pancakes reach an internal temperature of 165°F for food safety
Pro Tips for Perfect Oreo Pancakes
- Measure accurately: Use the spoon-and-level method for flour (spoon into measuring cup, level with knife)
- Don’t overmix: Count your stirs to avoid tough pancakes
- Perfect heat: Medium-low heat works best to prevent burning the Oreo pieces
- Patience pays off: Wait for those bubbles before flipping
- Fresh ingredients: Check your baking powder expiration date
- Cooking spray: Reapply between each pancake for easy flipping
- Rest the batter: A 5-minute rest helps the baking powder activate
- Keep it simple: If this is your first time, skip the variations until you master the basic recipe
Try this recipe on a weekend morning when you have a little extra time. The smell of chocolate cookies cooking in pancake batter will bring the whole family to the kitchen!