- Golden, fluffy stacks with irresistible texture in less than 30 minutes
- Easy styling tricks that transform basic pancakes into social media stars
- Beginner-friendly formula guarantees success, even for first-timers
- Simple ingredients you already have in your pantry
The Instagram Pancake Challenge (Solved)
We’ve all been there. You see those gorgeous pancake photos online and try to recreate them at home. But instead of photo-worthy stacks, you end up with pale, flat discs that nobody’s rushing to photograph.
Here’s why that changes today. Creating a stunning pancakes aesthetic recipe doesn’t require chef training or fancy gear.
The secret? A few simple techniques that transform ordinary pancakes into visual masterpieces. I’ve tested countless methods to create the perfect pancakes aesthetic recipe that works every time, even for total beginners.
Nutrition Facts (Per Serving – 2 Pancakes)
| Nutrient | Amount | % Daily Value |
|---|---|---|
| Calories | 310 | – |
| Total Fat | 9g | 12% |
| Saturated Fat | 5g | 25% |
| Cholesterol | 65mg | 22% |
| Sodium | 560mg | 24% |
| Total Carbohydrates | 48g | 17% |
| Dietary Fiber | 1g | 4% |
| Sugars | 12g | – |
| Protein | 8g | 16% |
Percent Daily Values based on a 2,000 calorie diet
What You’ll Need
Ingredients (Serves 4)
| Ingredient | Amount | Notes |
|---|---|---|
| All-purpose flour | 2 cups | Sifted |
| Granulated sugar | 1/4 cup | – |
| Baking powder | 2 tablespoons | Fresh is best |
| Salt | 1/2 teaspoon | Fine grain |
| Eggs | 2 large | Room temperature |
| Milk | 1 3/4 cups | Whole milk recommended |
| Unsalted butter | 1/4 cup (4 tbsp) | Melted, plus extra for cooking |
| Vanilla extract | 1 teaspoon | Pure, not imitation |
| For Styling: | ||
| Fresh berries | 1 cup | Strawberries, blueberries, raspberries |
| Pure maple syrup | 1/4 cup | Room temperature |
| Powdered sugar | 2 tablespoons | For dusting |
| Fresh mint leaves | 8-10 leaves | For garnish |
Equipment
| Tool | Purpose |
|---|---|
| Large mixing bowl | For dry ingredients |
| Medium mixing bowl | For wet ingredients |
| Whisk | For combining ingredients |
| 1/4 cup measuring cup | For portioning batter |
| Non-stick skillet or griddle | For cooking pancakes |
| Silicone spatula | For flipping pancakes |
| Small sieve | For dusting powdered sugar |
| White plate | For best presentation |
Substitutions
- Dairy-free? Replace milk with almond, oat, or soy milk and use coconut oil instead of butter
- Gluten-free? Swap all-purpose flour with a 1:1 gluten-free flour blend
- No eggs? Use 1/2 cup applesauce or 2 mashed bananas instead
- Less sugar? Reduce to 2 tablespoons or use monk fruit sweetener
Step-by-Step Instructions for Aesthetic Pancakes
Prep Time: 10 minutes
Cook Time: 15 minutes
Total Time: 25 minutes
Difficulty Level: Beginner-Friendly
1. Preparation Phase (Setting Up for Success)
- Organize your workspace
- Clear your counter of any clutter to give yourself plenty of room
- Choose a spot with good natural light if you’ll be taking photos
- Place all ingredients on the counter in the order you’ll use them
- Have a clean dish towel nearby for any spills
- Set out all measuring tools before starting
- Prepare your ingredients properly
- Take eggs and milk out 15 minutes before starting (room temperature ingredients blend better)
- Cut 4 tablespoons butter into small pieces and place in a microwave-safe bowl
- Microwave butter in 15-second intervals until just melted
- Let butter cool for 3-5 minutes (hot butter can cook the eggs when mixed)
- Wash berries in cold water and pat completely dry with paper towels
- Get your tools ready
- Place your large mixing bowl on a stable surface
- Have your whisk, spatula, and measuring cups within easy reach
- If using a non-stick pan, make sure nothing abrasive will touch it
- Set your timer or phone nearby for timing the cooking process
- Have plates ready for the finished pancakes
- Set up your photo area (if photographing)
- Choose a spot with good natural lighting (near a window is ideal)
- Select a simple, preferably white or light-colored plate
- Have styling elements (berries, syrup, mint) ready to go
- Clear any clutter from the background
- Position a clean fork and knife nearby for the finished photo
2. Make the Perfect Pancake Batter
- Measure dry ingredients with precision
- Place your large mixing bowl on the counter
- If you have a sifter, sift 2 cups flour directly into the bowl
- If no sifter, use a whisk to fluff flour before measuring
- To measure flour correctly: spoon flour into measuring cup, don’t scoop
- Level off with a knife for exact measurement
- Add 1/4 cup sugar (level it off for accuracy)
- Add 2 tablespoons baking powder (check that it’s fresh—expired baking powder won’t rise)
- Add 1/2 teaspoon salt (this enhances flavor and helps with browning)
- Mix dry ingredients thoroughly
- Take your whisk and mix with at least 15 circular motions
- Be sure to reach the bottom and sides of the bowl
- The ingredients should be evenly distributed with no visible clumps
- This mixing ensures the baking powder is distributed evenly
- Set this bowl aside once mixed
- Combine wet ingredients carefully
- In your medium bowl, crack 2 eggs one at a time
- Check for shell pieces and remove any with a spoon
- Beat eggs with a whisk until yolks and whites start to blend (about 30 seconds)
- Pour in 1 3/4 cups milk slowly while whisking
- Add your cooled melted butter (1/4 cup) to the mixture
- Add 1 teaspoon vanilla extract
- Whisk until the mixture looks uniform and slightly frothy
- The color should be a consistent pale yellow with no streaks
- Combine wet and dry ingredients properly
- Make a small well in the center of your dry ingredients
- Pour all wet ingredients into this well at once
- Using a rubber spatula or wooden spoon (not the whisk), stir gently
- Use a folding motion rather than vigorous stirring
- CRITICAL TIP: Count your strokes—aim for no more than 10-12 total
- Stop mixing as soon as there are no large patches of dry flour
- The batter should look lumpy—this is exactly what you want
- BEGINNER WARNING: Over-mixing is the #1 cause of flat, tough pancakes
- Rest your batter (don’t skip this)
- Cover bowl with a kitchen towel
- Let batter rest undisturbed for exactly 5 minutes
- This allows the baking powder to activate and flour to absorb liquid
- You’ll see tiny bubbles forming—this is perfect
- Use this time to prepare your pan and arrange toppings
- After resting, do not stir the batter again except for one gentle fold before using
3. Cooking Your Instagram-Worthy Pancakes
- Heat your pan correctly
- Place non-stick skillet on burner and turn heat to medium
- Let pan heat for 2-3 minutes (patience here is key)
- Test if the pan is ready with the water drop test:
- Sprinkle a few drops of water on the pan
- If drops “dance” and evaporate within 2-3 seconds, temperature is perfect
- If water disappears immediately with a loud sizzle, pan is too hot
- If water just sits there, pan needs more heating time
- Add fat to the pan properly
- When pan reaches correct temperature, add 1/2 tablespoon butter
- Tilt pan to coat entire cooking surface evenly
- The butter should melt and begin to bubble slightly
- If butter browns or smokes, your pan is too hot—wipe clean and start again
- A properly buttered pan prevents sticking and creates that golden-brown aesthetic
- Pour perfect pancake circles
- Give batter one gentle fold with spatula before using
- Dip a 1/4 cup measuring cup into batter (don’t scrape sides)
- Hold measuring cup about 1 inch above center of pan
- Pour in a steady stream, letting batter fall in one spot
- The batter will spread into a perfect circle naturally
- For beginners, cook just one pancake at a time initially
- If making multiple, leave at least 2 inches between them
- Master the timing and flip technique
- Watch pancake carefully—timing makes or breaks aesthetic pancakes
- First, tiny bubbles form on surface (about 1 minute)
- Next, bubbles get larger (about 2 minutes)
- THE KEY MOMENT: When bubbles pop and holes remain open
- Edges should look set and slightly drier than center
- Gently slide a thin spatula completely under the pancake
- Lift slightly to ensure it’s not sticking
- Flip with one confident, swift motion
- Don’t flip from a height—keep spatula close to pan surface
- BEGINNER TIP: If first flip isn’t perfect, don’t worry! Practice makes perfect
- Cook second side to golden perfection
- Second side cooks faster—only about 1-2 minutes
- Resist pressing down with spatula (squeezes out air and makes pancakes flat)
- Second side is done when center feels firm when gently pressed
- Pancake should spring back slightly when touched
- Color should be an even golden brown
- Remove when perfectly cooked—don’t let it get too dark
- Transfer to a warm plate or place in oven at 200°F to keep warm
- Maintain cooking conditions
- Keep pan at consistent temperature throughout cooking
- If pancakes brown too quickly, reduce heat slightly
- If they take too long to bubble, increase heat slightly
- Wipe pan clean between batches to remove any burnt butter
- Add fresh butter for each new pancake
- Be patient—rushing leads to imperfect pancakes
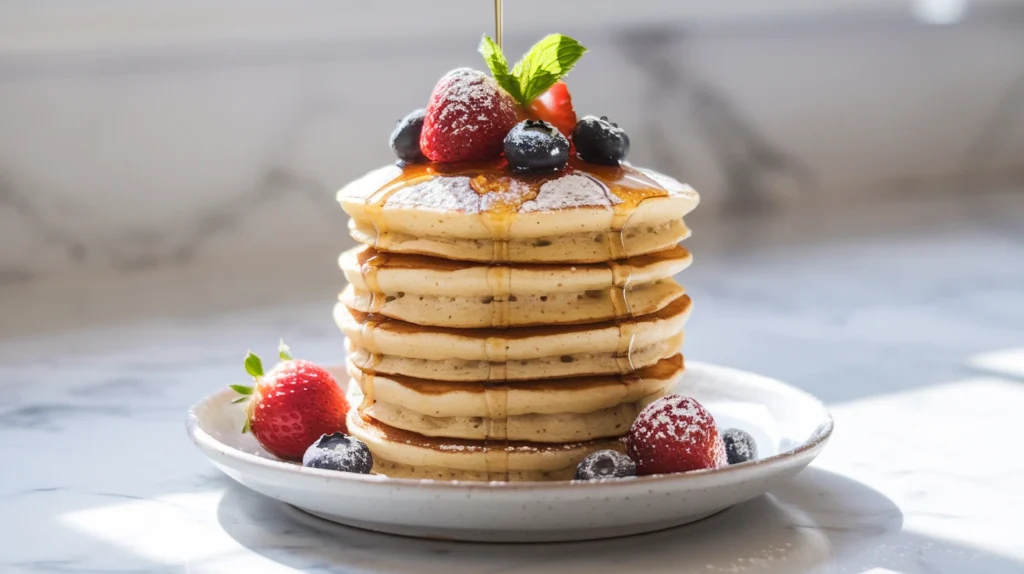
4. Styling for Peak Pancake Aesthetics
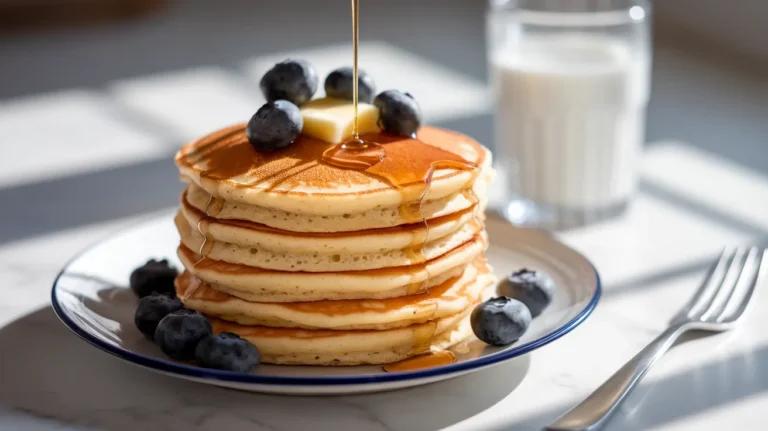
- Stack with purpose
- Choose your most perfectly round, evenly colored pancakes
- Place first pancake slightly off-center on a white plate
- Stack 2-3 pancakes in a slightly offset arrangement
- Create height but keep stack stable enough for toppings
- Apply toppings strategically
- Place a small pat of butter on top of warm stack
- Hold syrup bottle 6-8 inches above pancakes
- Pour syrup in a thin, steady stream
- Let it cascade naturally down the sides
- Apply enough to glisten but not so much it pools excessively
- STYLING TIP: Capture the pouring moment for dynamic photos
- Add berries for color and contrast
- Place larger berries (strawberries) at the base of the stack
- Sprinkle smaller berries (blueberries) on top and around plate
- Arrange in odd numbers (3, 5, 7) for better visual appeal
- Create color contrast with different berry types
- For sliced strawberries, fan them slightly for elegant presentation
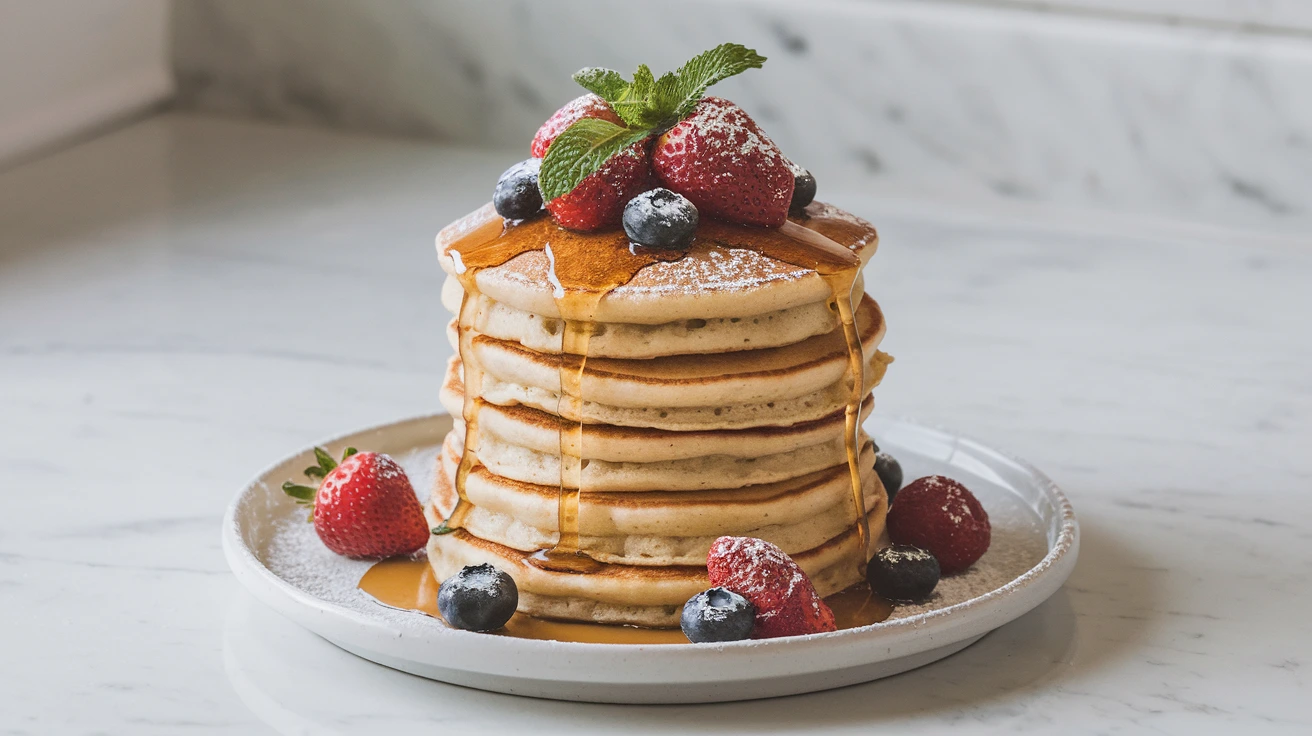
- Add finishing touches
- Position 2-3 mint leaves as small accents of color
- Hold sieve 6-8 inches above the stack
- Add a small amount of powdered sugar
- Tap gently for a light, even “snow” effect
- Clean any sugar from plate edges with a clean brush or paper towel
- Create dimension in your presentation
- Use a fork and knife to cut a small wedge from the stack
- Pull the wedge slightly away to reveal fluffy interior
- This shows texture and creates visual interest
- Position utensils nearby for a “ready to eat” feeling
- Adjust lighting to highlight syrup’s glossy appearance
Troubleshooting Your Pancake Aesthetic
| Problem | Cause | Solution |
|---|---|---|
| Pancakes too flat | Old baking powder; overmixed batter | Replace baking powder; count mixing strokes (10-12 max) |
| Uneven color | Pan hot spots; inconsistent heat | Rotate pancakes halfway through cooking; maintain steady heat |
| Bubbles don’t form | Pan not hot enough; batter too thick | Increase heat slightly; add 1-2 tablespoons milk to thin batter |
| Pancakes stick to pan | Pan not hot enough; not enough butter | Ensure proper preheating; add fresh butter for each pancake |
| Raw center | Heat too high; pancakes too thick | Lower heat for longer cooking; use less batter per pancake |
| Burnt exterior | Pan too hot; too much sugar | Lower heat; verify sugar measurement; wipe pan between batches |
| Batter too thick | Too much flour; measurement error | Add milk 1 tablespoon at a time until pourable but not runny |
| Batter too thin | Too much liquid; measurement error | Add flour 1 tablespoon at a time until thicker |
| Pancakes hard to flip | Attempting to flip too early | Wait for bubbles to pop and leave open holes |
| Edges look ragged | Pouring technique; spatula damage | Pour from low height; use gentle touch with spatula |
Variations & Substitutions for Different Aesthetics
Berry-Stuffed Pancakes
- Prepare batter as directed
- Pour 1/4 cup batter into pan
- Immediately place 5-6 berries on top, pressing slightly into batter
- Allow bubbles to form and cook as normal
- VISUAL TIP: Berries create beautiful purple-blue bursts when cut open
- Perfect for dramatic cross-section photos
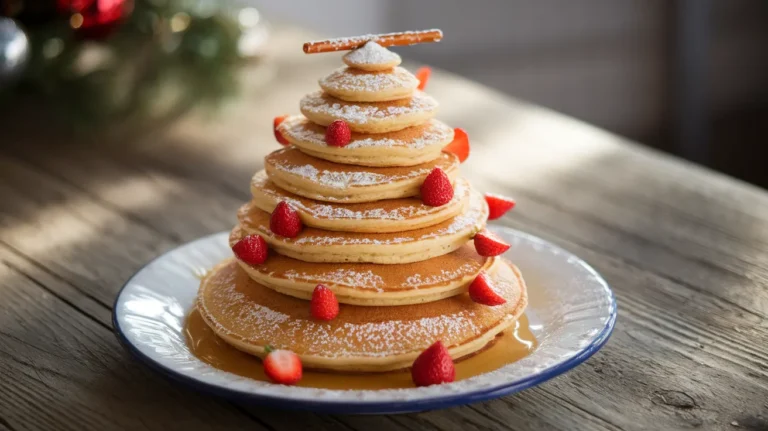
Ombré Pancake Stack
- Divide batter into three portions
- Leave one portion plain
- Add 2-3 drops of food coloring to second portion (pink works beautifully)
- Add 4-5 drops to third portion for deeper color
- Cook each color separately
- Stack from darkest (bottom) to lightest (top)
- Creates a stunning gradient effect perfect for photos
Lemon Ricotta Pancakes (Extra Fluffy)
- Add zest of 1 lemon to dry ingredients
- Fold in 1/2 cup ricotta cheese after combining wet and dry ingredients
- Produces extra height and a sophisticated, light texture
- Pair with fresh berries and honey instead of syrup
- The vibrant yellow interior makes for gorgeous photos
If you’re looking for even more creative ways to elevate your pancake presentation, check out my collection of unique pancake ideas that are guaranteed to impress!
Storage & Reheating While Preserving Aesthetic
Refrigerating:
- Cool pancakes completely on wire rack (about 20 minutes)
- Place parchment paper between each pancake
- Store in airtight container
- Refrigerate up to 3 days
- AESTHETIC TIP: For best visual results, store flat rather than stacked
Freezing:
- Place cooled pancakes in single layer on parchment-lined baking sheet
- Freeze uncovered for 1 hour until solid
- Transfer to freezer bag with parchment between layers
- Remove excess air from bag
- Label with date
- Freeze up to 2 months
- BEGINNER TIP: Individual wrapping preserves shape better
Reheating for Best Appearance:
- Toaster method:
- Use lowest setting
- Watch carefully to prevent burning edges
- Best for preserving crisp edges
- Microwave method:
- Place on microwave-safe plate
- Cover with damp paper towel
- Heat 20 seconds per pancake
- AESTHETIC WARNING: Can make pancakes soft and less photogenic
- Oven method (best for preserving appearance):
- Preheat oven to 350°F
- Place pancakes in single layer
- Cover loosely with foil
- Heat 5-7 minutes until warm
- Maintains shape and texture best for photos
If you’re curious how restaurant pancakes always look so perfect, my copycat McDonald’s pancakes recipe reveals some of their professional secrets!
Safety Notes & Styling Tips
Kitchen Safety:
- Turn pan handles inward to prevent accidental bumping
- Keep paper towels and other flammables away from stovetop
- Never leave cooking pancakes unattended
- Use dry oven mitts or towels when handling hot pans
- Keep a fire extinguisher accessible just in case
Food Safety:
- Wash hands before handling ingredients
- Refrigerate any unused batter within 1 hour
- Discard batter after 24 hours
- Cook pancakes to an internal temperature of 165°F
- Refrigerate leftover cooked pancakes within 2 hours
Beginner Tips:
- Start with a single test pancake to gauge heat and timing
- The first pancake is often a “practice” one—don’t get discouraged
- Use a timer for consistent results
- Take photos quickly before pancakes deflate or syrup soaks in
- Natural light produces the best food photography results
Styling for Perfect Photos:
- Use neutral backgrounds to make pancakes stand out
- Position light source (window) to the side for dimension
- Take multiple angles: overhead, 45-degree, and side views
- Capture action shots of pouring syrup or cutting into the stack
- Keep styling elements simple—let the pancakes be the star
Final Success Tip: Remember that creating an aesthetically pleasing pancake stack is as much about confidence as technique. Practice makes perfect, and even professional food stylists sometimes make dozens of pancakes to get that one perfect shot. Enjoy the process!