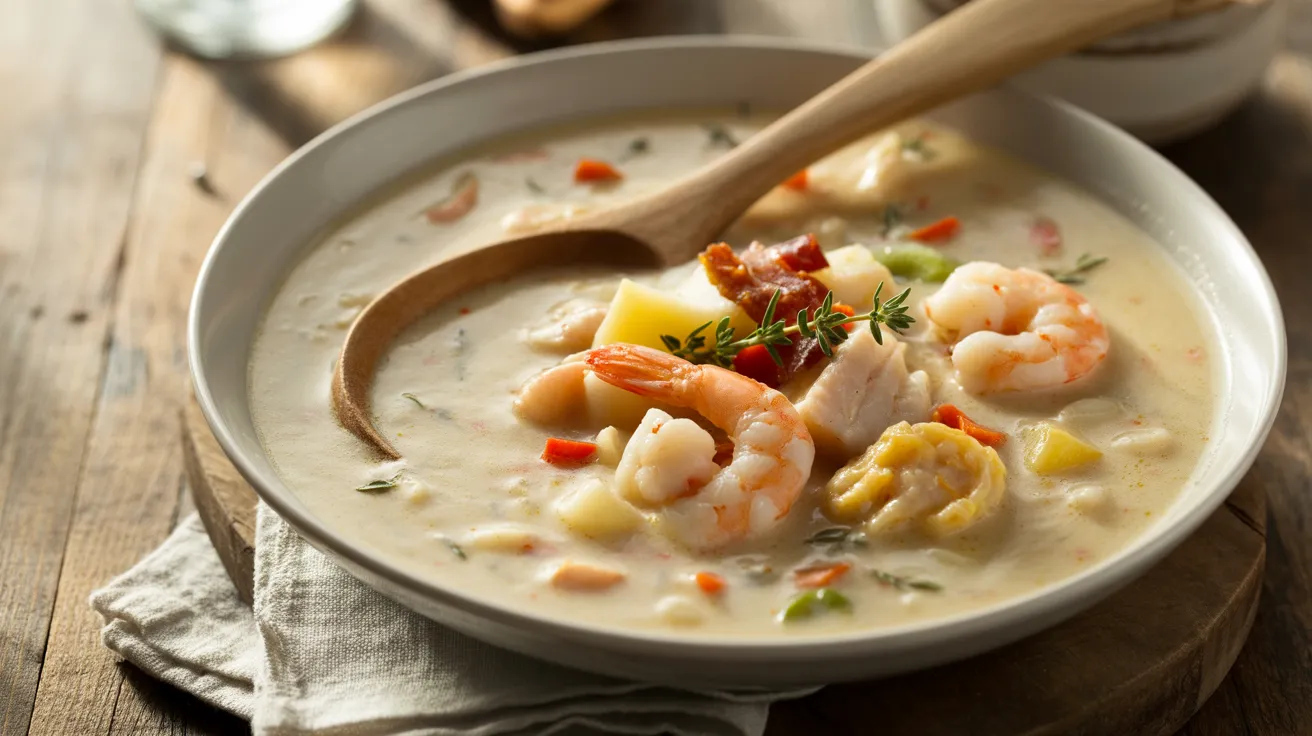
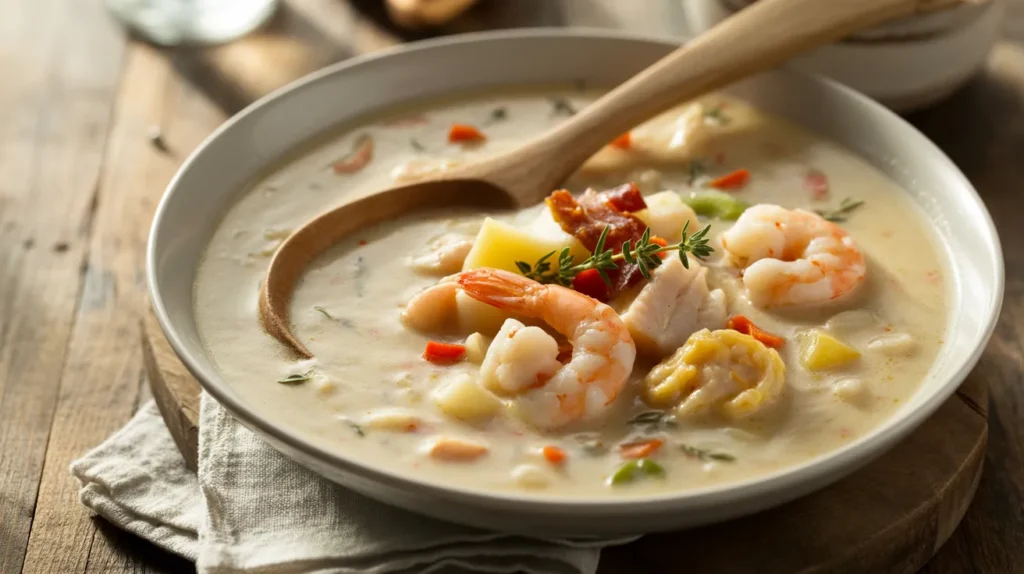
This rich seafood chowder brings the taste of New England’s finest restaurants straight to your kitchen. Loaded with succulent shrimp, tender scallops, and flaky white fish swimming in a velvety cream base, this homemade rich seafood chowder creates pure comfort in every spoonful that even beginners can master with confidence.
SERVES: 4 | PREP: 20 MIN | COOK: 25 MIN | TOTAL: 45 MIN
Ingredients for Perfect Rich Seafood Chowder
Seafood Mix
| Ingredient | Amount | Notes |
|---|---|---|
| Large shrimp, peeled | 1 lb | 21-25 count works best |
| Sea scallops | 8 oz | Remove side muscle |
| White fish fillets | 8 oz | Cod or halibut preferred |
| Lump crab meat | 4 oz | Optional but recommended |
Chowder Base
| Ingredient | Amount | Notes |
|---|---|---|
| Thick-cut bacon | 4 strips | Adds smoky depth |
| Yellow onion, diced | 1 medium | About 1 cup |
| Celery stalks, diced | 2 large | Include leaves |
| Carrots, diced | 2 medium | Small dice works best |
| Garlic cloves, minced | 4 cloves | Fresh only |
| All-purpose flour | 1/4 cup | For thickening |
| Fish or seafood stock | 3 cups | Low-sodium preferred |
| Heavy cream | 1 cup | Room temperature |
| Yukon potatoes | 2 medium | Waxy texture holds shape |
| Bay leaves | 2 whole | Remove before serving |
| Fresh thyme | 2 teaspoons | Or 1 tsp dried |
| Old Bay seasoning | 1 tablespoon | Classic seafood blend |
| Salt and pepper | To taste | Season gradually |
Detailed Step-by-Step Rich Seafood Chowder Instructions
Phase 1: Prepare Your Seafood Foundation (8 minutes)
Step 1: Inspect and Clean Your Seafood Remove your seafood from the refrigerator and place on a clean cutting board. Look for any shells, ice crystals, or debris on the shrimp and scallops. Rinse each piece under cold running water for 10 seconds, then immediately pat completely dry with paper towels. Moisture is your enemy here—wet seafood won’t sear properly and will make your rich seafood chowder watery instead of creamy.
Step 2: Prepare the Shrimp Properly If your shrimp still have tails, pinch and twist to remove them completely. Check each shrimp for the dark vein running along the back. Use a small paring knife to make a shallow cut along the outer curve and rinse out any dark matter you see. This step prevents gritty texture in your finished chowder.
Step 3: Handle Scallops Like a Pro Look for a small rectangular piece of muscle attached to the side of each scallop—this is tough and chewy. Gently pull this “side muscle” away with your fingers or cut it off with a knife. Pat scallops extra dry since they hold more water than other seafood.
Step 4: Cut Fish into Perfect Pieces Use a sharp knife to cut your fish fillets into 1-inch chunks. Make sure pieces are roughly the same size so they cook evenly. Remove any bones you feel by running your fingers along each piece. Season fish lightly with 1/2 teaspoon salt and set aside on a separate plate.
Phase 2: Create Your Flavor Foundation (10 minutes)
Step 5: Start with Bacon for Maximum Flavor Place your heavy-bottomed pot over medium heat and add the bacon strips. Don’t add oil—the bacon will render its own fat. Cook for 4-5 minutes, turning once, until the bacon is golden brown and crispy. You’ll hear it sizzling steadily, which means it’s rendering fat properly.
Step 6: Save That Precious Bacon Fat Use tongs to transfer the crispy bacon to a paper towel-lined plate. Look at the fat in your pot—you want exactly 2 tablespoons. If you have more, pour off the excess and save it for another use. If you have less, add 1 tablespoon of butter to make up the difference.
Step 7: Build Your Vegetable Base Add your diced onion to the bacon fat and you should hear a gentle sizzle immediately. This tells you the temperature is perfect. Stir with a wooden spoon for 2 minutes until the onion starts to look translucent around the edges but isn’t browning.
Step 8: Add Celery and Carrots for Texture Add the diced celery and carrots to the pot with the onions. Stir everything together and cook for 3-4 minutes, stirring every 30 seconds. The vegetables should start to soften but still have some bite. You’ll smell the vegetables becoming fragrant—this is exactly what you want.
Step 9: Add Garlic at the Perfect Moment Add the minced garlic and stir constantly for exactly 30 seconds. Set a timer if you need to. The garlic should smell amazing but not turn brown. Burnt garlic will make your entire rich seafood chowder taste bitter, so watch it carefully.
Phase 3: Build Your Creamy Base (8 minutes)
Step 10: Create the Thickening Roux Sprinkle the flour evenly over your vegetables and immediately start stirring with your wooden spoon. Cook while stirring constantly for 1 full minute. The mixture will look pasty and thick—this is perfect. You’re cooking out the raw flour taste, which is essential for smooth flavor.
Step 11: Add Stock Gradually to Prevent Lumps Start with just 1/2 cup of stock and whisk it in completely until smooth. Once that’s incorporated, add another cup and whisk again. Finally, add the remaining stock and whisk until completely smooth. This gradual method prevents lumps that can’t be fixed later.
Step 12: Add Potatoes and Seasonings Add your diced potatoes, bay leaves, and fresh thyme to the pot. Increase heat to medium-high and bring to a gentle simmer. You’ll see small bubbles breaking the surface regularly, but not a rolling boil. A hard boil will break apart your ingredients and make the chowder cloudy.
Phase 4: Perfect the Texture (10 minutes)
Step 13: Cook Potatoes to Perfect Tenderness Let the mixture simmer for 5-7 minutes, stirring every 2 minutes to prevent sticking. Test a potato piece with a fork—it should pierce easily but the potato shouldn’t fall apart. If the fork goes through with slight resistance, they’re perfect. Overcooked potatoes will make your chowder gummy.
Step 14: Season the Base Properly Add the Old Bay seasoning, 1 teaspoon salt, and 1/2 teaspoon black pepper. Stir well and taste the broth. Remember, you haven’t added the seafood yet, so it should taste slightly overseasoned at this point. The seafood will balance the flavors perfectly.
Step 15: Add Cream Like a Professional Reduce heat to medium-low—this is crucial. Slowly pour in the room-temperature cream while stirring constantly. If your cream is cold, it could cause the mixture to curdle, which ruins the smooth texture. Stir for 1 minute until completely incorporated.
Phase 5: Add Seafood for Perfect Results (7 minutes)
Step 16: Add Fish First for Even Cooking Gently place the fish pieces into the simmering chowder. Don’t stir aggressively—use a wooden spoon to gently fold the fish into the liquid. Let it cook for exactly 2 minutes. The fish should start to turn opaque white around the edges.
Step 17: Add Shrimp and Scallops Together Add the shrimp and scallops to the pot at the same time. Gently stir once to distribute them evenly. Cook for 2-3 minutes, watching carefully. The shrimp will turn pink and curl slightly, while the scallops will become opaque white. Don’t overcook or they’ll become rubbery.
Step 18: Fold in Delicate Crab Meat Gently fold in the crab meat and crumbled bacon during the last 30 seconds of cooking. Use a folding motion rather than stirring to keep the crab chunks intact. Heat just until warmed through—crab is already cooked and just needs to be heated.
Step 19: Final Seasoning and Cleanup Remove the bay leaves immediately—they’ve done their job. Taste your rich seafood chowder and adjust seasoning with salt, pepper, or a squeeze of fresh lemon juice if needed. The chowder should coat the back of a spoon and taste rich and balanced.
Chef’s Notes for Rich Seafood Chowder Mastery
Temperature Control: Your rich seafood chowder needs gentle, consistent heat. Too hot and the cream separates, the seafood toughens, and the texture becomes grainy instead of silky smooth.
Seafood Selection: Fresh seafood makes the biggest difference in your rich seafood chowder. Frozen works if thawed completely and patted dry, but fresh creates superior flavor and texture.
Cream Technique: Room-temperature cream incorporates smoothly into hot liquid. Cold cream can shock the mixture and create lumps that can’t be fixed, ruining your rich seafood chowder.
Make-Ahead Strategy: Cook the base completely without seafood, then add fresh seafood when reheating. This prevents overcooking and keeps your rich seafood chowder tasting fresh.
Nutrition Information (Per Serving)
- Calories: 485
- Protein: 42g
- Carbohydrates: 28g
- Fat: 24g
- Fiber: 3g
- Sodium: 1,240mg
Creative Rich Seafood Chowder Variations
New England Classic: Replace half the cream with whole milk and add extra diced potatoes for a traditional lighter version that still delivers incredible flavor depth.
Smoky Bacon Chowder: Double the bacon and add a teaspoon of smoked paprika with the Old Bay for a deeper, smokier rich seafood chowder variation.
Mediterranean Style: Similar to our bouillabaisse seafood stew, add fennel, saffron, and white wine for European coastal flavors.
Spicy Asian Fusion: Incorporate coconut milk, lemongrass, and chili paste for flavors reminiscent of tom yum talay Thai seafood soup with Western creaminess.
Storage & Reheating Your Rich Seafood Chowder
Refrigerator Storage: Store leftover rich seafood chowder in sealed containers for up to 3 days. The flavors actually meld and improve after the first day.
Proper Freezing: Freeze only the base without seafood for up to 3 months. Add fresh seafood when reheating for optimal texture and flavor.
Gentle Reheating: Warm over low heat while stirring frequently. Add a splash of cream or stock if the chowder has thickened too much during storage.
Food Safety: Never leave your rich seafood chowder at room temperature longer than 2 hours, as seafood spoils quickly at unsafe temperatures.
Troubleshooting Common Rich Seafood Chowder Problems
Problem: Curdled or Separated Cream Solution: Heat was too high or cream too cold when added. Always use room-temperature cream and gentle heat. Unfortunately, curdling can’t be reversed once it happens.
Problem: Lumpy, Uneven Texture Solution: Flour wasn’t incorporated properly or stock added too quickly. Strain through fine mesh or use an immersion blender briefly to smooth out lumps.
Problem: Too Thin Consistency Solution: Mix 2 tablespoons flour with 1/4 cup cold water until smooth, then stir into simmering chowder. Cook 2-3 minutes to activate the thickening.
Problem: Rubbery, Overcooked Seafood Solution: Seafood added too early or heat too high. Remove from heat immediately when seafood turns opaque. Prevention is key here.
Problem: Bland, Underseasoned Flavor Solution: Missing acid brightens flavors. Add more Old Bay, salt, or a squeeze of fresh lemon juice to balance and enhance the rich seafood chowder.
Essential Equipment for Rich Seafood Chowder
- Heavy-bottomed pot (4-6 quart capacity) for even heat distribution
- Sharp chef’s knife for precise, uniform vegetable cuts
- Separate cutting boards (one for seafood, one for vegetables)
- Wire whisk for smooth sauce incorporation
- Wooden spoon for gentle stirring without breaking ingredients
- Fine-mesh strainer as backup for any lumps
- Ladle for clean, professional serving
Organized Shopping List
Seafood Counter
- 1 lb large shrimp (21-25 count, peeled)
- 8 oz sea scallops (side muscle removed)
- 8 oz white fish fillets (cod or halibut)
- 4 oz lump crab meat (optional)
Meat Department
- 4 strips thick-cut bacon
Produce Section
- 1 medium yellow onion
- 2 large celery stalks
- 2 medium carrots
- 4 fresh garlic cloves
- 2 medium Yukon potatoes
- Fresh thyme sprigs
Dairy Case
- 1 cup heavy cream
Pantry Aisles
- All-purpose flour
- Fish or seafood stock (low-sodium)
- Bay leaves
- Old Bay seasoning
- Salt and black pepper
Professional Success Secrets
1. Room temperature ingredients prevent curdling and ensure smooth incorporation. Remove cream and seafood from refrigeration 30 minutes before cooking your rich seafood chowder.
2. Gentle, consistent heat throughout the cooking process keeps seafood tender and cream smooth. Patience creates restaurant-quality texture.
3. Fresh seafood investment pays off dramatically in flavor. Frozen works if properly thawed and dried, but fresh creates superior rich seafood chowder.
4. Layer your seasoning gradually rather than adding everything at once. Build complex flavors step by step for the most balanced results.
5. Serve immediately while hot for optimal texture and temperature. Your rich seafood chowder continues cooking even after removing from heat.
This rich seafood chowder recipe transforms your home kitchen into a New England coastal restaurant with surprisingly achievable techniques. The secret lies in respecting each ingredient’s unique cooking requirements and building complementary flavors that enhance rather than mask the sweet, delicate seafood. Master these fundamentals, and you’ll create a rich seafood chowder that rivals any restaurant version.