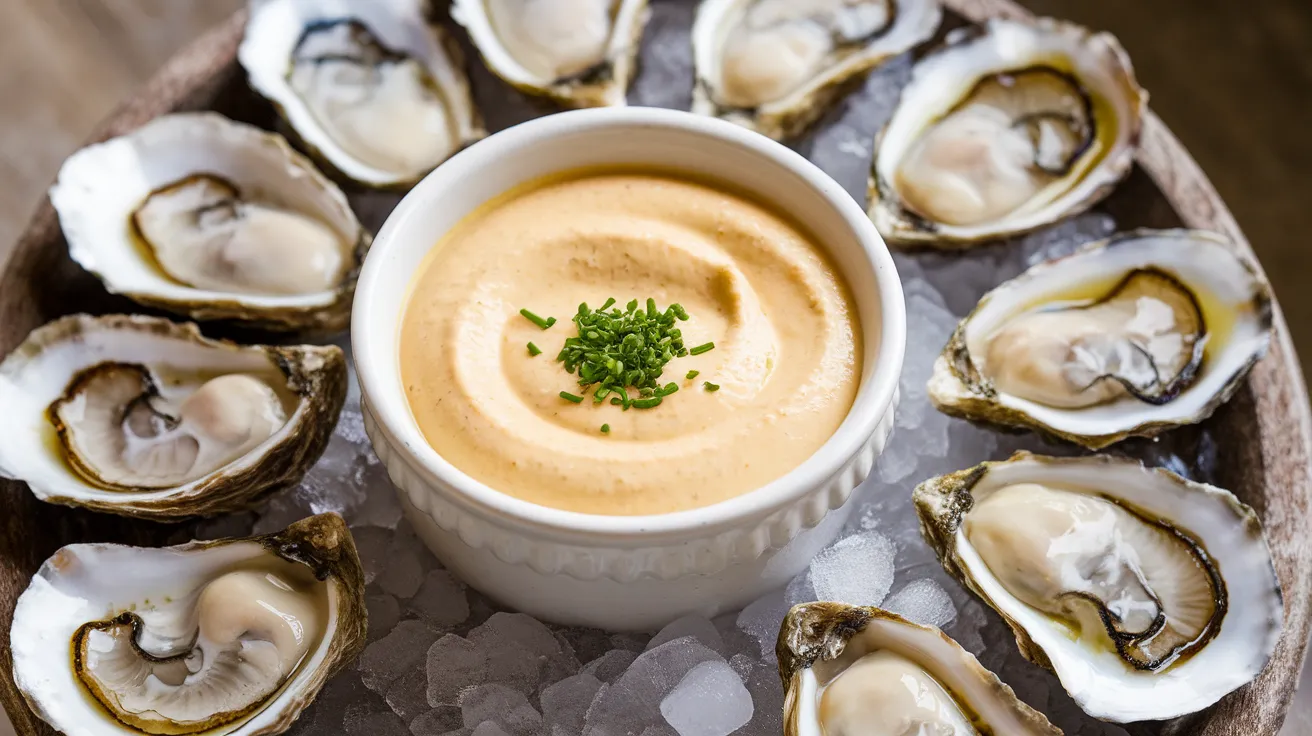
This creamy, zesty sauce for oysters dipping brings restaurant-quality flavor to your home kitchen with simple ingredients you probably already have. Our foolproof sauce for oysters dipping recipe combines tangy horseradish, bright lemon juice, and fresh herbs to create the perfect complement for briny fresh oysters.
SERVES: 4 | PREP: 15 MIN | COOK: 0 MIN | TOTAL: 15 MIN
Ingredients for the Perfect Sauce for Oysters Dipping
Base Sauce Components
| Ingredient | Amount | Purpose |
|---|---|---|
| Mayonnaise | ½ cup | Creates creamy foundation |
| Sour cream | ¼ cup | Adds tanginess and smoothness |
| Fresh lemon juice | 2 tablespoons | Provides bright acidity |
| Prepared horseradish | 1 tablespoon | Gives signature kick |
Flavor Enhancement Ingredients
| Ingredient | Amount | Purpose |
|---|---|---|
| Worcestershire sauce | 1 teaspoon | Adds umami depth |
| Hot sauce (Tabasco) | ½ teaspoon | Controls spice level |
| Fresh chives, minced | 2 tablespoons | Fresh herb brightness |
| Garlic powder | ¼ teaspoon | Subtle garlic flavor |
| Fine salt | ¼ teaspoon | Enhances all flavors |
| Black pepper | ⅛ teaspoon | Adds subtle heat |
Detailed Step-by-Step Instructions for Sauce for Oysters Dipping
Phase 1: Creating the Creamy Base (6-8 minutes)
Step 1: Set up your workspace Place a medium mixing bowl (about 2-quart capacity) on a flat, stable surface. Gather all your ingredients and measuring tools. Pro tip: Use a bowl with a wide bottom – this makes whisking much easier and prevents ingredients from splashing out.
Step 2: Measure the mayonnaise correctly Using a ½ cup dry measuring cup, scoop out the mayonnaise. Level it off with a knife for accuracy. Why this matters: Too much mayonnaise makes the sauce too thick and masks other flavors. Add the mayonnaise to your mixing bowl.
Step 3: Add sour cream with proper technique Measure ¼ cup sour cream using the same measuring technique. Beginner tip: If your sour cream is very thick, let it sit at room temperature for 10 minutes first. This prevents lumpy mixing later.
Step 4: Initial mixing technique Using a wire whisk, combine the mayonnaise and sour cream with gentle circular motions. Important: Don’t whisk vigorously yet – we’re just combining the base. Mix until you see no white streaks, about 30 seconds. The mixture should look uniformly creamy.
Step 5: Test your base consistency Lift your whisk and let the mixture drip back into the bowl. It should fall in a smooth, thick ribbon. If you see any lumps, continue whisking gently for another 15-20 seconds.
Phase 2: Adding Acidic Components (4-5 minutes)
Step 6: Prepare fresh lemon juice Cut 1 large lemon in half. Using a citrus juicer or fork, extract 2 tablespoons of juice. Critical step: Strain out any seeds through a fine-mesh strainer. Why fresh matters: Bottled lemon juice has a flat taste that won’t brighten your sauce for oysters dipping properly.
Step 7: Incorporate lemon juice gradually Add the lemon juice 1 tablespoon at a time while whisking continuously. Beginner warning: Adding all the lemon juice at once can cause the mixture to look curdled temporarily. After each addition, whisk for 10-15 seconds before adding more.
Step 8: Add horseradish with caution Start with ½ tablespoon prepared horseradish from the jar. Important note: Different brands vary in strength – some are much spicier than others. Mix thoroughly and taste. Safety tip: Don’t inhale directly over the bowl when adding horseradish – it can cause a burning sensation in your nose.
Step 9: Adjust horseradish level Taste your sauce carefully. The horseradish should provide a gentle burn that clears in 2-3 seconds. If you want more heat, add the remaining ½ tablespoon gradually, ¼ teaspoon at a time.
Phase 3: Building Complex Flavors (3-4 minutes)
Step 10: Add Worcestershire sauce precisely Measure 1 teaspoon Worcestershire sauce using a measuring spoon, not by pouring directly. Why precision matters: This ingredient is very salty and can overpower your sauce for oysters dipping if you add too much. Whisk it in completely.
Step 11: Control the heat level Add ¼ teaspoon hot sauce first, then taste. Beginner tip: Different hot sauces have varying heat levels. Tabasco is recommended because it’s consistent and not too sweet. Add more ¼ teaspoon at a time until you reach your preferred heat level.
Step 12: Prepare fresh chives correctly Washing: Rinse 2-3 chive stems under cold water and pat completely dry with paper towels. Cutting technique: Using sharp kitchen shears or a sharp knife, cut into very small pieces – about ⅛ inch long. Why small pieces: Large chive pieces can overwhelm individual bites.
Step 13: Fold in fresh herbs Add the minced chives to your sauce. Folding technique: Use a rubber spatula to gently fold the chives in with a cutting and turning motion. Don’t stir in circles – this bruises the herbs and makes them look wilted.
Phase 4: Final Seasoning and Perfection (2-3 minutes)
Step 14: Add dry seasonings systematically Add seasonings in this order: ¼ teaspoon garlic powder, ¼ teaspoon salt, then ⅛ teaspoon black pepper. Why this order: Garlic powder can clump if added to wet mixtures, so we add it before the final mixing.
Step 15: Final mixing technique Whisk everything together using figure-8 motions for 30-45 seconds. This ensures even distribution without overworking the mixture. Visual cue: The sauce should be smooth and uniform in color.
Step 16: Critical taste test Using a clean spoon, taste your sauce for oysters dipping. What to look for:
- Creaminess from the mayo and sour cream
- Brightness from the lemon juice
- Heat that builds gently from horseradish
- Depth from Worcestershire sauce
- Freshness from chives
Step 17: Make final adjustments Too bland? Add ¼ teaspoon more salt Not tangy enough? Add 1 more teaspoon lemon juice Needs more heat? Add ¼ teaspoon more horseradish Too thick? Thin with 1 tablespoon milk
Step 18: Proper chilling technique Transfer your finished sauce to a serving bowl and cover tightly with plastic wrap. Refrigerate for minimum 15 minutes before serving. Why chilling matters: Cold temperature enhances flavors and allows the sauce to thicken to perfect consistency.
Professional Chef’s Notes for Sauce for Oysters Dipping
• Ingredient temperature matters – Let cold ingredients sit at room temperature for 10-15 minutes before mixing to prevent separation and ensure smooth blending.
• Horseradish varies significantly between brands and ages. Fresh prepared horseradish from the refrigerated section provides the best flavor and proper heat level for your sauce for oysters dipping.
• Taste as you go – This sauce should balance creamy, tangy, and spicy elements. Each addition changes the overall profile, so frequent tasting prevents over-seasoning.
• Make-ahead advantage – This sauce for oysters dipping actually improves after 4-6 hours of refrigeration as flavors meld and intensify naturally.
Complete Nutrition Information (Per Serving)
- Calories: 142
- Protein: 2g
- Total Carbohydrates: 3g
- Dietary Fiber: 0g
- Total Fat: 14g
- Saturated Fat: 3g
- Sodium: 285mg
- Vitamin C: 8% Daily Value
Creative Variations of Sauce for Oysters Dipping
Spicy Jalapeño Kick Version
Replace horseradish with 2 tablespoons finely minced pickled jalapeños plus 1 teaspoon jalapeño brine. This creates a Mexican-inspired sauce for oysters dipping with different heat characteristics – more immediate burn, less sinus-clearing effect.
Asian-Fusion Style Dipping Sauce
Substitute soy sauce for Worcestershire and add 1 teaspoon rice vinegar plus ½ teaspoon toasted sesame oil. Include 1 teaspoon minced fresh ginger for authentic Asian flavors that complement oysters beautifully.
Fresh Herb Garden Variation
Triple the chives and add 1 tablespoon each minced fresh dill and parsley. This creates a vibrant green sauce that’s especially elegant for dinner parties and pairs wonderfully with both raw and cooked oysters.
Smoky Chipotle Version
Replace regular hot sauce with ½ teaspoon chipotle powder and 1 teaspoon adobo sauce from chipotle peppers. This creates a smoky, complex heat that works exceptionally well with grilled oysters. For more seafood sauce inspiration, check out our sauce for octopus recipe.
Storage & Reheating Guidelines for Sauce for Oysters Dipping
Proper Refrigerator Storage: Store your sauce for oysters dipping in an airtight container or covered bowl for up to 4 days. Glass containers work best as they don’t absorb flavors or odors.
Optimal Serving Temperature: Remove from refrigerator 10 minutes before serving to reach ideal consistency. Too cold makes the sauce thick and hard to drizzle; too warm makes it runny and less refreshing.
Freezing Guidelines: Not recommended for this dairy-based sauce. Freezing causes separation that cannot be reversed, resulting in a grainy, unappetizing texture.
Make-Ahead Strategy: Prepare up to 24 hours in advance for best flavor development. The lemon juice stays bright, and all ingredients meld perfectly overnight. Consider our sauce for scallops for similar make-ahead seafood accompaniments.

Comprehensive Troubleshooting Guide
Problem: Sauce looks curdled or separated Detailed Solution: This happens when ingredients are too cold or acid is added too quickly. Fix: Use an immersion blender for 10-15 seconds, or whisk vigorously while adding 1 tablespoon warm milk gradually.
Problem: Sauce is too spicy/hot Complete Solution: Don’t add more liquid – this dilutes flavor. Instead, double the base by adding ¼ cup each mayonnaise and sour cream, then 1 tablespoon lemon juice. Mix thoroughly and taste. This maintains the proper consistency while reducing heat.
Problem: Lacks depth of flavor Professional Fix: Add ½ teaspoon additional Worcestershire sauce and ⅛ teaspoon more salt. Let sit 15 minutes and taste again. Advanced tip: A tiny pinch of white pepper can add complexity without changing color.
Problem: Sauce is too thin/watery Expert Solution: Never add more mayonnaise directly – this makes it too rich. Instead, refrigerate for 30 minutes to naturally thicken, or whisk in 1 tablespoon sour cream which thickens without adding heaviness.
Problem: Overwhelming garlic flavor Recovery Method: Balance with extra lemon juice (start with 1 teaspoon) and 1 tablespoon additional sour cream. Prevention: Always use garlic powder, never fresh garlic, which can become harsh and overpowering in cold sauces.
Essential Equipment for Perfect Results
Must-Have Tools
- Medium mixing bowl (2-3 quart, non-reactive material)
- Wire whisk (balloon whisk works best for incorporating air)
- Measuring cups (dry and liquid)
- Measuring spoons (metal preferred for accuracy)
- Rubber spatula for folding and scraping
Helpful Additions
- Citrus juicer for maximum lemon extraction
- Fine-mesh strainer for removing seeds
- Small prep bowls for organizing ingredients
- Kitchen shears for cutting chives
- Immersion blender for emergency de-lumping
Complete Shopping List for Sauce for Oysters Dipping
Refrigerated Dairy Section
- Mayonnaise (Best Foods/Hellmann’s recommended)
- Sour cream (full-fat for best consistency)
- Prepared horseradish (refrigerated section, not shelf-stable)
Fresh Produce Section
- Fresh lemons (buy 2-3 for backup)
- Fresh chives (1 small bunch)
Condiment/Sauce Aisle
- Worcestershire sauce (Lea & Perrins preferred)
- Tabasco hot sauce (classic red variety)
Spice Section
- Garlic powder (not garlic salt)
- Fine sea salt
- Black pepper (freshly ground preferred)
Expert Success Secrets for Sauce for Oysters Dipping
1. Temperature Control is Critical Let all cold ingredients sit at room temperature for 15 minutes before mixing. Cold mayonnaise and sour cream resist blending and can create a lumpy sauce. Professional tip: Place ingredients on counter while you prep other components.
2. Quality Ingredient Selection Choose fresh prepared horseradish from the refrigerated section, not shelf-stable jars which lack intensity. High-quality mayonnaise like Best Foods or Hellmann’s provides better emulsion stability than generic brands.
3. Proper Acid Balance Fresh lemon juice is non-negotiable for this sauce for oysters dipping. Bottled juice tastes flat and won’t provide the bright acidity needed to cut through rich oysters. Squeeze just before using for maximum vitamin C and flavor.
4. Gradual Seasoning Technique Add spicy elements incrementally – you can always add more heat, but you cannot remove it. Start with half the recommended amount of horseradish and hot sauce, then build to your preference. Taste after each addition.
5. Resting Time Enhances Flavor Even though this is a no-cook sauce, allowing 15-30 minutes of refrigeration time lets flavors marry and develop complexity. The sauce will also thicken slightly to perfect consistency. This principle applies to many cold seafood sauces – similar patience improves results whether you’re making sauce for oysters dipping or other shellfish accompaniments.
This comprehensive sauce for oysters dipping recipe ensures perfect results every time. The detailed instructions help beginners avoid common mistakes while creating restaurant-quality flavor that transforms simple oysters into an elegant appetizer experience.