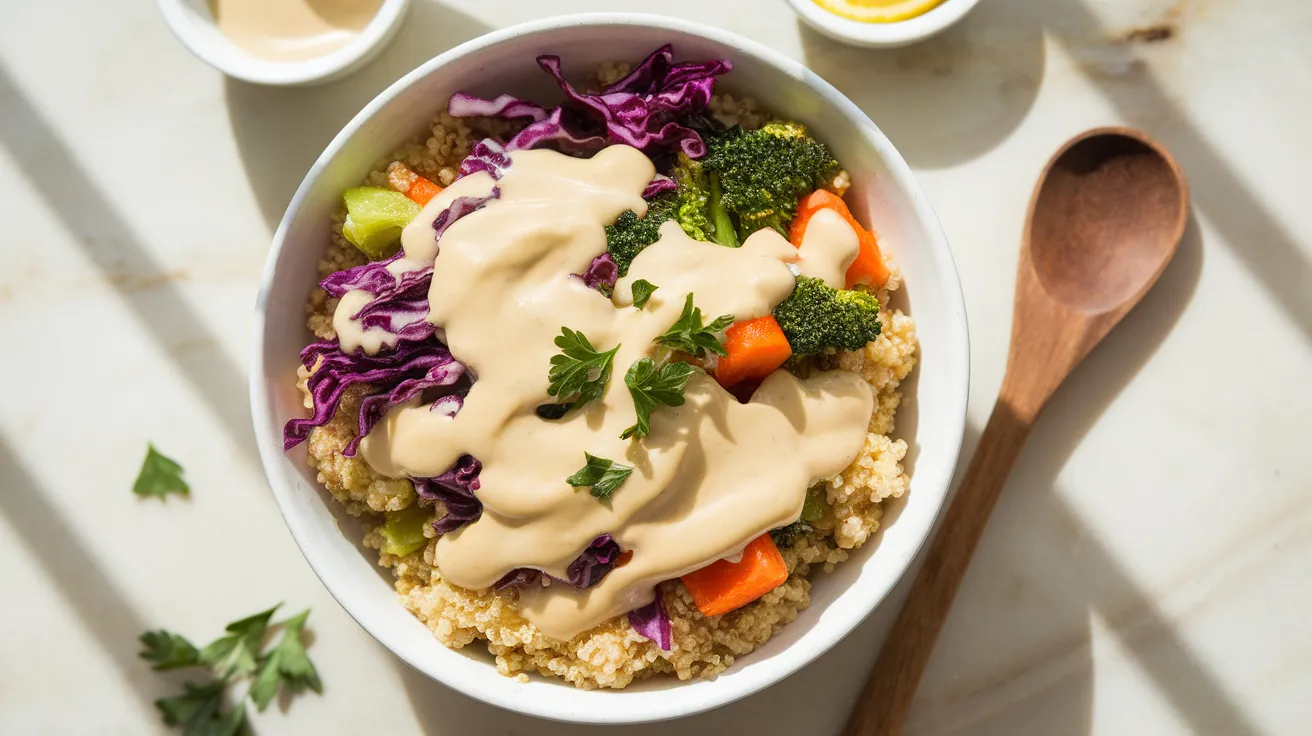
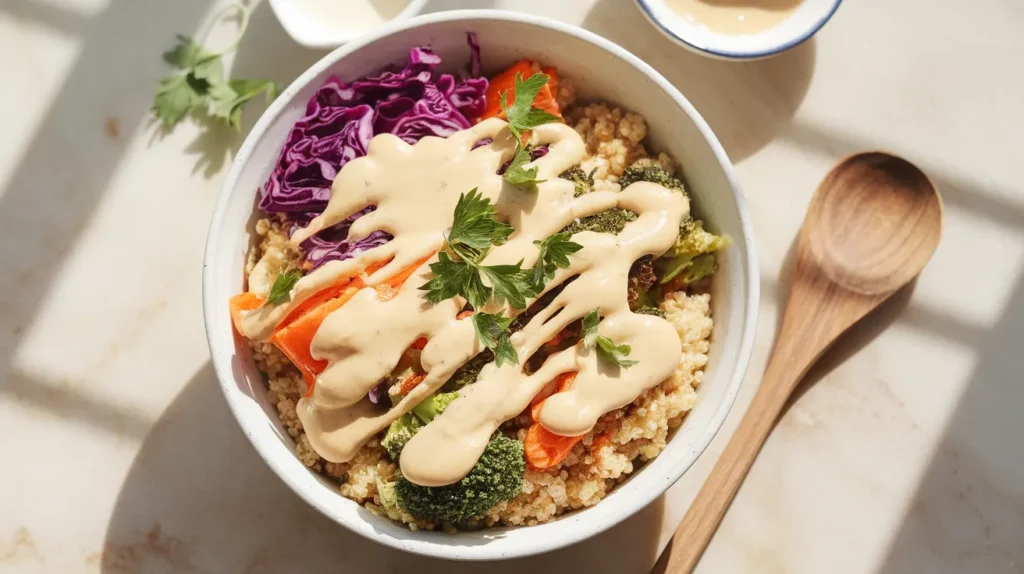
This creamy sauce for quinoa bowl transforms plain quinoa into an exciting, flavorful meal that even beginners can master. Our foolproof sauce for quinoa bowl recipe combines nutty tahini, bright citrus, and aromatic herbs to create a restaurant-quality sauce that makes healthy eating absolutely delicious.
Recipe Info
SERVES: 4 | PREP: 15 MIN | COOK: 10 MIN | TOTAL: 25 MIN
Ingredients
For the Base Sauce
| Ingredient | Amount | Notes |
|---|---|---|
| Tahini paste | ¼ cup | Room temperature works best |
| Fresh lemon juice | 3 tablespoons | About 1 large lemon |
| Olive oil | 2 tablespoons | Extra virgin preferred |
| Garlic cloves | 2 medium | Minced finely |
| Water | 2-4 tablespoons | For consistency |
| Salt | ½ teaspoon | Adjust to taste |
For the Flavor Boost
| Ingredient | Amount | Notes |
|---|---|---|
| Fresh parsley | ¼ cup | Chopped finely |
| Fresh cilantro | 2 tablespoons | Optional but recommended |
| Ground cumin | ½ teaspoon | Toasted if possible |
| Paprika | ¼ teaspoon | Sweet or smoked |
| Black pepper | ¼ teaspoon | Freshly ground |
Detailed Step-by-Step Instructions for Sauce for Quinoa Bowl
Phase 1: Getting Your Ingredients Ready (8 minutes)
1. Prepare Your Tahini (2 minutes) Remove your tahini jar from the refrigerator and let it sit at room temperature for 10-15 minutes before starting. If your tahini has separated (oil on top), don’t panic – this is normal. Use a butter knife to stir the oil back into the paste until it’s uniform. Why this matters: Cold, lumpy tahini creates a grainy sauce that never becomes smooth, no matter how much you whisk.
2. Juice Your Lemons Properly (2 minutes) Roll each lemon firmly on your counter while pressing down – this breaks down the internal membranes and releases more juice. Cut the lemon in half and remove any visible seeds. Squeeze through a fine-mesh strainer directly into a small bowl to catch pulp and remaining seeds. Pro tip: You need exactly 3 tablespoons, so squeeze an extra lemon half if your lemons are small.
3. Prepare Your Garlic Like a Pro (2 minutes) Place the flat side of your knife over each garlic clove and give it a firm smack with your palm – this loosens the skin for easy removal. Mince the garlic as finely as possible, then sprinkle a pinch of salt over it and use the flat side of your knife to mash it into a paste. Why this step: Large garlic chunks create uneven flavor distribution and can overpower bites of your sauce.
4. Measure Your Water Precisely (1 minute) Fill a small measuring cup with 4 tablespoons of lukewarm water – not cold, not hot. Cold water can shock the tahini and cause separation, while hot water can cook the garlic and create bitter flavors. Temperature check: The water should feel neutral when you dip your finger in it.
5. Set Up Your Workspace (1 minute) Place all ingredients within arm’s reach of your mixing bowl. Have your whisk ready and a clean kitchen towel nearby for wiping up any spills. Organization tip: Arrange ingredients in the order you’ll use them – this prevents mistakes and makes the process smoother.
Phase 2: Creating the Perfect Base Sauce (10 minutes)
6. Master the Tahini Foundation (3 minutes) Scoop your room-temperature tahini into a medium mixing bowl (glass or stainless steel works best). Using a wire whisk, stir the tahini in one direction for about 30 seconds until it’s completely smooth and creamy. What to look for: The tahini should be pale, fluffy, and uniform in color with no streaks or lumps. If you see any lumps, keep whisking – they will disappear.
7. Add Lemon Juice Using the Magic Technique (2 minutes) Here’s where beginners often panic – pour about half of your lemon juice into the tahini while whisking vigorously. The mixture will immediately look curdled, separated, and absolutely terrible. Don’t stop whisking! This is completely normal and expected. Keep whisking for 30 seconds, then slowly drizzle in the remaining lemon juice while continuing to whisk. Visual cue: After 1-2 minutes of whisking, the mixture will suddenly transform from separated to smooth and creamy.
8. Incorporate Garlic Paste Thoroughly (1 minute) Add your garlic paste to the tahini mixture and whisk for 30 seconds until evenly distributed. Taste test: Dip a clean spoon into the mixture – you should taste garlic throughout, not in random strong bursts.
9. Achieve Perfect Consistency with Water (3 minutes) This is the most critical step for beginners. Add exactly 1 tablespoon of your lukewarm water while whisking constantly in a circular motion. The sauce will thin slightly. Wait 10 seconds for the mixture to absorb the water completely, then add another tablespoon. Consistency check: After 2 tablespoons, the sauce should coat the back of a spoon but still drip off slowly. If it’s still too thick, add the third tablespoon. If it’s perfect, save the fourth tablespoon for later adjustments.
10. Emulsify with Olive Oil (1 minute) Drizzle your olive oil very slowly into the sauce while whisking rapidly – imagine you’re making mayonnaise. This creates a stable emulsion that prevents separation later. Success indicator: The sauce will become glossy and slightly lighter in color when properly emulsified.
Phase 3: Building Flavor Layers (5 minutes)
11. Season with Dry Spices First (2 minutes) Add salt, cumin, and paprika to your sauce. Whisk thoroughly for 30 seconds to ensure even distribution. Beginner tip: Taste the sauce now – it should be well-seasoned but not overwhelming. The salt should enhance the tahini’s nuttiness, not mask it.
12. Add Fresh Black Pepper (1 minute) Grind your black pepper directly into the sauce for maximum potency. Whisk gently to incorporate. Why fresh matters: Pre-ground pepper loses its essential oils and creates a flat, dusty flavor instead of the bright heat you want.
13. Incorporate Fresh Herbs Properly (2 minutes) Using a sharp knife, chop your parsley into very fine pieces – aim for pieces smaller than a grain of rice. If using cilantro, chop it the same way. Gentle folding technique: Switch from your whisk to a large spoon and fold the herbs into the sauce using a bottom-to-top motion. This prevents bruising the delicate herb leaves, which can create bitter flavors.
Phase 4: Final Perfection and Quality Control (7 minutes)
14. The Critical Resting Period (5 minutes) Cover your sauce with plastic wrap and let it rest at room temperature for exactly 5 minutes. What happens during rest: The tahini continues to absorb the liquid ingredients, flavors meld together, and the consistency stabilizes. Don’t skip this step – it’s what separates good sauce from great sauce.
15. Final Consistency Check and Adjustment (1 minute) After resting, stir the sauce gently with a spoon. If it has thickened too much (this happens as tahini absorbs moisture), add your reserved water 1 teaspoon at a time until you achieve a honey-like consistency that flows smoothly off a spoon but isn’t runny.
16. The Ultimate Taste Test (1 minute) Taste your sauce for quinoa bowl with a clean spoon. Perfect balance checklist: You should taste nuttiness from tahini, brightness from lemon, warmth from garlic, and freshness from herbs. If any element is missing, adjust accordingly – more lemon for brightness, more salt for overall flavor, more herbs for freshness.
Phase 5: Serving and Storage Preparation (5 minutes)
17. Prepare for Immediate Use (2 minutes) If serving immediately, transfer your sauce for quinoa bowl to a squeeze bottle or small pitcher for easy drizzling. Serving temperature: This sauce tastes best at room temperature, where all the flavors are most pronounced.
18. Storage Preparation (3 minutes) If not using immediately, transfer to an airtight container, leaving about ½ inch of headspace. Press plastic wrap directly onto the surface of the sauce to prevent a skin from forming, then cover with the lid. Label clearly with the date – this sauce keeps for 5 days refrigerated.
Chef’s Professional Tips for Perfect Sauce for Quinoa Bowl
Temperature Control: Your sauce for quinoa bowl should always be served at room temperature for optimal flavor release. Cold sauce mutes the fresh herbs and makes the tahini taste flat and chalky.
Consistency Secrets: The perfect sauce should have the consistency of thick cream – it should coat quinoa without being gloopy or so thin that it runs off immediately.
Fresh Ingredient Impact: Using fresh lemon juice instead of bottled makes an enormous difference in the final product. Fresh juice provides bright acidity and natural oils that bottled versions lack.
Make-Ahead Magic: This sauce for quinoa bowl actually improves after sitting overnight in the refrigerator as the flavors develop and intensify, making it perfect for meal prep.
Nutrition Information (Per Serving)
- Calories: 95
- Protein: 3g
- Carbohydrates: 4g
- Fat: 8g
- Fiber: 1g
- Sodium: 290mg
Creative Variations for Your Sauce for Quinoa Bowl
Mediterranean Herb Sauce for Quinoa Bowl
Transform your base recipe by adding 2 tablespoons of fresh dill and 1 tablespoon of dried oregano. This variation pairs beautifully with roasted vegetables and creates a Greek-inspired flavor profile that’s perfect over warm quinoa with cucumber and tomatoes.
Spicy Harissa Twist
Blend in 1 teaspoon of harissa paste for a North African-inspired sauce with gentle heat. This version complements roasted cauliflower and chickpeas perfectly, adding smoky depth to your quinoa bowl.
Green Goddess Style
Add 2 tablespoons of fresh basil and 1 tablespoon of fresh chives for a vibrant green sauce that’s Instagram-worthy. For another delicious sauce option that uses similar fresh herb techniques, try this sauce for zucchini patties recipe.
Asian Fusion Blend
Substitute rice vinegar for lemon juice and add 1 teaspoon of sesame oil plus ½ teaspoon of grated fresh ginger. This pairs wonderfully with edamame and shredded carrots. You might also enjoy this sauce for quinoa patties for similar Asian-inspired flavors.
Storage & Reheating Your Sauce for Quinoa Bowl
Refrigerator Storage
Store your finished sauce for quinoa bowl in an airtight container for up to 5 days. The sauce may thicken slightly when cold – simply stir in a teaspoon of water to restore the perfect consistency.
Freezer Storage
This sauce freezes beautifully for up to 3 months. Freeze in ice cube trays for perfect single-serving portions that you can thaw as needed.
Reheating Instructions
Never heat this sauce directly on the stove or in the microwave. Instead, let it come to room temperature naturally over 30 minutes, then thin with water if needed. Heating can cause separation and create bitter flavors.
Troubleshooting Guide for Quinoa Bowl Sauce
Problem: Sauce is Too Thick
Solution: Add water gradually, one teaspoon at a time, whisking constantly. The sauce should flow smoothly off a spoon like thick cream, not glob off in chunks.
Problem: Sauce Tastes Bland
Solution: Increase the lemon juice first (add 1 teaspoon at a time), then add more salt. Sometimes a small pinch of sugar helps balance overly strong tahini flavors.
Problem: Sauce Looks Separated and Curdled
Solution: This usually happens when ingredients are too cold or you added liquid too quickly. Let everything reach room temperature, then whisk vigorously while adding water very slowly.
Problem: Sauce is Too Salty
Solution: Add more tahini and lemon juice in equal parts to balance the salt. You can also thin with water and add a touch of honey to counteract saltiness.
Problem: Bitter Aftertaste
Solution: This often comes from over-whisking fresh herbs or using old tahini. Add a small amount of honey or maple syrup to counteract bitterness, or strain out the herbs and add fresh ones.
Equipment Essentials
- Medium mixing bowl (glass or stainless steel works best)
- Wire whisk (balloon whisk preferred for maximum aeration)
- Measuring cups and spoons
- Sharp knife for mincing garlic and chopping herbs
- Cutting board
- Fine-mesh strainer for lemon juice
- Airtight storage containers
Equipment Alternatives
No whisk? Use a fork and extra effort, or blend everything in a food processor for ultra-smooth results. A food processor actually works wonderfully for beginners who struggle with the whisking technique.
Shopping List
Pantry Section
- Tahini paste (check expiration date)
- Extra virgin olive oil
- Ground cumin
- Sweet paprika
- Salt and black pepper
Produce Section
- Fresh lemons (buy 2 large ones)
- Fresh garlic bulb
- Fresh parsley bunch
- Fresh cilantro (optional)
Pro Shopping Tip
Look for tahini in either the international aisle or near the peanut butter. Choose brands with just sesame seeds listed in the ingredients – avoid those with added oils or sugar.
Success Secrets for the Best Sauce for Quinoa Bowl
1. Temperature Control is Everything: Always start with room-temperature tahini and lukewarm water. Cold ingredients create lumpy, difficult-to-smooth sauce that never reaches its full creamy potential, no matter how long you whisk.
2. Master the Water Addition Technique: Add water slowly while whisking constantly – this is the make-or-break step for beginners. Rushing this creates uneven texture and potential separation that’s difficult to fix.
3. Taste and Adjust Philosophy: The best sauce for quinoa bowl recipes are customized to your personal taste preferences. Start with our measurements as a foundation, then adjust boldly until it’s perfect for you.
4. Fresh Herb Timing Matters: Add fresh herbs last and fold gently to preserve their bright color and prevent them from becoming bruised and bitter. Bruised herbs turn dark and create off-flavors.
5. The Magic of Resting Time: Let your finished sauce for quinoa bowl rest for at least 5 minutes before serving. This simple step allows flavors to marry and creates a more complex, restaurant-quality taste that impressed guests will notice immediately.
This comprehensive sauce for quinoa bowl recipe creates enough for 4 generous servings and stores beautifully in the refrigerator for up to 5 days. The combination of creamy tahini, bright lemon, aromatic garlic, and fresh herbs transforms simple quinoa into a satisfying, restaurant-quality meal that’s both nutritious and absolutely delicious. Perfect for beginners, this foolproof method ensures success every single time.