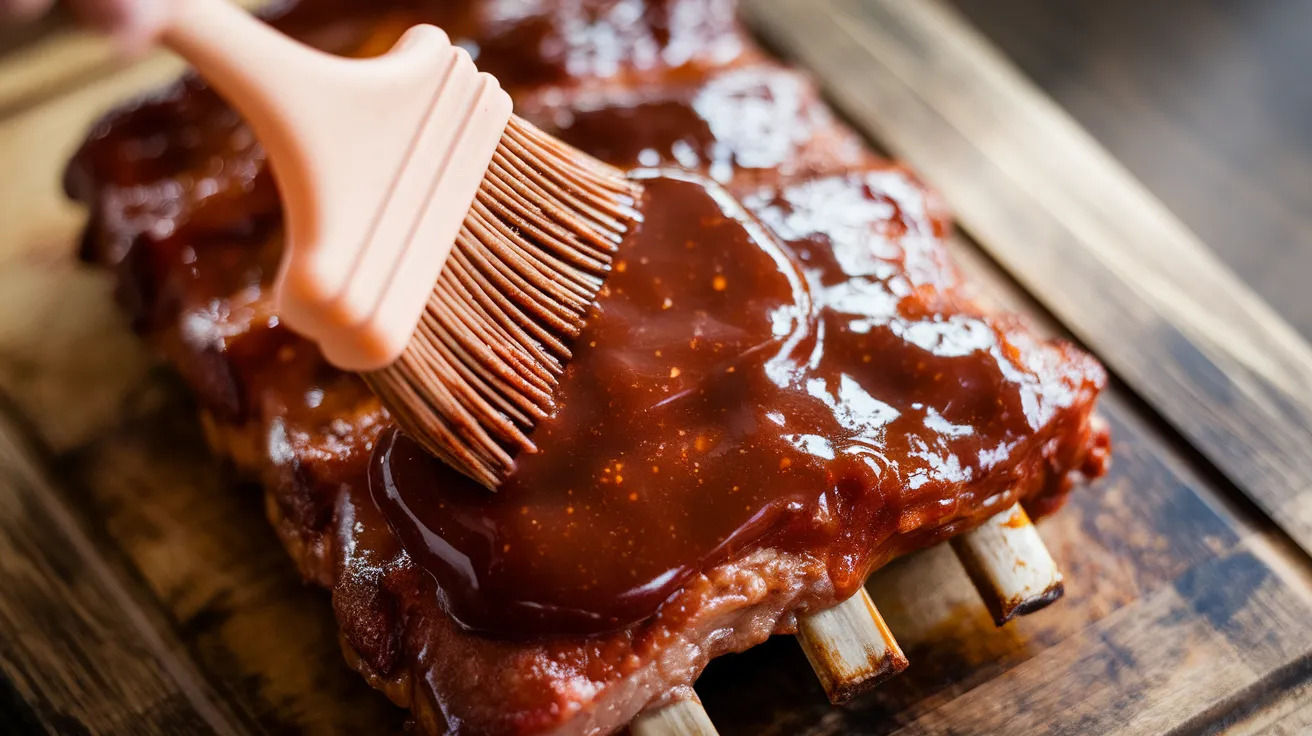
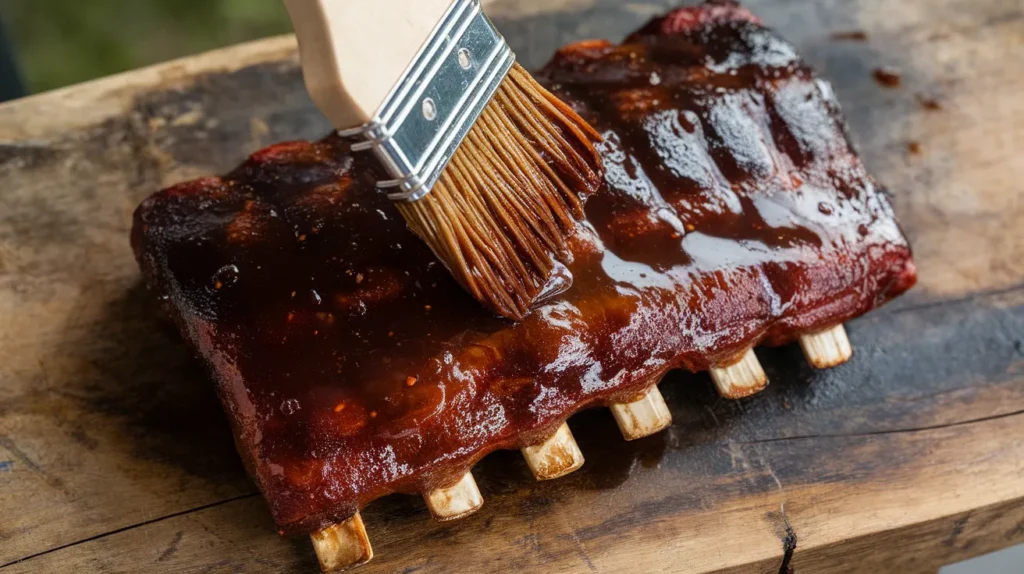
This sauce for ribs homemade transforms ordinary barbecue into restaurant-quality perfection with minimal effort. Our foolproof sauce for ribs homemade recipe combines sweet molasses, tangy vinegar, and smoky spices to create the ultimate rib glaze that caramelizes beautifully on the grill and impresses every guest.
Recipe Info Bar
SERVES: 4 | PREP: 15 MIN | COOK: 25 MIN | TOTAL: 40 MIN
Ingredients
Base Sauce Components
| Ingredient | Amount | Purpose |
|---|---|---|
| Ketchup | 1 cup | Sweet-tangy foundation |
| Apple cider vinegar | 1/3 cup | Balancing acidity |
| Brown sugar (packed) | 1/2 cup | Caramelizing sweetness |
| Molasses | 3 tablespoons | Deep, rich flavor |
| Worcestershire sauce | 2 tablespoons | Umami depth |
| Yellow mustard | 1 tablespoon | Tangy brightness |
Essential Spice Blend
| Ingredient | Amount | Flavor Profile |
|---|---|---|
| Smoked paprika | 2 teaspoons | Smoky barbecue essence |
| Garlic powder | 1 teaspoon | Savory backbone |
| Onion powder | 1 teaspoon | Sweet aromatics |
| Ground black pepper | 1/2 teaspoon | Warm spice |
| Cayenne pepper | 1/4 teaspoon | Gentle heat |
| Salt | 1/2 teaspoon | Flavor enhancement |
Detailed Step-by-Step Instructions for Beginners
Phase 1: Setting Up Your Workspace (3 minutes)
1. Gather all ingredients and place them within arm’s reach of your stove. Beginner tip: Measure everything into small bowls first – this prevents scrambling when cooking and ensures you don’t forget anything. Check that your brown sugar is packed firmly (press it down with the back of a spoon in the measuring cup until it holds its shape when turned out).
2. Choose the right saucepan – use a medium-sized pan (2-3 quarts) with a heavy bottom. Why this matters: Thin-bottomed pans create hot spots that burn sugar quickly. If you only have a thin pan, use the lowest heat setting throughout the process. The pan should be wide enough that you can whisk comfortably without splashing.
3. Set your stove to medium heat and let the pan warm for 30 seconds before adding ingredients. Temperature check: Hold your hand 6 inches above the pan – you should feel gentle warmth, not intense heat. Safety note: Never leave a heating pan unattended, even for a minute.
Phase 2: Creating the Perfect Base (8 minutes)
4. Add ketchup to your warm pan first, spreading it evenly across the bottom. Visual cue: The ketchup should sizzle very gently – if it spatters aggressively, reduce heat immediately. Beginner mistake to avoid: Don’t dump all ingredients at once; layering them properly creates better flavor integration.
5. Pour in apple cider vinegar slowly while stirring with a whisk. What to expect: The mixture will look separated and chunky at first – this is completely normal. Whisking technique: Use a figure-8 motion to incorporate thoroughly. The mixture should start looking smooth after 30-45 seconds of constant whisking.
6. Add Worcestershire sauce and yellow mustard to the mixture. Pro tip: Measure these into the same small bowl beforehand to add simultaneously. Visual progress: Your sauce base should now be a rich reddish-brown color with no visible streaks of individual ingredients. Keep whisking until completely uniform.
7. Heat the mixture to a gentle simmer – you’ll see tiny bubbles forming around the edges of the pan, not violent bubbling in the center. Temperature guide: This happens around 180-185°F if you have a thermometer. Timing: This usually takes 3-4 minutes from when you start heating. Sound check: You should hear a very soft bubbling, not aggressive boiling.
Phase 3: Adding Sweetness and Depth (7 minutes)
8. Add brown sugar gradually – sprinkle in about 1/4 at a time while whisking constantly. Why gradually: Dumping it all at once creates lumps that never dissolve properly. Visual cue: Each addition should dissolve completely before adding the next. Stirring pattern: Use long, sweeping motions around the entire pan bottom.
9. Pour in molasses slowly while continuing to whisk. Beginner note: Molasses is thick and sticky – warm your measuring spoon under hot water first for easier pouring. What you’ll see: The sauce will darken significantly and develop a glossy sheen. Consistency check: The mixture should coat your whisk when lifted but still drip off easily.
10. Let the mixture simmer gently for 5 minutes while stirring every 30 seconds. What’s happening: The sugars are dissolving completely and flavors are beginning to marry. Visual changes: The sauce will start thickening slightly and the color will deepen to a rich mahogany brown. Bubble check: Maintain gentle simmering – if bubbles become aggressive, reduce heat.
Phase 4: Perfect Spice Integration (10 minutes)
11. Measure all spices into one small bowl before adding to sauce. Organization tip: This prevents accidentally double-adding any spice and ensures even distribution. Mixing technique: Stir the dry spices together in the bowl first so they blend evenly when added to the sauce.
12. Remove sauce from heat temporarily before adding spices. Why this step: Hot sauce can cause spices to clump or burn before they incorporate. Temperature management: Let the sauce stop bubbling completely – about 30 seconds off heat is perfect. Safety benefit: This also prevents dangerous splattering when adding dry ingredients to hot liquid.
13. Add spice mixture while whisking vigorously – dump all spices in at once and whisk immediately. Whisking speed: Fast, continuous motion for the first 30 seconds prevents any clumping. Visual progress: The sauce will darken further and develop a rich, complex color with flecks of spices throughout. Texture goal: Completely smooth with no visible spice clumps.
14. Return to low heat and simmer for 5 minutes while stirring every minute. Heat level: Lower than before – you want gentle flavor melding, not aggressive cooking. Stirring pattern: Scrape the bottom of the pan with each stir to prevent any sticking. Aroma check: The sauce should smell deeply savory and balanced, not sharp or overpowering.
Phase 5: Final Adjustments and Quality Control (7 minutes)
15. Test sauce consistency by lifting your spoon and watching how it drips. Perfect consistency: Should coat the spoon but drip off in a steady stream, not thick globs or thin liquid. Too thick solution: Add warm water 1 tablespoon at a time. Too thin solution: Simmer uncovered for 2-3 more minutes.
16. Cool sauce for 2 full minutes before tasting – hot sauce burns your tongue and masks true flavors. Temperature test: Touch the spoon to your lower lip gently first. Flavor balance check: You should taste sweet first, followed by tangy, then smoky, with gentle heat at the end. Adjustment window: This is your last chance to perfect the flavor before finishing.
17. Make final seasoning adjustments based on your taste test. Too sweet: Add 1 teaspoon vinegar. Too tart: Add 1 tablespoon brown sugar. Needs heat: Add pinches of cayenne. Needs depth: Add 1/2 teaspoon Worcestershire. Important: Make one adjustment at a time and taste between each change.
18. Strain sauce through fine-mesh sieve (optional step for ultra-smooth texture). Technique: Pour sauce through sieve into clean bowl, then press solids with back of spoon to extract all liquid. Quality check: Finished sauce for ribs homemade should be glossy, smooth, and coat ribs perfectly without being too thick or thin.
Chef’s Professional Notes
• Perfect your sauce for ribs homemade by making it 4-6 hours before cooking. The resting time allows all flavors to blend completely, creating restaurant-quality depth and complexity.
• Double this sauce for ribs homemade recipe – it stores beautifully and actually improves with age. The second day brings out incredible flavor development that impresses even experienced pitmasters.
• Apply your sauce for ribs homemade in three stages: light coating at 75% cook time, heavy coating at 90% cook time, and final glaze in last 5 minutes. This prevents burning while building beautiful caramelized layers.
• Reserve extra sauce for ribs homemade for tableside service. Guests appreciate having extra sauce for customizing their perfect bite and adding extra moisture to drier pieces.
Complete Nutrition Information (Per Serving)
- Calories: 95
- Protein: 1g
- Carbohydrates: 24g
- Fat: 0.2g
- Fiber: 0.5g
- Sodium: 520mg
- Sugar: 22g
- Vitamin C: 8% DV
Creative Sauce for Ribs Homemade Variations
Spicy Jalapeño Heat Version
Replace cayenne with 2 finely minced jalapeños (seeds removed for less heat). Add them during Phase 3 for perfect integration. This creates complex heat layers that build gradually.
Sweet Bourbon BBQ Style
Include 3 tablespoons bourbon during Phase 2 – the alcohol cooks off, leaving rich depth. Add extra tablespoon brown sugar to balance. The complexity rivals expensive restaurant sauces and pairs beautifully with our sauce for quesadilla burgers for variety.
Carolina Mustard Gold
Replace half the ketchup with yellow mustard and add extra vinegar (2 tablespoons). This creates authentic Carolina-style tanginess that cuts through rich, fatty ribs perfectly.
Asian-Fusion Glaze
Substitute honey for molasses and add 2 tablespoons soy sauce plus 1 teaspoon sesame oil. This international twist offers incredible umami depth, similar to the global flavors in our sauce for zinger burger recipe.
Storage & Reheating Your Sauce for Ribs Homemade
Refrigerator Storage: Store your sauce for ribs homemade in glass jars with tight-fitting lids for up to 1 month. Label with date made – the sauce actually improves significantly after the first week as flavors continue developing.
Freezer Storage: Pour into ice cube trays for perfect single-serving portions. Once frozen, transfer cubes to freezer bags labeled with contents and date. Keeps for 6 months with no quality loss.
Reheating Methods: Microwave in 20-second intervals, stirring between each. Stovetop warming over low heat works best for larger amounts. Add 1-2 tablespoons water if consistency thickens too much during storage.
Make-Ahead Strategy: Prepare your sauce for ribs homemade up to 5 days before your barbecue event. This advance preparation actually improves flavor complexity and saves valuable cooking day time.
Beginner Troubleshooting Guide
Problem: Sauce Tastes Too Sweet
Detailed Solution: Add apple cider vinegar 1 teaspoon at a time while sauce is warm. Stir thoroughly and taste after each addition. Balance usually returns after 2-3 teaspoons. Prevention: Taste frequently during cooking and adjust gradually.
Problem: Sauce Won’t Thicken Properly
Step-by-step Fix: Return to stovetop over low heat. Simmer uncovered while stirring every 2 minutes. Natural sugars will concentrate and thicken the mixture. Timeline: Usually takes 5-8 additional minutes. Visual cue: Sauce should coat spoon completely when lifted.
Problem: Spices Created Lumps
Complete Solution: Remove from heat immediately. Use immersion blender for 30 seconds, or strain through fine-mesh sieve while pressing solids. Prevention tip: Always mix spices in small bowl first, then add to cooled sauce while whisking vigorously.
Problem: Sauce Separates During Storage
Easy Fix: Whisk vigorously while reheating. If separation continues, blend briefly with immersion blender or regular blender. Root cause: Usually happens when sauce gets too hot during initial cooking or reheating.
Problem: Too Much Heat/Spiciness
Recovery method: Add more brown sugar (1 tablespoon at a time) and extra ketchup (2 tablespoons at a time) to balance the heat. Cooling agents: A tablespoon of honey can also mellow excessive spiciness effectively.
Essential Equipment for Perfect Results
- Heavy-bottomed saucepan (2-3 quart capacity) – prevents hot spots and burning
- Balloon whisk – creates smoothest mixing action
- Wooden spoon – won’t scratch pan and handles heat well
- Fine-mesh strainer – for ultra-smooth professional texture
- Glass storage containers with airtight lids
- Measuring cups and spoons – accuracy matters for consistent results
- Instant-read thermometer – takes guesswork out of temperature control
Organized Shopping List
Condiment & Sauce Aisle
- Ketchup (32 oz bottle – you’ll use 1 cup)
- Apple cider vinegar (16 oz bottle)
- Worcestershire sauce
- Yellow mustard (squeeze bottle)
Baking & Sweetener Section
- Dark brown sugar (1 lb box)
- Molasses (unsulphured, 12 oz bottle)
Spice Aisle
- Smoked paprika (essential for authentic flavor)
- Garlic powder (not garlic salt)
- Onion powder (not onion salt)
- Cayenne pepper (start small – a little goes far)
- Ground black pepper (freshly ground preferred)
- Salt (kosher or table salt works)
Five Success Secrets for Perfect Sauce for Ribs Homemade
1. Temperature control is everything – keep heat at gentle simmer throughout cooking. High heat creates bitter flavors from burnt sugars and breaks down the sauce structure. Patience creates the smoothest, most flavorful results.
2. Quality ingredients make the difference – choose organic ketchup when possible for cleaner tomato flavor. Real molasses (not corn syrup) adds authentic depth. Investment tip: Good spices transform the entire sauce profile.
3. Timing your application perfectly – apply your sauce for ribs homemade only during the final 15 minutes of cooking. Earlier application burns the sugars and creates bitter, charred flavors instead of beautiful caramelization.
4. Make it ahead for superior flavor – this sauce for ribs homemade develops incredible complexity when rested overnight. The ingredients marry completely, creating restaurant-quality depth that impresses every guest.
5. Taste and adjust throughout – every ingredient brand varies slightly in saltiness, sweetness, and acidity. Trust your palate and make small adjustments to create your family’s perfect balance. Keep notes for next time!