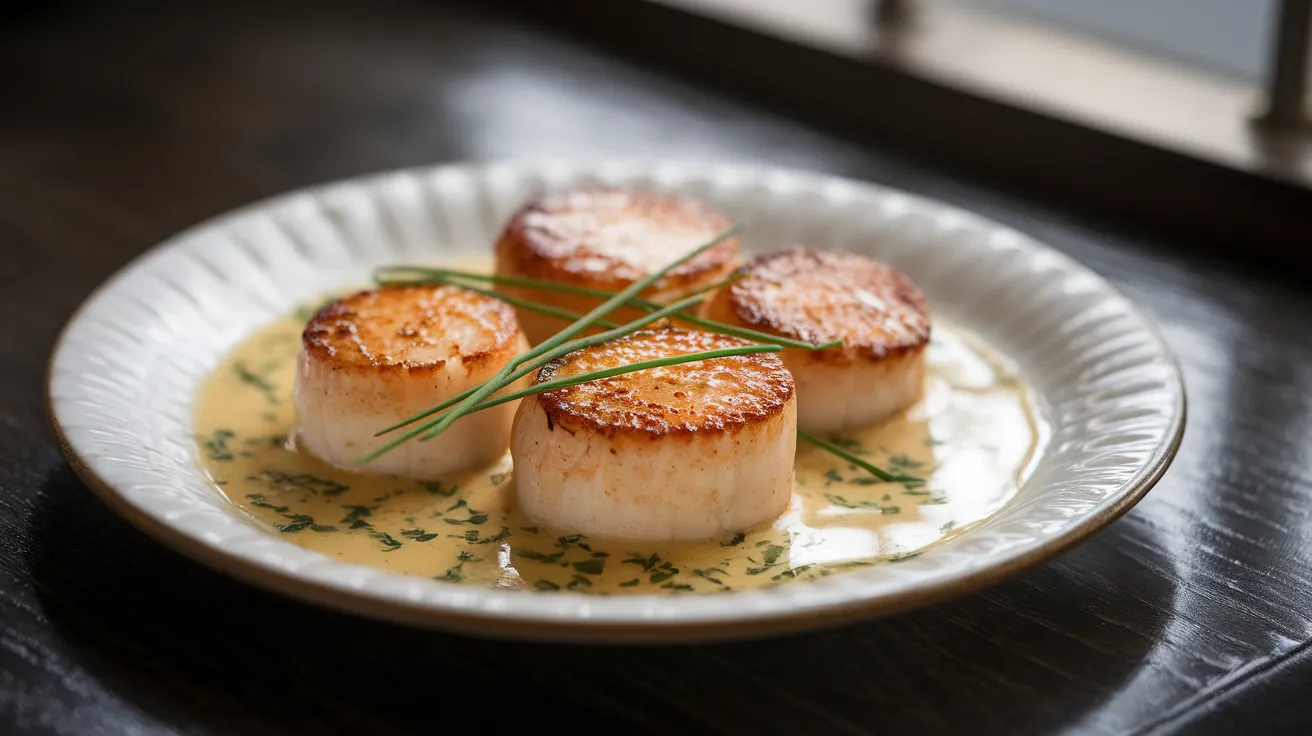
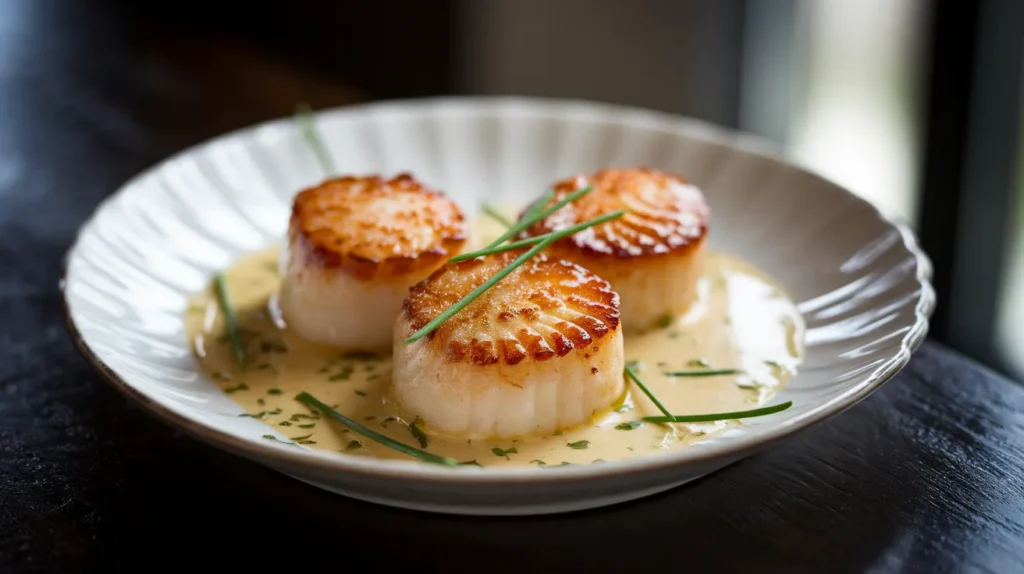
This luxurious sauce for scallops transforms simple seafood into restaurant-quality elegance. Our velvety pan sauce combines butter, white wine, and fresh herbs to create the perfect complement to sweet, tender scallops. This sauce for scallops recipe delivers sophisticated flavors that will impress your dinner guests every time.
RECIPE INFO
SERVES: 4 | PREP: 15 MIN | COOK: 12 MIN | TOTAL: 27 MIN
INGREDIENTS
For the Scallops
| Ingredient | Amount |
|---|---|
| Large sea scallops | 1½ pounds (16-20 scallops) |
| Olive oil | 2 tablespoons |
| Salt | 1 teaspoon |
| Black pepper | ½ teaspoon |
For the Pan Sauce
| Ingredient | Amount |
|---|---|
| Unsalted butter | 4 tablespoons |
| Shallot, minced | 1 large |
| Garlic cloves, minced | 3 |
| Dry white wine | ½ cup |
| Heavy cream | ⅓ cup |
| Fresh lemon juice | 2 tablespoons |
| Fresh thyme leaves | 1 tablespoon |
| Fresh chives, chopped | 2 tablespoons |
| Salt | ¼ teaspoon |
STEP-BY-STEP INSTRUCTIONS FOR SAUCE FOR SCALLOPS
Phase 1: Preparing the Scallops (10 minutes)
Step 1: Remove Scallops from Refrigerator Take your scallops out of the refrigerator and place them on a large plate. Cold scallops won’t sear properly, so letting them come to room temperature is crucial for even cooking. This should take about 10 minutes while you prepare other ingredients.
Step 2: Inspect and Clean Each Scallop Look at each scallop carefully. You’ll notice a small, tough rectangular piece attached to the side – this is called the side muscle or “foot.” Gently pull this off with your fingers and discard it. It’s chewy and unpleasant to eat. Some scallops may not have this attached if your fishmonger already removed it.
Step 3: Pat Scallops Completely Dry This is the most important step for achieving a golden crust. Use several layers of paper towels to pat each scallop dry on both the top and bottom. Press firmly but gently – you want to remove every bit of surface moisture. Wet scallops will steam instead of sear, preventing that beautiful golden-brown color.
Step 4: Season the Scallops Sprinkle both sides of each scallop evenly with salt and freshly cracked black pepper. Use your fingers to gently press the seasoning into the surface. The salt will help draw out any remaining moisture and enhance the natural sweetness of the scallops.
Step 5: Let Scallops Rest Place seasoned scallops on a clean plate and let them sit at room temperature for 10 minutes. During this time, gather all your other ingredients so everything is ready when you start cooking.
Phase 2: Preparing Your Mise en Place (5 minutes)
Step 6: Prepare All Ingredients Measure out all your sauce ingredients into small bowls. Mince the shallot finely (about ¼-inch pieces). Mince the garlic cloves until they’re almost paste-like. Strip thyme leaves from their stems by running your fingers backward along the stem. Chop chives into small pieces. Have your wine, cream, and lemon juice measured and ready.
Step 7: Set Up Your Cooking Station Place a large plate next to your stove for the cooked scallops. Have your butter divided into tablespoon-sized pieces on a small plate. Keep a whisk nearby for the sauce. This preparation prevents scrambling when things move quickly during cooking.
Phase 3: Searing the Scallops (6 minutes)
Step 8: Heat Your Pan Properly Use a large stainless steel or cast-iron skillet – non-stick won’t give you the proper browning. Heat it over medium-high heat for 2-3 minutes until it’s very hot. To test if it’s ready, flick a drop of water into the pan. It should sizzle and evaporate immediately.
Step 9: Add Oil and Heat Until Shimmering Pour the olive oil into the hot pan. Swirl it around to coat the bottom evenly. The oil should shimmer and move easily but not smoke. If it starts smoking, reduce the heat slightly and let it cool for 30 seconds.
Step 10: Place Scallops in Pan Carefully Gently lay each scallop into the pan, placing them away from you to avoid oil splatter. Don’t crowd them – there should be at least 1 inch of space between each scallop. You should hear an immediate loud sizzling sound. If you don’t hear sizzling, your pan wasn’t hot enough.
Step 11: Resist the Urge to Move Them This is crucial: do not touch, move, or peek under the scallops for the next 2-3 minutes. They need this undisturbed time to develop a golden-brown crust. The proteins need to cook and release naturally from the pan surface. Moving them too early will result in torn, pale scallops.
Step 12: Check for Proper Browning After 2-3 minutes, gently lift one scallop with tongs or a spatula to check the bottom. It should be golden brown and release easily from the pan. If it sticks or looks pale, cook for another 30 seconds before checking again.
Step 13: Flip Scallops Carefully Using tongs or a thin spatula, flip each scallop over gently. You should see a beautiful golden-brown crust on the cooked side. Cook the second side for 1-2 minutes until the scallops feel slightly firm when gently pressed with your finger.
Step 14: Remove Scallops from Pan Transfer the seared scallops to your prepared plate. They should have golden-brown crusts on both sides and feel slightly firm but not hard. Cover them loosely with aluminum foil to keep warm. Important: Don’t clean the pan – those brown bits stuck to the bottom are pure flavor!
Phase 4: Building Your Sauce for Scallops (8 minutes)
Step 15: Adjust Heat and Add First Butter Reduce your heat to medium. The pan should still be hot but not screaming hot. Add 1 tablespoon of butter to the center of the pan. It should melt quickly and foam gently. If it turns brown immediately, your heat is too high.
Step 16: Cook the Shallot Base Add your minced shallot to the foaming butter. Stir constantly with a wooden spoon, scraping up all those beautiful brown bits from the scallops. These bits (called fond) will dissolve into your sauce and add incredible depth of flavor. Cook for 1-2 minutes until the shallot becomes translucent and fragrant.
Step 17: Add Garlic Carefully Stir in the minced garlic and cook for just 30 seconds, stirring constantly. Garlic burns quickly and becomes bitter, so watch it carefully. You’ll smell the wonderful aroma when it’s perfectly cooked.
Step 18: Deglaze with White Wine Pour the white wine into the pan all at once – it will bubble up vigorously, which is exactly what you want. Use your wooden spoon to scrape up any remaining brown bits from the bottom of the pan. The alcohol needs to cook off, so let it bubble actively for 1-2 minutes.
Step 19: Reduce the Wine Continue cooking the wine at a steady simmer until it reduces by about half. You’ll know it’s ready when you can draw a line through the liquid with your spoon and it doesn’t immediately fill back in. This concentrates the flavors and removes the harsh alcohol taste.
Step 20: Add Cream and Simmer Pour in the heavy cream and stir gently to combine. Bring the mixture to a gentle simmer – you want small bubbles around the edges, not a rolling boil. A hard boil will cause the cream to break and become grainy. Simmer for 2-3 minutes until the sauce coats the back of your spoon.
Step 21: Finish with Butter (Monte au Beurre) Remove the pan from heat temporarily. Add the remaining 3 tablespoons of cold butter one piece at a time, whisking constantly after each addition. This technique creates a silky, glossy sauce that will cling beautifully to your scallops. The cold butter helps emulsify everything together.
Step 22: Season and Brighten Stir in the fresh lemon juice, thyme leaves, and a pinch of salt. Taste your sauce for scallops and adjust seasoning if needed. The sauce should be rich but bright, with a perfect balance of cream, wine, and herbs.
Phase 5: Final Assembly (2 minutes)
Step 23: Warm Scallops in Sauce Gently nestle the seared scallops back into the warm sauce for about 30 seconds. This warms them through without overcooking. Turn them once to coat both sides with the luxurious sauce.
Step 24: Plate and Garnish Arrange 4-5 scallops on each warmed dinner plate. Spoon the creamy sauce generously around and over the scallops. Sprinkle with freshly chopped chives for a pop of color and fresh flavor.
Step 25: Serve Immediately Serve your sauce for scallops immediately while everything is hot and the sauce is at its glossiest. The butter emulsion is most stable when served right away.
CHEF’S NOTES FOR PERFECT SAUCE FOR SCALLOPS
• Temperature control: Keep your sauce for scallops at a gentle simmer. High heat will break the cream and make it curdle into an unappealing texture.
• Wine selection: Choose a crisp white wine you’d actually drink – Sauvignon Blanc or Pinot Grigio work perfectly in this sauce for scallops.
• Butter technique: Adding cold butter off the heat creates the silkiest texture. This French technique called “monter au beurre” is the secret to restaurant-quality sauces.
• Timing is everything: Have all ingredients prepped before you start cooking. This sauce for scallops comes together quickly once you begin the process.
NUTRITION (Per Serving)
- Calories: 285
- Protein: 28g
- Carbohydrates: 4g
- Fat: 16g
- Sodium: 680mg
DELICIOUS VARIATIONS FOR YOUR SAUCE FOR SCALLOPS
Lemon Herb Butter Sauce
Replace cream with additional butter and lemon zest for a lighter option. Add fresh parsley and tarragon for extra brightness.
Bacon Pan Sauce
Cook 2 strips of bacon first, remove, then use the rendered fat instead of olive oil. Crumble bacon back into the finished sauce.
Mushroom Wine Sauce
Sauté sliced mushrooms with the shallots for an earthy twist. This pairs beautifully with the sweet scallops, much like our sauce for oysters dipping complements briny shellfish.
Spicy Cajun Cream
Add ½ teaspoon each paprika, garlic powder, and cayenne to create a bold sauce with Southern flair, similar to the zesty flavors in our sauce for shrimp tacos.
STORAGE & REHEATING YOUR SAUCE FOR SCALLOPS
Refrigeration: Store leftover sauce for scallops in an airtight container for up to 3 days. The sauce may separate when cold, which is normal.
Reheating: Warm gently in a small saucepan over low heat, whisking constantly. Add a splash of cream if the sauce seems too thick after reheating.
Freezing: Not recommended as cream-based sauces can separate when frozen and thawed, ruining the smooth texture.
TROUBLESHOOTING YOUR SAUCE FOR SCALLOPS
Problem: Sauce is too thin and watery Solution: Simmer uncovered for 1-2 more minutes to reduce liquid, or whisk in an extra tablespoon of cold butter to thicken.
Problem: Cream sauce curdled and looks broken Solution: Remove from heat immediately and whisk in cold butter vigorously. Strain through fine mesh if necessary to remove lumps.
Problem: Scallops are rubbery and overcooked Solution: Don’t overcook! Scallops need only 2-3 minutes per side. They should feel slightly firm but not hard when pressed.
Problem: No golden crust formed on scallops Solution: Make sure scallops are completely dry and the pan is hot enough before adding them. Moisture prevents browning.
Problem: Sauce tastes bland or flat Solution: Add more lemon juice, salt, or fresh herbs. A pinch of white pepper can also brighten the flavors significantly.
EQUIPMENT ESSENTIALS
- Large stainless steel or cast-iron skillet (10-12 inch)
- Sharp knife for mincing ingredients
- Cutting board
- Paper towels for patting scallops dry
- Small whisk for emulsifying sauce
- Measuring cups and spoons
- Tongs for flipping scallops safely
- Wooden spoon for stirring
SHOPPING LIST
Seafood Counter
- Large sea scallops (1½ pounds)
Produce Section
- Fresh shallot (1 large)
- Fresh garlic (1 head)
- Fresh thyme (1 package)
- Fresh chives (1 bunch)
- Lemon (1 large)
Dairy Case
- Unsalted butter (1 stick)
- Heavy cream (small container)
Wine Section
- Dry white wine (1 bottle – use remainder for dinner!)
Pantry Items
- Olive oil
- Salt
- Black pepper
SUCCESS SECRETS FOR SAUCE FOR SCALLOPS
- Buy dry-packed scallops when possible. Wet-packed scallops contain preservatives that prevent proper browning and dilute your sauce.
- Use a hot, dry pan for the initial sear. Water droplets should sizzle and evaporate immediately when the pan is properly heated.
- Don’t move the scallops once placed in the pan. Let them develop that gorgeous golden crust naturally without interference.
- Taste your sauce for scallops before serving and adjust the acid-to-richness balance with lemon juice or additional butter.
- Serve immediately while the sauce is glossy and warm. This sauce for scallops doesn’t hold well and is best enjoyed fresh from the pan.
This elegant sauce for scallops elevates any dinner into a special occasion. The rich, creamy texture and bright herb flavors create the perfect backdrop for sweet, tender scallops that will have your guests asking for the recipe! Master this technique and you’ll have a restaurant-quality dish that’s surprisingly simple to execute at home.