- Ready in just 20 minutes with minimal cleanup
- Perfect weeknight solution for busy families
- Customizable toppings make it great for picky eaters
- One pan does it all – no extra dishes to wash!
The Easiest Sheet Pan Chicken Fajitas at Home
Ever found yourself craving restaurant-style fajitas but dreading the mess of multiple pans and complicated timing? Sheet Pan Chicken Fajitas solve this problem beautifully.
This Sheet Pan Chicken Fajitas recipe brings the sizzle of your favorite Mexican restaurant right to your kitchen with just one pan. By roasting marinated chicken strips alongside colorful bell peppers and onions, you’ll get that perfect caramelization without standing over a hot stove. If you enjoy international chicken dishes like Chicken Masala, you’ll love how these fajitas bring bold flavors with minimal effort.
Four hungry people, one pan, 20 minutes. Let’s make dinner happen!
Nutrition Comparison
| Item | Calories | Protein | Carbs | Fat | Fiber |
|---|---|---|---|---|---|
| Sheet Pan Chicken Fajitas (per serving) | 350 | 28g | 24g | 16g | 5g |
| Restaurant Fajitas (avg) | 590 | 32g | 45g | 34g | 4g |
| Frozen Fajita Kit | 420 | 22g | 38g | 24g | 3g |
Equipment & Ingredients
Kitchen Tools
| Tool | Purpose |
|---|---|
| Large rimmed baking sheet | Main cooking surface |
| Cutting board | For slicing ingredients |
| Sharp knife | For cutting meat and vegetables |
| Mixing bowl | For marinating chicken |
| Measuring spoons | For precise seasoning |
| Oven mitts | Safety when handling hot sheet pan |
| Aluminum foil (optional) | For easier cleanup |
Ingredients for Sheet Pan Chicken Fajitas (Serves 4)
| Ingredient | Amount | Notes |
|---|---|---|
| Boneless, skinless chicken breasts | 1½ pounds | Cut into ½-inch strips |
| Red bell pepper | 1 large | Sliced into ¼-inch strips |
| Yellow bell pepper | 1 large | Sliced into ¼-inch strips |
| Green bell pepper | 1 large | Sliced into ¼-inch strips |
| Yellow onion | 1 large | Sliced into ¼-inch strips |
| Olive oil | 3 tablespoons | Divided |
| Lime juice | 2 tablespoons | Freshly squeezed |
| Chili powder | 2 teaspoons | |
| Ground cumin | 1 teaspoon | |
| Garlic powder | 1 teaspoon | |
| Paprika | 1 teaspoon | Regular or smoked |
| Salt | 1 teaspoon | |
| Black pepper | ½ teaspoon | |
| Flour tortillas | 8-12 (6-inch) | Warmed |
Optional Toppings
- Lime wedges
- Fresh cilantro, chopped
- Sour cream
- Guacamole or sliced avocado
- Shredded cheese
- Pico de gallo or salsa
Substitutions
- Chicken: Substitute with steak strips, shrimp, or portobello mushrooms for vegetarian option
- Bell peppers: Any color works, or try poblano peppers for more heat
- Flour tortillas: Corn tortillas or lettuce wraps for gluten-free option
- Sour cream: Greek yogurt makes a healthier alternative
Detailed Step-by-Step Instructions for Sheet Pan Chicken Fajitas
Prep Time: 10 minutes
Cook Time: 10-12 minutes
Total Time: 20-22 minutes
Preparation Phase
- Preheat your oven
- Start by turning your oven on to 425°F (220°C)
- Wait until the oven display shows it has reached this temperature before cooking
- If your oven has different heating modes, select “Bake” or “Conventional”
- Make sure the oven rack is positioned in the middle of the oven (not too high or too low)
- Beginner tip: If your oven runs hot, consider setting it to 415°F instead
- Prepare your baking sheet
- Take out a large rimmed baking sheet (cookie sheet with raised edges)
- If you’d like easier cleanup, line the sheet with aluminum foil
- If using foil, gently press it into the corners and up the sides of the pan
- Warning: Never use wax paper in the oven – only aluminum foil or parchment paper
- Prepare the chicken
- Wash your hands with soap and warm water before and after handling raw chicken
- Remove chicken breasts from packaging and place on a clean cutting board
- Pat the chicken dry with paper towels (this helps with browning)
- With a sharp knife, slice chicken into ½-inch wide strips
- Hold the knife at a slight angle
- Cut against the grain (perpendicular to the natural lines in the meat)
- Try to make all strips roughly the same size for even cooking
- Transfer chicken strips to a mixing bowl
- Beginner tip: If you’re not confident in your slicing skills, partially freeze the chicken for 15 minutes before cutting – it will be firmer and easier to slice evenly
- Recipe note: If you enjoy Asian-inspired chicken dishes, try this technique with our Chicken Nanban recipe as well
- Prepare the vegetables
- Wash all bell peppers under cool running water
- Place each pepper on its side on the cutting board
- Cut off the top and bottom of each pepper
- Stand the pepper up on one flat end
- Slice down along the sides to remove the white membranes and seeds
- Open the pepper and remove any remaining seeds
- Lay the pepper flat and slice into ¼-inch strips
- Repeat for all peppers
- For the onion:
- Cut off both ends
- Peel away the papery outer skin
- Cut the onion in half from top to bottom
- Place each half flat-side down
- Slice into ¼-inch strips (from pole to pole, not across)
- Place all sliced vegetables in a separate bowl from the chicken
- Beginner tip: For less tears when cutting onions, chill them in the refrigerator for 30 minutes before slicing
- Mix the seasoning for Sheet Pan Chicken Fajitas
- Take out a small bowl
- Add each of the following spices, measuring carefully:
- 2 teaspoons chili powder (level, not heaping spoons)
- 1 teaspoon ground cumin
- 1 teaspoon garlic powder
- 1 teaspoon paprika
- 1 teaspoon salt
- ½ teaspoon black pepper
- Use a small spoon or fork to mix the spices together until uniformly combined
- Beginner tip: If you don’t have measuring spoons, 1 teaspoon is about the size of the tip of your thumb, and ½ teaspoon is half that amount
Assembly Steps
- Season the chicken
- Drizzle the chicken strips with 1½ tablespoons olive oil
- Measure the oil carefully or count to 3 while pouring a thin stream
- Add 1 tablespoon lime juice
- This is about the juice from half a medium lime
- Sprinkle ⅔ of your spice mixture over the chicken
- You can use a spoon to gently scoop out about ⅔ of the mixture
- Sprinkle evenly so all pieces get some seasoning
- Using clean hands or tongs, toss the chicken until all pieces are evenly coated
- Beginner warning: If using hands, wash thoroughly with soap immediately after handling raw chicken
- Drizzle the chicken strips with 1½ tablespoons olive oil
- Season the vegetables
- Add the sliced peppers and onions to their bowl
- Drizzle with the remaining 1½ tablespoons olive oil
- Add the remaining 1 tablespoon lime juice
- Sprinkle with all the remaining seasoning mixture
- Using clean hands or a spoon, toss until the vegetables are evenly coated
- Beginner tip: If your hands touched raw chicken, use a clean utensil instead of your hands for this step
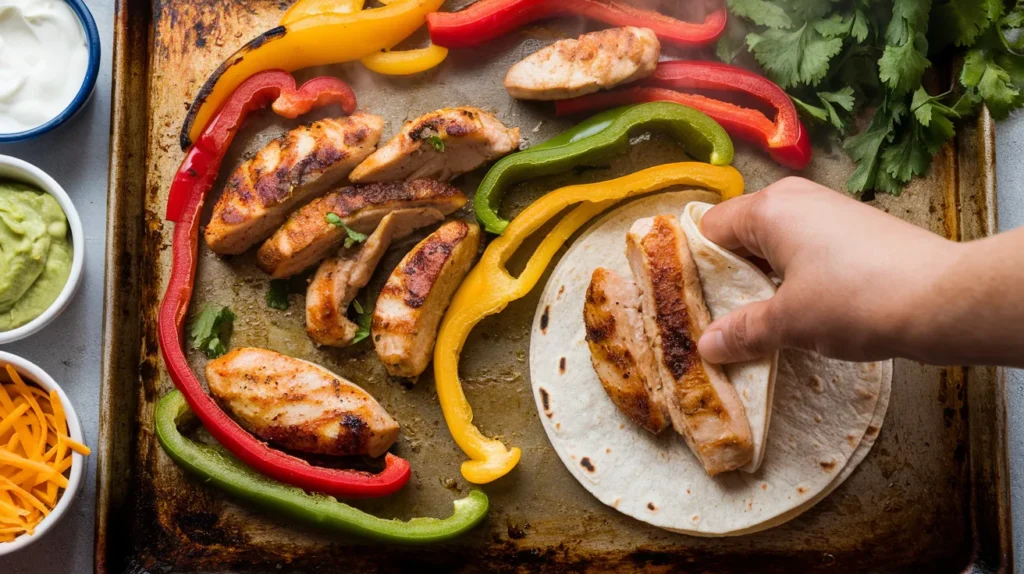
- Arrange on sheet pan
- Take your prepared baking sheet
- Spread the seasoned vegetables over one half of the sheet
- Try to create a single layer with minimal overlapping
- Arrange the chicken strips on the other half of the sheet
- Make sure each piece has some space around it
- Keep chicken and vegetables separate on the pan
- Important beginner warning: If pieces are crowded or piled on top of each other, they will steam rather than roast, resulting in soggy fajitas
- Beginner tip: If your sheet pan seems too crowded, use two pans instead – one for chicken and one for vegetables
Cooking Phase for Sheet Pan Chicken Fajitas
- Place in oven carefully
- Open the oven door fully
- Use two hands to hold the baking sheet
- Carefully slide the sheet onto the middle rack
- Close the oven door gently
- Set a timer for 5 minutes
- Safety warning for beginners: Always use oven mitts, as the oven and racks are extremely hot
- Check and stir halfway through
- When the timer goes off at 5 minutes, put on your oven mitts
- Carefully open the oven door and pull the rack out slightly
- Use a spatula or tongs to gently stir the vegetables
- Leave the chicken pieces undisturbed at this point
- Push the rack back in and close the oven door
- Reset the timer for another 5-7 minutes
- Beginner tip: If vegetables are browning too quickly, you can stir them more frequently
- Check for doneness
- When the timer goes off, carefully remove the pan from the oven
- The chicken is done when:
- It’s no longer pink in the center
- The juices run clear
- It reaches 165°F on a meat thermometer (safest way to check)
- The pieces have some golden brown edges
- The vegetables are done when:
- They’re tender but still have a slight crunch
- They have some charred spots
- You can easily pierce them with a fork
- If everything’s not done, return to the oven for 2-3 more minutes
- Beginner safety tip: Always check chicken with a thermometer if you’re unsure
- Warm the tortillas
- While the chicken and vegetables finish cooking:
- Stack 8-12 tortillas together
- Wrap them completely in aluminum foil
- Place the wrapped stack in the oven on a lower rack for the final 2 minutes
- Alternatively:
- Place tortillas on a microwave-safe plate
- Cover with a very slightly damp paper towel
- Microwave for 30 seconds
- Keep covered until ready to serve to retain heat and moisture
- Beginner tip: Warming tortillas makes them soft and pliable so they won’t crack when folded
- While the chicken and vegetables finish cooking:
Serving Steps
- Final assembly of Sheet Pan Chicken Fajitas
- Remove the sheet pan from the oven using oven mitts
- Place on a heat-safe surface
- Allow everything to rest for 1 minute
- You can mix the chicken and vegetables together on the pan or keep separate
- Cut a lime into wedges and squeeze fresh juice over everything if desired
- Beginner tip: The resting time allows juices to redistribute in the chicken for maximum flavor
- Serving suggestion: If you’re a fan of creamy pasta dishes, try our Easy Creamy Cajun Chicken Pasta another time for a completely different flavor profile
- Set up fajita station
- Place warmed tortillas on a plate, covered with a clean kitchen towel to keep warm
- Put out small bowls with each topping:
- Shredded cheese
- Sour cream
- Guacamole or sliced avocado
- Chopped cilantro
- Salsa or pico de gallo
- Lime wedges
- Beginner serving suggestion: Set up the toppings in order of how they should be added to the tortilla
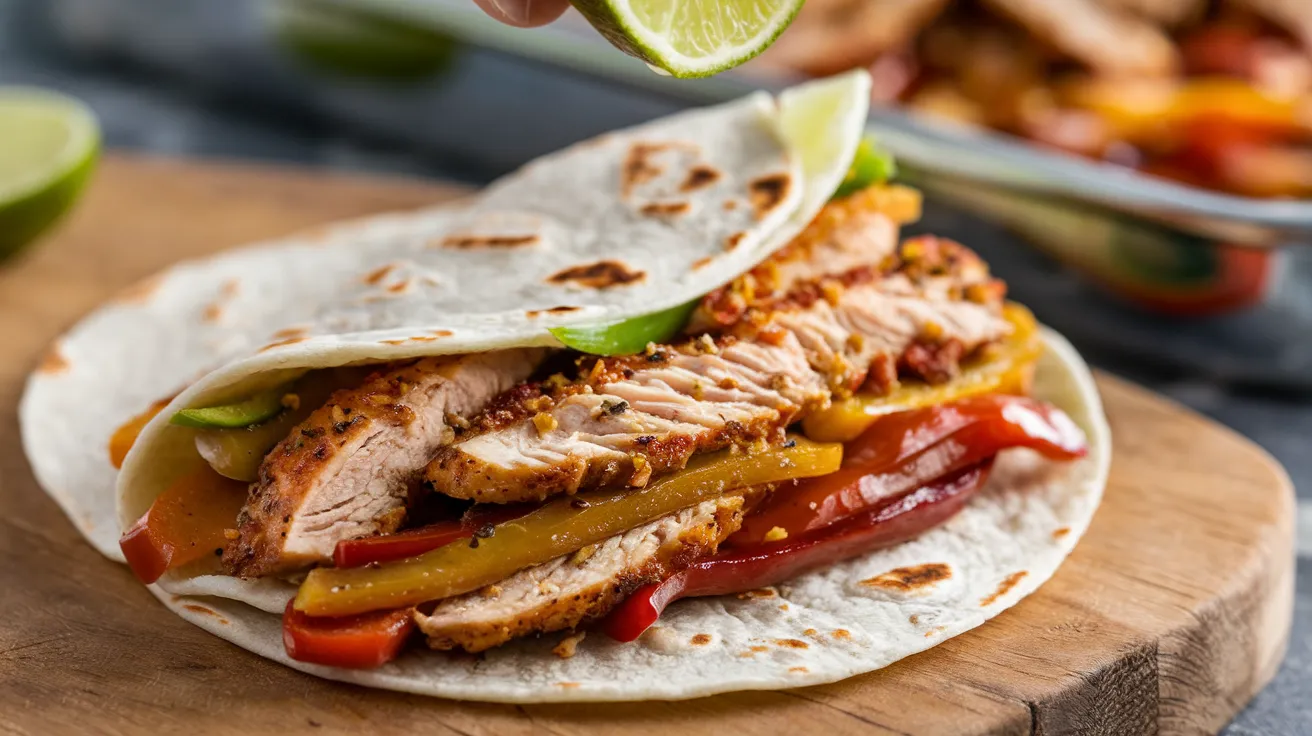
- Build your fajitas
- Take a warm tortilla
- Add a spoonful of the chicken and vegetable mixture down the center
- Top with your favorite toppings
- Fold one side of the tortilla over the filling
- Fold the other side over, slightly overlapping
- Beginner tip: Don’t overfill your tortilla or it will be difficult to fold and messy to eat
Troubleshooting Sheet Pan Chicken Fajitas
| Problem | Cause | Solution |
|---|---|---|
| Vegetables too soft | Oven too hot or cooked too long | Check oven temperature with separate thermometer; reduce cooking time by 2 minutes |
| Chicken not cooked through | Pieces cut too thick or oven too cool | Ensure uniform ½-inch strips; check oven temperature; extend cooking time by 2-3 minutes |
| Burnt edges | Oven hot spots | Rotate pan halfway through cooking; use middle rack position |
| Not enough flavor | Insufficient seasoning | Double the seasoning mixture; add ¼ teaspoon cayenne for heat |
| Tortillas falling apart | Not warmed properly | Make sure to warm tortillas until soft and pliable; keep covered until serving |
| Vegetables charring too quickly | Oven running hot | Cover vegetables with a small piece of foil while continuing to cook chicken |
| Chicken drying out | Overcooked or sliced too thin | Check chicken earlier; aim for slightly thicker slices next time |
| Watery vegetables | Overcrowding the pan | Use two sheet pans instead of one; pat vegetables dry before seasoning |
Variations & Substitutions for Sheet Pan Chicken Fajitas
Protein Options
- Steak Fajitas: Use flank or skirt steak sliced thinly against the grain (reduce cooking time to 8-10 minutes for medium)
- Shrimp Fajitas: Use large peeled and deveined shrimp (reduce cooking time to 8 minutes)
- Vegetarian Fajitas: Double the vegetables and add 1 can (15 oz) drained black beans during the last 5 minutes of cooking
Flavor Twists
- Smoky: Add 1 teaspoon smoked paprika and ½ teaspoon liquid smoke to the marinade
- Pineapple: Add 1 cup pineapple chunks to the sheet pan for sweet-savory contrast
- Spicy: Add 1 sliced jalapeño to the vegetables and ¼ teaspoon cayenne to the seasoning
Storage & Reheating
Refrigerator Storage
- Allow leftovers to cool completely (no more than 1 hour at room temperature)
- Store cooked fajita mixture in an airtight container
- Keep in refrigerator for up to 3 days
- Store tortillas in their original packaging or in a separate container
- Keep all toppings in separate containers
Freezer Storage
- Cool completely before freezing
- Portion into meal-sized freezer-safe containers or bags
- Press out excess air if using bags
- Label with the date and contents
- Store for up to 2 months
- Beginner tip: Freeze in individual portions for easy single-serving meals later
Reheating Methods
- Microwave (Quick Method)
- Place fajita mixture in a microwave-safe dish
- Cover with a damp paper towel to prevent drying out
- Heat for 1 minute, stir, then heat in 30-second intervals until hot
- Heat tortillas separately for 10-15 seconds
- Oven (Best Texture)
- Preheat oven to 350°F
- Spread fajita mixture evenly on a baking sheet
- Cover with aluminum foil to prevent drying
- Heat for 7-10 minutes until internal temperature reaches 165°F
- Warm tortillas in foil during the last 2 minutes
- Skillet (Restaurant Style)
- Heat 1 tablespoon oil in a skillet over medium-high heat
- Add fajita mixture in a single layer
- Let it sit for 30 seconds, then stir occasionally
- Cook for 3-4 minutes until hot and slightly crisp at edges
- Warm tortillas in a dry skillet for 10-15 seconds per side
Safety Notes & Tips for Sheet Pan Chicken Fajitas
Food Safety
- Always wash hands with soap and warm water for 20 seconds before and after handling raw chicken
- Use a dedicated cutting board for raw chicken
- Sanitize surfaces that have contacted raw chicken with a kitchen disinfectant or bleach solution
- Never place cooked food on surfaces that held raw chicken
- Chicken must reach internal temperature of 165°F to be safe
- Don’t leave cooked fajitas at room temperature for more than 2 hours
Cooking Tips
- For beginners: Read the entire recipe before starting
- For crispy edges: Don’t overcrowd the pan—use two pans if needed
- For maximum flavor: Let chicken marinate for up to 30 minutes if time allows
- For perfect cooking: Cut all pieces to uniform size
- For easier slicing: Partially freeze chicken for 15 minutes before cutting
- For juicier chicken: Let the cooked chicken rest for a few minutes before serving
- Time-saving tip: Pre-cut vegetables can be found in many grocery stores
Make-Ahead Options
- Slice chicken and vegetables up to 24 hours ahead (store separately)
- Mix seasoning up to 1 month ahead (store in airtight container)
- Assemble sheet pan but don’t bake until ready to serve
- Prepare toppings up to 24 hours ahead
Bonus tip for beginners: For the authentic restaurant sizzle, heat your empty sheet pan in the oven for 5 minutes before carefully adding the seasoned ingredients!