Key Takeaways:
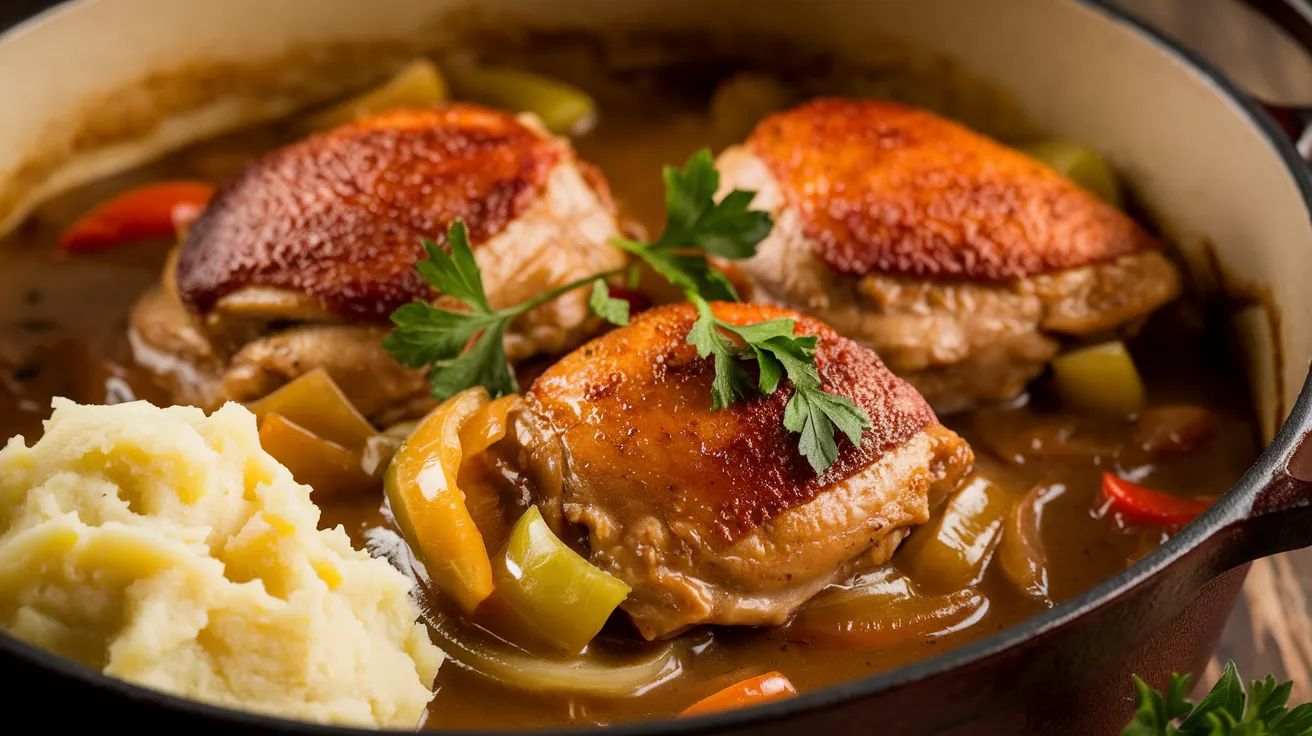
- Rich, gravy-smothered chicken that’s tender enough to fall off the bone
- Ready in just 90 minutes with simple, everyday ingredients
- Perfect make-ahead meal that tastes even better the next day
- Great crowd-pleaser that stretches your grocery budget
Why You Need This Smothered Chicken Recipe
Ever found yourself staring at chicken thighs wondering how to make them exciting? Smothered chicken is the answer. This Southern classic transforms ordinary chicken into a meal that’ll have everyone asking for seconds.
This smothered chicken recipe delivers fork-tender meat swimming in silky gravy with just the right kick of seasoning. Best of all? It’s nearly impossible to mess up – perfect for both weeknight dinners and special occasions. If you enjoy flavor-packed chicken dishes, you might also like these chicken tenders and fries for a quicker weeknight option.
Nutrition Facts
| Nutrient | Amount Per Serving |
|---|---|
| Calories | 485 |
| Protein | 38g |
| Carbohydrates | 18g |
| Fat | 28g |
| Fiber | 2g |
| Sodium | 720mg |
| Sugars | 3g |
What You’ll Need for Smothered Chicken
Ingredients (Serves 4)
| Ingredient | Amount |
|---|---|
| Bone-in, skin-on chicken thighs | 8 pieces (about 3 pounds) |
| All-purpose flour | 1/2 cup + 2 tablespoons |
| Paprika | 2 teaspoons |
| Garlic powder | 1 1/2 teaspoons |
| Onion powder | 1 1/2 teaspoons |
| Salt | 2 teaspoons |
| Black pepper | 1 teaspoon |
| Cayenne pepper | 1/4 teaspoon (optional) |
| Vegetable oil | 1/4 cup |
| Yellow onion | 2 medium, sliced |
| Bell pepper | 1 large, sliced |
| Celery | 2 stalks, diced |
| Garlic | 4 cloves, minced |
| Chicken broth | 2 1/2 cups |
| Bay leaves | 2 |
| Fresh thyme | 4 sprigs (or 1 teaspoon dried) |
| Hot sauce | To taste (optional) |
| Fresh parsley | 2 tablespoons, chopped |
Kitchen Equipment
| Tool | Purpose |
|---|---|
| Large Dutch oven or heavy pot | Main cooking vessel |
| Mixing bowl | For flour mixture |
| Tongs | For flipping chicken |
| Wooden spoon | For stirring |
| Sharp knife | For cutting vegetables |
| Cutting board | For prep work |
| Measuring cups and spoons | For precise measurements |
| Paper towels | For patting chicken dry |
| Meat thermometer | For checking doneness |
Possible Substitutions
- Chicken parts: Use bone-in chicken breasts instead of thighs (reduce cooking time by 10 minutes)
- Bell peppers: Any color works fine
- Vegetable oil: Substitute with canola oil or bacon fat for extra flavor
- Fresh herbs: Use 1 teaspoon dried thyme if fresh isn’t available
Prep Time
- Prep Time: 25 minutes
- Cook Time: 65 minutes
- Total Time: 90 minutes
Step-by-Step Smothered Chicken Instructions
Preparation Phase
- Gather all ingredients and equipment
- Take all ingredients out of the refrigerator 20 minutes before cooking
- Arrange your workspace with all tools and ingredients within reach
- Read through the entire recipe at least once before beginning
- Prepare the chicken
- Unwrap chicken and check for any excess fat or skin you’d like to trim (optional)
- Using paper towels, pat each chicken thigh completely dry on both sides
- Place chicken on a clean plate
- Measure 1 teaspoon salt and 1/2 teaspoon black pepper
- Using your fingers, sprinkle both sides of each chicken thigh evenly with salt and pepper
- Allow chicken to sit at room temperature for 15 minutes (this helps it brown better)
- Mix the flour coating
- Find a shallow bowl or pie plate for your flour mixture
- Measure and add 1/2 cup flour to the bowl
- Add 2 teaspoons paprika
- Add 1 1/2 teaspoons garlic powder
- Add 1 1/2 teaspoons onion powder
- Add the remaining 1 teaspoon salt
- Add the remaining 1/2 teaspoon black pepper
- If using, add 1/4 teaspoon cayenne pepper
- Using a fork or small whisk, mix thoroughly until all spices are evenly distributed
- Set aside near your cooking area
- Prepare your vegetables
- Place your cutting board on a stable surface
- For onions:
- Cut off both ends of each onion
- Remove the outer papery skin
- Cut each onion in half from top to bottom
- Place flat side down on cutting board for stability
- Slice each half into 1/4-inch thick half-moons
- Place sliced onions in a bowl and set aside
- For bell pepper:
- Stand pepper upright and cut around the stem in a circle
- Remove stem and seeds
- Cut pepper in half
- Remove any remaining white ribs inside
- Slice into 1/2-inch strips
- Place in bowl with onions
- For celery:
- Trim off the leafy tops and bottom
- Cut each stalk lengthwise into 3 strips
- Dice into small 1/4-inch pieces
- Add to bowl with other vegetables
- For garlic:
- Separate cloves from head
- Place flat side of knife on each clove and press firmly to crush
- Remove papery skin
- Mince garlic into very small pieces
- Keep separate from other vegetables (as it’s added later)
Cooking Phase
- Heat your cooking vessel
- Place Dutch oven or heavy pot on stove
- Turn heat to medium-high
- Add 1/4 cup vegetable oil
- Allow oil to heat until it shimmers slightly (about 2-3 minutes)
- Test oil by dropping a tiny pinch of flour in – it should sizzle immediately
- Dredge and brown the chicken
- Pick up one chicken thigh with tongs
- Place it in the flour mixture, pressing gently
- Flip and coat the other side
- Lift and shake gently to remove excess flour
- Carefully place chicken skin-side down in the hot oil
- Repeat with more pieces, but don’t overcrowd (4 pieces at a time is usually right)
- Let chicken cook undisturbed for 5-6 minutes until golden brown
- Using tongs, carefully flip each piece
- Cook second side for 5-6 minutes
- Remove chicken to a clean plate
- Repeat process with remaining chicken pieces
- Note: Chicken will not be fully cooked at this stage – just browned
- Sauté the vegetables
- Check oil level – there should be about 2-3 tablespoons left
- If there’s too much, carefully spoon some out
- Reduce heat to medium
- Add all sliced onions, bell peppers, and celery to the pot
- Stir with wooden spoon to coat vegetables in oil
- Cook for 8-10 minutes, stirring every 2 minutes
- Vegetables should soften and onions become translucent
- Add minced garlic
- Stir constantly for 1 minute (garlic burns easily)
- Make the roux for gravy
- Measure 2 tablespoons flour
- Sprinkle flour evenly over the cooked vegetables
- Using wooden spoon, stir constantly for 2 minutes
- The mixture will look pasty and stick to the vegetables
- Keep stirring to prevent burning
- The flour needs to cook to remove raw taste
- Build the gravy
- Open your chicken broth container and have it ready
- Slowly pour about 1/2 cup of broth into the pot while stirring vigorously
- This will create a thick paste initially
- Continue to stir while slowly adding the remaining 2 cups of broth
- Add 2 bay leaves
- Add 4 sprigs of fresh thyme (or 1 teaspoon dried)
- Use wooden spoon to scrape any browned bits from bottom of pot (this is flavor!)
- Bring mixture to a gentle simmer
- Let gravy cook for 2-3 minutes, stirring occasionally
- It should thicken slightly but still be quite liquid (it will continue to thicken as it cooks)
- Return chicken to pot
- Using tongs, place each piece of browned chicken back into the pot
- Position chicken skin-side up
- Nestle pieces into the gravy without stacking them
- Using a spoon, scoop gravy and pour over each chicken piece
- Cover pot with lid
- Reduce heat to low (you want a gentle simmer, not a boil)
- Set a timer for 35 minutes
- Check for doneness
- After 35 minutes, carefully remove lid (watch for steam)
- Insert meat thermometer into thickest part of largest chicken thigh (don’t touch the bone)
- Temperature should read 165°F
- If not yet at temperature, cover and cook additional 5-10 minutes
- Test chicken by gently pulling with fork – meat should easily pull from bone
If you love how onions add flavor to this smothered chicken, you might enjoy my French onion chicken crock pot recipe that uses similar flavor principles but with a different cooking method.
Finishing Steps
- Final adjustments
- Remove bay leaves and thyme sprigs with tongs
- Taste a small spoonful of gravy (careful, it’s hot!)
- If needed, add more salt and pepper to taste
- If desired, add a few dashes of hot sauce
- Check gravy thickness:
- If too thin: Simmer uncovered for 5-10 minutes to reduce
- If too thick: Add 1/4 cup chicken broth and stir
- Rest before serving
- Turn off heat
- Let chicken rest in gravy for 5-10 minutes
- This allows juices to redistribute and flavors to settle
- Prepare for serving
- Wash and chop fresh parsley
- Warm serving plates if desired
- Prepare side dishes like rice or mashed potatoes
- Serve
- Using tongs, transfer chicken pieces to serving plates (2 pieces per person)
- With a ladle, spoon plenty of gravy and vegetables over chicken
- Sprinkle each serving with fresh chopped parsley
- Serve immediately with your choice of sides

Troubleshooting Smothered Chicken
Problem: Gravy is lumpy
- Solution: Whisk vigorously to break up lumps or strain through a fine-mesh sieve
Problem: Chicken skin isn’t crispy
- Solution: After cooking, remove chicken pieces and place on baking sheet. Broil in oven for 2-3 minutes until skin crisps up, then return to gravy
Problem: Gravy is too thin
- Solution: Mix 1 tablespoon flour with 2 tablespoons cold water in a small bowl until smooth. Stir this mixture into simmering gravy and cook for 5 minutes
Problem: Chicken isn’t tender enough
- Solution: Continue cooking in 10-minute increments until fork-tender. Make sure heat is low enough for a gentle simmer
Problem: Oil splattered during browning
- Solution: Use a splatter screen if you have one, or reduce heat slightly. Pat chicken extra dry next time before dredging
Variations & Substitutions
Herb-Forward Smothered Chicken
- Add 2 tablespoons fresh rosemary and sage when adding thyme
- Include 1/2 cup white wine when building the gravy
- Reduce chicken broth by 1/2 cup to compensate for added liquid
Mushroom Lover’s Smothered Chicken
- Add 8 ounces sliced mushrooms when cooking the other vegetables
- Cook until mushrooms release their moisture and begin to brown
- Use 1/2 cup heavy cream at the end for a richer gravy (stir in during final 5 minutes)
Lighter Smothered Chicken
- Use boneless, skinless chicken breasts (reduce cooking time to 20-25 minutes)
- Replace half the flour with cornstarch for a lighter coating
- Use low-sodium chicken broth and reduce salt by half
For another slow-cooked chicken option with French onion flavors, try my chicken French onion soup slow cooker recipe when you have less hands-on time available.
Storage & Reheating
Refrigeration:
- Allow smothered chicken to cool completely (no more than 2 hours at room temperature)
- Transfer to airtight containers
- Store in refrigerator for up to 3 days
- Gravy may thicken when cold – this is normal
Freezing:
- Portion cooled chicken and gravy into freezer-safe containers
- Leave 1/2-inch space at top for expansion
- Label with date and contents
- Freeze for up to 3 months
- Thaw overnight in refrigerator before reheating
Reheating:
- Stovetop: Place in saucepan over medium-low heat. Add 2-4 tablespoons chicken broth or water. Cover and heat until bubbling and chicken reaches 165°F, about 10-15 minutes
- Microwave: Place in microwave-safe container. Cover with microwave-safe lid or plastic wrap with one corner vented. Heat in 1-minute intervals at 70% power, stirring between each interval until hot throughout
- Oven: Place in oven-safe dish. Cover tightly with foil. Heat at 325°F for 20-25 minutes or until internal temperature reaches 165°F
Safety Notes & Tips
- Raw Chicken Handling: Wash hands and surfaces thoroughly after handling raw chicken
- Internal Temperature: Always ensure chicken reaches 165°F using a meat thermometer
- Cooling: Never leave cooked chicken at room temperature for more than 2 hours
- Make Ahead: This smothered chicken tastes even better the next day as flavors continue to develop
- Don’t Rush: Low and slow cooking creates the most tender results
- Oil Temperature: If oil starts smoking, it’s too hot – remove pot from heat briefly
- Tasting: Never taste gravy until chicken has cooked thoroughly to avoid foodborne illness
Expert Tips
- Brown in batches: Don’t overcrowd the pan when browning chicken – leave at least 1 inch between pieces
- Don’t skip dredging: The flour coating helps thicken the gravy and creates a better texture
- Season layers: Add salt at multiple stages for best flavor development
- Rest before serving: Let chicken rest 5-10 minutes before serving to maximize juiciness
- Gravy rescue: If gravy separates or breaks, whisk in 1-2 tablespoons cold butter until smooth
- Leftover ideas: Shred leftover chicken and use in sandwiches, quesadillas, or over pasta
Remember, the secret to amazing smothered chicken is patience. Let those flavors meld together over low heat, and you’ll be rewarded with a meal that makes any day feel special.