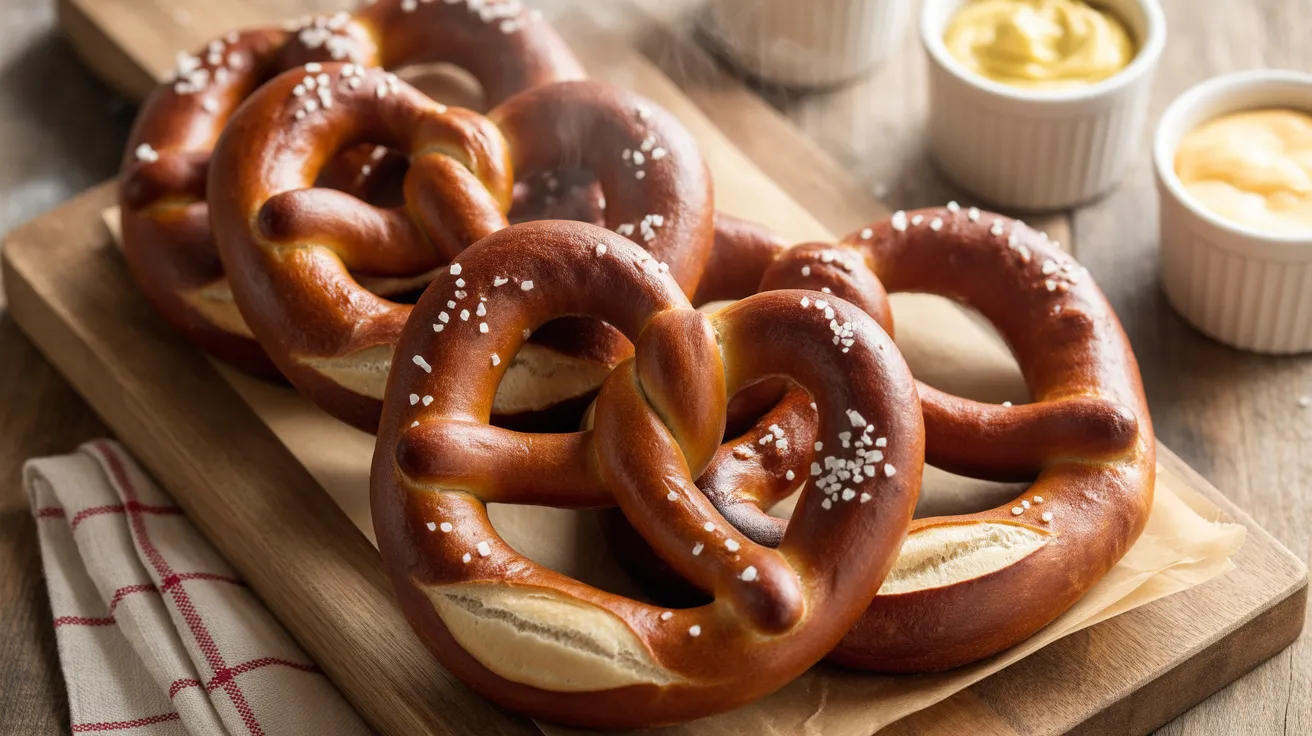
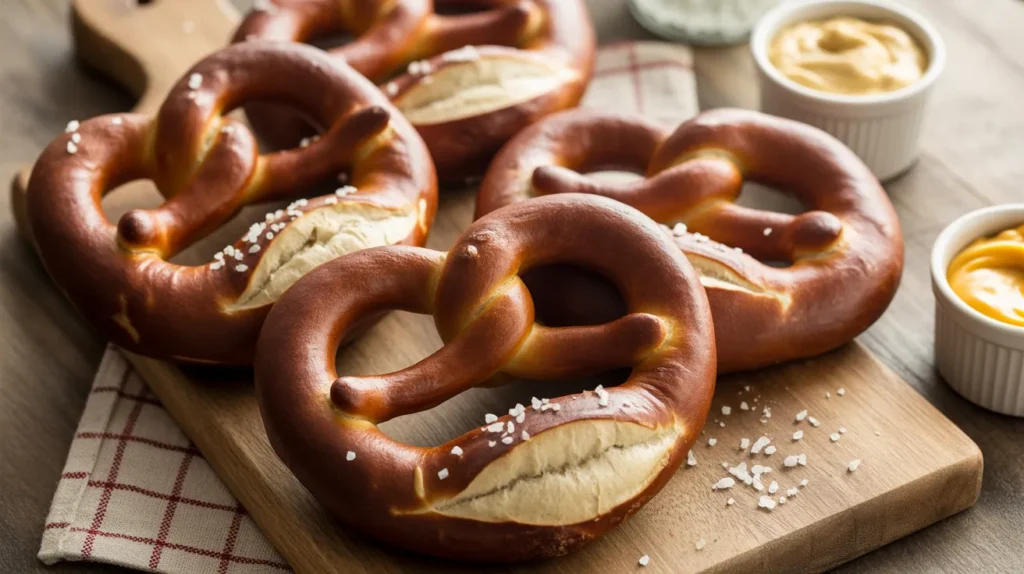
Nothing beats the chewy, golden perfection of homemade sourdough pretzels with their signature deep mahogany crust and soft, pillowy interior. These sourdough pretzels bring authentic German bakery flavor to your kitchen with that tangy sourdough depth you can’t get from instant yeast versions. I’ve spent years perfecting this recipe to give you that iconic pretzel twist with a satisfying snap on the outside and tender crumb inside.
SERVES: 4 | PREP: 30 MIN | REST: 8-12 HRS | COOK: 15 MIN | TOTAL: 9-13 HRS
Ingredients
For the Dough
| Ingredient | Amount | Notes |
|---|---|---|
| Active sourdough starter | 1 cup (240g) | Fed and bubbly |
| Warm water | ¾ cup (180ml) | 90-100°F |
| Bread flour | 3½ cups (420g) | High protein preferred |
| Granulated sugar | 2 tablespoons | Feeds the starter |
| Fine sea salt | 1½ teaspoons | Don’t skip this |
| Unsalted butter | 2 tablespoons | Softened |
For the Baking Soda Bath
| Ingredient | Amount | Purpose |
|---|---|---|
| Water | 8 cups (2 liters) | For boiling |
| Baking soda | ⅓ cup (65g) | Creates the crust |
For Topping
| Ingredient | Amount | Optional |
|---|---|---|
| Coarse sea salt | 2-3 tablespoons | Traditional |
| Melted butter | 3 tablespoons | For brushing |
Step-by-Step Instructions
Phase 1: Building Your Dough (15 minutes)
Step 1: Start by checking your sourdough starter is at peak activity. You want to see lots of bubbles on top and it should have doubled in size from its last feeding. This usually happens 4-6 hours after feeding at room temperature.
Step 2: In a large mixing bowl, combine your 1 cup of active starter with ¾ cup warm water. Whisk these together until the starter breaks up and creates a milky, slightly frothy mixture. The water temperature matters here – too hot kills the beneficial bacteria, too cold slows everything down.
Step 3: Add 2 tablespoons sugar and 1½ teaspoons salt to your starter mixture. Stir until both dissolve completely. The sugar feeds your sourdough culture while salt strengthens the gluten structure you’re about to build.
Step 4: Pour in 3 cups of bread flour (saving the remaining ½ cup for later adjustments). Use a wooden spoon or Danish dough whisk to mix until you get a shaggy, rough dough. Don’t worry if it looks messy – that’s exactly right.
Step 5: Add your 2 tablespoons softened butter in small pieces. Work the butter into the dough by squishing and folding with your hands. This takes about 2-3 minutes of mixing until the butter disappears into the dough.
Phase 2: Kneading and First Rise (20 minutes + 8-12 hours)
Step 6: Turn your dough onto a lightly floured surface. Begin kneading by pushing the dough away from you with the heel of your hand, then folding it back over itself. Rotate the dough a quarter turn and repeat. Continue this rhythm for 8-10 minutes until the dough transforms from sticky and rough to smooth and elastic.
Step 7: Check if your dough is ready by doing the windowpane test. Pinch off a small piece and gently stretch it between your fingers. If it stretches thin enough to see light through without tearing, your gluten is perfectly developed. If it tears, knead for 2-3 more minutes.
Step 8: Form your dough into a smooth ball by tucking all edges underneath. Place it in a lightly greased bowl, turning once to coat all sides with oil. Cover tightly with plastic wrap or a damp kitchen towel.
Step 9: Let your dough rise at room temperature (68-72°F) for 8-12 hours or overnight. The dough should roughly double in size and feel puffy when gently poked. This slow fermentation develops that signature sourdough tang.
Phase 3: Shaping Your Pretzels (15 minutes)
Step 10: Once your dough has risen, punch it down gently to release excess gas. Turn it out onto a clean work surface – no flour needed as pretzel dough should be slightly tacky but not sticky.
Step 11: Divide your dough into 4 equal pieces using a bench scraper or sharp knife. Each piece should weigh approximately 200g if you want perfectly uniform pretzels.
Step 12: Roll each piece into a 20-22 inch rope. Start from the center and roll outward with both hands, applying even pressure. The rope should be slightly thicker in the middle and tapered at the ends. If the dough resists stretching, let it rest for 5 minutes – the gluten needs to relax.
Step 13: Shape your pretzel by forming a U-shape with the rope. Cross the ends over each other twice (this creates that classic twist), then bring them down and press firmly onto the bottom curve of the U. Press hard enough that the ends stick – they’ll want to pop up during baking otherwise.
Phase 4: The Crucial Baking Soda Bath (10 minutes)
Step 14: Bring 8 cups water to a rolling boil in a large, wide pot. Once boiling, carefully add ⅓ cup baking soda – stand back as it will foam up dramatically. Reduce heat to maintain a gentle simmer.
Step 15: Line a baking sheet with parchment paper and preheat your oven to 425°F (218°C). Position the rack in the center of your oven for even browning.
Step 16: Gently lower one pretzel at a time into the simmering baking soda bath using a large slotted spoon or spider strainer. Boil for 30 seconds on each side – you’ll see the pretzel puff slightly and develop a shinier surface. This alkaline bath is what creates that distinctive mahogany crust and unique pretzel flavor.
Step 17: Remove each boiled pretzel with your slotted spoon, letting excess water drip off. Place on your prepared baking sheet, leaving 2-3 inches between each pretzel as they’ll puff during baking.
Phase 5: Baking to Golden Perfection (15 minutes)
Step 18: While the pretzels are still damp from the bath, sprinkle generously with coarse sea salt. The moisture helps the salt crystals stick. Use more salt than you think you need – some will fall off, and pretzels should be noticeably salty.
Step 19: Bake for 12-15 minutes until the pretzels develop a deep, dark brown color. Don’t underbake – that pale golden color isn’t what you want. True pretzel color is a rich mahogany brown, almost looking slightly burnt (but it’s not).
Step 20: Remove from the oven when the pretzels are deeply browned. Immediately brush each one generously with melted butter while they’re still hot. This adds flavor and gives that glossy, bakery-style finish.
Chef’s Notes
Starter Strength Matters: Your sourdough pretzels will only be as good as your starter. I always use my starter when it’s doubled in size and passes the float test – drop a small spoonful in water and it should bob on the surface.
The Baking Soda Secret: Don’t substitute the baking soda bath with anything else. This alkaline solution (similar to traditional lye but much safer) is what gives pretzels their distinctive flavor and that gorgeous dark crust. The chemical reaction is essential to authentic pretzel character.
Temperature Control: If your kitchen is warm (above 75°F), reduce your bulk fermentation time to 6-8 hours or move the dough to a cooler spot. Too much warmth creates over-fermented dough that’s difficult to shape.
Shape Variations Welcome: Not confident in the traditional twist? Try pretzel bites instead. Roll the dough into ropes and cut into 1-inch pieces. Boil and bake the same way for 10-12 minutes. Kids love these bite-sized versions.
Nutrition Information (Per Pretzel)
- Calories: 385
- Protein: 12g
- Carbohydrates: 72g
- Fat: 6g
- Fiber: 3g
- Sodium: 890mg
- Sugar: 6g
Creative Variations to Try
Cinnamon Sugar Sourdough Pretzels: Skip the salt topping and instead brush your hot pretzels with melted butter, then toss in a mixture of ½ cup sugar and 2 tablespoons cinnamon. These sweet pretzels pair perfectly with cream cheese dipping sauce.
Everything Bagel Pretzels: Love the flavor profile of sourdough bagels? After brushing with butter, coat your pretzels in everything bagel seasoning (2 tablespoons each of sesame seeds, poppy seeds, dried minced garlic, dried minced onion, and coarse salt). The combination works beautifully with the tangy sourdough base.
Jalapeño Cheddar Stuffed Pretzels: Roll your dough slightly wider, place a strip of sharp cheddar and sliced jalapeños down the center, then fold and seal before shaping. The cheese melts inside creating a spicy, gooey surprise.
Pretzel Sandwich Buns: Instead of the classic twist shape, form your dough into 4 large rounds about 4 inches across. After the baking soda bath and baking, slice horizontally and use as burger buns. These pair exceptionally well with bold flavors like bang bang chicken for an elevated sandwich experience.
Storage and Reheating
Room Temperature: Store cooled pretzels in an airtight container or zip-top bag for 2-3 days at room temperature. They’ll lose some crispness but remain delicious.
Refrigeration: I don’t recommend refrigerating pretzels as the cold temperature makes them stale faster. Room temperature or freezing are your best options.
Freezing: These freeze beautifully for up to 3 months. Wrap each pretzel individually in plastic wrap, then place all wrapped pretzels in a freezer bag. Squeeze out excess air before sealing.
Reheating: Thaw frozen pretzels at room temperature for 1-2 hours, then warm in a 350°F oven for 5-7 minutes. Spray lightly with water before reheating to restore moisture. For extra indulgence, brush with melted butter after warming.
Pro Tip: Freeze unbaked pretzels after shaping but before the baking soda bath. When ready to bake, boil directly from frozen (add 15 seconds to each side), then bake as directed. This gives you fresh pretzels anytime with minimal effort.
Troubleshooting Common Problems
Problem 1: My dough won’t rise Your starter might not be active enough or your kitchen is too cold. Make sure your starter doubles within 4-6 hours of feeding before using. If your kitchen is below 68°F, place your dough in a turned-off oven with the light on to create a warmer environment. The ideal rising temperature is 70-75°F.
Problem 2: Pretzels are pale and don’t have that dark color This happens when the baking soda bath is too cool or pretzels aren’t baked long enough. Your baking soda water must be actively simmering (not just warm). During baking, don’t pull them out when they’re just golden – wait for that deep mahogany brown that looks almost too dark. That’s the correct pretzel color.
Problem 3: The twisted ends pop up during baking You didn’t press the ends firmly enough onto the pretzel body when shaping. After twisting and bringing the ends down, really press them into the dough – almost smashing them flat. You can also use a tiny bit of water on your finger to help them stick better.
Problem 4: Pretzels are tough and chewy instead of tender inside You’ve either over-kneaded the dough or over-baked the pretzels. Knead just until the windowpane test passes – 8-10 minutes max by hand. During baking, watch closely after 12 minutes and remove as soon as they’re deeply browned. Every oven is different, so yours might run hot.
Problem 5: Dough is too sticky to shape Your dough might have too much hydration or wasn’t kneaded enough. Add the reserved ½ cup flour gradually during kneading if your dough remains overly sticky. Pretzel dough should be tacky but not stick to your hands. If shaping is difficult, lightly dust your work surface with flour – but use sparingly as too much flour makes tough pretzels.
Equipment Essentials
- Large mixing bowl (at least 4-quart capacity)
- Kitchen scale (for precise measurements)
- Bench scraper (makes dividing dough easy)
- Large pot (at least 6-quart for the baking soda bath)
- Slotted spoon or spider strainer (for safe pretzel transfer)
- Baking sheet (half-sheet pan works perfectly)
- Parchment paper (prevents sticking)
- Pastry brush (for butter application)
- Instant-read thermometer (optional but helpful for water temperature)
Shopping List by Store Section
Baking Aisle:
- Bread flour (or all-purpose as backup)
- Granulated sugar
- Baking soda (you’ll need a full box)
Dairy Section:
- Unsalted butter
Spices/Seasonings:
- Fine sea salt
- Coarse sea salt (or pretzel salt if available)
Already in Your Kitchen:
- Active sourdough starter
- Water
Success Secrets
1. Feed Your Starter the Night Before: I always feed my starter 12 hours before I plan to make pretzels. This ensures it’s at peak strength and activity when I need it, giving maximum rise and best flavor.
2. Don’t Rush the Bulk Fermentation: That long 8-12 hour first rise isn’t just for schedule convenience – it’s where the magic happens. The slow fermentation develops complex flavors you simply can’t achieve with quick-rise methods.
3. Master the Boil: The baking soda bath seems intimidating but it’s actually simple. Keep your water at a steady simmer (not a rolling boil) and use 30 seconds per side as your timing. Set a timer – don’t guess.
4. Embrace the Dark Crust: First-time pretzel makers often pull their pretzels too early because they look dark. Trust the process – authentic pretzels should be a deep, rich brown. That’s where the flavor lives.
5. Serve Them Warm: Pretzels are absolutely best within 2 hours of baking. If you’re serving guests, time your baking so the pretzels come out of the oven 30 minutes before serving. The texture and flavor are incomparable when they’re still slightly warm with that crispy exterior and soft inside.