Prep Time: 15 minutes | Cook Time: 25 minutes | Total Time: 40 minutes | Servings: 4
Key Takeaways
- This sweet-heat chicken dish brings restaurant quality to your kitchen in just 40 minutes
- The perfect balance of honey sweetness with spicy ginger kick
- Meal prep friendly – stays juicy even when reheated
- Easily customizable for different heat levels
Why You Need This Spicy Honey-Ginger Chicken Recipe
Ever tried to recreate your favorite takeout chicken only to end up with something bland and disappointing? We’ve been there too.
That stops today.
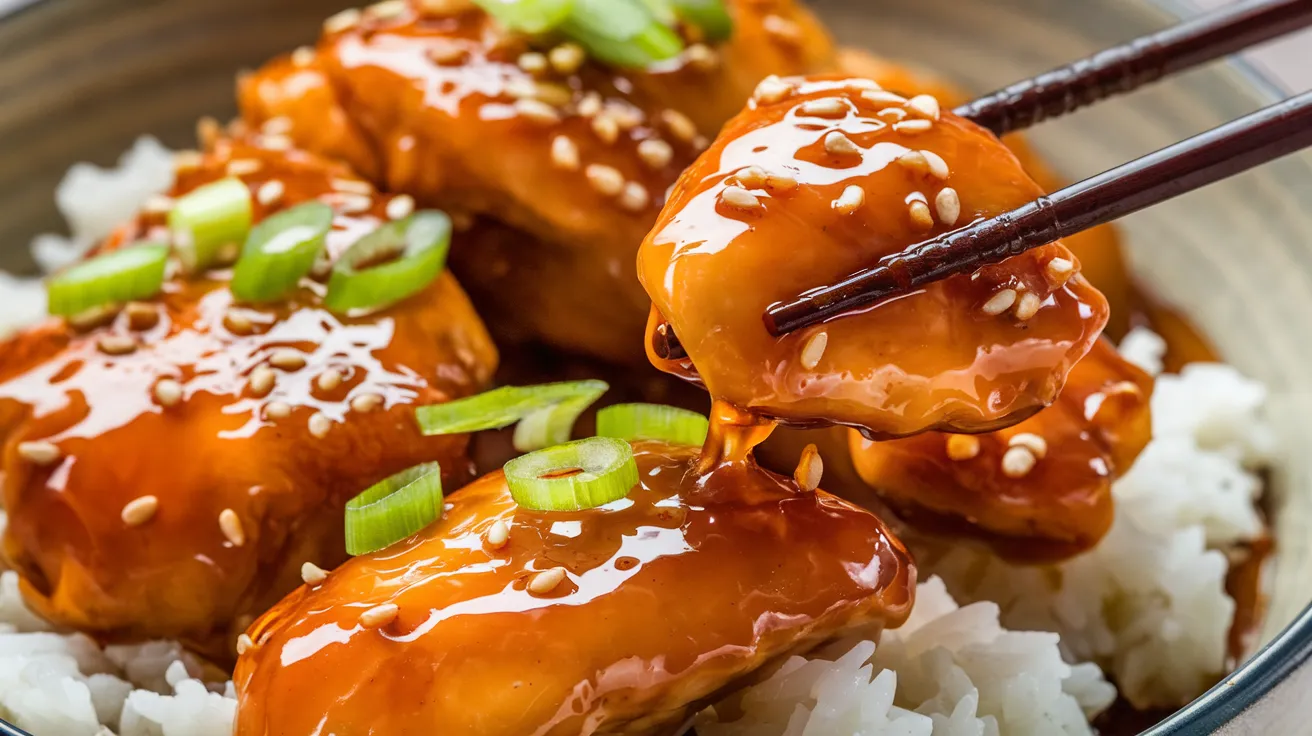
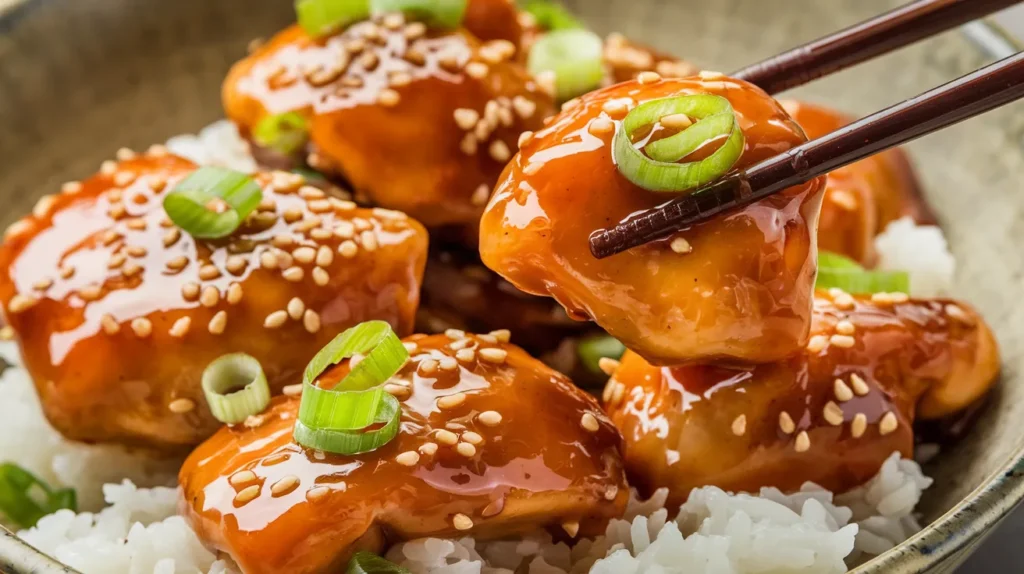
This Spicy Honey-Ginger Chicken recipe delivers that perfect balance of sweet, savory, and spicy that will make your taste buds dance. The secret lies in our special sauce that combines fragrant ginger, fiery chili, and sweet honey for a flavor explosion that’s impossible to resist. It’s one of my favorite protein-specific sauces that transforms ordinary chicken into something extraordinary.
Best of all? You don’t need professional cooking skills to make it happen.
Nutrition Facts
| Nutrient | Amount per Serving |
|---|---|
| Calories | 385 |
| Protein | 32g |
| Carbohydrates | 24g |
| Fat | 18g |
| Fiber | 1g |
| Sugar | 19g |
| Sodium | 620mg |
What You’ll Need
Ingredients
| Ingredient | Amount | Notes |
|---|---|---|
| Boneless, skinless chicken thighs | 1.5 pounds | Cut into 2-inch pieces |
| Fresh ginger | 2 tablespoons | Finely minced |
| Garlic | 4 cloves | Minced |
| Honey | 1/3 cup | Raw honey preferred |
| Soy sauce | 1/4 cup | Low-sodium option available |
| Rice vinegar | 2 tablespoons | |
| Chili garlic sauce | 1-3 tablespoons | Adjust to your heat preference |
| Cornstarch | 1 tablespoon | For thickening |
| Vegetable oil | 2 tablespoons | For cooking |
| Green onions | 4 stalks | Sliced, for garnish |
| Sesame seeds | 1 tablespoon | For garnish |
| Salt | 1/2 teaspoon | |
| Black pepper | 1/4 teaspoon | Freshly ground |
Kitchen Equipment
| Tool | Purpose |
|---|---|
| Large skillet or wok | For cooking chicken and sauce |
| Mixing bowls | For marinating and sauce preparation |
| Measuring spoons and cups | For precise measurements |
| Sharp knife | For cutting chicken and mincing ginger |
| Cutting board | For food preparation |
| Whisk | For mixing sauce |
| Tongs | For turning chicken |
| Meat thermometer | For checking doneness |
Possible Substitutions
- Chicken breasts can replace thighs (reduce cooking time by 2-3 minutes)
- Maple syrup or agave nectar can substitute for honey
- Coconut aminos work as a soy-free alternative to soy sauce
- Sriracha can replace chili garlic sauce (start with less and adjust)
- Fresh chilis can be used instead of chili sauce (remove seeds for less heat)
Step-by-Step Instructions
Preparation Phase
- Prepare your workspace
- Clear your countertop so you have plenty of room to work
- Wash your hands thoroughly with soap and warm water
- Gather all ingredients and equipment before starting
- Place a trash bowl nearby for scraps and packaging
- Set out two cutting boards – one for chicken and one for other ingredients
- Prep the chicken
- Remove chicken thighs from packaging and place on the meat-designated cutting board
- Using paper towels, pat each piece completely dry (this helps them brown better)
- Using a sharp knife, trim any excess fat from the edges
- Cut each thigh into even 2-inch chunks (about the size of a golf ball)
- Place cut chicken in a clean bowl
- Sprinkle evenly with 1/2 teaspoon salt and 1/4 teaspoon black pepper
- Toss gently with your hands or tongs to coat all pieces
- Set aside at room temperature for 10 minutes (but no longer than 20)
- SAFETY TIP: Wash hands immediately after handling raw chicken
- Prepare the aromatics
- Switch to your clean cutting board for vegetables
- For the ginger:
- Use a spoon to scrape the skin off the ginger root (the edge of a spoon works better than a peeler)
- Slice the peeled ginger into thin coins
- Stack the coins and cut into matchsticks
- Cut the matchsticks into tiny cubes (this is mincing)
- You should end up with 2 tablespoons of minced ginger
- For the garlic:
- Separate 4 cloves from the head
- Place a clove under the flat side of your knife
- Gently press with the heel of your hand to crush the clove
- The skin should now slip off easily
- Chop the garlic roughly, then run your knife through it repeatedly until finely minced
- For the green onions:
- Rinse under cold water
- Trim off the root ends and any wilted tops
- Slice thinly, keeping the white/light green parts separate from the dark green parts
- The white parts will go into the cooking, the green parts are for garnish
- TIP: Place all prepped aromatics in small separate bowls so they’re ready to go
- Mix the sauce
- Find a medium bowl that will fit all your liquid ingredients
- Measure and add 1/3 cup honey (spray measuring cup with oil first so honey slides out easily)
- Add 1/4 cup soy sauce
- Add 2 tablespoons rice vinegar
- Start with 1 tablespoon chili garlic sauce (you can add more later if you want it spicier)
- Using a whisk, stir vigorously until honey fully dissolves and mixture looks uniform
- Dip a clean spoon to taste (add more chili sauce now if desired)
- TIP: If your honey is too thick, microwave it for 10 seconds to make it easier to pour
- Make cornstarch slurry
- Find a small bowl or cup
- Add 1 tablespoon cornstarch
- Add 2 tablespoons cold water (must be cold!)
- Stir with a small whisk or fork until completely smooth
- Make sure there are no lumps hiding at the bottom
- Set aside within reach of your cooking area
- TIP: This will thicken your sauce, so don’t skip this step!
Cooking Phase
- Heat your pan properly
- Place a large skillet or wok on the stove
- Turn heat to medium-high
- Add 2 tablespoons vegetable oil
- Wait about 1-2 minutes for the pan to fully heat
- You’ll know it’s ready when the oil shimmers and moves easily around the pan
- If you see smoke, your pan is too hot – remove from heat briefly and reduce temperature
- WARNING: Stay by the stove – never leave hot oil unattended
- Cook the chicken (first batch)
- Make sure your chicken pieces are still separated and not sticking together
- Using tongs, carefully place half the chicken pieces into the hot pan
- Arrange them in a single layer with space between pieces
- Let them cook untouched for 3-4 minutes
- You’ll see the bottom edges turning golden brown
- Using tongs, flip each piece over
- Cook for another 3-4 minutes until golden on the second side
- Check one piece with a meat thermometer – it should read at least 165°F
- Transfer the cooked chicken to a clean plate
- TIP: Don’t crowd the pan or the chicken will steam instead of brown
- Cook the chicken (second batch)
- If needed, add 1 more tablespoon oil to the pan
- Once oil is hot again, add remaining chicken pieces
- Repeat the same cooking process as the first batch
- Transfer the second batch to the plate with the first batch
- TIP: The second batch may cook slightly faster since the pan is already hot
- Sauté the aromatics
- Reduce heat to medium
- Add the white parts of green onions to the pan
- Add all of the minced ginger
- Add all of the minced garlic
- Using a wooden spoon, stir constantly for 30-60 seconds
- The mixture should be very fragrant but not browning
- If the garlic starts to brown, immediately proceed to the next step
- WARNING: Garlic goes from perfect to burnt very quickly, so watch carefully
- Create the sauce in the pan
- While still on medium heat, pour the honey-soy mixture into the pan
- It will sizzle and steam – this is normal
- Use your wooden spoon to scrape the bottom of the pan
- This releases the browned bits (fond) which add amazing flavor
- Let the sauce come to a gentle simmer (small bubbles around the edge)
- Let it simmer for 1 minute, stirring occasionally
- Give your cornstarch slurry a quick stir to recombine
- Pour the slurry into the simmering sauce in a thin stream while stirring
- Stir continuously until the sauce thickens, about 1-2 minutes
- It should coat the back of your spoon and leave a clear line when you run your finger through it
- TIP: If sauce becomes too thick, add water 1 tablespoon at a time
- Combine and finish the dish
- Add all the cooked chicken back to the pan
- Don’t forget to add any juices that collected on the plate
- Gently toss the chicken to coat each piece evenly with sauce
- Let everything simmer together for 2-3 minutes
- The sauce will continue to thicken and cling to the chicken
- Stir occasionally to prevent sticking
- Taste a small amount of sauce and adjust seasoning if needed
- If you want more heat, you can add a little more chili garlic sauce
- If too spicy, add another teaspoon of honey
- TIP: The chicken will continue cooking slightly in the hot sauce
Finishing Touches
- Plate and garnish your masterpiece
- Find a large serving platter or individual plates
- If serving with rice, place rice on plates first
- Using tongs, arrange chicken pieces over rice or on serving platter
- Pour remaining sauce from the pan over the chicken
- Sprinkle generously with the sliced green parts of green onions
- Scatter sesame seeds across the top
- Serve immediately while hot
- TIP: For a restaurant-style presentation, pack rice into a small bowl, then invert onto the plate before adding chicken
Troubleshooting
Common Issues and Fixes
Sauce too thin?
- Mix 1 teaspoon of cornstarch with 1 tablespoon cold water and add to the simmering sauce
- Continue cooking until it reaches desired thickness
Sauce too thick?
- Add 1 tablespoon of water at a time until reaching desired consistency
- Remember that sauce thickens as it cools
Chicken not browning?
- Make sure chicken pieces are completely dry before cooking
- Don’t overcrowd the pan – cook in smaller batches if needed
- Ensure your pan is hot enough before adding chicken
- Let chicken cook undisturbed for full 3-4 minutes before checking
Too spicy?
- Add an extra tablespoon of honey to balance the heat
- Serve with plain rice or cucumber to offset the spiciness
- Add a dollop of plain yogurt on the side
Not spicy enough?
- Add more chili garlic sauce, 1 teaspoon at a time, tasting between additions
- Include a pinch of red pepper flakes
- Add a small amount of minced fresh chili
- Try a few drops of your favorite hot sauce
Chicken overcooked/dry?
- Next time, cook for 1-2 minutes less per side
- Make sure your chicken pieces are uniform in size
- Consider using chicken thighs which are more forgiving than breasts
Variations & Substitutions
Make It Your Own
Pineapple Spicy Chicken
- Add 1 cup fresh pineapple chunks during the final cooking step
- The sweetness complements the spicy sauce beautifully
Citrus Twist
- Add 1 tablespoon orange zest and 2 tablespoons orange juice to the sauce
- This brightens the flavors and adds complexity
Nutty Version
- Add 1/4 cup toasted cashews or peanuts at the end
- Toast nuts in a dry pan for 2-3 minutes before adding
- For a richer nutty flavor, try adding a tablespoon of my cowboy butter sauce for a fusion twist
Veggie Boost
- Add sliced bell peppers, snap peas, or broccoli florets when returning chicken to the pan
- For harder vegetables like broccoli, steam for 2 minutes first
Low-Sugar Option
- Reduce honey to 2 tablespoons and add 2 tablespoons chicken broth
- The sauce won’t be as thick but still delicious
Lemongrass Variation
- Add 1 stalk of minced lemongrass with the ginger and garlic
- Remove the tough outer leaves and use only the tender inner part
Storage & Reheating
Keep It Fresh
Refrigeration
- Allow leftovers to cool completely (but no longer than 2 hours at room temperature)
- Transfer to airtight containers, separating chicken from rice if applicable
- Label with the date (a good habit to develop)
- Keeps well in the refrigerator for up to 3 days
- The flavors often improve overnight as they meld together!
Freezing
- Can be frozen for up to 2 months in freezer-safe containers
- Freeze sauce and chicken separately from rice for best results
- Leave some space at the top of containers for expansion
- Thaw overnight in the refrigerator before reheating
Reheating Methods
- Stovetop (best method):
- Heat a pan over medium-low heat
- Add 1-2 tablespoons water or chicken broth
- Add chicken and sauce
- Cover and heat for 5-7 minutes, stirring occasionally until heated through
- Microwave (quickest method):
- Place in a microwave-safe dish
- Cover with a damp paper towel
- Heat in 30-second intervals at 70% power
- Stir between each interval
- Continue until heated through (usually 1-2 minutes total)
- TIP: Add a splash of water when reheating to prevent drying out and revive the sauce
Safety Notes & Tips
Food Safety First
- Always wash hands for 20 seconds with soap before and after handling raw chicken
- Use separate cutting boards for raw chicken and other ingredients
- Chicken must reach an internal temperature of 165°F (74°C)
- Check temperature at the thickest part of the chicken piece
- Never reuse marinades or sauces that have contacted raw chicken
- Clean all surfaces that contacted raw chicken with hot, soapy water
- Refrigerate leftovers within 2 hours of cooking (1 hour if room temperature is above 90°F)
Pro Tips for Success
- Room temperature: Let chicken sit at room temperature for 10 minutes before cooking for more even cooking
- Mise en place: Prepare and measure all ingredients before turning on the heat
- Taste as you go: Adjust seasoning before adding chicken back to the sauce
- Rice prep: Start your rice before beginning the chicken for perfect timing (most rice takes 20 minutes)
- Make ahead: The sauce can be prepared up to 3 days in advance and stored in the refrigerator
- Color check: Your sauce should be a rich amber color – if too dark, you may have reduced it too much
- Sticky situations: If sauce sticks to pan, add a splash of water and scrape gently with wooden spoon
- Rest your wok: Let your pan cool completely before washing to prevent warping
Serving Suggestions
This Spicy Honey-Ginger Chicken pairs perfectly with:
- Steamed jasmine or basmati rice
- Simple stir-fried vegetables
- Cucumber salad with rice vinegar dressing
- Warm flour tortillas for Asian-fusion wraps
- Crisp lettuce leaves for low-carb wraps
- Steamed broccoli with a squeeze of lemon
- Cold sesame noodles
Dietary Notes
- Gluten-free option: Use tamari instead of soy sauce (check label to ensure it’s certified gluten-free)
- Lower sodium: Use low-sodium soy sauce and reduce amount to 3 tablespoons
- Keto-friendly: Replace honey with sugar-free syrup and reduce amount
- Paleo option: Use coconut aminos instead of soy sauce and a paleo-approved sweetener
- Dairy-free: This recipe is naturally dairy-free