- Ready in just 30 minutes with minimal cleanup
- Perfect balance of sweet, spicy and savory flavors in every bite
- Meal-prep friendly – stays delicious for up to 4 days in the fridge
- Customizable heat level makes it family-friendly for all spice preferences
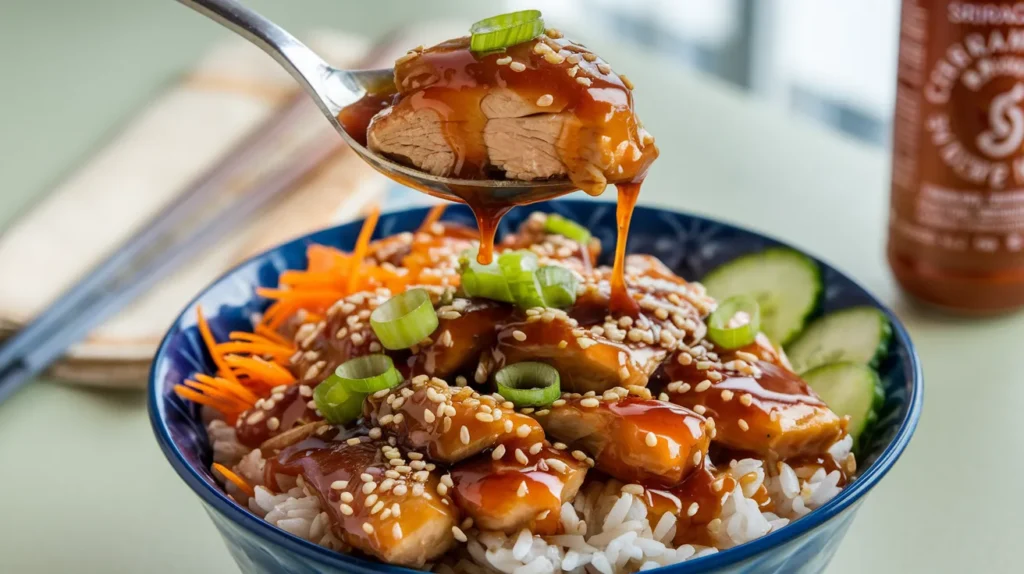
From Boring Chicken to Flavor-Packed Bowls
Tired of the same old bland chicken dinners? These Spicy Honey-Ginger Chicken Bowls with Yum Yum Sauce will stop you in your tracks. I discovered this recipe by accident when trying to use up leftover ingredients, and it quickly became my go-to meal prep solution.
What makes these bowls special is the perfect balance of sticky-sweet honey, zingy ginger, and just enough heat to wake up your taste buds. The creamy yum yum sauce ties everything together for a bowl that’s both satisfying and exciting.
This recipe serves 4 and takes just 30 minutes from start to finish. Let’s get cooking!
Nutrition Facts (Per Serving)
| Nutrient | Amount | % Daily Value |
|---|---|---|
| Calories | 520 | – |
| Total Fat | 18g | 23% |
| Saturated Fat | 3g | 15% |
| Cholesterol | 85mg | 28% |
| Sodium | 650mg | 28% |
| Total Carbs | 62g | 23% |
| Dietary Fiber | 3g | 11% |
| Sugars | 15g | – |
| Protein | 28g | 56% |
What You’ll Need
Ingredients List
| Ingredient | Amount | Purpose |
|---|---|---|
| For the Chicken | ||
| Boneless, skinless chicken thighs | 1½ pounds | Main protein |
| Honey | ¼ cup | Sweetness/glaze |
| Low-sodium soy sauce | 3 tablespoons | Savory flavor |
| Fresh ginger | 2 tablespoons, grated | Aromatic base |
| Garlic | 3 cloves, minced | Flavor enhancer |
| Sriracha sauce | 1-3 tablespoons (adjust to taste) | Heat element |
| Vegetable oil | 2 tablespoons | For cooking |
| Salt | ½ teaspoon | Flavor enhancer |
| Black pepper | ¼ teaspoon | Seasoning |
| For the Yum Yum Sauce | ||
| Mayonnaise | ½ cup | Creamy base |
| Ketchup | 2 tablespoons | Color/flavor |
| Rice vinegar | 1 tablespoon | Acidity |
| Sugar | 1 teaspoon | Sweetness |
| Paprika | ½ teaspoon | Color/flavor |
| Garlic powder | ¼ teaspoon | Flavor |
| For the Bowls | ||
| Cooked rice | 4 cups | Base of bowl |
| Cucumber | 1 medium, sliced | Fresh element |
| Carrots | 2 medium, julienned | Crunch/color |
| Green onions | 4, sliced | Garnish |
| Sesame seeds | 2 tablespoons | Garnish |
Kitchen Equipment
| Tool | Purpose |
|---|---|
| Large skillet | Cooking chicken |
| Medium bowl | Mixing marinade |
| Small bowl | Mixing sauce |
| Cutting board | Prep surface |
| Sharp knife | Chopping ingredients |
| Measuring cups & spoons | Accurate measurements |
| Tongs | Flipping chicken |
| Rice cooker (optional) | Cooking rice |
| Grater | For ginger |
Substitution Options
- Chicken thighs: Substitute with chicken breast, but reduce cooking time by 2-3 minutes
- Honey: Maple syrup or brown sugar works in a pinch
- Soy sauce: Coconut aminos for gluten-free option
- Sriracha: Gochujang or any hot sauce you have on hand
- Rice: Quinoa, cauliflower rice, or noodles
Step-by-Step Instructions
Prep Time: 10 minutes
Cook Time: 20 minutes
Total Time: 30 minutes
Preparation Phase
- Gather all ingredients
- Take all ingredients out of the refrigerator and pantry
- Place them on your counter organized by chicken ingredients, sauce ingredients, and bowl components
- This ensures you won’t forget anything and makes the cooking process smoother
- Prepare your work station
- Clear counter space for your cutting board
- Place a trash bowl nearby for scraps
- Have measuring cups and spoons ready
- Set out all needed bowls for prepped ingredients
- Prepare the chicken
- Unwrap the chicken thighs and place them on the cutting board
- Using paper towels, pat the chicken completely dry (this helps with browning)
- Using a sharp knife, trim any excess fat from the edges
- Cut each thigh into even 1-inch cubes (about the size of a game die)
- Place cubed chicken in a medium bowl
- Sprinkle with ½ teaspoon salt and ¼ teaspoon black pepper
- Toss with your hands or a spoon to ensure even coating
- Prepare the fresh ingredients
- Peel the ginger using the edge of a spoon (easier than a peeler)
- Grate the ginger using the small holes of a box grater until you have 2 tablespoons
- Peel 3 garlic cloves by gently crushing them with the flat side of your knife, then removing the skin
- Mince the garlic by cutting into tiny pieces (about the size of grains of rice)
- Set both ginger and garlic aside in a small bowl
- Make the marinade
- In a medium bowl, measure and add:
- ¼ cup honey (spray measuring cup with cooking spray first so honey slides out easily)
- 3 tablespoons low-sodium soy sauce
- The prepared 2 tablespoons grated ginger
- The 3 cloves of minced garlic
- For mild heat: 1 tablespoon sriracha
- For medium heat: 2 tablespoons sriracha
- For spicy: 3 tablespoons sriracha
- Whisk thoroughly with a fork until well combined
- Marinate the chicken
- Pour the marinade over the seasoned chicken pieces
- Using a spoon or clean hands, mix thoroughly to ensure every piece is coated
- Let sit at room temperature for at least 5 minutes
- Make-ahead option: Cover and refrigerate for up to 24 hours for deeper flavor
- Make the Yum Yum Sauce
- In a small bowl, add ½ cup mayonnaise
- Add 2 tablespoons ketchup
- Measure and add 1 tablespoon rice vinegar
- Add 1 teaspoon sugar
- Add ½ teaspoon paprika
- Add ¼ teaspoon garlic powder
- Whisk with a fork until completely smooth and no streaks remain
- Taste and adjust seasoning if needed
- Cover and refrigerate until ready to serve
- Prepare the vegetables
- Wash all vegetables under cold running water
- For carrots: Peel 2 medium carrots using a vegetable peeler
- Cut carrots into julienne strips (thin matchsticks) by:
- First cutting into 2-inch sections
- Slicing each section into thin planks
- Stacking planks and cutting into thin strips
- For cucumber: Wash 1 medium cucumber
- Cut off ends and slice into thin rounds (about ⅛-inch thick)
- For green onions: Trim roots from 4 green onions
- Slice thinly, separating white and green parts (keep both)
- Place all prepared vegetables in separate small bowls or on a plate
- Start cooking rice (do this before cooking chicken)
- Measure 2 cups uncooked rice (will yield about 4 cups cooked)
- Rinse rice in cold water until water runs clear (helps remove excess starch)
- Cook according to package directions or:
- In a pot, combine rinsed rice with 3½ cups water and a pinch of salt
- Bring to a boil, then reduce heat to low
- Cover and simmer for 15-20 minutes until water is absorbed
- Remove from heat and let sit, covered, for 5 minutes
- Fluff with a fork before serving
Cooking Phase
- Heat the pan
- Place a large skillet on the stove
- Add 2 tablespoons vegetable oil
- Turn heat to medium-high
- Allow pan to heat for 1-2 minutes until oil shimmers but doesn’t smoke
- Test if pan is ready: Sprinkle a few drops of water into the pan – if they sizzle, it’s ready
- Cook the chicken (first batch)
- Using tongs, place half the chicken pieces in the hot pan in a single layer
- Important: Leave space between pieces and don’t crowd the pan
- Let chicken cook undisturbed for 3-4 minutes (this develops caramelization)
- Check one piece by lifting with tongs – it should be golden brown on the bottom
- Flip each piece with tongs and cook for another 3-4 minutes
- Check for doneness by cutting into a larger piece – it should be opaque throughout with no pink
- Or use a meat thermometer to ensure chicken has reached 165°F
- Transfer first batch to a clean plate
- Cook the chicken (second batch)
- If pan looks dry, add 1 more tablespoon of oil
- Add remaining chicken to the pan in a single layer
- Cook following the same method as the first batch
- When second batch is fully cooked, return first batch to the pan
- Finish the chicken with glaze
- Pour any remaining marinade into the pan with all the chicken
- Safety note: This is safe only because the marinade will now cook thoroughly
- Reduce heat to medium
- Stir constantly for 1-2 minutes until sauce thickens and becomes sticky
- Watch carefully – the honey can burn quickly
- Sauce is ready when it coats the back of a spoon
- If sauce becomes too thick, add 1-2 tablespoons water
- Remove from heat when chicken is well-glazed
Assembly
- Prepare serving bowls
- Set out 4 wide, shallow bowls
- Place 1 cup of cooked rice in the center of each bowl
- Add chicken
- Using a clean spoon, divide chicken evenly among the 4 bowls
- Place directly on top of rice or slightly to one side
- Arrange vegetables
- Place sliced cucumber along one edge of each bowl
- Arrange julienned carrots along another edge
- Try to create a colorful arrangement
- Add finishing touches
- Drizzle 2 tablespoons of yum yum sauce over each bowl
- Sprinkle green onions over the top
- Add a final sprinkle of sesame seeds (about ½ tablespoon per bowl)
- For extra flavor, add a small drizzle of sriracha if desired
- Serve immediately
- Provide extra yum yum sauce on the side
- Serve with chopsticks or forks
Troubleshooting
| Problem | Solution |
|---|---|
| Chicken sticking to pan | Make sure pan is hot before adding chicken; don’t move chicken too soon |
| Sauce burning | Lower heat and add 1-2 tablespoons water to thin the sauce |
| Sauce too thin | Simmer longer to reduce, or mix 1 teaspoon cornstarch with 1 tablespoon water and add to sauce |
| Not spicy enough | Add more sriracha or a pinch of red pepper flakes to finished dish |
| Too spicy | Add more yum yum sauce to cool things down |
| Rice too sticky | Rinse rice more thoroughly before cooking; use slightly less water next time |
| Rice too dry | Add 1-2 tablespoons water, cover, and warm gently |
| Chicken undercooked | Return to pan and continue cooking until internal temperature reaches 165°F |
| Vegetables too thick | Practice knife skills for thinner cuts or use a mandoline (carefully!) |
Variations & Substitutions
Make It Veggie
Replace chicken with firm tofu, pressed and cubed. Marinate and cook the same way, but reduce cooking time to 2-3 minutes per side.
Low-Carb Option
Swap rice for cauliflower rice. Simply pulse cauliflower in a food processor until rice-sized, then sauté for 5 minutes.
Meal Prep Method
Double the recipe and store in airtight containers with sauce on the side. Will stay fresh for 4 days in the refrigerator.
Kid-Friendly Version
Reduce or eliminate the sriracha in the main recipe. Serve sauce on the side so everyone can adjust heat to their preference.
Quick Shortcut Version
Use pre-minced ginger and garlic from a jar (1 tablespoon each). Buy pre-julienned carrots from the produce section.
Storage & Reheating
Refrigerator Storage
- Store chicken, rice, and vegetables in separate containers for up to 4 days
- Keep yum yum sauce in its own container
- Wait until all components are completely cool before storing
- Use airtight containers to maintain freshness
Freezer Option
- The chicken portion freezes well for up to 3 months
- Portion into freezer-safe containers before freezing
- Label with date and contents
- Thaw overnight in refrigerator before reheating
- Rice can also be frozen separately
- Fresh vegetables do not freeze well – prepare fresh when serving
Reheating Instructions
- Microwave method:
- Place chicken and rice in a microwave-safe container
- Sprinkle 1 tablespoon water over rice to prevent drying
- Cover loosely with a damp paper towel
- Heat for 1-2 minutes on high, stirring halfway through
- Check temperature and heat for additional 30-second intervals if needed
- Stovetop method:
- Heat a non-stick skillet over medium heat
- Add 1 tablespoon water or oil to the pan
- Add chicken and heat for 2-3 minutes, stirring occasionally
- Add rice and continue heating until warmed through
- Add fresh vegetables after reheating
Safety Notes & Tips
- Always wash hands for 20 seconds with soap before and after handling raw chicken
- Use a separate cutting board for chicken and vegetables to prevent cross-contamination
- Sanitize all surfaces that come in contact with raw chicken
- Always cook chicken to an internal temperature of 165°F
- If marinating for more than 30 minutes, keep chicken refrigerated
- Don’t reuse marinade that has touched raw chicken unless it’s cooked thoroughly
- For meal prep, cool food completely before refrigerating to prevent bacterial growth
- Refrigerate leftovers within 2 hours of cooking
Pro tip: For maximum flavor, toast your sesame seeds in a dry pan for 1-2 minutes until golden brown before sprinkling on your bowl.
Make-ahead tip: The yum yum sauce actually tastes better after sitting in the refrigerator for a day, as the flavors have time to meld.
Serving suggestion: For a beautiful presentation, arrange components in distinct sections rather than mixing, and serve with lime wedges for a fresh squeeze of acid that brightens all the flavors.