Key Takeaways:
- Master this versatile stir fry sauce recipe in just 5 minutes with pantry staples
- Perfect balance of sweet, savory, and umami flavors works with any protein or vegetables
- Make ahead and store for up to 2 weeks for quick weeknight dinners
- Customize with easy substitutions for dietary needs (gluten-free, low-sodium options included)
The Secret to Restaurant-Quality Stir Fry at Home
Ever tried making stir fry at home only to end up with bland, watery results? The stir fry sauce recipe is where most home cooks go wrong.
I’ve tested dozens of combinations to create this foolproof stir fry sauce that rivals your favorite takeout. This recipe makes enough for four generous servings and comes together in minutes using ingredients you likely already have.
Stop settling for disappointing stir fries! With this simple sauce, you’ll transform ordinary ingredients into extraordinary meals.
Nutrition Facts (Per Serving)
| Nutrient | Amount | % Daily Value |
|---|---|---|
| Calories | 62 | 3% |
| Fat | 1g | 1% |
| Sodium | 680mg | 30% |
| Carbohydrates | 12g | 4% |
| Sugar | 8g | 16% |
| Protein | 2g | 4% |
Values based on 1/4 of recipe when used with standard vegetables and protein
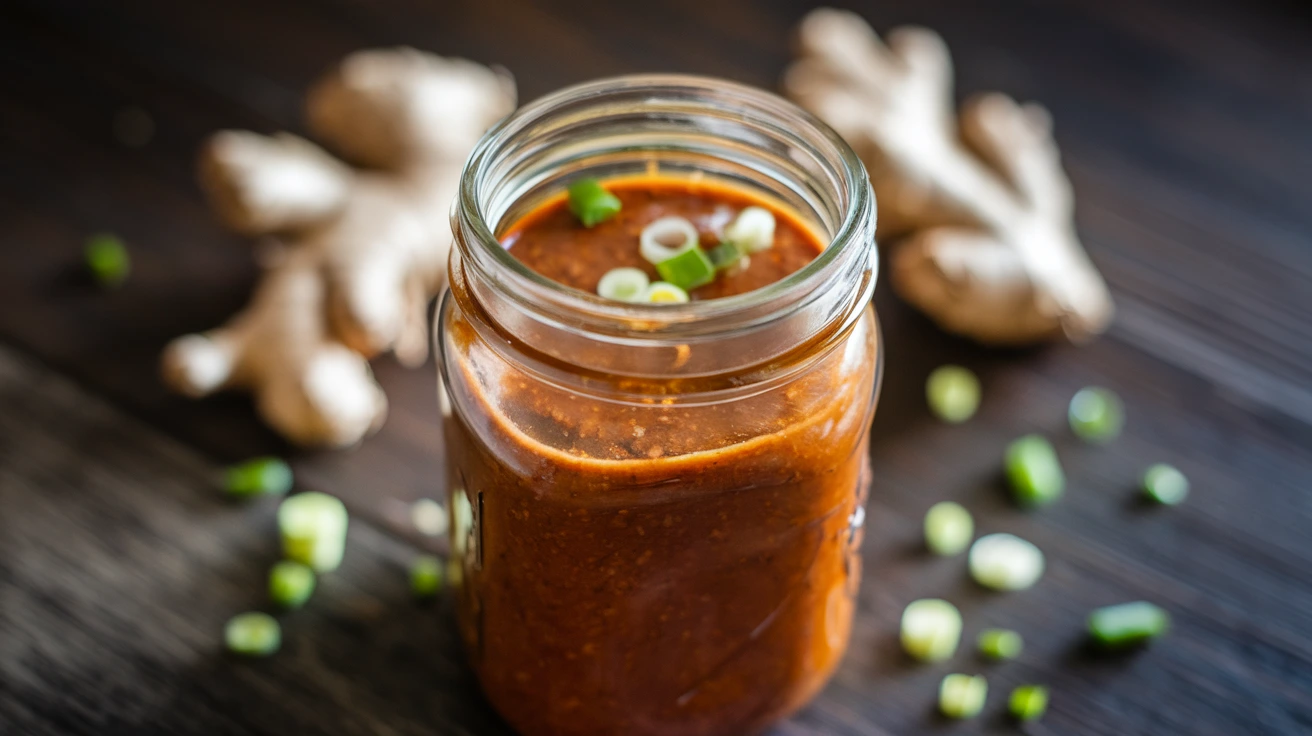
The Essential Ingredients
This stir fry sauce recipe uses simple pantry staples to create deep flavor:
| Ingredient | Measurement | Notes |
|---|---|---|
| Low-sodium soy sauce | 1/3 cup | Foundation of umami flavor |
| Chicken or vegetable broth | 1/4 cup | Adds depth without extra salt |
| Brown sugar | 2 tablespoons | For caramelization and balance |
| Rice vinegar | 2 tablespoons | Bright acidity |
| Sesame oil | 1 tablespoon | Aromatic nuttiness |
| Garlic | 3 cloves, minced | Fresh is best |
| Ginger | 1 tablespoon, grated | Use fresh for best results |
| Cornstarch | 1 tablespoon | Thickening agent |
| Water | 2 tablespoons | For cornstarch slurry |
| Red pepper flakes | 1/2 teaspoon | Optional heat |
Kitchen Tools You’ll Need
| Tool | Purpose |
|---|---|
| Small bowl | For mixing sauce |
| Measuring cups and spoons | For accurate measurements |
| Garlic press | For mincing garlic easily |
| Microplane or grater | For grating fresh ginger |
| Whisk | For combining ingredients smoothly |
| Glass jar with lid | For storage if making ahead |
Smart Substitutions
- Gluten-free option: Replace soy sauce with tamari or coconut aminos
- Lower sodium version: Use all coconut aminos instead of soy sauce
- No rice vinegar? Use apple cider vinegar or white wine vinegar
- Sugar alternatives: Honey or maple syrup work well (use 1 1/2 tablespoons)
- No fresh garlic/ginger? Substitute 1/2 teaspoon garlic powder and 1/2 teaspoon ground ginger
Step-by-Step Instructions
Prep Time: 5 minutes
Cook Time: 0 minutes (sauce only)
Total Time: 5 minutes
Servings: 4
Preparation Phase
- Gather all your ingredients and measuring tools:
- Take out all ingredients and place them on your counter
- Find your measuring cups (1/3 cup, 1/4 cup) and measuring spoons (tablespoon, teaspoon)
- Select a medium-sized bowl that can hold at least 1 cup of liquid
- Locate a whisk or fork for mixing
- Prepare the fresh garlic:
- Take 3 whole garlic cloves
- Peel each clove by pressing it firmly with the flat side of a knife until the skin cracks
- Remove all the papery skin completely
- If using a garlic press, place each peeled clove in the press and squeeze firmly over your bowl
- If chopping by hand, finely mince each clove with a sharp knife (aim for pieces smaller than a grain of rice)
- Set aside the minced garlic (about 1 tablespoon total)
- Prepare the fresh ginger:
- Take a 1-inch knob of fresh ginger
- Use the edge of a spoon to scrape off the brown skin (it’s easier than using a knife)
- Once peeled, hold your microplane or grater over your prep bowl
- Grate the ginger using short, quick motions until you have about 1 tablespoon
- If you don’t have a grater, finely mince the ginger with a knife (aim for very tiny pieces)
- BEGINNER TIP: Freeze ginger root for easier grating and longer storage
- Set up your workspace properly:
- Position your bowl in the center of your workspace
- Arrange measured ingredients in the order you’ll use them
- Have a clean spoon or spatula ready for scraping the bowl
- Clear enough space around your work area to prevent spills
Assembly Steps (Detailed for Beginners)
- Create the cornstarch slurry (this prevents lumps in your sauce):
- Measure exactly 1 tablespoon of cornstarch and add to your bowl
- Measure exactly 2 tablespoons of room temperature water
- Add the water to the cornstarch, not the other way around
- Immediately whisk vigorously until the mixture is completely smooth and milky white
- BEGINNER TIP: If you see any lumps, crush them against the side of the bowl with your whisk or the back of a spoon
- Check that there are absolutely no dry spots or lumps before proceeding
- Add all liquid ingredients in this specific order:
- Pour in 1/3 cup low-sodium soy sauce (measure twice to be accurate)
- Add 1/4 cup chicken or vegetable broth (check that it’s not expired)
- Add 2 tablespoons rice vinegar (measure at eye level for accuracy)
- Add 1 tablespoon sesame oil (be careful not to add too much as it’s strongly flavored)
- BEGINNER TIP: After adding each liquid, give a quick stir to help combine with the cornstarch slurry
- Add the sweetener and dry ingredients:
- Measure 2 tablespoons brown sugar (pack it lightly in the measuring spoon)
- Add the sugar to your mixture
- If the sugar has hardened, break up any clumps with your fingers before adding
- Add 1/2 teaspoon red pepper flakes if using (adjust down to 1/4 teaspoon if you prefer milder heat)
- BEGINNER WARNING: Wash hands immediately after handling red pepper flakes to avoid accidentally touching your eyes
- Add the prepared aromatics:
- Add all your prepared minced garlic (should be about 1 tablespoon)
- Add all your prepared grated ginger (should be about 1 tablespoon)
- Use a rubber spatula to ensure you get every bit of garlic and ginger into the bowl
- BEGINNER TIP: The fresh aromatics make a huge difference in flavor; don’t skip this step!
- Combine all ingredients thoroughly:
- Whisk continuously for at least 60 seconds (time it if needed)
- Use a circular motion while whisking to create a small vortex in the liquid
- Make sure to reach the edges and bottom of the bowl where ingredients may settle
- The sauce should become uniform in color (amber-brown) with no visible separation
- The brown sugar should completely dissolve (rub a little sauce between your fingers to check for graininess)
- BEGINNER TIP: If the sugar isn’t dissolving, you can microwave the sauce for 10 seconds and whisk again
- Check your sauce consistency:
- The sauce should coat the back of a spoon lightly but not be thick yet (it thickens when cooked)
- If it seems too watery, add 1/2 teaspoon more cornstarch mixed with 1/2 teaspoon water
- If it seems too thick (unlikely at this stage), add 1 teaspoon more water or broth
- BEGINNER CHECK: Dip a spoon in the sauce and run your finger through it – the line should stay visible for a few seconds
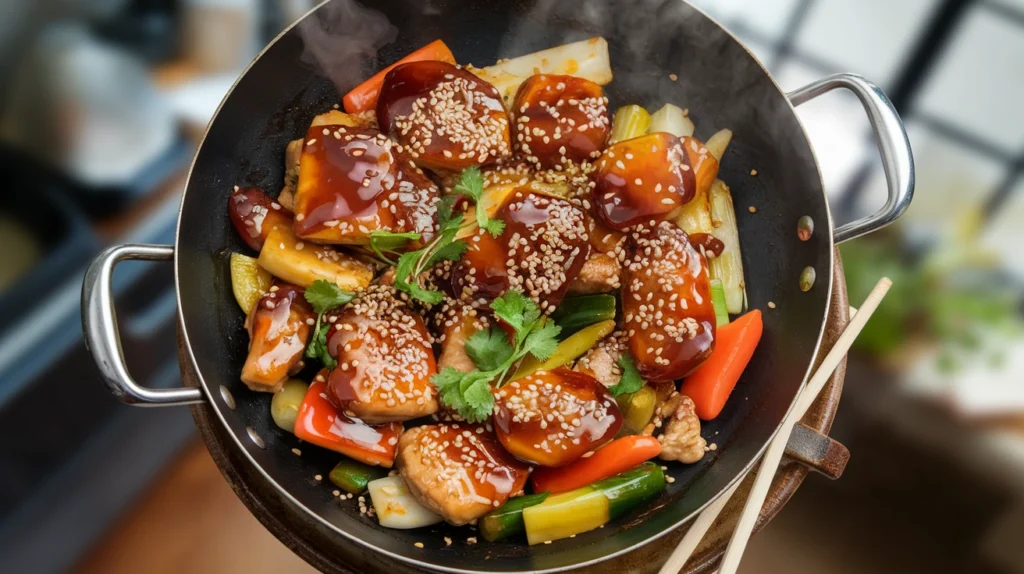
Using Your Stir Fry Sauce (Detailed Cooking Instructions)
- For immediate use with stir fry:
- Prepare all your stir fry ingredients first (chop vegetables, slice meat) before starting to cook
- Heat your wok or large skillet over high heat until very hot (flick a drop of water in—it should sizzle and evaporate immediately)
- Add 1 tablespoon oil with a high smoke point (like vegetable or peanut oil)
- Cook protein first until almost done (chicken: no pink; beef: desired doneness; tofu: golden), then remove to a plate
- Cook vegetables in the same pan, starting with the hardest (like carrots) and ending with the softest (like spinach)
- When vegetables are 90% cooked (still a bit crisp), add protein back to the pan
- BEGINNER TIP: Give your sauce a final whisk right before adding as separation may occur while it sits
- Pour the sauce evenly over all ingredients in the pan
- IMPORTANT: Immediately begin stirring constantly as the sauce will thicken quickly (30-60 seconds)
- The sauce should bubble and become glossy as the cornstarch activates with heat
- Once the sauce coats all ingredients and has thickened to a glossy finish (about the consistency of maple syrup), remove from heat
- BEGINNER WARNING: Do not overcook the sauce or it will become too thick and gummy
- If making ahead for future use:
- Let the prepared sauce cool for 5 minutes (but not longer than 30 minutes at room temperature)
- Pour into a clean glass jar or airtight container with a secure lid
- Label with the date and contents using a piece of tape or marker
- Refrigerate immediately
- When ready to use, remove from refrigerator
- Stir or shake vigorously as separation will occur during storage
- Use according to the instructions in step 11
- BEGINNER TIP: If sauce has thickened too much in the refrigerator, let it come to room temperature and whisk in 1 teaspoon of water before using
Troubleshooting Your Stir Fry Sauce
| Problem | Cause | Solution |
|---|---|---|
| Sauce too thin | Not enough cornstarch or insufficient cooking time | Mix 1 teaspoon cornstarch with 1 teaspoon water and add to hot sauce |
| Sauce too thick | Too much cornstarch or overcooked | Add 1-2 tablespoons water or broth while sauce is hot |
| Too salty | Too much soy sauce | Add 1 teaspoon sugar and 1 tablespoon water |
| Not flavorful enough | Insufficient aromatics | Add more fresh garlic, ginger, or 1/2 teaspoon five-spice powder |
| Sauce burning | Heat too high | Lower heat immediately and add 2 tablespoons water |
| Sauce clumping | Cornstarch not properly mixed | Next time, make sure cornstarch is fully dissolved in water before adding other ingredients |
| Bitter taste | Burned garlic or overcooked sauce | Start over, and be careful not to burn garlic when cooking |
| Sauce too sweet | Too much sugar | Add 1 teaspoon rice vinegar and a pinch of salt |
Creative Variations
Spicy Szechuan-Style
- Add 1 tablespoon chili oil
- Include 1/2 teaspoon Szechuan peppercorns (crushed)
- Double the red pepper flakes
Sweet and Sour Twist
- Increase brown sugar to 3 tablespoons
- Add 2 tablespoons pineapple juice
- Include 1 tablespoon ketchup
Peanut Sauce Variation
- Add 2 tablespoons creamy peanut butter
- Reduce soy sauce to 1/4 cup
- Add 1 tablespoon lime juice
If you’re interested in exploring more Asian-inspired sauce recipes, check out my complete guide to Asian sauces for more ideas!
Storage and Shelf Life
This stir fry sauce recipe stores beautifully, making meal prep a breeze:
- Refrigerator: Store in an airtight container for up to 2 weeks
- Freezer: Freeze in ice cube trays, then transfer to freezer bags for up to 3 months
- Before using: Allow frozen sauce to thaw completely, then whisk well to recombine
- Signs of spoilage: Discard if you notice any off smell, mold, or fermentation bubbles
Pro Tips for Stir Fry Success
- Heat matters: Always use a very hot pan or wok – proper stir frying requires high heat
- Mise en place: Prepare all ingredients before heating your pan as stir frying moves quickly
- Protein first: Cook meat or tofu first, remove from pan, then cook vegetables and recombine
- Don’t overcrowd: Cook in batches if necessary to maintain proper heat and prevent steaming
- Timing is key: Add sauce only after proteins and vegetables are 90% cooked
For those who enjoy hoisin-based sauces, you might also want to try my homemade hoisin sauce recipe which pairs wonderfully with this stir fry sauce for added depth.
Safety Notes
- Food safety: Always refrigerate leftover sauce promptly
- Allergen warning: Contains soy and potentially wheat (from soy sauce)
- Low-sodium diets: This recipe can be high in sodium even with low-sodium soy sauce; adjust accordingly
- Diabetic considerations: Sugar content can be reduced by using monk fruit sweetener
- Beginner warning: Be careful of hot oil splatters when adding sauce to a hot pan
- Kitchen safety: Keep a lid nearby when stir frying in case of oil flare-ups
Final Thoughts
Mastering this stir fry sauce recipe will transform your home cooking. The beauty lies in its versatility – use it with chicken, beef, tofu, or just vegetables.
Keep a batch in your refrigerator and you’ll always be minutes away from a satisfying meal that beats takeout any day.
What protein will you pair with your homemade stir fry sauce first?