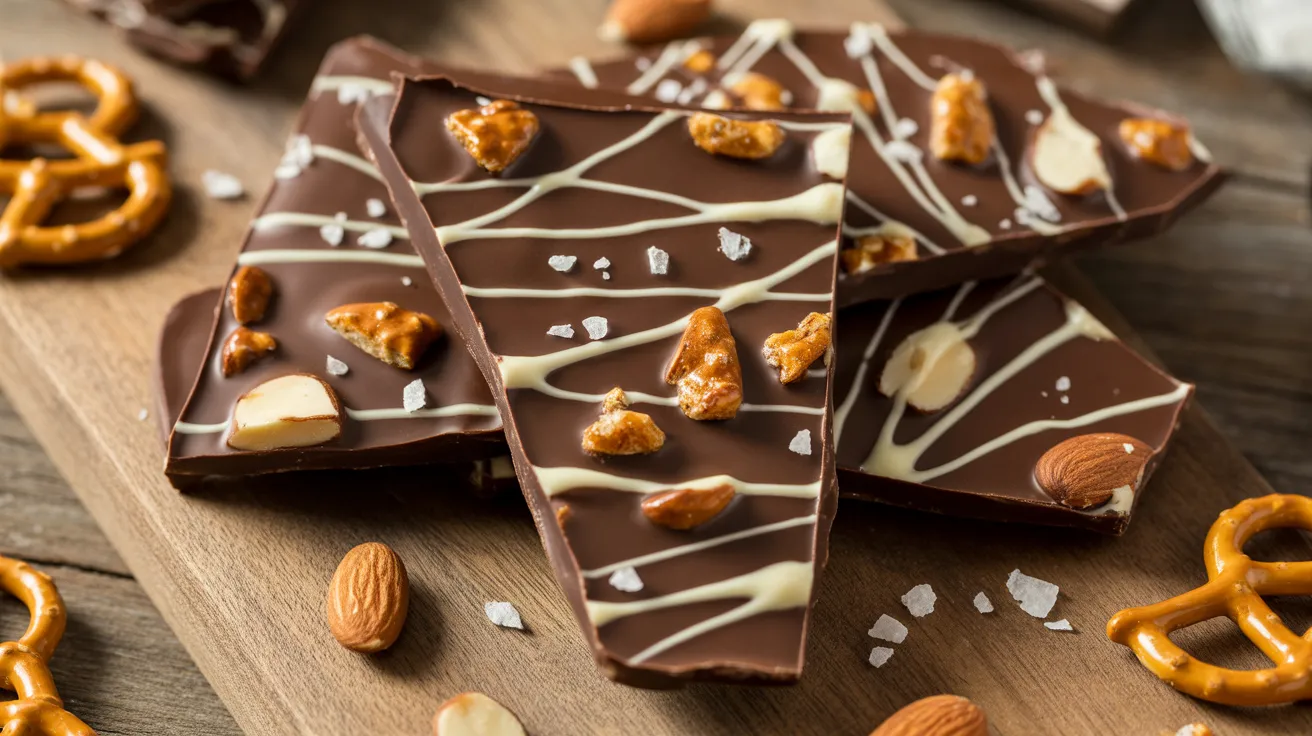
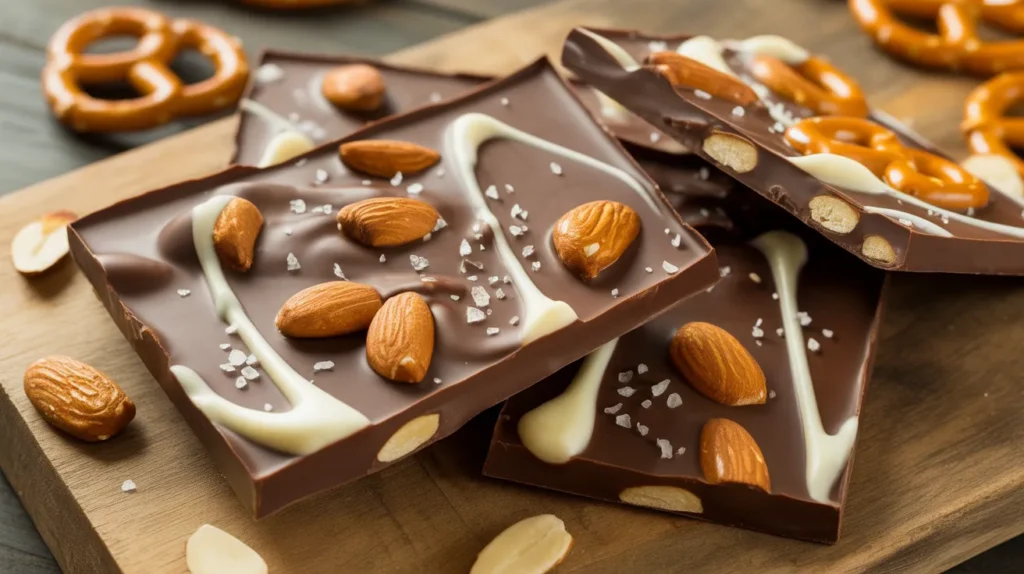
This sweet and salty chocolate bark combines rich dark chocolate with crunchy pretzels, roasted almonds, and a sprinkle of flaky sea salt for the perfect balance of flavors. Whether you’re looking for a quick homemade gift or an impressive dessert that requires no baking, this sweet and salty chocolate bark delivers every single time.
SERVES: 4 | PREP: 15 MIN | COOK: 5 MIN | TOTAL: 20 MIN (plus 1 hour chilling)
Ingredients
Chocolate Base
| Ingredient | Amount |
|---|---|
| Dark chocolate chips (60-70% cacao) | 12 ounces |
| Milk chocolate chips | 4 ounces |
| Coconut oil | 1 tablespoon |
Toppings
| Ingredient | Amount |
|---|---|
| Mini pretzel twists | 1 cup, crushed |
| Roasted salted almonds | ½ cup, roughly chopped |
| Flaky sea salt | 1 teaspoon |
| White chocolate chips (optional drizzle) | 2 ounces |
Step-by-Step Instructions
Phase 1: Preparation (5 minutes)
Step 1: Line a 9×13-inch baking sheet with parchment paper, making sure it extends over the edges by about 2 inches on each side. This overhang creates handles that make removing the finished bark super easy without breaking it into pieces.
Step 2: Crush your pretzel twists into ½-inch pieces using your hands or place them in a zip-top bag and gently crush with a rolling pin. You want varied sizes – some small crumbs and some larger chunks for interesting texture.
Step 3: Roughly chop your roasted almonds into quarters. Keeping some pieces larger gives you that satisfying crunch when you bite into your sweet and salty chocolate bark.
Phase 2: Melting the Chocolate (5 minutes)
Step 4: Combine 12 ounces dark chocolate chips, 4 ounces milk chocolate chips, and 1 tablespoon coconut oil in a microwave-safe bowl. The coconut oil helps create a glossy finish and makes the chocolate easier to spread.
Step 5: Microwave on 50% power for 30 seconds, then stir. Repeat this process 3-4 times until the chocolate is 90% melted. The residual heat will melt the remaining chips as you stir, preventing the chocolate from overheating and seizing.
Step 6: Stir the chocolate mixture vigorously for 30 seconds until it’s completely smooth and glossy. You should see no lumps or unmelted chips remaining. The mixture should flow like warm honey off your spoon.
Phase 3: Assembly (5 minutes)
Step 7: Pour the melted chocolate onto your prepared baking sheet immediately while it’s still warm. Working quickly prevents the chocolate from starting to set before you spread it.
Step 8: Use an offset spatula to spread the chocolate into a rectangle approximately ¼-inch thick. Don’t worry about making it perfectly even – rustic edges add charm to homemade chocolate bark.
Step 9: Immediately sprinkle ¾ of the crushed pretzels evenly over the warm chocolate surface. Press them gently into the chocolate with the back of a spoon so they stick when the bark hardens.
Step 10: Scatter the chopped almonds over the chocolate, again pressing lightly to secure them. Distribute them evenly so every piece of bark gets some nuts.
Step 11: Sprinkle the remaining ¼ of pretzel pieces on top for extra crunch and visual appeal. This layering technique ensures you get toppings in every bite.
Step 12: Immediately sprinkle 1 teaspoon flaky sea salt over the entire surface while the chocolate is still sticky. The salt crystals should be visible – they’re not just for flavor but also create beautiful contrast against the dark chocolate.
Phase 4: Optional White Chocolate Drizzle (2 minutes)
Step 13: If using white chocolate, melt 2 ounces in the microwave using the same method as before – 30-second intervals at 50% power, stirring between each. White chocolate scorches easily, so watch it carefully.
Step 14: Transfer melted white chocolate to a small zip-top bag, snip off a tiny corner, and drizzle it back and forth over the bark in zigzag patterns. This adds visual interest and extra sweetness.
Phase 5: Setting (1 hour)
Step 15: Refrigerate the baking sheet for 1 hour until the chocolate is completely firm to the touch. Resist checking too early – opening the fridge repeatedly can cause condensation that makes the chocolate bloom.
Step 16: Once set, lift the bark out using the parchment paper handles. Place it on a cutting board and use a sharp knife to break it into irregular 2-3 inch pieces. The random shapes look more artisan than perfect squares.
Chef’s Notes
Temperature Control: Keep your chocolate between 88-90°F when spreading. Too hot and the toppings will sink; too cool and the chocolate won’t spread smoothly, making your sweet and salty chocolate bark lumpy.
Quality Matters: Use real chocolate chips or bars, not candy melts. Real chocolate contains cocoa butter which gives that satisfying snap when you bite into the bark and creates better flavor complexity.
Pretzel Selection: Mini pretzel twists work better than sticks because their curves create little pockets that catch the chocolate. If you’re making similar treats, try this technique with chocolate orange bark for a citrus twist.
Make-Ahead Magic: This recipe doubles beautifully for gift-giving. Store pieces in airtight containers with parchment paper between layers to prevent sticking and maintain that perfect texture.
Nutrition Information (Per Serving)
- Calories: 385
- Protein: 6g
- Carbohydrates: 42g
- Fat: 23g
- Fiber: 4g
- Sugar: 32g
- Sodium: 285mg
Variations to Try
Peanut Butter Lover’s Bark: Replace almonds with ½ cup chopped peanut butter cups and add 2 tablespoons peanut butter chips mixed into the melted chocolate for double peanut flavor.
Holiday Cranberry Bark: Swap pretzels for ½ cup dried cranberries and ½ cup candied pecans. Add ¼ teaspoon orange zest to the melted chocolate for festive flair.
Triple Nut Delight: Combine ¼ cup each of cashews, pecans, and pistachios instead of just almonds. For more indulgent nut-topped chocolate ideas, check out this chocolate bark with caramel and pecans.
Espresso Crunch: Add 1 tablespoon instant espresso powder to the melted chocolate and top with ½ cup chocolate-covered espresso beans and crushed biscotti instead of pretzels.
Storage & Reheating
Room Temperature Storage: Keep your sweet and salty chocolate bark in an airtight container for up to 2 weeks in a cool, dry place below 70°F. Layer pieces between parchment paper to prevent sticking.
Refrigerator Storage: Store in the fridge for up to 1 month if your kitchen runs warm. Let pieces sit at room temperature for 5 minutes before serving so the chocolate isn’t tooth-achingly hard.
Freezer Storage: Freeze bark pieces in a freezer-safe container for up to 3 months. Thaw in the refrigerator overnight, then bring to room temperature for the best texture and flavor.
Gift Packaging: Pack pieces in cellophane bags tied with ribbon or layer in decorative tins with parchment paper. Store packaged gifts in a cool spot away from direct sunlight or heat sources.
Troubleshooting
Problem: Chocolate seized and became grainy
Solution: Even a tiny drop of water causes chocolate to seize. If this happens, whisk in 1 teaspoon of coconut oil or vegetable oil per cup of chocolate to smooth it out. The bark won’t be quite as snappy but it’s still usable.
Problem: Toppings fell off after the bark hardened
Solution: You didn’t press them into the warm chocolate enough. Next time, gently press toppings with the back of a spoon immediately after sprinkling. The chocolate should be sticky enough to grab them.
Problem: White chocolate drizzle hardened before I finished drizzling
Solution: White chocolate sets faster than dark chocolate. Work quickly and keep the bag in your warm palm between drizzles. If it hardens, microwave the bag for 5-10 seconds to re-melt.
Problem: Chocolate developed white streaks (bloomed)
Solution: Bloom happens when chocolate experiences temperature fluctuations or moisture. While it looks unappealing, bloomed chocolate is perfectly safe to eat. Store bark in consistent cool temperatures to prevent this.
Problem: Bark won’t snap cleanly and bends instead
Solution: Your chocolate layer was either too thin or didn’t set completely. Make sure you spread chocolate to at least ¼-inch thick and chill for the full hour before breaking into pieces.
Equipment Essentials
- 9×13-inch rimmed baking sheet – Must have raised edges to contain the chocolate
- Parchment paper – Creates a non-stick surface and easy removal handles
- Microwave-safe mixing bowl – Glass or ceramic works best for even heating
- Offset spatula – Makes spreading chocolate smooth and even
- Sharp chef’s knife – For chopping almonds and breaking the set bark
- Rolling pin – Optional for crushing pretzels uniformly
- Small zip-top bag – For creating the white chocolate drizzle
Shopping List
Baking Aisle
- Dark chocolate chips (60-70% cacao)
- Milk chocolate chips
- White chocolate chips (optional)
Oils & Condiments
- Coconut oil
Snack Aisle
- Mini pretzel twists
- Roasted salted almonds
Specialty/Spice Aisle
- Flaky sea salt (look for Maldon or similar)
Success Secrets
1. Use chocolate chips specifically labeled for melting rather than eating chocolate bars. Chips contain stabilizers that help them hold their shape and melt more evenly without scorching.
2. Don’t skip the coconut oil – this 1 tablespoon addition creates professional-looking shine and helps the chocolate spread like butter across your pan without dragging or tearing.
3. Crush pretzels into varied sizes intentionally. Having a mix of fine crumbs and larger chunks creates interesting texture contrast in every bite of your sweet and salty chocolate bark.
4. Press toppings into the chocolate within 60 seconds of spreading. After that, the chocolate begins forming a skin and toppings won’t adhere properly, leading to messy bark that sheds its toppings.
5. Break the bark into irregular pieces instead of cutting perfect squares. The rustic, artisan look makes homemade bark look more expensive and gift-worthy than uniform geometric shapes.