Quick Highlights:
- Ready in just 30 minutes with everyday pantry ingredients
- One-pot meal that feeds 4 people perfectly
- Customize with your favorite toppings for a personal touch
- Freezes beautifully for future quick dinners
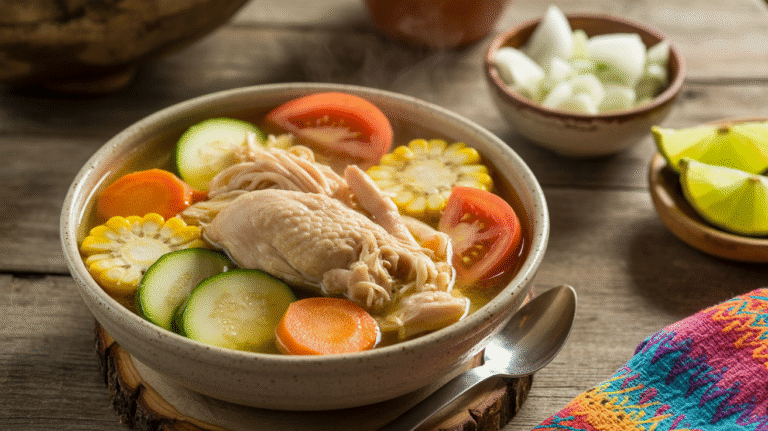
Looking for a quick dinner solution that doesn’t skimp on flavor? This Taco Soup recipe brings the zesty kick of tacos in a warm, comforting bowl—perfect for busy weeknights when you’re short on time but craving something satisfying. Unlike my chicken noodle soup that requires longer simmering, this Taco Soup comes together in just 30 minutes while delivering all the flavors of your favorite Mexican dish.
The beauty of Taco Soup lies in its simplicity and adaptability. With a few pantry staples and some fresh ingredients, you’ll have a hearty meal that satisfies the whole family. Let’s dive into how to make this crowd-pleasing soup that combines the best parts of taco night with the comfort of a warm bowl of goodness.
Nutrition Information
| Nutrient | Amount per Serving |
|---|---|
| Calories | 375 |
| Protein | 25g |
| Carbohydrates | 30g |
| Fat | 18g |
| Fiber | 8g |
| Sodium | 850mg |
| Sugar | 6g |
Nutrition values based on soup only, not including toppings
Time Needed
- Prep Time: 10 minutes
- Cook Time: 20 minutes
- Total Time: 30 minutes
Kitchen Equipment
| Essential Tools | Notes |
|---|---|
| Large soup pot/Dutch oven | 5-6 quart size ideal |
| Cutting board | Plastic preferred for meat safety |
| Sharp chef’s knife | For chopping vegetables |
| Measuring spoons/cups | For precise seasoning |
| Wooden spoon | For stirring and breaking up meat |
| Can opener | For multiple canned ingredients |
| Ladle | For serving |
Ingredients
| Ingredient | Amount | Notes |
|---|---|---|
| Ground beef | 1 pound (80/20) | For best flavor |
| Yellow onion | 1 medium | About 1 cup diced |
| Garlic | 2 cloves | Freshly minced |
| Diced tomatoes | 2 (14.5 oz) cans | Undrained |
| Black beans | 1 (15 oz) can | Drained and rinsed |
| Corn kernels | 1 (15 oz) can | Drained |
| Chicken broth | 2 cups | Low sodium preferred |
| Green chilies | 1 (4 oz) can | Mild, undrained |
| Chili powder | 2 tablespoons | Adjust to taste |
| Ground cumin | 1 tablespoon | For authentic flavor |
| Paprika | 1 teaspoon | Regular or smoked |
| Dried oregano | 1 teaspoon | Mexican oregano if available |
| Salt and pepper | To taste | Start with 1/2 tsp salt |
Optional Toppings:
- Shredded cheddar or Mexican blend cheese
- Sour cream
- Diced avocado
- Crushed tortilla chips
- Fresh cilantro, chopped
- Lime wedges
Step-by-Step Instructions
1. Preparation Phase (10 minutes)
Setting Up Your Work Area:
- Clear and clean your counter space
- Place cutting board on a stable, flat surface
- Gather all equipment and ingredients
- Wash your hands thoroughly with soap and water before handling food
Preparing Your Ingredients:
For the Vegetables:
- Onion prep:
- Cut off both ends of the onion
- Peel off the papery outer skin
- Cut in half from top to bottom
- Place each half flat-side down on cutting board
- Make 3-4 horizontal slices (not cutting through the root end)
- Make 3-4 vertical slices
- Cut across these slices to create small, even diced pieces
- Aim for pieces about 1/4 inch in size
- Transfer to a small bowl
- Garlic prep:
- Separate 2 cloves from the head of garlic
- Place the flat side of your knife on each clove
- Press down firmly with the heel of your hand to crush slightly
- Peel off the papery skin (it should come off easily now)
- Mince the garlic by chopping it into very tiny pieces
- Keep chopping until pieces are about the size of grains of rice
- Transfer to the bowl with the onion
For the Canned Ingredients:
- Open all cans:
- Place can on counter
- Attach can opener to rim
- Turn handle until can is completely open
- For black beans: pour into strainer and rinse under cold water until water runs clear
- For corn: pour into strainer and drain well
- For tomatoes and green chilies: no need to drain
For the Seasonings:
- Combine in a small bowl:
- 2 tablespoons chili powder
- 1 tablespoon ground cumin
- 1 teaspoon paprika
- 1 teaspoon dried oregano
- 1/2 teaspoon salt (to start)
- 1/4 teaspoon black pepper
- Mix well with a small spoon
Beginner’s Tip: Measuring spices accurately makes a big difference! Use proper measuring spoons and level off each spoonful by scraping the back of a knife across the top.
2. Cooking Phase (20 minutes)
Browning the Meat (8-10 minutes):
- Place your large pot on the stove
- Turn heat to medium-high
- Wait about 1 minute for pot to heat up
- Add ground beef to hot pot
- Break up meat with wooden spoon into smaller chunks
- Use spoon to press down and separate large pieces
- Keep breaking up any large chunks as they form
- Stir every 60 seconds to ensure even cooking
- Cook until meat is about half browned (about 3-4 minutes)
- Add your diced onion to the partially cooked meat
- Continue cooking, stirring every minute
- Look for these visual cues:
- Onions becoming translucent (see-through) and soft
- Meat fully browned with no pink spots
- Some browning on bottom of pot (this adds flavor!)
Safety Note: Ground beef needs to reach 160°F (71°C) for safe consumption. If you have a meat thermometer, check the temperature.
Draining Fat (Optional):
- Remove pot from heat
- Carefully tilt pot to one side
- Use a large spoon to remove excess fat
- Leave about 1 tablespoon of fat in pot for flavor
- Return pot to heat
Building the Soup (5 minutes):
- Add minced garlic to the meat and onion mixture
- Stir constantly for 30 seconds (garlic burns easily!)
- Pour in diced tomatoes with their juice
- Scrape bottom of pot with wooden spoon to loosen any browned bits
- Add drained black beans
- Add drained corn
- Add green chilies with their juice
- Pour in chicken broth
- Add your premixed seasonings
- Stir everything together thoroughly
Final Cooking (7-10 minutes):
- Increase heat to high
- Watch for bubbles to start forming around edges
- When soup begins to boil (lots of bubbles breaking the surface), reduce heat to low
- Let soup simmer (gentle bubbles) for 10 minutes
- Stir occasionally to prevent sticking
- After 10 minutes, taste carefully (soup will be hot!)
- Adjust seasonings if needed:
- Need more salt? Add 1/4 teaspoon at a time
- Want more heat? Add extra 1/2 teaspoon chili powder
- Need more depth? Add 1/2 teaspoon more cumin
Beginner’s Tip: When tasting hot soup, place a small amount in a spoon, then blow on it gently for a few seconds before tasting.
3. Serving Phase
Preparing Bowls:
- Get out 4 soup bowls
- Ladle soup evenly into each bowl
- Fill each bowl about 3/4 full to leave room for toppings
- About 1 1/2 cups of soup per bowl
Adding Toppings:
- Set out all toppings in separate small bowls
- Suggested topping order:
- Shredded cheese (add while soup is hottest for melting)
- Sour cream
- Diced avocado
- Crushed tortilla chips
- Fresh cilantro
- Squeeze of lime juice
If you enjoy hearty soups like this, my potato soup would be another great addition to your recipe collection!

Troubleshooting Tips
Soup Too Thin?
- Let it simmer uncovered for 5-10 extra minutes
- Crush some tortilla chips and stir them in
- Add 2 tablespoons of tomato paste
Too Spicy?
- Add a dollop of sour cream to each serving
- Stir in an extra cup of broth
- Add another can of beans (drained and rinsed)
Not Spicy Enough?
- Add an extra tablespoon of chili powder
- Include a diced jalapeño (remove seeds for moderate heat)
- Offer hot sauce at the table
Too Salty?
- Add a peeled, diced potato and simmer 10 minutes (remove before serving)
- Stir in 1 tablespoon of lemon juice
- Add another can of drained beans or corn
Variations & Substitutions
Make It Vegetarian:
- Replace ground beef with:
- Two additional cans of beans (black, pinto, or kidney)
- 8 oz of finely chopped mushrooms
- Use vegetable broth instead of chicken broth
Different Protein Options:
- Ground turkey (93% lean)
- Ground chicken
- Shredded rotisserie chicken (add with the broth)
- Plant-based ground meat substitute
Bean Variations:
- Pinto beans
- Kidney beans
- Mix multiple bean types
Dietary Notes:
- Gluten-free: Ensure your broth and seasonings are certified gluten-free
- Dairy-free: Skip cheese and sour cream toppings
- Lower sodium: Use no-salt-added canned goods and reduce added salt
For a different twist on the soup theme, try my lasagna soup for an Italian-inspired alternative!
Storage & Reheating
Storage:
- Refrigerator:
- Allow soup to cool completely (within 2 hours of cooking)
- Transfer to airtight containers
- Store up to 4 days
- Freezer:
- Cool soup completely
- Divide into freezer-safe containers
- Leave 1/2 inch space at top for expansion
- Label with date and contents
- Store up to 3 months
Reheating:
- Stovetop:
- Place in pot over medium-low heat
- Add 2-4 tablespoons water or broth if needed
- Stir occasionally until heated through (165°F)
- About 5-7 minutes
- Microwave:
- Place in microwave-safe bowl
- Cover loosely with microwave-safe lid or paper towel
- Heat on high for 1 minute
- Stir and check temperature
- Continue heating in 30-second intervals
- Stir between intervals
Safety Notes & Tips
Food Safety:
- Always wash hands before and after handling raw meat
- Use separate cutting boards for meat and vegetables
- Don’t leave soup at room temperature for more than 2 hours
- Reheat leftovers to 165°F (74°C)
Kitchen Safety:
- Keep pot handles turned inward on stove
- Use oven mitts when handling hot pot
- Keep a kitchen fire extinguisher nearby
Common Mistakes to Avoid:
- Adding all seasonings at once without tasting
- Overcooking the garlic (leads to bitterness)
- Boiling instead of simmering (makes meat tough)
- Adding toppings too early (they get soggy)
- Not stirring occasionally during simmering
Pro Tips:
- Make this soup a day ahead – the flavors develop beautifully overnight
- Prep all ingredients before you start cooking
- Keep a food journal of adjustments you make for future reference
- For a thicker soup, crush a handful of tortilla chips and stir them in
- Double the recipe and freeze half for an even quicker meal later