Prep Time: 15 minutes | Cook Time: 15 minutes | Total Time: 30 minutes | Servings: 4
Key Takeaways
- This 30-minute teriyaki chicken stir-fry uses everyday ingredients for an authentic taste
- The homemade teriyaki sauce beats store-bought with only 5 simple ingredients
- Perfect for meal prep – stays fresh for 4 days in the refrigerator
- Customize with any vegetables in your fridge to reduce food waste
Why You’ll Love This Teriyaki Chicken Stir-Fry
Ever stood in front of your fridge at 6 PM with hungry family members asking what’s for dinner? We’ve all been there.
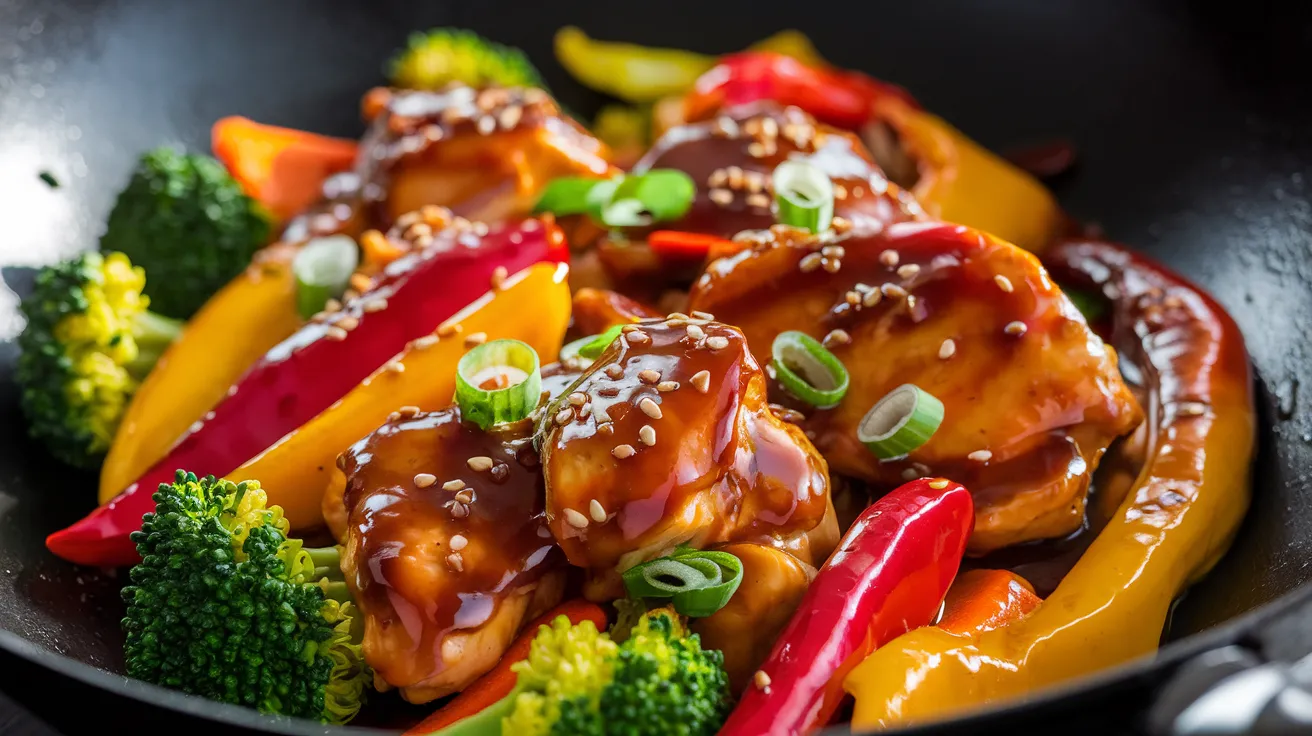
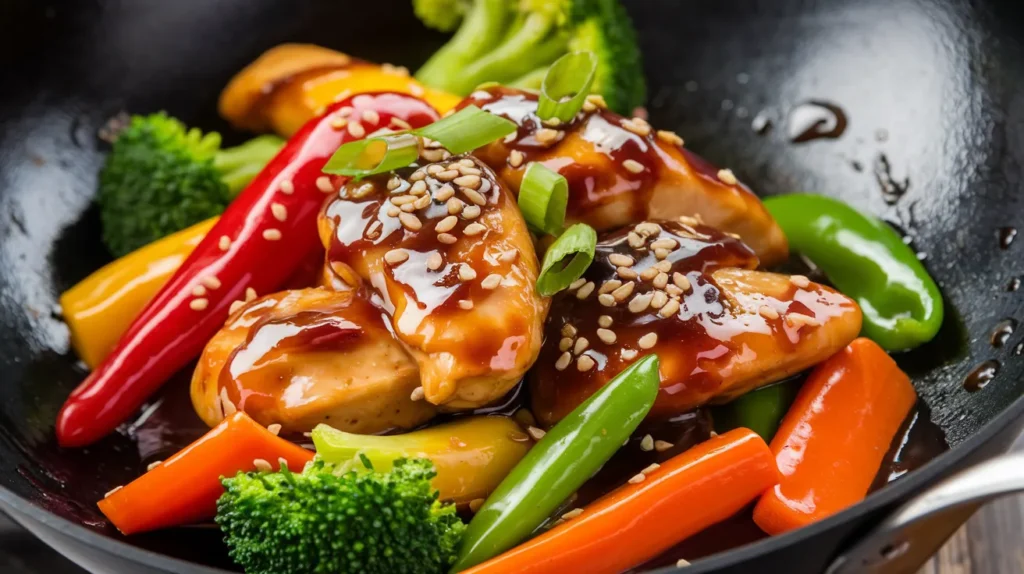
This Teriyaki Chicken Stir-Fry is your new weeknight hero. Ready in just 30 minutes, it’s faster than takeout and so much better.
The sticky-sweet homemade teriyaki sauce coats tender chicken and crisp vegetables for a meal that everyone will request again and again. If you enjoy Asian-inspired chicken dishes, you might also love my Chicken Nanban with its tangy sweet and sour sauce.
Let’s make restaurant-quality Teriyaki Chicken Stir-Fry at home – no complicated techniques required!
Nutrition Facts
| Nutrient | Amount per Serving |
|---|---|
| Calories | 382 |
| Protein | 28g |
| Carbohydrates | 32g |
| Fat | 16g |
| Fiber | 4g |
| Sugar | 18g |
| Sodium | 720mg |
What You’ll Need
Ingredients
| Ingredient | Amount | Notes |
|---|---|---|
| For the Stir-Fry | ||
| Boneless skinless chicken thighs | 1½ pounds | Cut into 1-inch pieces |
| Broccoli | 2 cups | Cut into florets |
| Bell peppers | 2 medium | Red and yellow, sliced |
| Carrots | 2 medium | Julienned |
| Snow peas | 1 cup | Trimmed |
| Garlic | 3 cloves | Minced |
| Ginger | 1 tablespoon | Fresh, grated |
| Green onions | 4 stalks | Sliced, white and green parts separated |
| Vegetable oil | 2 tablespoons | For cooking |
| Sesame seeds | 1 tablespoon | For garnish |
| For the Teriyaki Sauce | ||
| Soy sauce | ½ cup | Low-sodium preferred |
| Brown sugar | ¼ cup | Packed |
| Rice vinegar | 2 tablespoons | |
| Sesame oil | 1 tablespoon | |
| Cornstarch | 1 tablespoon | Mixed with 2 tablespoons water |
Kitchen Tools
| Tool | Purpose |
|---|---|
| Large wok or skillet | For stir-frying |
| Sharp knife | For cutting ingredients |
| Cutting board | For prep work |
| Small bowl | For mixing sauce |
| Whisk | For combining sauce ingredients |
| Measuring cups and spoons | For accurate measurements |
| Wooden spoon or spatula | For stirring |
Substitutions
- Protein: Swap chicken thighs for chicken breast, shrimp, tofu, or thinly sliced beef
- Vegetables: Use any vegetables you have – zucchini, mushrooms, and onions work great
- Soy sauce: Substitute tamari for gluten-free option or coconut aminos for soy-free
- Brown sugar: Replace with honey or maple syrup (use 3 tablespoons instead of ¼ cup)
- Rice vinegar: Apple cider vinegar works in a pinch
Step-by-Step Instructions for Beginners
Preparation Phase
- Set up your workspace
- Clear at least 2 feet of counter space for comfortable working
- Place a damp kitchen towel under your cutting board to prevent slipping
- Gather all ingredients from refrigerator and pantry
- Check that you have all needed tools within reach
- Place a bowl for food scraps nearby to keep your workspace tidy
- Prepare the chicken
- Unwrap chicken thighs and place on a clean cutting board
- Pat both sides dry with paper towels (this helps with browning)
- Trim any visible fat with kitchen scissors or a sharp knife
- Cut each thigh into evenly sized 1-inch pieces (about the size of a dice)
- Beginner tip: Slightly larger pieces are easier to cook without drying out
- Season with a pinch of salt and pepper (about ¼ teaspoon each)
- Wash hands thoroughly with soap after handling raw chicken
- Clean cutting board and knife with hot, soapy water before using for vegetables
- Prepare the vegetables step-by-step
- Broccoli:
- Rinse broccoli head under cold water
- Hold the stem in one hand and cut the florets off with a knife in your other hand
- Cut any large florets in half so all pieces are roughly the same size (about 1.5 inches)
- Bell peppers:
- Rinse peppers under cold water
- Stand pepper upright on cutting board
- Slice down along each side of the stem to remove the flesh in four pieces
- Remove any white membranes and seeds
- Stack the pepper pieces and slice into ½-inch strips
- Carrots:
- Peel carrots using a vegetable peeler, moving from top to bottom
- Cut off and discard the tops and tips
- Slice each carrot lengthwise into thin planks (about ⅛ inch thick)
- Stack planks and cut into matchsticks (julienne)
- Beginner tip: If julienning is difficult, simply cut into thin half-moon slices
- Snow peas:
- Rinse under cold water
- Hold each snow pea and snap off the stem end
- Pull downward to remove the tough string that runs along the seam
- Garlic:
- Separate one clove from the bulb
- Place clove on cutting board and press firmly with the flat side of knife to crush
- Remove the papery skin
- Finely chop garlic by rocking knife back and forth over the crushed clove
- Repeat for remaining cloves
- Ginger:
- Use a spoon to scrape off the brown skin of the ginger
- Grate ginger using the fine side of a box grater or a microplane
- Measure 1 tablespoon of grated ginger
- Green onions:
- Rinse under cold water
- Cut off and discard the root ends and any wilted green tops
- Cut into ¼-inch slices, keeping white/light green parts separate from dark green parts
- Broccoli:
- Make the teriyaki sauce
- Place a small bowl on the counter
- Measure ½ cup soy sauce and pour into bowl
- Add ¼ cup brown sugar (pack it into the measuring cup first)
- Pour in 2 tablespoons rice vinegar
- Add 1 tablespoon sesame oil
- In a separate small bowl or cup, add 1 tablespoon cornstarch
- Add 2 tablespoons cold water to the cornstarch
- Mix cornstarch and water with a fork until no lumps remain (this is called a “slurry”)
- Pour the cornstarch slurry into the sauce mixture
- Whisk everything together until well combined and sugar begins to dissolve
- Set sauce aside within reach of your cooking area
Cooking Phase for Perfect Teriyaki Chicken Stir-Fry
- Prepare your cooking station
- Place your wok or large skillet on the stove
- Have all prepped ingredients arranged nearby in order of use
- Keep a clean plate ready for the cooked chicken
- Have your wooden spoon or spatula in hand
- Keep pot holders nearby if your pan handle gets hot
- Heat the pan and cook the chicken
- Turn burner to medium-high heat
- Add 1 tablespoon vegetable oil to the pan
- Allow oil to heat for 30-60 seconds – it should appear shimmering but not smoking
- Visual cue: The oil will look thinner and move more easily around the pan
- Safety tip for beginners: Stand back about a foot from the stove as you add chicken to avoid oil splatters
- Add chicken pieces in a single layer (work in batches if your pan is small)
- Important: Let chicken cook undisturbed for 2 minutes to develop brown color
- Using your wooden spoon, flip each piece to cook the other side
- Cook for another 3-4 minutes, stirring occasionally
- Visual cue: Chicken is done when it’s no longer pink inside and has golden-brown edges
- Safety check: Cut the largest piece in half to ensure no pink remains inside
- Transfer chicken to the clean plate using a spoon or tongs
- Leave any oil and juices in the pan for cooking vegetables
- Cook the aromatics and vegetables
- Check if there’s still oil in the pan; if it looks dry, add the remaining 1 tablespoon of oil
- Add the white parts of green onions, minced garlic, and grated ginger
- Caution: These ingredients can burn easily, so keep them moving in the pan
- Stir continuously for 30 seconds until you can smell the fragrance
- Add broccoli florets and carrots first (these take longest to cook)
- Stir-fry for 2 minutes, keeping everything moving with your wooden spoon
- Add bell pepper strips and continue stir-frying for 2 more minutes
- Visual cue: Vegetables should be bright in color and slightly softened but still crisp
- Add snow peas last (they cook fastest)
- Stir-fry for 1 more minute
- Beginner tip: If vegetables seem to be browning too quickly, lower heat slightly to medium
- Combine and finish with sauce
- Return the cooked chicken and any accumulated juices to the pan with vegetables
- Stir to combine everything evenly
- Give your teriyaki sauce another quick stir with a spoon or whisk (the cornstarch may have settled)
- Pour the sauce evenly over the chicken and vegetable mixture
- Visual cue: The sauce will initially be thin and light in color
- Keep stirring gently as the sauce comes to a simmer
- Visual/audio cue: You’ll see small bubbles forming and hear a gentle sizzling sound
- Continue cooking for 2-3 minutes while stirring
- Visual cue: The sauce will change from thin and translucent to thicker and glossy
- The sauce is ready when it coats the back of your spoon and stays separated when you run your finger through it
- If sauce gets too thick, add 1-2 tablespoons water
- If sauce is still too thin after 3 minutes, continue simmering while stirring for another minute
- Turn off heat once sauce reaches desired thickness
Serving
- Finish and garnish
- Carefully transfer the stir-fry to a large serving dish using your spoon
- Sprinkle the reserved green parts of green onions all over the top
- Scatter 1 tablespoon sesame seeds evenly over the dish
- Presentation tip: Leave some green onions and sesame seeds to add at the table for a fresh garnish
- Serving suggestions
- For white rice: Scoop ¾ cup cooked rice into each bowl, then top with Teriyaki Chicken Stir-Fry
- For a complete meal presentation: Place rice on one side of the plate and stir-fry on the other
- Beginner tip: Slightly dampen your measuring cup before scooping rice to prevent sticking
- Serve immediately while hot for best flavor and texture
- Have extra soy sauce available at the table for those who prefer more saltiness
- For a lower-carb alternative to this Teriyaki Chicken Stir-Fry, try my One-Pan Chicken and Potatoes for another easy weeknight option
Troubleshooting
- Sauce too thin?
- Mix 1 teaspoon cornstarch with 1 tablespoon cold water
- Stir this mixture into the sauce
- Simmer while stirring for another minute
- Sauce too thick?
- Add 1-2 tablespoons of water or chicken broth
- Stir well to incorporate
- Continue stirring until you reach desired consistency
- Vegetables too crunchy?
- Add 2-3 tablespoons of water to the pan
- Cover with a lid if you have one that fits
- Let steam for 1-2 minutes until vegetables reach desired tenderness
- Sauce too salty?
- Add 1 teaspoon of brown sugar to counterbalance
- Add a squeeze of fresh lime juice (about 1 teaspoon)
- Stir well to incorporate
- Chicken sticking to pan?
- Next time, ensure your pan is fully heated before adding oil
- Make sure oil is hot before adding chicken
- Don’t try to flip or move chicken too soon – it will release naturally when seared
- If sticking happens, add 1 tablespoon water to the pan to help release stuck bits
- Vegetables cooking unevenly?
- Cut harder vegetables (carrots, broccoli) smaller than softer ones
- Add vegetables in stages according to cooking time
- Stir more frequently to ensure even heat distribution
Variations
Spicy Teriyaki Chicken
Add 1-2 teaspoons of sriracha or 1/4 teaspoon of red pepper flakes to the sauce for a kick of heat. For beginners, start with less and add more to taste.
Pineapple Teriyaki Chicken
Add 1 cup of pineapple chunks (fresh or canned, drained) when returning the chicken to the pan. The sweet-tangy flavor pairs perfectly with the teriyaki sauce.
Teriyaki Noodle Bowl
Instead of serving over rice:
- Cook 8 ounces of ramen or udon noodles according to package directions
- Drain and rinse under cold water
- Add noodles to the pan when you return the chicken
- Toss everything together with the sauce
Teriyaki Salmon Stir-Fry
Replace chicken with 1.5 pounds of salmon fillets:
- Remove skin and cut into 1-inch chunks
- Cook for just 2 minutes per side
- Remove and proceed with recipe as written
- Return salmon at the very end and gently fold in to avoid breaking the pieces
Storage & Reheating
Refrigerator Storage
- Allow stir-fry to cool completely before refrigerating (no more than 2 hours at room temperature)
- Store in airtight containers with tight-fitting lids
- Keeps for up to 4 days in the refrigerator
- Store rice separately from stir-fry when possible
Freezer Storage
- Portion completely cooled stir-fry into freezer-safe containers
- Leave about ½-inch space at the top for expansion
- Label with contents and date
- Freeze for up to 3 months
- Thaw overnight in refrigerator before reheating
Reheating Instructions
- Stovetop (best method):
- Place a non-stick skillet over medium heat
- Add 1 tablespoon water to the pan
- Add the stir-fry to the pan
- Cover with a lid if possible
- Heat for 5-6 minutes, stirring occasionally
- Ensure food reaches 165°F internal temperature for safety
- Microwave:
- Place portion in a microwave-safe container
- Cover with a microwave-safe lid or plate (leave slight vent)
- Heat on high for 1 minute
- Stir thoroughly
- Heat for additional 30-second intervals until warmed through
- Let stand for 1 minute before eating
Safety Notes & Tips
Food Safety
- Always wash hands before and after handling raw chicken
- Use separate cutting boards for meat and vegetables
- Cook chicken to an internal temperature of 165°F
- Don’t reuse marinades or plates that have touched raw chicken
- Refrigerate leftovers within 2 hours of cooking
- When reheating, ensure food reaches 165°F throughout
Cooking Tips for Beginners
- Mise en place is your friend: French for “everything in its place,” this means preparing and organizing all ingredients before you start cooking. Stir-frying moves quickly, so having everything chopped and measured beforehand is essential.
- Heat level indicators:
- Medium-high heat: You should be able to hold your hand 6 inches above the pan for 2-3 seconds before it feels too hot
- If food is smoking or burning, your heat is too high
- If food is steaming instead of sizzling, your heat is too low
- Vegetable cutting guide:
- For even cooking, cut harder vegetables smaller than softer ones
- Aim for uniform sizes so everything cooks at the same rate
- When in doubt, slightly bigger is better than too small (prevents overcooking)
- The order matters:
- Always cook meat first, then remove it
- Cook aromatics (garlic, ginger, onions) next
- Add vegetables in order of cooking time (longest to shortest)
- Return meat at the end to avoid overcooking
- Taste as you go: Before serving, take a small taste and adjust seasonings if needed
Meal Prep Ideas for Teriyaki Chicken Stir-Fry
This Teriyaki Chicken Stir-Fry is perfect for meal prep! If you enjoy make-ahead meals, you might also love my Creamy Garlic Chicken which reheats beautifully. Here’s how to set yourself up for success:
- Prep for the week:
- Divide into four microwave-safe containers
- Add ¾ cup rice to each container
- Place stir-fry on top or beside rice
- Cool completely before covering and refrigerating
- For the freshest results:
- Slightly undercook the vegetables if you plan to reheat later
- Pack sauce separately in small containers if preparing more than 2 days in advance
- Keep garnishes like green onions in separate small bags and add just before eating
- Grab-and-go lunch:
- Microwave on 70% power for 2-3 minutes
- Stir halfway through heating
- Add a splash of soy sauce or water if it seems dry
- Sprinkle with fresh garnishes before eating