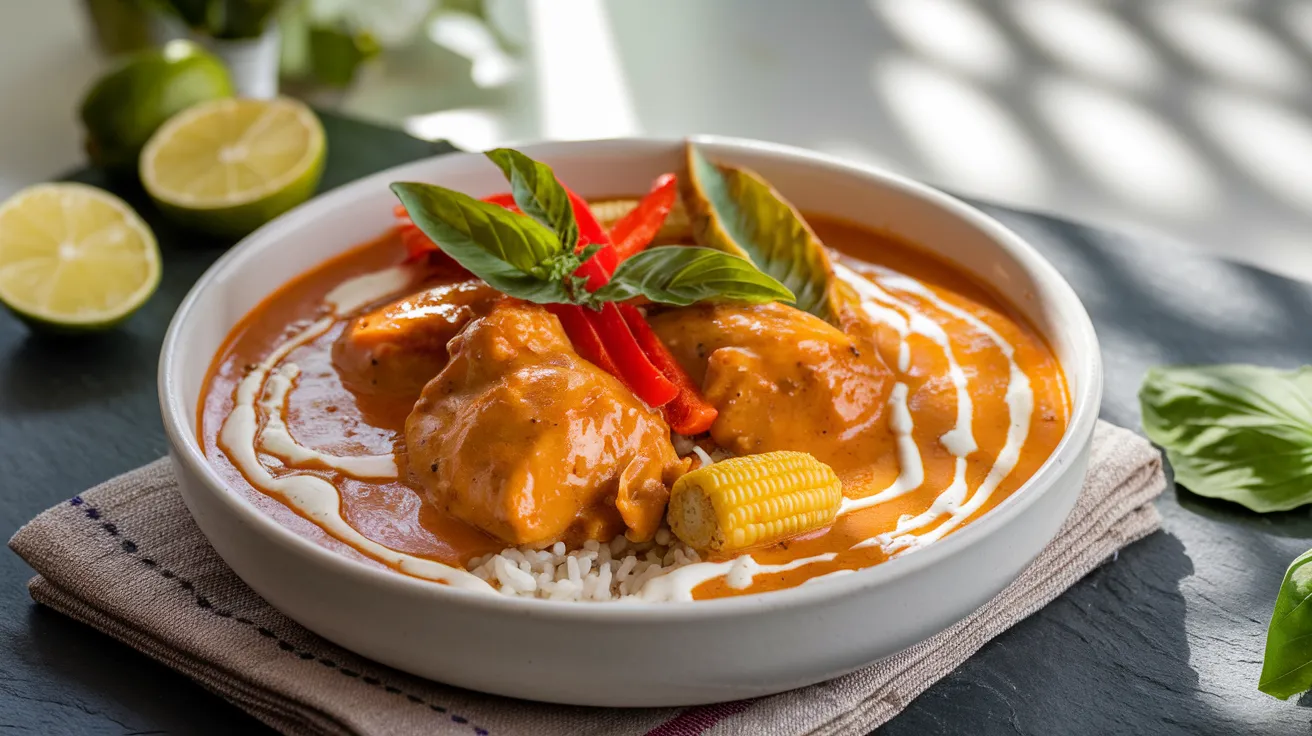
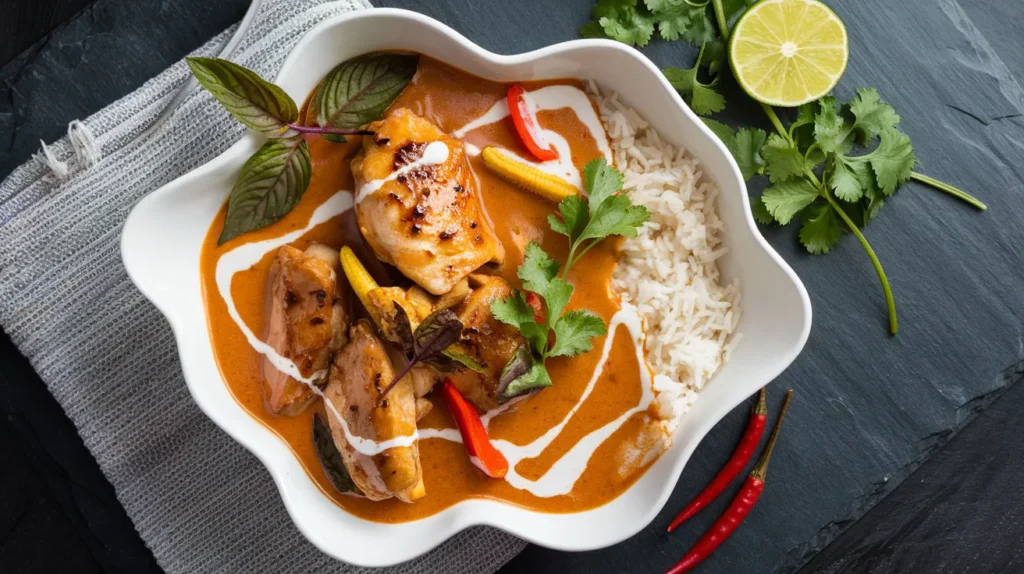
This authentic thai coconut curry chicken starts with a flavor-packed marinade that transforms ordinary chicken into restaurant-quality perfection. The overnight soak infuses every bite with aromatic Thai spices, while the creamy coconut curry sauce brings everything together in a dish that’s worth the wait. Perfect for when you want to impress with minimal effort.
SERVES: 4 | MARINATE: 4 HOURS (OR OVERNIGHT) | PREP: 20 MIN | COOK: 25 MIN | TOTAL: 45 MIN (PLUS MARINATING)
Ingredients
For the Marinade
| Ingredient | Amount |
|---|---|
| Chicken thighs (boneless, skinless) | 2 lbs, cut into 1.5-inch pieces |
| Red curry paste | 2 tablespoons |
| Coconut milk | 1/2 cup |
| Fish sauce | 1 tablespoon |
| Lime juice | 2 tablespoons |
| Garlic cloves | 3, minced |
| Fresh ginger | 1 tablespoon, grated |
| Vegetable oil | 1 tablespoon |
| Brown sugar | 1 teaspoon |
For the Curry Sauce
| Ingredient | Amount |
|---|---|
| Coconut milk (full-fat) | 1.5 cans (21 oz total) |
| Red curry paste | 1 tablespoon (additional) |
| Fish sauce | 1 tablespoon |
| Brown sugar | 2 teaspoons |
| Vegetable oil | 1 tablespoon |
Aromatics & Vegetables
| Ingredient | Amount |
|---|---|
| Yellow onion | 1 medium, thinly sliced |
| Red bell pepper | 1 large, cut into strips |
| Baby corn | 1 cup, halved lengthwise |
| Thai basil leaves | 1/2 cup, loosely packed |
| Lime | 2, one juiced, one for wedges |
| Lemongrass stalk | 1, bruised (optional but recommended) |
Finishing Touches
| Ingredient | Amount |
|---|---|
| Jasmine rice (cooked) | 4 cups (for serving) |
| Fresh cilantro | 1/4 cup, chopped |
| Red chili (optional) | 1, thinly sliced |
| Coconut cream | 2 tablespoons (for drizzling) |
Step-by-Step Instructions
Phase 1: Marinating the Chicken (4 hours or overnight)
Step 1: In a large mixing bowl, combine the curry paste, coconut milk, fish sauce, lime juice, minced garlic, grated ginger, vegetable oil, and brown sugar. Whisk everything together vigorously until the curry paste completely dissolves and the marinade looks smooth and creamy with no lumps.
Step 2: Pat your chicken pieces dry with paper towels before adding them to the marinade. This helps the marinade stick better to the meat surface. Add the chicken to the bowl and use your hands (wear gloves if you have sensitive skin) to massage the marinade into every piece, ensuring complete coverage.
Step 3: Cover the bowl tightly with plastic wrap, pressing it directly onto the surface of the chicken to minimize air exposure. Alternatively, transfer everything to a large zip-top bag, squeeze out excess air, and seal. Refrigerate for at least 4 hours, but overnight (8-12 hours) is ideal for maximum flavor penetration.
Step 4: About 30 minutes before cooking, remove the marinated chicken from the refrigerator. Let it sit at room temperature while you prep your other ingredients. Room-temperature chicken cooks more evenly than cold chicken straight from the fridge.
Phase 2: Prep Work (10 minutes)
Step 5: While the chicken comes to temperature, prepare all your vegetables. Slice the onion thinly, cut the bell pepper into uniform strips, and halve the baby corn lengthwise. Having everything ready before you start cooking makes the process smooth and stress-free.
Step 6: If using lemongrass, trim off the tough outer layers and woody bottom. Use the back of your knife to bruise the stalk—this releases the aromatic oils that will perfume your curry. Set it aside to add to the sauce later.
Step 7: Remove the chicken pieces from the marinade using tongs, letting excess marinade drip back into the bowl. Don’t discard the marinade—we’ll use it to boost the curry sauce flavor. Place the chicken on a clean plate.
Phase 3: Searing the Marinated Chicken (6 minutes)
Step 8: Heat a large, deep skillet or wok over medium-high heat for 2 minutes. Add 1 tablespoon of vegetable oil and swirl to coat. Wait until you see thin wisps of smoke—that’s your signal the pan is properly heated.
Step 9: Working in batches if necessary to avoid overcrowding, add the marinated chicken pieces in a single layer. You’ll hear an immediate sizzle—that’s the sound of flavor developing. Let them cook undisturbed for 3 minutes until the edges turn golden and slightly caramelized.
Step 10: Flip each piece and cook for another 2-3 minutes on the second side. The marinade will create a beautiful glaze on the chicken. Don’t worry if the chicken isn’t fully cooked yet—it will finish cooking in the curry sauce. Transfer the seared chicken to a clean plate.
Phase 4: Building the Aromatic Base (5 minutes)
Step 11: Lower the heat to medium and add the sliced onions to the same pan without wiping it clean. Those caramelized bits from the chicken are liquid gold. Stir the onions for 2-3 minutes until they soften and turn translucent, scraping up all those flavorful brown bits stuck to the pan.
Step 12: Push the onions to one side and add the additional tablespoon of red curry paste to the cleared space. Let it sizzle and bloom for 45 seconds—you’ll smell the spices wake up and intensify. This step is crucial for developing deep curry flavor in your thai coconut curry chicken.
Step 13: Stir the curry paste into the onions until everything is coated in that gorgeous red color. The onions should look like they’ve been painted with the curry paste.
Phase 5: Creating the Enriched Curry Sauce (4 minutes)
Step 14: Pour in the reserved marinade from the bowl (yes, all of it—this is where the magic happens). Stir it into the curry paste and onions, scraping the bottom of the pan to incorporate all the caramelized flavors. Cook for 1 minute to allow the raw garlic and ginger in the marinade to cook through.
Step 15: Add the remaining 1.5 cans of coconut milk, fish sauce, and brown sugar. If using lemongrass, add the bruised stalk now. Stir everything together until completely combined. The sauce should look silky and uniform with a beautiful burnt-orange color.
Step 16: Increase heat to medium-high and bring the mixture to a gentle boil. Small bubbles should break the surface steadily. Taste the sauce now—it should taste slightly too strong because it will mellow as the chicken cooks and releases its juices.
Phase 6: Simmering the Thai Coconut Curry Chicken (12 minutes)
Step 17: Return all the seared chicken pieces (including any juices that accumulated on the plate) back into the curry sauce. Reduce the heat to medium-low to maintain a gentle simmer. You want to see lazy bubbles rising slowly—not a rolling boil that could make the coconut milk separate.
Step 18: Cover the pan with a lid slightly ajar (leave a small gap for steam to escape) and simmer for 8 minutes. This allows the curry flavors to penetrate deeper into the already-marinated chicken, creating layers upon layers of taste.
Step 19: Remove the lid and add the red bell pepper strips and baby corn. Stir them into the sauce and continue cooking uncovered for 4 more minutes. The vegetables should be tender-crisp—cooked through but still with a slight bite.
Step 20: Check your chicken for doneness by cutting into the thickest piece. The meat should be completely white with no pink, and juices should run clear. If you see any pink, simmer for another 2-3 minutes and check again.
Phase 7: Final Touches and Serving (3 minutes)
Step 21: Remove and discard the lemongrass stalk if you used one—it’s done its aromatic job. Turn off the heat completely and stir in the lime juice. Tear the Thai basil leaves with your hands directly into the curry (tearing releases more essential oils than cutting) and give everything a gentle stir.
Step 22: Taste the curry and adjust the seasoning. Need more salt? Add fish sauce. Want more brightness? Squeeze in more lime. Too spicy? Stir in a spoonful of brown sugar or extra coconut milk. This is your chance to make it perfect for your palate.
Step 23: Let the thai coconut curry chicken rest off the heat for 3-5 minutes before serving. This resting period allows the chicken to reabsorb some sauce and the flavors to marry together beautifully.
Step 24: Divide jasmine rice among four shallow bowls or plates. Ladle generous portions of the curry over the rice, making sure each serving gets plenty of chicken, vegetables, and that luscious sauce. Drizzle a spoonful of coconut cream over each bowl for extra richness.
Step 25: Garnish with fresh cilantro, sliced red chili for heat lovers, and a lime wedge on the side. Serve immediately while steaming hot. Watch your dinner guests’ faces light up as they take that first aromatic bite!
Chef’s Notes
Marinade Magic: The overnight marinade does double duty—it tenderizes the chicken while infusing it with flavor, then becomes part of the curry sauce so nothing goes to waste. This technique creates depth you simply can’t achieve with quick-cook methods.
Curry Paste Power: Since we’re using curry paste in both the marinade and the sauce, you get multiple layers of curry flavor. The marinated paste caramelizes when you sear the chicken, adding complexity to your thai coconut curry chicken.
Temperature Control: When searing marinated chicken, medium-high heat is crucial. Too hot and the marinade burns before the chicken cooks; too low and you miss out on that beautiful caramelization that adds depth.
Marinade Safety: Always use the reserved marinade within 2 hours of removing the chicken, and make sure it comes to a full boil in the curry sauce. This kills any bacteria from the raw chicken, making it completely safe to use.
Nutrition Per Serving
| Nutrient | Amount |
|---|---|
| Calories | 512 |
| Protein | 39g |
| Carbohydrates | 54g |
| Fat | 24g |
Variations to Try
Quick Marinade Version: Short on time? A 30-minute marinade still adds fantastic flavor. Just increase the curry paste in the marinade to 3 tablespoons and add an extra tablespoon of lime juice for faster penetration.
Grilled Curry Chicken: After marinating overnight, thread the chicken onto skewers and grill over medium-high heat for 8-10 minutes, turning occasionally. Make the curry sauce separately and serve the grilled chicken over rice with sauce drizzled on top.
Yellow Curry Alternative: Swap red curry paste for yellow curry paste in both the marinade and sauce. Add diced potatoes with the vegetables for a milder, earthier version of thai coconut curry chicken. Yellow curry pairs beautifully with root vegetables.
Spicy Fusion Bowl: For an exciting fusion twist, serve your marinated curry chicken over cauliflower rice instead of jasmine rice. Top with pickled vegetables and sriracha mayo. If you enjoy bold Asian marinades, try this Korean BBQ chicken next for a completely different marinating technique.
Sheet Pan Style: After marinating, arrange chicken and vegetables on a parchment-lined sheet pan. Roast at 425°F for 20-25 minutes, then toss with the curry sauce made separately on the stovetop. Great for meal prep! For more Asian-inspired marinated dishes, this sesame ginger chicken offers another delicious overnight option.
Storage & Reheating
Marinated Chicken Storage: Raw marinated chicken keeps in the refrigerator for up to 2 days. Beyond that, freeze it in the marinade for up to 3 months. Thaw overnight in the fridge before cooking.
Cooked Curry Storage: Cool completely and transfer to airtight containers. The cooked thai coconut curry chicken stays fresh for 5 days refrigerated. The flavors continue developing, making day-two curry even more delicious than day one.
Freezing Cooked Curry: Portion into freezer-safe containers, leaving 1 inch of headspace. Freeze for up to 4 months. The overnight marinade makes the chicken especially freezer-friendly—it stays tender and flavorful even after freezing.
Reheating Best Practices: Thaw frozen curry overnight in the refrigerator. Reheat gently in a saucepan over medium-low heat, stirring occasionally. Add 2-3 tablespoons of coconut milk or water to restore the sauce’s creamy consistency. Don’t microwave on high—use 50% power in 2-minute intervals, stirring between each.
Meal Prep Winner: This recipe is perfect for Sunday meal prep. Marinate Sunday morning, cook Sunday evening, and you’ll have incredible lunches or quick dinners through Thursday.
Troubleshooting
Problem: Chicken is tough despite marinating You likely overcooked it during the simmering phase. Marinated chicken cooks faster than un-marinated because the acids and enzymes have already begun breaking down proteins. Reduce simmering time to 8 minutes total next time. Use a meat thermometer—chicken is done at 165°F internal temperature.
Problem: Marinade made the chicken mushy You marinated too long (over 24 hours) or used too much acid. Lime juice is powerful and can “cook” the chicken if left too long, creating an unpleasant texture. Stick to the 4-12 hour window for best results. If you want to prep further ahead, freeze the chicken in marinade and thaw when needed.
Problem: Curry sauce tastes overwhelmingly of raw garlic The reserved marinade didn’t cook long enough before adding the coconut milk. Next time, sauté the marinade mixture for a full 2 minutes after adding it to the pan, stirring constantly. This cooks out the raw garlic bite while preserving the flavor.
Problem: Chicken burned during searing The sugars in the marinade caramelize quickly and can burn if the heat is too high. Use medium-high heat (not high) and don’t walk away during searing. If your pan is smoking heavily, it’s too hot—reduce heat immediately. Pat excess marinade off chicken before searing to prevent burning.
Problem: Curry sauce separated or looks oily This happens when coconut milk boils too vigorously or when you add cold coconut milk to a very hot pan. Always use medium-low heat for simmering after the initial boil. Let canned coconut milk come to room temperature before adding. If separation occurs, remove from heat and whisk vigorously or use an immersion blender for 10 seconds to re-emulsify.
Equipment Essentials
- Large mixing bowl or zip-top bag (1 gallon size) for marinating
- Large deep skillet or wok (12-inch minimum) with lid
- Sharp chef’s knife for cutting chicken and vegetables
- Two cutting boards (one for raw meat, one for produce—critical for food safety)
- Tongs for handling marinated chicken
- Wooden spoon or silicone spatula for stirring
- Measuring spoons and cups for accurate marinade and sauce ratios
- Box grater for fresh ginger
- Citrus juicer for extracting maximum lime juice
- Meat thermometer for perfect doneness (optional but recommended)
- Rice cooker or medium pot for jasmine rice
Shopping List
Meat Counter
- Boneless, skinless chicken thighs (2 lbs)
Canned Goods Aisle
- Full-fat coconut milk (2 cans, 14 oz each—you’ll use 2 total)
- Red curry paste (small jar—Thai Kitchen or Mae Ploy brands recommended)
- Fish sauce (small bottle)
Produce Section
- Yellow onion (1 medium)
- Red bell pepper (1 large)
- Baby corn (1 cup, fresh or canned)
- Garlic (1 head)
- Fresh ginger root (1 large knob)
- Thai basil (1 bunch—regular basil works in a pinch)
- Limes (4 total—2 for marinade, 2 for serving)
- Fresh cilantro (1 bunch)
- Red chili, optional (1)
- Lemongrass stalk (1—optional but adds authentic flavor)
Dairy/Alternative Section
- Coconut cream (small carton or can for garnish)
Pantry & Staples
- Vegetable oil
- Brown sugar
- Jasmine rice
- Plastic wrap or zip-top bags
Success Secrets
1. Plan Ahead for Maximum Flavor: The key to outstanding thai coconut curry chicken is patience. Start marinating the night before or in the morning before work. Those extra hours let the curry paste, coconut milk, and aromatics work their magic deep into the chicken fibers.
2. Don’t Waste the Marinade: Many recipes tell you to discard marinades, but not this one. Since we’re bringing it to a full boil and simmering it thoroughly, it’s completely safe and adds incredible depth. This technique concentrates all those wonderful flavors you worked to develop.
3. Room Temperature Matters: Cold chicken straight from the fridge into a hot pan causes uneven cooking—burned outside, raw inside. Those 30 minutes of countertop time ensure even cooking and better caramelization when searing.
4. Taste and Adjust at Every Phase: Thai cooking is about balance. Taste the sauce before adding chicken, taste again before adding vegetables, and do a final taste before serving. Each ingredient you add changes the flavor profile slightly, so adjust seasoning accordingly.
5. The Resting Period is Non-Negotiable: After all that marinating and careful cooking, don’t skip the final 3-5 minute rest. This brief pause lets the chicken reabsorb sauce, ensures even temperature throughout, and allows the Thai basil’s aroma to infuse the curry. It’s the difference between good curry and extraordinary curry.
Transform your weeknight dinners with this marinated thai coconut curry chicken that tastes like you spent hours in the kitchen—even though the marinade did most of the work! The overnight soak creates restaurant-quality depth that’ll have everyone asking for your secret recipe.