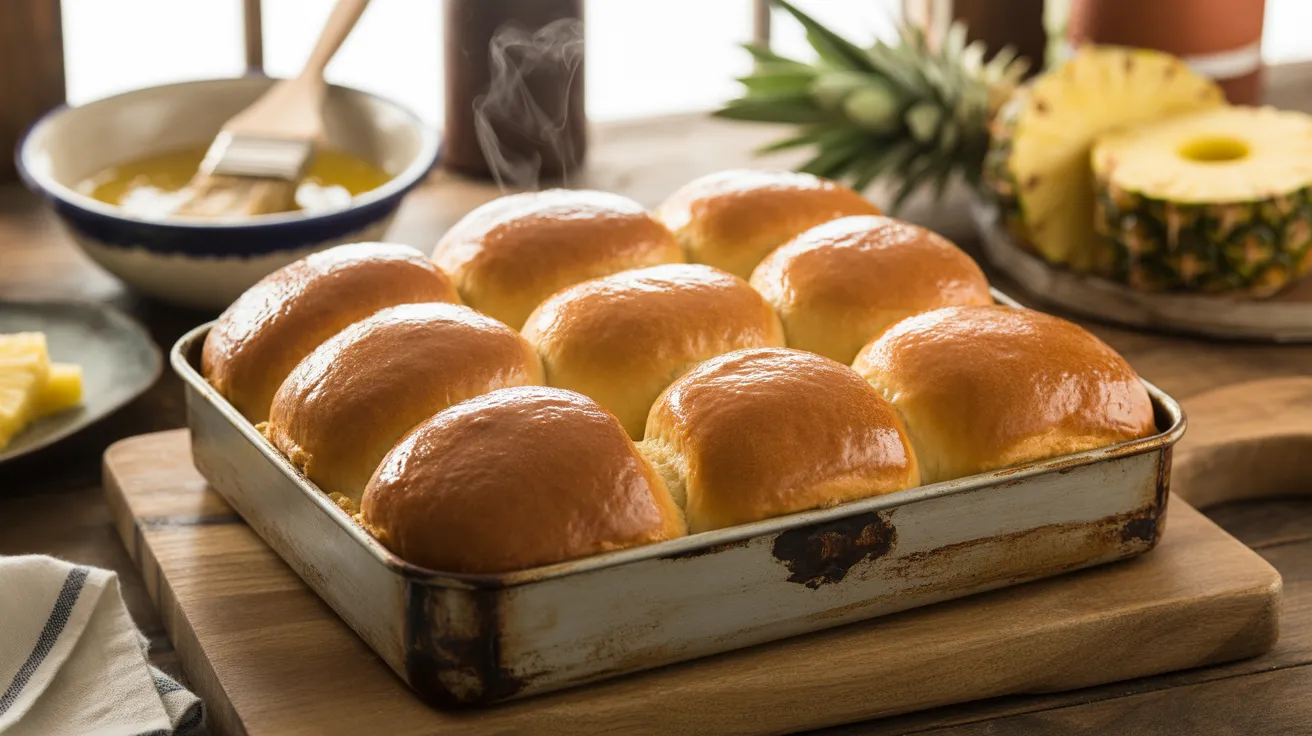
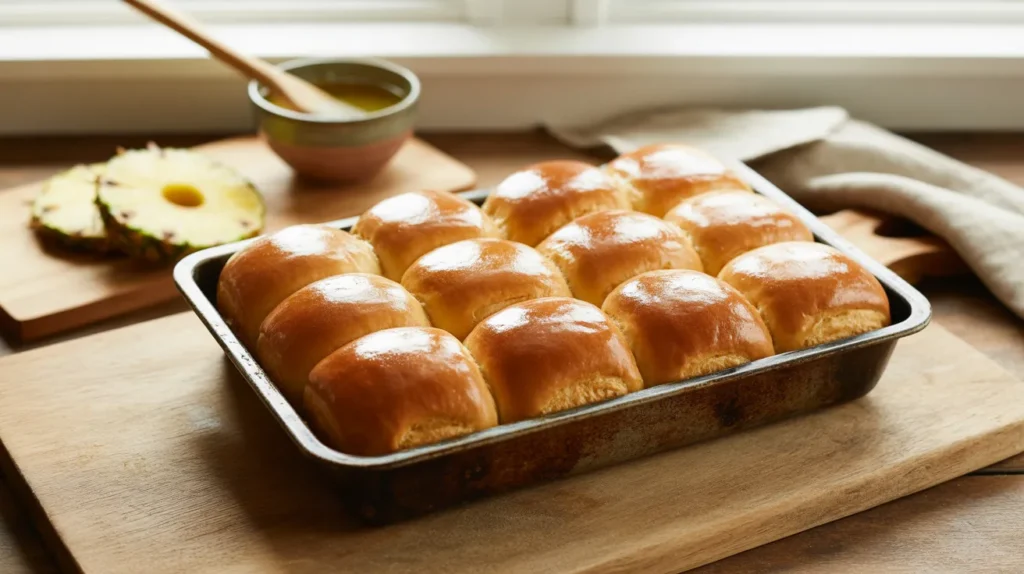
These heavenly vegan Hawaiian sweet rolls deliver all the pillowy softness and tropical sweetness you crave from traditional Hawaiian bread, but made completely plant-based. With their golden exterior and tender, pull-apart texture, these vegan Hawaiian sweet rolls are perfect for beginners who want to create bakery-quality bread at home. Each bite offers that signature subtle pineapple flavor that makes Hawaiian rolls so irresistible.
SERVES: 4 | PREP: 20 MIN | COOK: 25 MIN | TOTAL: 45 MIN
Ingredients for Perfect Vegan Hawaiian Sweet Rolls
Dry Ingredients
| Ingredient | Amount |
|---|---|
| All-purpose flour | 2½ cups |
| Active dry yeast | 1 packet (2¼ tsp) |
| Sugar | 3 tablespoons |
| Salt | 1 teaspoon |
Wet Ingredients
| Ingredient | Amount |
|---|---|
| Warm water | ¾ cup |
| Pineapple juice | ¼ cup |
| Coconut oil, melted | 3 tablespoons |
| Vanilla extract | 1 teaspoon |
For Brushing
| Ingredient | Amount |
|---|---|
| Melted coconut oil | 2 tablespoons |
| Maple syrup | 1 tablespoon |
Detailed Step-by-Step Instructions for Vegan Hawaiian Sweet Rolls
Phase 1: Preparing and Activating Your Yeast (5-7 minutes)
1. Test your water temperature first. Fill a small bowl with ¾ cup water and test it with your wrist – it should feel comfortably warm like a baby’s bath, not hot. If it’s too hot, let it cool for 2-3 minutes. Water that’s too hot (over 115°F) will kill the yeast, while water that’s too cool won’t activate it properly.
2. Create your yeast mixture. In your largest mixing bowl, combine the warm water with 1 tablespoon of the sugar (save the remaining 2 tablespoons for later). Stir gently with a spoon until the sugar dissolves completely – this feeds the yeast and helps it activate.
3. Add the yeast carefully. Sprinkle the entire packet of active dry yeast evenly over the surface of the sweetened water. Don’t stir it in – just let it sit on top. This allows the yeast to hydrate properly.
4. Wait for the magic to happen. Set a timer for 5 minutes and walk away. Don’t disturb the mixture. After 5 minutes, you should see a foamy, bubbly layer on top that looks like beer foam. This proves your yeast is alive and ready to make your vegan Hawaiian sweet rolls rise beautifully. If you don’t see bubbles, your yeast might be expired – start over with fresh yeast.
Phase 2: Building Your Dough Foundation (10-12 minutes)
5. Add the liquid ingredients to your activated yeast. Pour in the ¼ cup pineapple juice (this gives your vegan Hawaiian sweet rolls their signature tropical flavor), 3 tablespoons melted coconut oil (make sure it’s just melted, not hot), 1 teaspoon vanilla extract, and the remaining 2 tablespoons sugar.
6. Mix the wet ingredients thoroughly. Use a whisk or large spoon to combine everything until the mixture looks uniform and slightly cloudy. The coconut oil should blend in completely – if you see white chunks, let the mixture sit for 2 minutes to warm up the oil.
7. Start adding flour gradually. Add 2 cups of flour and the 1 teaspoon salt to your wet mixture. Using a wooden spoon (it won’t stick like metal spoons do), stir everything together. The mixture will look rough and shaggy at first – this is exactly what you want.
8. Add the remaining flour slowly. Sprinkle in the remaining ½ cup flour a little at a time while stirring. Stop adding flour when the dough starts pulling away from the sides of the bowl but still feels slightly sticky to touch. You might not need all the flour, or you might need an extra tablespoon – dough consistency depends on humidity and how you measured your flour.
Phase 3: Kneading for Perfect Texture (8-10 minutes)
9. Prepare your work surface. Lightly flour a clean countertop or large cutting board. Use just enough flour to prevent sticking – too much will make your vegan Hawaiian sweet rolls dense instead of fluffy.
10. Turn out your dough. Scrape all the dough from the bowl onto your floured surface. It will look messy and feel sticky – this is normal for beginners, don’t panic.
11. Learn the proper kneading technique. Push the dough away from you with the heel of your hand, then fold it back over itself toward you. Give it a quarter turn and repeat. This push-fold-turn motion develops the gluten that makes your rolls fluffy.
12. Knead for 6-8 minutes without stopping. Set a timer so you don’t shortcut this crucial step. As you knead, the dough will transform from sticky and rough to smooth and elastic. If it sticks to your hands, dust them with flour, but resist adding too much flour to the work surface.
13. Test if your kneading is complete. Poke the dough gently with your finger. If it springs back quickly, you’re done. If the indentation stays, knead for 2 more minutes and test again.
Phase 4: First Rise – Building Flavor (20-25 minutes)
14. Prepare your rising bowl. Lightly oil a clean large bowl with coconut oil or cooking spray. This prevents the dough from sticking and makes it easier to remove later.
15. Shape your dough into a ball. Gather the edges of your kneaded dough underneath to create a smooth ball. Place it seam-side down in your oiled bowl.
16. Oil the top of the dough. Drizzle a tiny bit of oil over the dough ball and turn it to coat all sides. This prevents a skin from forming during rising, which would make your vegan Hawaiian sweet rolls tough.
17. Cover and create the perfect rising environment. Cover the bowl with a damp (not soaking) kitchen towel. Place it in a warm, draft-free spot like on top of your refrigerator, near (not on) a heating vent, or in an oven with just the light on (oven should be OFF, just the light provides gentle warmth).
18. Wait for the dough to double. Set a timer for 20 minutes, but don’t just rely on time – look for the dough to literally double in size. It should look puffy and feel light when you gently poke it.
Phase 5: Shaping Your Vegan Hawaiian Sweet Rolls (8-10 minutes)
19. Punch down the risen dough gently. Make a fist and punch the center of the dough once. This releases excess gas and redistributes the yeast for even texture in your finished rolls.
20. Turn the dough onto a lightly floured surface. Use just a light dusting of flour – the dough should be much easier to handle now than before the first rise.
21. Divide into equal portions. Using a sharp knife or bench scraper, cut the dough into 8 equal pieces. For perfectly even rolls, first cut the dough in half, then cut each half in half again, then cut each quarter in half once more.
22. Shape each piece into a perfect ball. Take one piece of dough and stretch the edges underneath while rolling it between your palms. The top should be smooth and tight, with all the seams tucked underneath. Repeat with all 8 pieces.
23. Arrange in your baking pan. Place the shaped rolls in a greased 8-inch square baking pan, leaving about ½ inch space between each roll. They’ll expand during the final rise and baking to create that signature pull-apart texture.
Phase 6: Final Rise and Oven Preparation (15-20 minutes)
24. Cover for the final rise. Place a damp towel over the shaped rolls and let them rise for 15-20 minutes. They’re ready when they’re touching each other and look puffy and light.
25. Preheat your oven. About 10 minutes before the final rise is complete, preheat your oven to 375°F. Place the oven rack in the center position for even browning.
26. Prepare your finishing glaze. In a small bowl, mix 2 tablespoons melted coconut oil with 1 tablespoon maple syrup. This creates the golden, glossy finish that makes your vegan Hawaiian sweet rolls look professional.
Phase 7: Baking to Golden Perfection (25-30 minutes)
27. Apply the first glaze. Using a pastry brush (or clean kitchen brush), gently brush the tops of your risen rolls with half of the coconut oil and maple syrup mixture. This helps them brown beautifully and adds flavor.
28. Bake with attention to timing. Place the pan in your preheated oven and bake for 22-25 minutes. The tops should turn golden brown and the rolls should sound hollow when tapped gently.
29. Check for doneness properly. The most accurate way to test doneness is with an instant-read thermometer inserted into the center of a middle roll – it should read 190°F. If you don’t have a thermometer, the rolls should be golden brown and spring back when lightly pressed.
30. Apply the finishing touch immediately. As soon as you remove the pan from the oven, brush the hot rolls with the remaining coconut oil and maple syrup mixture. This keeps the crust soft and adds extra flavor while they’re still hot and can absorb it.
31. Cool properly before serving. Let the vegan Hawaiian sweet rolls cool in the pan for 5 minutes before serving. This allows the interior to set up properly while keeping them warm enough to melt any butter you might add.
Expert Chef’s Notes for Vegan Hawaiian Sweet Rolls Success
• Pineapple juice is the secret ingredient – It provides that authentic Hawaiian sweetness and helps create the tender, moist crumb that makes these vegan Hawaiian sweet rolls taste just like the traditional version.
• Temperature control is everything – Use a kitchen thermometer if you’re unsure about water temperature. Yeast is living and sensitive, so getting this right ensures your rolls will rise perfectly every time.
• Don’t rush the rising process – Both rising periods develop flavor and texture. Cold kitchens may need extra time, while warm kitchens work faster. Go by appearance (doubled size) rather than just time.
• The double brush technique matters – Brushing before baking creates color, brushing after baking creates that soft, glossy finish that makes these vegan Hawaiian sweet rolls irresistible.
Nutrition Per Serving (2 rolls)
- Calories: 285
- Protein: 7g
- Carbohydrates: 52g
- Fat: 6g
- Fiber: 2g
- Sugar: 8g
Creative Variations for Your Vegan Hawaiian Sweet Rolls
Tropical Coconut Version
Add 3 tablespoons shredded coconut to the dough during step 7 for extra tropical flavor. The coconut adds texture and pairs beautifully with our rosemary ciabatta bread for a complete artisan bread experience.
Sweet Orange Hawaiian Rolls
Replace the pineapple juice with fresh orange juice and add 1 teaspoon orange zest to create citrusy vegan Hawaiian sweet rolls with a bright, sunny flavor.
Cinnamon Swirl Hawaiian Rolls
After the first rise, roll the dough into a rectangle, brush with coconut oil, sprinkle with cinnamon sugar, roll up tightly, and slice for spiral-shaped rolls that are as delightful as our vegan apple pop tarts.
Whole Grain Hawaiian Rolls
Substitute 1 cup whole wheat flour for 1 cup all-purpose flour to create heartier vegan Hawaiian sweet rolls with added fiber and a subtle nutty flavor.
Storage & Reheating Your Vegan Hawaiian Sweet Rolls
Room Temperature Storage: Keep your vegan Hawaiian sweet rolls in an airtight container for up to 3 days. The coconut oil helps maintain moisture better than traditional dairy-based rolls.
Freezing Instructions: Wrap individual rolls tightly in plastic wrap, then place in a freezer bag. Freeze for up to 3 months. Thaw at room temperature for 2 hours before serving.
Reheating Methods: Warm in a 300°F oven for 5-7 minutes to restore that fresh-baked texture, or microwave individual rolls for 15-20 seconds. Brush with a little melted coconut oil to restore softness.
Make-Ahead Strategy: Complete through step 23, cover tightly, and refrigerate overnight. In the morning, let come to room temperature (about 1 hour), complete the final rise, and bake as directed.
Troubleshooting Common Vegan Hawaiian Sweet Rolls Problems
1. My rolls didn’t rise at all Your yeast was likely expired or the water was too hot (over 115°F). Always check yeast expiration dates and test water temperature. Start over with fresh yeast and properly tempered water.
2. The rolls turned out dense and heavy This usually means too much flour was added during mixing or kneading. Measure flour by spooning it lightly into the measuring cup and leveling off – don’t scoop or pack it down.
3. My vegan Hawaiian sweet rolls are too dry The oven temperature might have been too high, or they were overbaked. Use an oven thermometer to verify temperature and don’t exceed 190°F internal temperature when testing doneness.
4. The rolls aren’t sweet enough Hawaiian rolls should have subtle sweetness. Next time, increase the sugar to 4 tablespoons total, or add 1 tablespoon maple syrup directly to the dough in step 6.
5. The coconut oil solidified and created lumps Your other ingredients were too cold. Always use room temperature pineapple juice and make sure your melted coconut oil is just warm, not hot, when adding to the mixture.
Essential Equipment for Making Vegan Hawaiian Sweet Rolls
- Large mixing bowl (at least 4-quart capacity)
- Measuring cups and spoons (dry and liquid measures)
- Kitchen scale (optional but recommended for consistency)
- 8-inch square baking pan (metal works best for even browning)
- Clean kitchen towels (for covering during rises)
- Instant-read thermometer (for testing doneness)
- Pastry brush (for applying glazes)
- Wooden spoon (won’t stick to dough like metal)
Complete Shopping List for Vegan Hawaiian Sweet Rolls
Baking Aisle
- All-purpose flour (5-lb bag)
- Active dry yeast (3-pack or jar)
- Granulated sugar
- Salt
- Pure vanilla extract
Oils & Fats Section
- Coconut oil (solid, unrefined preferred)
Juice Aisle
- 100% pineapple juice (no added sugar – check label)
Natural/Organic Section
- Pure maple syrup (Grade A)
Professional Success Secrets for Perfect Vegan Hawaiian Sweet Rolls
1. Always proof your yeast first – Those bubbles in step 4 are your guarantee that your vegan Hawaiian sweet rolls will rise beautifully and have proper texture.
2. Embrace the slightly sticky dough – Resist the urge to add too much flour. Slightly sticky dough creates the tender, pull-apart texture that makes these rolls special.
3. Create consistent warmth for rising – Place your covered bowl on top of the refrigerator or in an oven with just the light on. Consistent temperature ensures even rising.
4. Time the rises by appearance, not the clock – Proper fermentation develops the complex flavors that make these vegan Hawaiian sweet rolls taste authentically Hawaiian. Wait for true doubling.
5. Master the double-brush technique – Brush once before baking for beautiful color, then again immediately after baking for that signature soft, glossy finish that makes bakery-quality rolls.
These detailed instructions ensure that even complete beginners can create bakery-quality vegan Hawaiian sweet rolls at home. The combination of pineapple juice and coconut oil delivers that unmistakable tropical flavor and incredibly soft texture that makes every bite taste like paradise. With patience and attention to these detailed steps, you’ll have perfect vegan Hawaiian sweet rolls that rival any traditional recipe.