These vegan sugar cookies are the perfect introduction to plant-based baking! Soft, sweet, and incredibly simple to make, these cookies prove that you don’t need eggs or dairy to create bakery-quality treats. Whether you’re new to vegan baking or just looking for foolproof vegan sugar cookies, this beginner-friendly recipe delivers tender, flavorful cookies with a beautiful sparkly sugar coating that everyone will love.
SERVES: 4 | PREP: 20 MIN | COOK: 12 MIN | TOTAL: 32 MIN
Ingredients for Perfect Vegan Sugar Cookies
Dry Ingredients
| Ingredient | Amount |
|---|---|
| All-purpose flour | 2 cups |
| Baking powder | 1 teaspoon |
| Salt | 1/4 teaspoon |
| Sugar (for rolling) | 1/4 cup |
Wet Ingredients
| Ingredient | Amount |
|---|---|
| Vegan butter (softened) | 1/2 cup |
| Granulated sugar | 3/4 cup |
| Vanilla extract | 1 teaspoon |
| Non-dairy milk | 2 tablespoons |
Detailed Step-by-Step Instructions for Vegan Sugar Cookies
Phase 1: Kitchen Setup and Preparation (8 minutes)
Step 1: Preheat Your Oven Properly Set your oven to 350°F (175°C) and allow it to fully preheat for at least 10 minutes. Place one oven rack in the center position – this ensures even heat circulation around your cookies. If your oven runs hot or cold, use an oven thermometer to verify the temperature. The correct temperature is crucial for vegan sugar cookies that bake evenly without burning.
Step 2: Prepare Your Baking Sheets Line two large baking sheets with parchment paper, making sure the paper lies flat with no wrinkles. Cut the parchment slightly larger than your pan and press down any corners that curl up. This prevents your cookies from sticking and makes cleanup effortless. Never use wax paper – it will smoke and potentially catch fire in the oven.
Step 3: Soften Your Vegan Butter Correctly Remove your vegan butter from the refrigerator 30-45 minutes before you plan to start mixing. Properly softened butter should give slightly when pressed with your finger but still hold its shape. If you forgot to soften it, cut the butter into small cubes and let it sit at room temperature for 15 minutes, or microwave for 5-10 seconds at a time until soft but not melted.
Step 4: Gather and Measure All Ingredients Measure all your ingredients before you start mixing – this is called “mise en place” and makes the process much smoother. Use dry measuring cups for flour and sugar, and liquid measuring cups for non-dairy milk. Level off dry ingredients with a knife for accuracy. Having everything ready prevents mistakes and ensures your vegan sugar cookies turn out perfectly.
Phase 2: Creating the Perfect Dry Mixture (5 minutes)
Step 5: Combine Dry Ingredients Thoroughly In a medium mixing bowl, add the 2 cups flour, 1 teaspoon baking powder, and 1/4 teaspoon salt. Use a wire whisk to mix these ingredients together for at least 30 seconds. Whisking is important because it breaks up any lumps in the flour and evenly distributes the baking powder throughout the mixture. This ensures your cookies will rise evenly and have a consistent texture.
Step 6: Check for Proper Mixing Your flour mixture should look uniform in color with no streaks of baking powder visible. If you see white streaks, whisk for another 15-20 seconds. Set this bowl aside – you’ll add it to your wet ingredients later. Don’t skip this step; poorly mixed dry ingredients can result in cookies with uneven texture and flavor.
Phase 3: Mastering the Wet Ingredient Mixture (8 minutes)
Step 7: Cream Butter and Sugar Like a Pro In a large mixing bowl, add your softened vegan butter and 3/4 cup granulated sugar. Using an electric mixer on medium speed, beat these together for 2-3 minutes. The mixture should become noticeably lighter in color and fluffy in texture. This process incorporates air into the mixture, which creates the tender crumb texture that makes these vegan sugar cookies so delicious. If using a hand mixer, you may need an extra minute.
Step 8: Add Flavor and Liquid Elements Stop the mixer and scrape down the sides of the bowl with a rubber spatula. Add the 1 teaspoon vanilla extract and 2 tablespoons non-dairy milk. Mix on low speed for 30 seconds until just combined. The vanilla adds essential flavor, while the non-dairy milk provides moisture and helps bind the ingredients. Don’t overmix at this stage – just until everything is incorporated.
Step 9: Check Your Wet Mixture Consistency Your wet mixture should be smooth and creamy without any lumps of butter visible. It should hold together when you lift the beaters but still be soft enough to mix easily with the flour. If it looks separated or curdled, continue mixing on low speed for another 30 seconds until smooth.
Phase 4: Bringing the Dough Together (6 minutes)
Step 10: Combine Wet and Dry Ingredients Carefully With your mixer on the lowest speed, gradually add the flour mixture to the wet ingredients. Add about 1/3 of the flour mixture at a time, mixing just until you can’t see any dry flour before adding the next portion. This gradual method prevents overmixing, which can make your cookies tough instead of tender.
Step 11: Perfect Dough Consistency Check Stop mixing as soon as the last bit of flour disappears into the dough. The finished dough should be soft and slightly sticky but hold together when pressed. It shouldn’t be dry and crumbly, nor should it be wet and sticky. If it’s too dry, add non-dairy milk 1 teaspoon at a time. If too wet, add flour 1 tablespoon at a time.
Step 12: Test Your Dough Pinch off a small piece of dough and roll it between your palms. It should form a smooth ball without cracking or leaving sticky residue on your hands. If it cracks, add a tiny bit more non-dairy milk. If it’s too sticky, add a little more flour. This perfect consistency is key to beautiful vegan sugar cookies.
Phase 5: Shaping Your Vegan Sugar Cookies (8 minutes)
Step 13: Prepare Your Sugar Rolling Station Pour the remaining 1/4 cup granulated sugar into a shallow dish or small bowl. This sugar coating gives your cookies their signature sparkly appearance and adds a delightful sweet crunch to the outside while keeping the inside soft.
Step 14: Portion the Dough Evenly Using a tablespoon or small cookie scoop, portion the dough into 16 equal pieces. Each piece should be about the size of a walnut or roughly 1 tablespoon of dough. Keeping them the same size ensures all your cookies bake at the same rate. Place the portions on a clean plate or directly on your work surface.
Step 15: Roll Perfect Cookie Balls Take each portion of dough and roll it between your palms to form a smooth ball. Apply gentle, even pressure and rotate the dough as you roll. The balls should be perfectly round with no cracks or flat spots. If the dough sticks to your hands, lightly dampen your palms with water.
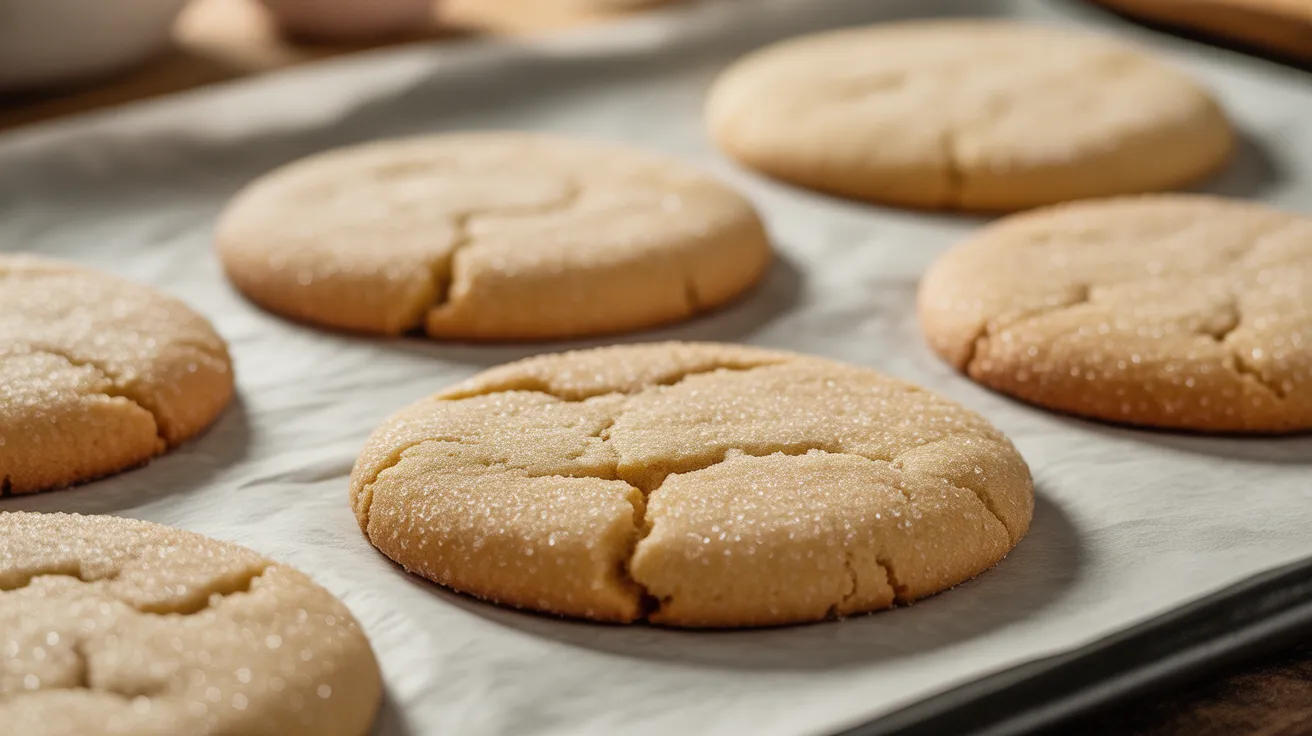
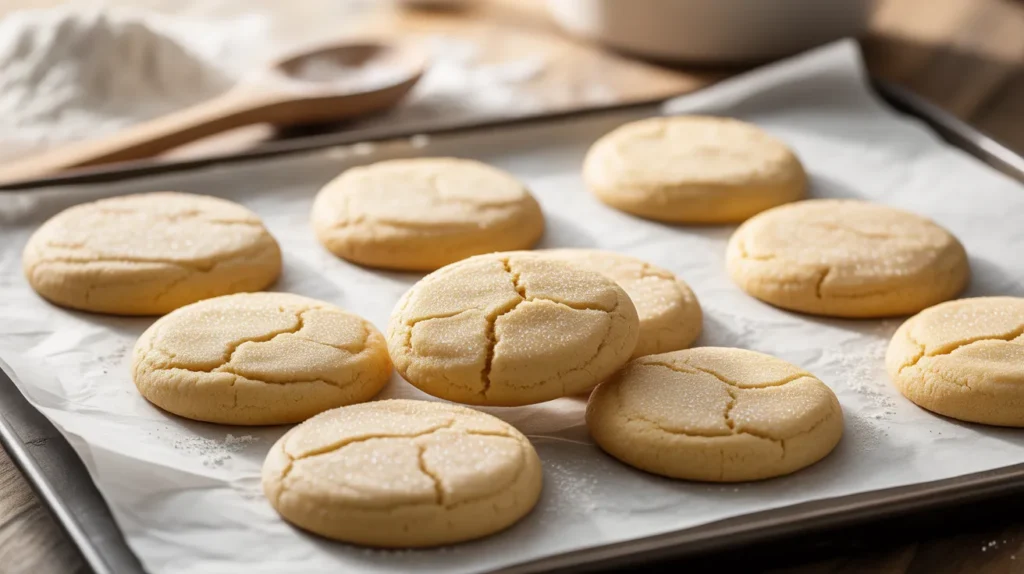
Step 16: Create the Sugar Coating Roll each dough ball in the sugar dish, turning it to coat all sides evenly. Gently press the ball into the sugar to ensure good coverage – this creates that beautiful sparkly coating that makes vegan sugar cookies so appealing. The sugar should stick well to the slightly sticky dough surface.
Phase 6: Baking to Perfection (15 minutes)
Step 17: Arrange Cookies for Even Baking Place the sugar-coated balls on your prepared baking sheets, spacing them 2 inches apart in all directions. They will spread during baking, so proper spacing prevents them from running into each other. You should fit about 8 cookies per standard baking sheet.
Step 18: Bake with Precision Timing Place one baking sheet in the center of your preheated oven. Bake for 10-12 minutes, watching carefully. The cookies are done when the edges are set and lightly golden, but the centers still look soft and slightly underbaked. They should not be brown all over – this means they’re overbaked.
Step 19: Test for Doneness Look for these visual cues: the edges should be firm and just beginning to turn golden, the centers should still look soft and slightly puffy, and the sugar coating should have a slight crackled appearance. If you gently touch the edge, it should feel set but not hard.
Step 20: Cool Properly for Best Texture Remove the baking sheet from the oven and let the cookies cool on the pan for exactly 5 minutes. This cooling time is crucial – it allows the cookies to finish cooking from residual heat while preventing them from breaking when moved. After 5 minutes, use a thin spatula to transfer them to a wire cooling rack.
Step 21: Final Cooling and Storage Let the cookies cool completely on the wire rack for at least 15 minutes before serving or storing. This final cooling sets the texture and prevents condensation if you store them in a container while still warm.
Chef’s Notes for Vegan Sugar Cookie Success
Temperature Control is Everything: Room temperature vegan butter creams properly and creates the perfect texture. Cold butter won’t incorporate well, while melted butter makes flat cookies instead of the fluffy vegan sugar cookies we want.
Don’t Skip the Sugar Roll: The sugar coating isn’t just decorative – it creates a delicate sweet crust that contrasts beautifully with the soft interior. Press firmly when rolling to ensure good coverage.
Timing Prevents Overbaking: These cookies continue cooking on the hot pan after removal. They should look slightly underdone when you take them out – this ensures perfectly soft vegan sugar cookies.
Consistent Sizing Matters: Use a cookie scoop or measuring spoon for uniform cookies. Different sizes bake at different rates, leading to some cookies being perfect while others are over or underdone.
Nutrition Per Serving (4 cookies)
- Calories: 285
- Protein: 4g
- Carbohydrates: 52g
- Fat: 8g
- Fiber: 1g
- Sodium: 180mg
Creative Vegan Sugar Cookie Variations
Citrus Burst Vegan Sugar Cookies
Add 1 tablespoon lemon zest and 1 teaspoon lemon extract to the wet ingredients for bright, sunny flavor. The citrus oils in the zest add amazing aroma and taste that pairs perfectly with the sweet sugar coating.
Double Chocolate Delight
Fold in 1/2 cup mini vegan chocolate chips after combining wet and dry ingredients. The chips add delightful texture and rich chocolate flavor to complement the vanilla base. For more plant-based dinner ideas, try our creative vegan tacos.
Warm Spice Holiday Cookies
Mix 1/2 teaspoon cinnamon, 1/4 teaspoon nutmeg, and 1/8 teaspoon cardamom into the flour mixture. These warming spices create perfect holiday vegan sugar cookies that fill your kitchen with festive aromas.
Almond Lovers’ Version
Replace vanilla with 1/2 teaspoon almond extract for an elegant, sophisticated flavor. Almond extract is potent, so start with less – you can always add more next time. Pair these with other creative dishes like vegan sushi for an eclectic meal.
Storage & Reheating Guide
Room Temperature Storage: Store completely cooled cookies in an airtight container for up to 5 days. Layer them between parchment paper to prevent the sugar coating from sticking together.
Make-Ahead Freezing: Roll dough balls and freeze on a baking sheet for 2 hours. Transfer to freezer bags for up to 3 months. Bake directly from frozen, adding 1-2 extra minutes to the baking time.
Freezing Baked Cookies: Wrap individual cookies in plastic wrap and freeze for up to 2 months. Thaw at room temperature for 30 minutes before serving.
Refreshing Day-Old Cookies: Warm slightly stale cookies in a 300°F oven for 2-3 minutes to restore their soft, fresh-baked texture.
Troubleshooting Your Vegan Sugar Cookies
Cookies Spread Too Much During Baking
Problem: Flat, thin cookies that lose their shape. Solution: Chill the shaped dough balls for 30 minutes before baking. Ensure your vegan butter wasn’t too warm when mixing, and check that your oven is at the correct temperature.
Cookies Turn Out Too Hard or Crunchy
Problem: Tough, dry texture instead of soft and chewy. Solution: Don’t overbake – remove when edges are just set but centers look soft. Use an oven thermometer to verify temperature accuracy, as many ovens run hot.
Dough is Too Sticky to Handle
Problem: Dough sticks to hands and won’t form smooth balls. Solution: Add flour 1 tablespoon at a time until manageable. Alternatively, chill the dough for 15-20 minutes to firm it up before shaping.
Cookies Crumble and Fall Apart
Problem: Dry, crumbly cookies that don’t hold together. Solution: Add non-dairy milk 1 teaspoon at a time until the dough binds properly. Ensure your vegan butter was properly creamed with the sugar.
Uneven Baking Results
Problem: Some cookies brown faster than others on the same pan. Solution: Rotate baking sheets halfway through baking time. Check for oven hot spots and consider using light-colored metal pans for more even browning.
Essential Equipment for Vegan Sugar Cookies
- Electric mixer (hand or stand mixer for proper creaming)
- Large mixing bowl (at least 3-quart capacity)
- Medium mixing bowl (for dry ingredients)
- Measuring cups and spoons (both dry and liquid measures)
- Wire whisk (for combining dry ingredients)
- Cookie scoop or tablespoon (for consistent sizing)
- Two large baking sheets (light-colored metal preferred)
- Parchment paper (never substitute wax paper)
- Wire cooling rack (allows air circulation)
- Shallow dish (for rolling cookies in sugar)
- Rubber spatula (for scraping bowl sides)
Complete Shopping List
Baking Aisle
- All-purpose flour (2 cups needed)
- Baking powder (fresh container recommended)
- Granulated sugar (1 cup total needed)
- Pure vanilla extract
Refrigerated Section
- Vegan butter (Earth Balance, Miyoko’s, or similar brand)
- Non-dairy milk (oat, almond, or soy work well)
Pantry Staples
- Fine sea salt or table salt
Top 5 Success Secrets for Perfect Vegan Sugar Cookies
1. Master Your Ingredients: Always use room temperature vegan butter and fresh baking powder. Check expiration dates – old leavening agents won’t work properly and will result in flat cookies.
2. Perfect the Sugar Roll Technique: Don’t just dust the cookies with sugar – really press and roll them to get complete coverage. This creates the signature sparkly appearance and sweet crunch.
3. Watch the Oven Like a Hawk: Set a timer for 10 minutes and check your cookies. They can go from perfect to overbaked in just 1-2 minutes. Look for set edges and soft centers.
4. Test Your First Batch: Bake just 4 cookies first to test your oven timing and cookie spacing. Make adjustments for the remaining batches based on these results.
5. Cool Completely Before Storing: Patience pays off! Let cookies cool fully before storing to prevent condensation that makes them soggy. Properly cooled vegan sugar cookies stay fresh longer.
These beginner-friendly vegan sugar cookies prove that plant-based baking can be simple, successful, and absolutely delicious. With detailed instructions and helpful tips, even first-time bakers can create bakery-quality cookies that everyone will love!