- Ready in just 15 minutes with simple pantry ingredients
- Authentic Japanese flavor without hard-to-find components
- Stores for up to 2 weeks in the refrigerator
- Perfect balance of sweet, savory, and umami flavors
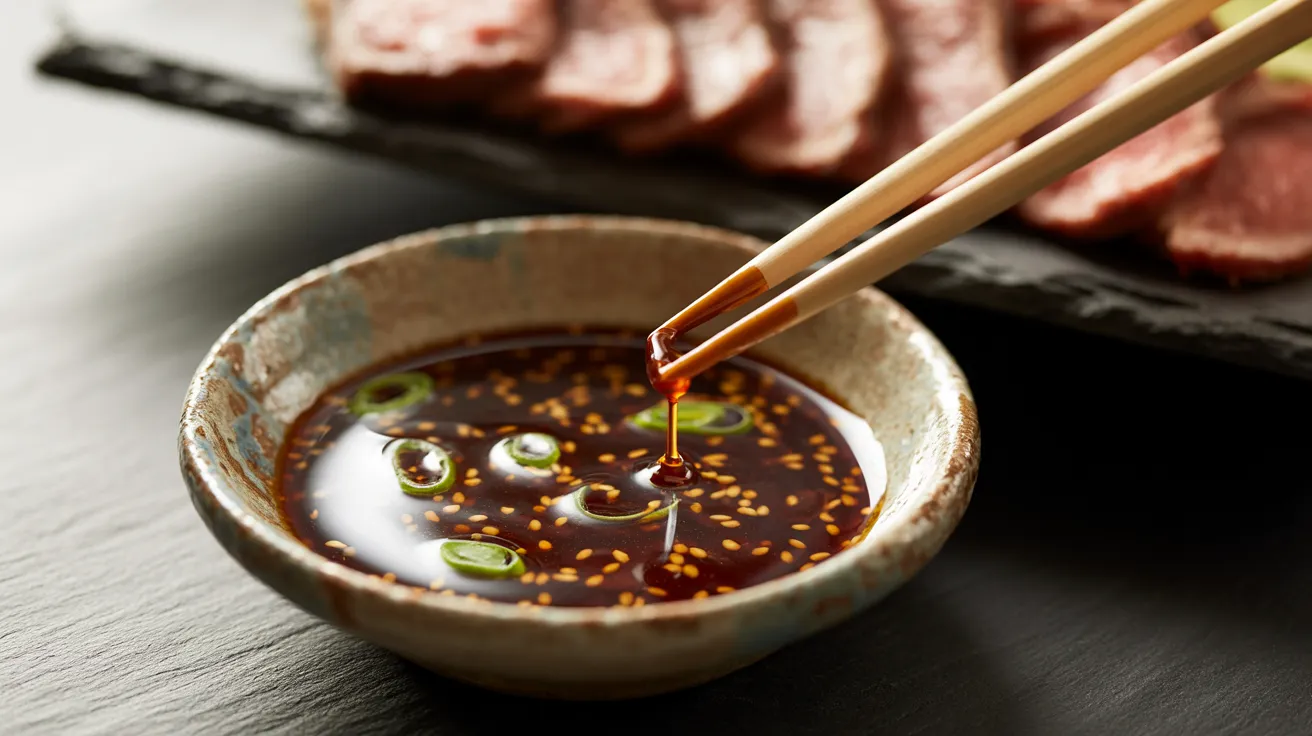
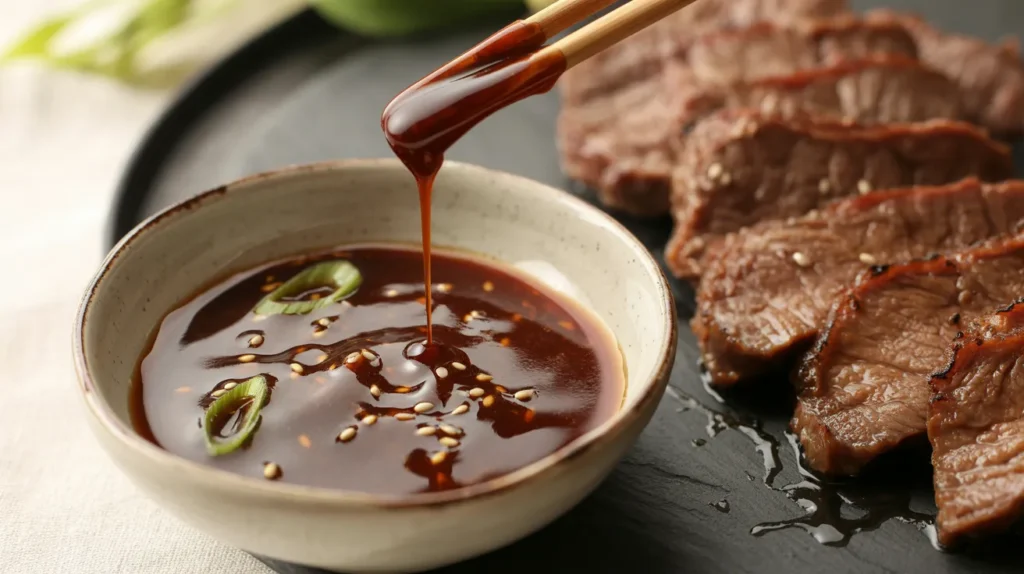
Why This Yakiniku Sauce Will Elevate Your Grilled Meats
Ever taken a bite of grilled meat that was good but missing that special something? That’s where Yakiniku Sauce comes in. This Japanese BBQ sauce creates a flavor explosion that turns ordinary grilled meats into an unforgettable meal.
Making Yakiniku Sauce at home gives you complete control over the ingredients—no preservatives or mystery additives, just pure, authentic flavor. Restaurant versions might be expensive, but this homemade Yakiniku Sauce recipe delivers rich taste at a fraction of the cost. The best part? Most ingredients are probably sitting in your pantry right now.
This Yakiniku Sauce recipe makes enough for 4 people to enjoy with their favorite grilled meats. The deep umami flavor perfectly complements beef, chicken, and even vegetables. Once you try it, store-bought sauces will never satisfy you again!
Nutrition Comparison: Homemade vs. Store-Bought Yakiniku Sauce
| Nutrient | Homemade Yakiniku Sauce (2 Tbsp) | Store-Bought Yakiniku Sauce (2 Tbsp) |
|---|---|---|
| Calories | 45 | 70 |
| Sugar | 6g | 12g |
| Sodium | 450mg | 680mg |
| Preservatives | None | 2-3 types |
| Cost | $0.75 per serving | $2.50 per serving |
What You’ll Need For Perfect Yakiniku Sauce
Ingredients
| Ingredient | Amount | Notes |
|---|---|---|
| Soy sauce | 1/4 cup | Low-sodium works too |
| Mirin | 2 tablespoons | Sweet rice wine adds authentic flavor |
| Sake | 2 tablespoons | Cooking sake is perfectly fine |
| Brown sugar | 2 tablespoons | Packed for best measurement |
| Rice vinegar | 1 tablespoon | Adds essential tanginess |
| Sesame oil | 2 teaspoons | Toasted variety preferred for depth |
| Garlic | 2 cloves, minced | Fresh provides the best flavor |
| Ginger | 1 teaspoon, grated | Fresh root, not powdered |
| Apple | 2 tablespoons, grated | Adds natural sweetness and tenderizing enzymes |
| White pepper | 1/4 teaspoon | For subtle heat without changing color |
| Sesame seeds | 1 teaspoon | For garnish and texture |
| Green onion | 1 tablespoon, chopped | For fresh garnish |
Kitchen Tools For Yakiniku Sauce Preparation
| Tool | Purpose |
|---|---|
| Small saucepan | For combining and simmering ingredients safely |
| Measuring spoons | For accurate measurements of small quantities |
| Measuring cups | For precise measurement of liquid ingredients |
| Microplane/grater | For finely grating ginger and apple |
| Garlic press | Optional, makes mincing garlic much easier |
| Glass jar | For proper storage of finished sauce |
| Whisk | For thoroughly mixing ingredients without lumps |
| Sharp knife | For chopping garnishes |
| Cutting board | Safe surface for preparation |
Optional Substitutions For Yakiniku Sauce
Can’t find some ingredients? Here are beginner-friendly substitutions:
- Mirin: Substitute with 1 tablespoon rice vinegar + 1 tablespoon sugar
- Sake: Use dry white wine or chicken broth in equal amount
- Brown sugar: Honey or maple syrup (use 1.5 tablespoons)
- Fresh garlic/ginger: 1/2 teaspoon powder each, but fresh is much better!
- Apple: Pear or applesauce (2 tablespoons)
- Need a similar alternative with different flavors? Try Hoisin Sauce for a Chinese-inspired option with your grilled meats.
Yakiniku Sauce Prep Time & Planning
- Prep Time: 5 minutes
- Cook Time: 10 minutes
- Total Time: 15 minutes
- Servings: 4 (about 3/4 cup total)
- Storage: Refrigerate up to 2 weeks
Detailed Yakiniku Sauce Step-by-Step Instructions
Preparation Phase
- Gather all ingredients and measure them out before starting. This beginner-friendly approach prevents mistakes during cooking.
- Place all ingredients on your counter where you can see them
- Check expiration dates on all bottled ingredients (especially soy sauce and mirin)
- Set out measuring spoons and cups
- Make sure your work area is clean and organized with enough space
- Prepare your cooking area:
- Place your small saucepan on the stove (don’t turn it on yet)
- Have a heat-resistant spoon or whisk nearby
- Clear counter space for cooling the sauce later
- Have your storage container washed and ready
- Prepare fresh ingredients:
- For garlic: Place garlic cloves on cutting board
- Remove papery skin by pressing with the flat side of knife
- Cut off the hard end of each clove
- Mince into very small pieces (1-2mm) with a sharp knife
- If using a garlic press, simply press peeled cloves through
- For ginger:
- Use a spoon to scrape skin off a small piece of ginger
- Using the finest side of your grater/microplane, grate exactly 1 teaspoon
- Watch your fingertips when you get close to the end!
- For apple:
- Wash apple thoroughly
- Cut apple in half and remove core with a small knife
- Grate 2 tablespoons with the medium side of grater
- Measure exactly – too much will make sauce too sweet
- For green onions:
- Rinse under cold water
- Remove any wilted outer layer and root end
- Chop into small rings about 1-2mm thick
- Measure 1 tablespoon after chopping
- For garlic: Place garlic cloves on cutting board
Cooking Phase
- Combine base liquid ingredients in your small saucepan:
- Pour in exactly 1/4 cup soy sauce (use a measuring cup, not just eyeball it)
- Add 2 tablespoons mirin (use measuring spoon)
- Add 2 tablespoons sake (use measuring spoon)
- Add 1 tablespoon rice vinegar (use measuring spoon)
- Add sweetener and aromatics:
- Add 2 tablespoons brown sugar (pack it into measuring spoon)
- Add your minced garlic (all 2 cloves)
- Add your grated ginger (full teaspoon)
- Add your grated apple (2 tablespoons)
- Add white pepper (1/4 teaspoon – don’t substitute black pepper as it changes appearance)
- Whisk everything together thoroughly for at least 30 seconds until sugar begins to dissolve
- Begin cooking process:
- Place saucepan over medium heat (not high!)
- Wait for small bubbles to form around the edges (about 2-3 minutes)
- Important beginner tip: Do not walk away during this time – sauces can quickly boil over
- If bubbles form too quickly, immediately reduce heat
- Simmer and reduce your Yakiniku Sauce:
- Once small bubbles appear consistently, lower heat to medium-low
- You want a gentle simmer, not a rolling boil
- Watch for these signs: small bubbles, slight steam, gentle movement
- Stir with whisk or spoon every 2 minutes to prevent burning
- Simmer for exactly 7-10 minutes (set a timer!)
- You’ll know it’s thickened enough when it coats the back of a spoon – draw your finger through the sauce on the spoon; if the line stays clear, it’s ready
- Too thin: Sauce runs off spoon quickly like water
- Perfect: Sauce coats spoon and leaves clear path when you draw finger through
- Too thick: Sauce is syrupy and doesn’t pour easily
- Finish the Yakiniku Sauce:
- Remove from heat completely
- Add sesame oil (2 teaspoons) – measure exactly, as too much will overpower
- Stir well to incorporate – about 10-15 circular motions
- Allow to cool for 5 minutes – sauce will thicken slightly more as it cools
- Safety tip for beginners: The pan and sauce are still very hot! Use caution.
Serving & Finishing Your Yakiniku Sauce
- Prepare for serving:
- You can use the sauce warm or cooled
- If serving immediately:
- Transfer to a small serving bowl with a pouring lip if possible
- Sprinkle with sesame seeds (1 teaspoon)
- Sprinkle with chopped green onions (1 tablespoon)
- If storing for later use:
- Allow to cool completely (15-20 minutes)
- Transfer to clean glass jar with tight-fitting lid
- Label with date made
- Refrigerate immediately
- How to use your Yakiniku Sauce:
- For dipping: Pour small amounts into individual dipping bowls
- For basting: Use a cooking brush to apply to meats in final minutes of grilling
- For marinating: Mix 1 part sauce with 1 part oil and marinate meat for 2-4 hours
Troubleshooting Your Yakiniku Sauce
| Problem | Cause | Solution |
|---|---|---|
| Sauce is too thin | Not simmered long enough | Return to heat and simmer 3-5 minutes more, watching carefully |
| Sauce is too thick | Overcooked or reduced too much | Add 1-2 teaspoons water and stir until desired consistency |
| Too salty | Too much soy sauce or reduced too far | Add 1 teaspoon sugar and 1 tablespoon water, stir well |
| Too sweet | Too much sugar or apple | Add 1 teaspoon rice vinegar or a few drops of lemon juice |
| Burned flavor | Heat too high during cooking | Unfortunately, you’ll need to start fresh and watch heat carefully |
| Separated sauce | Normal after refrigeration | Shake or stir well before using |
| Crystallized sugar | Sugar not fully dissolved | Gently reheat while stirring |
Yakiniku Sauce Variations & Substitutions
Spicy Yakiniku Sauce
- Add 1-2 teaspoons of gochujang paste or sriracha
- Include 1/4 teaspoon red pepper flakes
- Perfect with beef and pork
Citrus Yakiniku Sauce
- Add 1 tablespoon of orange or yuzu juice
- Include 1/2 teaspoon of orange or yuzu zest
- Excellent with chicken and fish
Pineapple Yakiniku Sauce
- Replace apple with 2 tablespoons crushed pineapple
- Add 1/2 teaspoon pineapple juice
- Great with ham and chicken
Looking for another Japanese sauce option? Tonkatsu Sauce offers a thicker, more Worcestershire-like flavor profile that’s perfect for breaded cutlets!
Yakiniku Sauce Storage & Reheating Guidelines
Storage Guidelines
- Cool completely before storing (15-20 minutes minimum)
- Transfer to an airtight glass container with a tight-fitting lid
- Refrigerate for up to 2 weeks
- Do not freeze as texture changes when thawed and ingredients may separate
- Keep away from strong-smelling foods in refrigerator
Reheating Instructions
- Remove from refrigerator 15 minutes before using
- If sauce has separated (oil floating on top), this is normal
- Stir well for 10-15 seconds before serving to recombine ingredients
- Can be served cold or gently rewarmed in microwave (15 seconds at 50% power)
- If too thick after refrigeration, add 1/2 teaspoon water and stir
Yakiniku Sauce Safety Notes & Tips
Food Safety
- Always use clean utensils when handling the sauce
- Never double-dip utensils that have touched raw meat
- Never return used sauce to your storage container
- If sauce develops an off smell, unusual color, or mold, discard immediately
- Keep refrigerated below 40°F (4°C)
Pro Tips for Perfect Yakiniku Sauce
- Make ahead: Flavors improve dramatically after 24 hours in the refrigerator
- Double batch: This recipe doubles easily for larger gatherings
- Consistency matters: The sauce should be pourable but thick enough to cling to meat
- Quality ingredients: Use the best soy sauce you can afford for superior flavor
- Fresh aromatics: Fresh garlic and ginger make a noticeable difference
- Meal prep: Make on Sunday for use throughout the week
- For an Indian-inspired alternative to pair with grilled meats, try Tandoori Sauce for a completely different but equally delicious experience!
Perfect Pairings For Your Yakiniku Sauce
Yakiniku Sauce shines when served with:
- Thinly sliced beef (ribeye, short rib, flank steak)
- Pork belly or pork shoulder slices
- Chicken thighs (boneless, skin-on for best results)
- Firm tofu (press water out first, then grill)
- Grilled vegetables (especially mushrooms, zucchini, eggplant, and bell peppers)
- Grilled rice balls (brush on after grilling)
Frequently Asked Questions About Yakiniku Sauce
Q: Can I make this Yakiniku Sauce vegan? A: Yes! Just ensure your mirin is vegan-friendly (some contain fish products).
Q: How long can I store homemade Yakiniku Sauce? A: Up to 2 weeks in an airtight container in the refrigerator.
Q: Why add apple to the Yakiniku Sauce? A: Apple adds natural sweetness and helps tenderize meat when used as a marinade.
Q: Is this Yakiniku Sauce gluten-free? A: Not with regular soy sauce. Use tamari or certified gluten-free soy sauce to make it gluten-free.
Q: Can I use this Yakiniku Sauce as a marinade? A: Absolutely! Marinate meat for 2-4 hours before grilling for extra flavor.
Q: What makes Yakiniku Sauce different from teriyaki sauce? A: Yakiniku Sauce is typically thinner, less sweet, and more complex with deeper umami notes than teriyaki sauce.