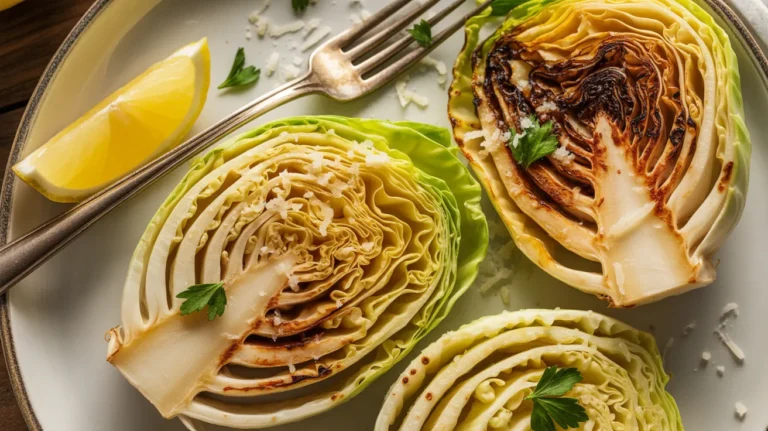
This Za’atar Roasted Cauliflower transforms simple vegetables into a Middle Eastern masterpiece. Golden edges meet aromatic spices in this easy weeknight side that tastes like it came from your favorite restaurant. Perfect for anyone who wants Za’atar Roasted Cauliflower that’s crispy, flavorful, and ready in under an hour.
SERVES: 4 | PREP: 15 MIN | COOK: 35 MIN | TOTAL: 50 MIN
What Makes This Za’atar Roasted Cauliflower Special
You’re about to make cauliflower that even cauliflower skeptics will devour. The za’atar spice blend creates these incredible layers of flavor—tangy sumac, earthy thyme, and toasty sesame seeds all working together. High-heat roasting turns the florets golden brown and crispy on the edges while keeping them tender inside.
This recipe beats plain roasted vegetables every time. The cauliflower gets tossed in olive oil and za’atar before hitting a hot oven. Simple technique, restaurant-quality results.
Ingredients You’ll Need
For the Cauliflower Base
| Ingredient | Amount | Notes |
|---|---|---|
| Cauliflower head | 1 large (about 2 lbs) | Fresh, firm florets |
| Extra virgin olive oil | ¼ cup | Don’t skimp here |
| Za’atar spice blend | 3 tablespoons | Store-bought or homemade |
| Kosher salt | 1 teaspoon | Adjust to taste |
| Black pepper | ½ teaspoon | Freshly ground |
| Garlic cloves | 4 large | Minced or pressed |
| Lemon juice | 2 tablespoons | Fresh squeezed only |
For the Finishing Touch
| Ingredient | Amount | Notes |
|---|---|---|
| Fresh parsley | ¼ cup | Chopped |
| Sesame seeds | 2 tablespoons | Toasted |
| Lemon wedges | 4 pieces | For serving |
| Flaky sea salt | To taste | Optional but recommended |
Step-by-Step Instructions
Phase 1: Prep Work (10 minutes)
Step 1: Set your oven to 425°F and let it heat up completely. This high temperature creates those crispy, caramelized edges you’re looking for. A properly preheated oven makes all the difference between soggy and crispy cauliflower.
Step 2: Line your largest baking sheet with parchment paper. The paper prevents sticking and makes cleanup a breeze. If you’re doubling the recipe, use two sheets—crowding the pan creates steam instead of roasting.
Step 3: Remove the green leaves from your cauliflower head. Turn it upside down and cut out the tough core at an angle. Break the head into florets about 1½ inches wide. Size matters here—too small and they’ll burn, too large and they won’t cook through.
Step 4: Check each floret. They should be similar sizes so everything cooks evenly. If you have some larger pieces, slice them in half lengthwise. You want every piece to have at least one flat side for maximum contact with the pan.
Phase 2: Building Flavor (5 minutes)
Step 5: Drop all your cauliflower florets into your biggest mixing bowl. You need room to toss them without pieces flying everywhere. A large bowl makes coating much easier.
Step 6: Pour the olive oil over the florets. Use good quality oil—it carries all those spice flavors and helps with browning. Don’t hold back on the oil or your cauliflower will taste dry.
Step 7: Sprinkle the za’atar, salt, and pepper over the oiled cauliflower. Add your minced garlic now too. The raw garlic will mellow and sweeten as it roasts, becoming almost nutty.
Step 8: Get your hands in there and toss everything together. Mix for a full minute, making sure every floret gets coated with the spice mixture. You want to see za’atar clinging to all sides of each piece.
Phase 3: Roasting Magic (35 minutes)
Step 9: Spread your seasoned cauliflower on the prepared baking sheet in a single layer. Leave space between florets—about ½ inch gaps. Crowded vegetables steam instead of roast. If pieces are touching, they won’t get crispy.
Step 10: Slide the pan into your preheated oven on the middle rack. Set a timer for 15 minutes. This first phase starts the cooking process and begins caramelization.
Step 11: After 15 minutes, pull out the pan and flip each floret with a spatula. The bottoms should be starting to brown. If they’re still pale, your oven wasn’t hot enough. Check those flat sides—they should look golden.
Step 12: Return the pan to the oven. Roast for another 15 minutes without opening the door. Steam escapes every time you peek, which slows down the crisping process.
Step 13: Check again at the 30-minute mark. The cauliflower should be deeply golden brown with some dark crispy edges. Pierce a floret with a fork—it should slide in easily but the floret should still hold its shape.
Step 14: If the edges aren’t dark enough yet, give it 5 more minutes. Watch closely during this final stage because the line between perfectly roasted and burnt is thin.
Phase 4: Finishing Touches (2 minutes)
Step 15: Remove your pan from the oven. Immediately drizzle the fresh lemon juice over the hot cauliflower. The citrus brightens all those earthy spices and cuts through the richness.
Step 16: Transfer the cauliflower to your serving platter. Use a spatula to scrape up any crispy bits stuck to the parchment—those are flavor gold.
Step 17: Sprinkle the fresh parsley and toasted sesame seeds over the top. The green herbs add freshness and the sesame seeds give extra crunch.
Step 18: Finish with a pinch of flaky sea salt if you’re using it. The large crystals add texture and little bursts of saltiness. Serve immediately with lemon wedges on the side.
Chef’s Notes
Temperature Control: Your oven temperature makes or breaks this Za’atar Roasted Cauliflower. If your oven runs cool, bump it up to 450°F. An oven thermometer is your friend here—many home ovens are off by 25 degrees or more.
Za’atar Quality: Not all za’atar blends taste the same. Look for one with visible sesame seeds and a greenish color from the herbs. Fresh za’atar smells intensely aromatic. Old, stale spices won’t give you the flavor punch you’re after.
Oil Matters: Extra virgin olive oil isn’t just for drizzling. Its fruity flavor complements the Middle Eastern spices perfectly. Regular vegetable oil works if that’s what you have, but the flavor won’t be as rich.
Timing Flexibility: Your cauliflower might cook faster or slower depending on floret size and oven quirks. Start checking at 25 minutes if you cut your pieces smaller. The goal is deep brown edges with tender centers, not specific timing.
Nutrition Information (Per Serving)
Calories: 185
Protein: 4g
Carbohydrates: 12g
Fat: 15g
Fiber: 5g
Sodium: 625mg
Delicious Variations to Try
Spicy Harissa Version: Mix 2 tablespoons of harissa paste with your olive oil before tossing. The North African chili paste adds heat and depth. If you love bold flavors like our Tennessee Onions, this version is calling your name.
Tahini Drizzle: Whisk ¼ cup tahini with 2 tablespoons lemon juice and water until it’s pourable. Drizzle over the finished cauliflower. The creamy sesame sauce adds richness and makes this hearty enough for a light meal.
Maple-Glazed Twist: Toss the roasted cauliflower with 2 tablespoons maple syrup in the last 5 minutes of cooking. Sweet and savory plays beautifully here, similar to how Chili Maple Brussels Sprouts balance those flavors.
Greek-Style: Swap za’atar for dried oregano and add crumbled feta cheese when you pull it from the oven. Finish with fresh dill and extra lemon. This Mediterranean take is lighter but equally crave-worthy.
Storage & Reheating
Refrigerator: Store cooled cauliflower in an airtight container for up to 4 days. The flavors actually deepen overnight as the za’atar continues seasoning the vegetables.
Reheating: Spread leftovers on a baking sheet and reheat at 400°F for 8-10 minutes. The microwave makes them soggy—the oven brings back that crispy texture. You can also eat them cold in salads or grain bowls.
Freezing: Not recommended. Frozen and thawed cauliflower turns mushy and loses its crispy edges. This recipe is best enjoyed fresh or within a few days of making it.
Make-Ahead: Cut and season your cauliflower up to 4 hours ahead. Keep it covered in the fridge. When ready to cook, spread it on your pan and roast as directed. No need to bring it to room temperature first.
Troubleshooting Common Problems
Problem: Cauliflower is burnt on the outside but raw inside
Solution: Your florets were too large. Cut them smaller next time—no bigger than 1½ inches. You can also lower the oven to 400°F and cook longer for more even results.
Problem: Everything is soggy instead of crispy
Solution: Three likely culprits here. First, your pan was overcrowded—use two pans if needed. Second, you didn’t preheat the oven long enough. Third, you used wet cauliflower—always pat it completely dry after washing.
Problem: Za’atar tastes bitter
Solution: Your spice blend is old or your oven was too hot. Za’atar contains thyme and sumac, which can taste bitter when burnt. Check the expiration date on your spices and make sure your oven temperature is accurate.
Problem: Cauliflower is bland
Solution: You either didn’t use enough za’atar or forgot the salt. This recipe needs a full 3 tablespoons of za’atar and a full teaspoon of salt to shine. Don’t be shy with seasonings—cauliflower can handle bold flavors.
Problem: Garlic is burning
Solution: Your minced garlic was too small or you added it too early. Try slicing the garlic instead of mincing it, or add it halfway through roasting. Whole smashed cloves work great too and won’t burn as easily.
Equipment Essentials

Large Baking Sheet: A heavy, rimmed sheet pan works best. Thin pans buckle at high heat and cause uneven cooking.
Parchment Paper: Prevents sticking and eliminates scrubbing burnt-on bits. Silicone baking mats work too.
Large Mixing Bowl: You need room to toss everything without making a mess. A 4-quart bowl minimum.
Sharp Knife: A dull knife crushes cauliflower instead of cutting it cleanly. Sharp blade, clean cuts.
Metal Spatula: For flipping florets halfway through. Plastic spatulas can melt at high temperatures.
Oven Thermometer: Optional but helpful for verifying your actual oven temperature matches the dial.
Shopping List by Store Section
Produce Section:
- 1 large cauliflower head (2 lbs)
- 1 garlic bulb
- 2 lemons
- Fresh parsley bunch
Spice Aisle:
- Za’atar spice blend
- Kosher salt
- Black pepper
- Sesame seeds
Oil & Vinegar:
- Extra virgin olive oil
Specialty/International:
- Flaky sea salt (if not in spice aisle)
5 Success Secrets from the Pros
1. Dry Your Cauliflower Completely
Water is the enemy of crispy vegetables. After washing, spread florets on a kitchen towel for 10 minutes before seasoning. Even better, skip washing if your cauliflower looks clean—just wipe it with a damp cloth.
2. Cut One Flat Side on Each Floret
Professional chefs always ensure each piece has a flat surface to sit on the pan. That flat side gets the most contact with the hot pan, creating maximum caramelization and crunch.
3. Don’t Skip the Flip
Flipping halfway through isn’t optional. It ensures even browning on multiple sides and prevents burning. Set a timer so you don’t forget this critical step.
4. Use the Bottom Oven Rack for Extra Crispy
If you want even crispier edges, move your pan to the lowest rack for the last 5 minutes. The bottom heat source intensifies the browning. Watch carefully so it doesn’t burn.
5. Let It Rest on the Pan for 2 Minutes
After pulling from the oven, leave the cauliflower on the hot pan briefly. Those final moments continue cooking and crisping the bottoms without drying out the florets.
This Za’atar Roasted Cauliflower proves that simple vegetables can steal the show. The combination of high heat and aromatic spices turns everyday cauliflower into something special enough for company. Make it once and it’ll become your go-to side dish for everything from weeknight dinners to holiday tables.