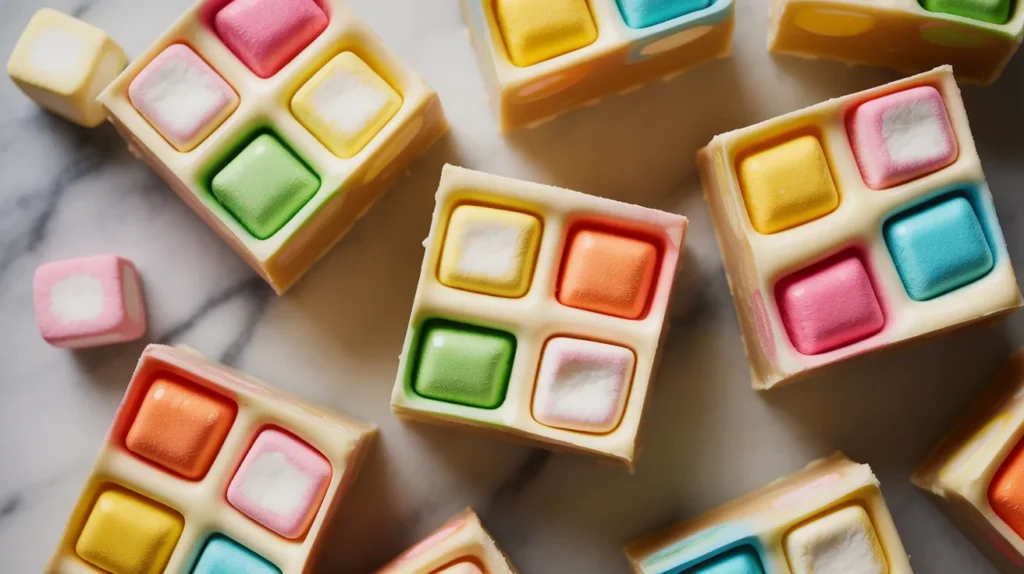
This stained glass fudge is hands-down one of the prettiest desserts you’ll ever make—and the easiest. When you cut through that glossy white chocolate, you’ll reveal gorgeous jewel-toned marshmallows suspended like actual stained glass. I’ve been making this stained glass fudge for years at holidays, and people always ask for the recipe because it looks so fancy but takes just 15 minutes of active work.
SERVES: 4 | PREP: 15 MIN | COOK: 5 MIN | TOTAL: 20 MIN (plus 2-3 hours chilling)
Ingredients
Base Layer
| Ingredient | Amount |
|---|---|
| White chocolate chips | 3 cups (18 oz) |
| Sweetened condensed milk | 1 can (14 oz) |
| Vanilla extract | 2 teaspoons |
| Salt | ¼ teaspoon |
Stained Glass Element
| Ingredient | Amount |
|---|---|
| Colored mini marshmallows | 4 cups (or fruit-flavored marshmallows) |
| Butter (for greasing) | 1 tablespoon |
Step-by-Step Instructions
Phase 1: Pan Preparation (2 minutes)
Step 1: Line an 8×8-inch baking pan with parchment paper, letting it hang over the edges by about 2 inches on each side. These “handles” will make removing your fudge super easy later. Take your 1 tablespoon of butter and lightly grease the parchment paper—this prevents any sticking and gives you that perfect clean cut when slicing.
Step 2: Scatter your 4 cups of colored mini marshmallows across your workspace. Check each marshmallow color to make sure they’re evenly distributed—you want a good mix of colors in every slice of your stained glass fudge. If one color is dominating, separate them into small piles. This might seem fussy, but trust me, it makes the final presentation stunning.
Phase 2: Creating the White Chocolate Base (8 minutes)
Step 3: Place a medium saucepan on the stove over low heat—and I mean truly low. White chocolate is incredibly temperamental and will seize up (turn grainy and clumpy) if you rush this step. Pour in your 3 cups of white chocolate chips.
Step 4: Add the entire 14-ounce can of sweetened condensed milk to the chocolate chips. Don’t turn up the heat yet! The condensed milk needs to warm gradually with the chocolate. Stir constantly with a silicone spatula, making sure to scrape the bottom and corners of the pan where chocolate loves to stick and burn.
Step 5: Keep stirring for about 5-7 minutes until the chocolate completely melts. You’ll know it’s ready when the mixture becomes completely smooth with no lumps, and it coats the back of your spatula in a glossy, even layer. The mixture should look like thick, pourable cream. If you see any grainy bits, keep stirring over low heat—don’t increase the temperature.
Step 6: Remove the pan from heat immediately once smooth. Add your 2 teaspoons of vanilla extract and ¼ teaspoon of salt. The salt is crucial—it balances the sweetness and makes the flavors pop. Stir vigorously for about 30 seconds until the vanilla is completely incorporated. You should smell that beautiful vanilla aroma rising from the pan.
Phase 3: Assembling the Stained Glass Effect (5 minutes)
Step 7: Working quickly now (the mixture starts to firm up as it cools), add your 4 cups of marshmallows directly into the white chocolate mixture. Here’s the technique: don’t stir aggressively. Use a folding motion with your spatula, gently lifting from the bottom and turning the mixture over itself. You want the marshmallows to stay whole and intact—that’s what creates the stained glass effect.
Step 8: Fold gently for about 1-2 minutes until every marshmallow is coated with white chocolate, but you can still see their distinct colors and shapes. If you overmix, the marshmallows will start to melt and blend together, losing that sharp, jewel-like appearance we’re going for.
Step 9: Pour the entire mixture into your prepared pan. Use your spatula to spread it evenly into the corners, but resist the urge to press down hard. Light pressure is all you need—pressing too hard crushes the marshmallows and ruins the stained glass look. The surface should be relatively level but doesn’t need to be perfectly smooth.
Step 10: Here’s a professional trick: take a small offset spatula or the back of a spoon, dip it in cold water, and gently smooth the top surface. The water prevents sticking and gives you that beautiful, glossy finish you see in candy shops.
Phase 4: Setting and Cutting (2-3 hours passive time)
Step 11: Place your pan in the refrigerator, uncovered, for 2-3 hours until completely firm. Don’t cover it during the first hour—condensation can form and make the surface sticky. After the first hour, you can loosely cover with plastic wrap if needed. The fudge should feel solid to the touch and not leave an indentation when you gently press the surface.
Step 12: When ready to cut, grab those parchment paper “handles” and lift the entire block of stained glass fudge out of the pan in one smooth motion. Place it on a cutting board. If it’s been in the fridge for more than 3 hours and feels too hard, let it sit at room temperature for 5-10 minutes to make cutting easier.
Step 13: Use a large, sharp knife for cutting. Here’s the secret to perfect squares: run your knife under hot water, dry it completely, then make one cut. Clean the knife, run it under hot water again, dry it, and make the next cut. This warm, clean knife technique prevents the fudge from cracking and gives you those sharp, professional edges that really showcase the stained glass effect.
Step 14: Cut the fudge into 16 squares (4 rows by 4 rows). Each piece will serve one person, giving you a nice 4-serving batch with some extra for sampling. As you cut, you’ll see those gorgeous marshmallow “gems” suspended in the white chocolate—that’s your stained glass fudge masterpiece!
Chef’s Notes
Temperature Control is Everything: White chocolate melts at a lower temperature than regular chocolate (around 110°F), so keeping your heat low prevents that grainy, seized texture. If your chocolate does seize, try whisking in 1 teaspoon of vegetable oil to bring it back together.
Marshmallow Quality Matters: I’ve tested this stained glass fudge with budget marshmallows and premium brands, and the premium ones hold their shape better and provide brighter colors. The slightly higher cost is worth it for the visual impact.
Fresh is Best: Make sure your marshmallows are fresh, not stale. Stale marshmallows are hard and won’t give you that soft, chewy contrast against the smooth fudge. Squeeze a marshmallow—it should bounce back immediately.
Presentation Perfect: When gifting, wrap individual squares in clear cellophane so people can see those beautiful colors through the wrapper. The stained glass effect is your biggest selling point!
Nutrition Information (Per Serving)
- Calories: 485
- Protein: 6g
- Carbohydrates: 71g
- Fat: 20g
- Saturated Fat: 12g
- Sugar: 64g
- Fiber: 0g
- Sodium: 125mg
Based on 4 servings (4 squares per serving)
Creative Variations
Peppermint Stained Glass Fudge: Replace regular marshmallows with peppermint-flavored marshmallows and add ½ teaspoon of peppermint extract to the white chocolate base. This creates a refreshing twist perfect for winter holidays. The cool mint flavor cuts through the sweetness beautifully.
Chocolate Drizzle Variation: Once your stained glass fudge is set and cut, melt ½ cup of dark chocolate chips and drizzle thin lines across the top of each square. The dark chocolate provides a sophisticated contrast and adds a slightly bitter note that balances the sweetness. If you love chocolate variations, try this salted caramel fudge for another impressive treat.
Fruity Rainbow Version: Use fruit-flavored mini marshmallows (strawberry, grape, orange, lemon) instead of traditional colored ones. The fruit flavors add an extra dimension beyond just the visual appeal, making each bite taste slightly different depending on which marshmallow you hit.
Nutty Texture Addition: Fold in 1 cup of chopped toasted pecans or walnuts along with the marshmallows. The nuts add a crunchy element that contrasts beautifully with the smooth fudge and soft marshmallows. This makes it feel more substantial and less candy-like. For simpler fudge options, check out this 3-ingredient fudge that’s equally impressive.
Storage & Reheating
Room Temperature Storage: Keep your stained glass fudge in an airtight container at room temperature for up to 5 days. Layer parchment paper between stacks to prevent sticking. The fudge maintains its texture best at 65-70°F—warmer and it gets too soft, cooler and it becomes too hard.
Refrigerator Storage: For longer storage, refrigerate in an airtight container for up to 3 weeks. Let pieces come to room temperature for 15-20 minutes before serving for the best texture and flavor. Cold fudge is harder and less enjoyable to eat.
Freezer Storage: Wrap individual pieces tightly in plastic wrap, then place in a freezer-safe container. Freeze for up to 2 months. Thaw in the refrigerator overnight, then bring to room temperature before serving. The marshmallows might lose a tiny bit of their bounce after freezing, but the flavor remains excellent.
Humidity Warning: In humid environments, the fudge can become sticky on the surface. If this happens, dust lightly with powdered sugar just before serving. Store in the coolest, driest spot in your kitchen.
Troubleshooting Guide
Problem: My white chocolate seized and became grainy
Solution: This happens when chocolate gets too hot or when water gets into the mixture. Next time, use lower heat and make sure all utensils are completely dry. To salvage seized chocolate, try whisking in 1 tablespoon of vegetable oil or shortening over very low heat until smooth again.
Problem: The marshmallows melted instead of staying whole
Solution: Your white chocolate mixture was too hot when you added the marshmallows. Let the chocolate mixture cool for 2-3 minutes after removing from heat before folding in marshmallows. The mixture should still be pourable but not steaming hot.
Problem: My fudge won’t set properly, it’s still soft after 3 hours
Solution: This usually means your white chocolate to condensed milk ratio was off, or you didn’t cook the mixture long enough. Make sure you’re using full-fat sweetened condensed milk, not evaporated milk. Put it back in the fridge for another 2-3 hours. It should eventually set, though it might be slightly softer than ideal.
Problem: The fudge is cracking when I try to cut it
Solution: The fudge is too cold. Let it sit at room temperature for 10-15 minutes to warm slightly. Also, use the hot water knife method described in Step 13—this makes an enormous difference in getting clean cuts without cracks.
Problem: My colors all blended together and look muddy instead of distinct
Solution: You overmixed the marshmallows into the white chocolate. Remember, we’re folding gently, not stirring vigorously. The marshmallows should maintain their individual shapes and colors. You want to see distinct “gems” of color suspended in white, not a swirled mess.
Equipment Essentials
- 8×8-inch baking pan (metal or glass)
- Parchment paper (for easy removal)
- Medium saucepan (2-3 quart capacity)
- Silicone spatula (heat-resistant)
- Large sharp knife (for clean cuts)
- Cutting board
- Measuring cups and spoons
- Offset spatula or spoon (for smoothing)
Shopping List by Store Section
Baking Aisle:
- White chocolate chips (18 oz bag)
- Vanilla extract (2 teaspoons needed)
Canned Goods Aisle:
- Sweetened condensed milk (14 oz can)
Candy/Snack Aisle:
- Colored mini marshmallows (one 10 oz bag)
Spices:
- Salt (if you don’t have at home)
Dairy Section:
- Butter (1 tablespoon for greasing)
Paper Products:
- Parchment paper (if you don’t have at home)
Success Secrets
1. Temperature Precision: Keep your heat on the lowest setting possible when melting white chocolate. I actually turn my burner to medium-low, wait for the pan to warm, then drop it down to low. Patience here prevents that grainy disaster that ruins stained glass fudge.
2. Marshmallow Distribution Strategy: Before you even start cooking, sort your marshmallows by color into small bowls. When you fold them into the chocolate, alternate colors as you add them. This ensures every square has a balanced rainbow effect rather than clusters of one color.
3. The Cold Knife is Your Enemy: Always use a hot, clean knife for each cut. I keep a tall glass of hot water next to my cutting board and dip-dry-cut-repeat. This single technique transforms amateur-looking squares into professional confection shop quality.
4. Time Your Assembly: Don’t answer your phone or multitask during the marshmallow folding phase. You have about 3-4 minutes of working time before the mixture starts to set. Work steadily but calmly, and have everything you need within arm’s reach.
5. Visual Quality Check: Before refrigerating, look at your pan from above. You should see distinct marshmallow shapes in various colors against the white background. If it looks like a homogeneous mass, you overmixed. You can actually pick out and rearrange a few marshmallows on the surface right after pouring if you need to improve the visual balance.