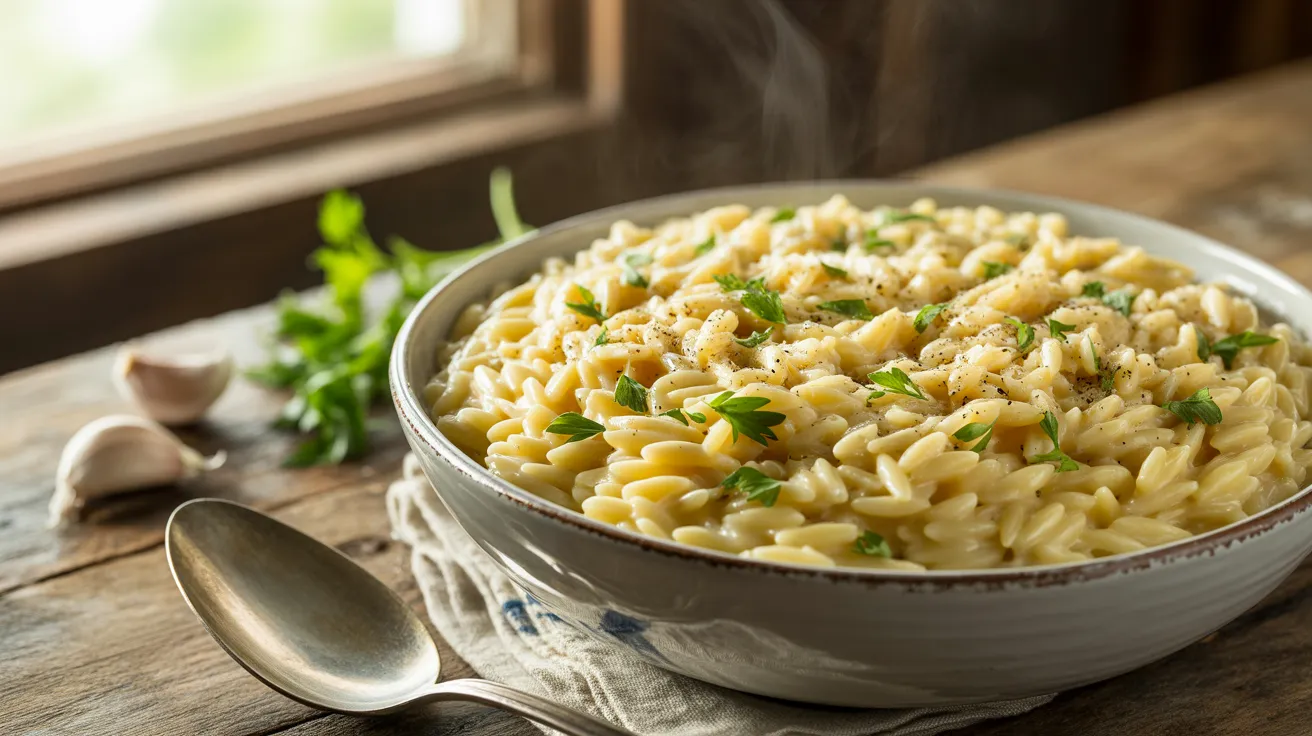
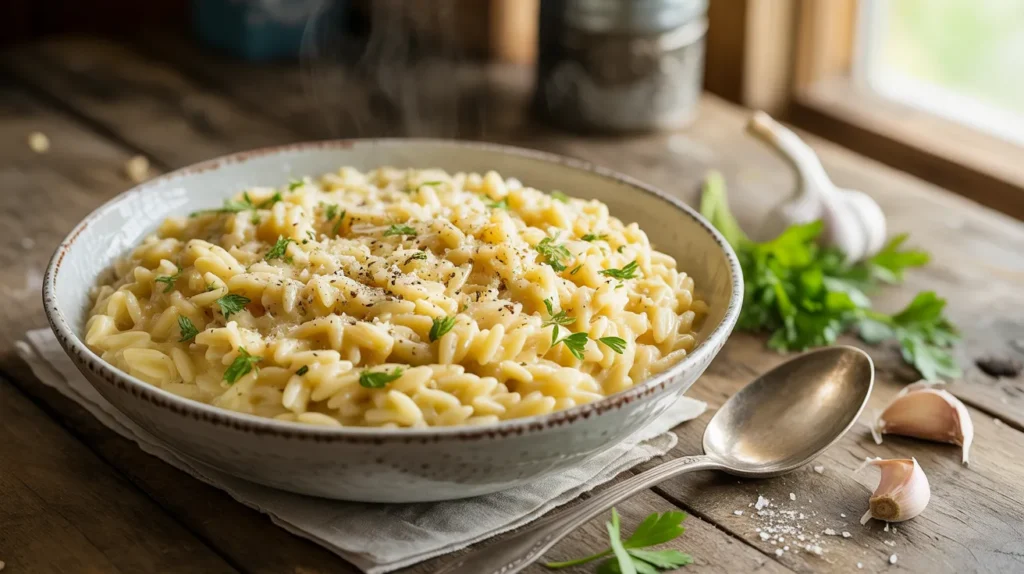
This orzo side dish transforms tiny rice-shaped pasta into something extraordinary with butter, garlic, and parmesan cheese. It’s the perfect complement to any main course and takes just 25 minutes from start to finish. My family requests this orzo side dish every single week because it’s creamy, flavorful, and pairs beautifully with everything from grilled chicken to roasted vegetables.
SERVES: 4 | PREP: 10 MIN | COOK: 15 MIN | TOTAL: 25 MIN
Ingredients
Base Ingredients
| Ingredient | Amount |
|---|---|
| Orzo pasta | 1½ cups |
| Chicken broth | 3 cups |
| Butter | 4 tablespoons |
| Garlic cloves, minced | 4 cloves |
Flavor Components
| Ingredient | Amount |
|---|---|
| Parmesan cheese, freshly grated | 1 cup |
| Heavy cream | ½ cup |
| Fresh parsley, chopped | ¼ cup |
| Fresh lemon juice | 2 tablespoons |
Seasonings
| Ingredient | Amount |
|---|---|
| Salt | 1 teaspoon |
| Black pepper | ½ teaspoon |
| Garlic powder | ½ teaspoon |
| Onion powder | ¼ teaspoon |
Step-by-Step Instructions
Phase 1: Preparation (5 minutes)
Step 1: Measure out 1½ cups of orzo pasta and set aside. This exact amount will give you perfectly portioned servings for four people. Don’t use more or less because the liquid ratio won’t work correctly.
Step 2: Mince 4 garlic cloves as finely as possible. I press mine through a garlic press for the best flavor distribution. Larger pieces will burn when you cook them, so take your time here.
Step 3: Grate 1 cup of parmesan cheese using the fine side of a box grater. Pre-shredded cheese won’t melt as smoothly because it contains anti-caking agents. Fresh is always better for this recipe.
Step 4: Chop ¼ cup of fresh parsley and set aside. You’ll add this at the very end to keep the bright green color vibrant.
Phase 2: Toasting the Orzo (3 minutes)
Step 5: Heat a large skillet or sauté pan over medium heat. Add 2 tablespoons of butter and let it melt completely. The butter should foam but not brown.
Step 6: Add the orzo pasta to the melted butter. Stir constantly for 2-3 minutes until the orzo turns golden brown. You’ll smell a nutty aroma when it’s ready. This toasting step adds incredible depth of flavor that you can’t get any other way.
Step 7: Add the minced garlic to the toasted orzo. Stir constantly for 30 seconds. The garlic should become fragrant but not brown. If it browns, it will taste bitter.
Phase 3: Cooking the Orzo (12 minutes)
Step 8: Pour in 3 cups of chicken broth all at once. The liquid will bubble vigorously when it hits the hot pan. Stir well to scrape up any browned bits from the bottom.
Step 9: Add 1 teaspoon of salt, ½ teaspoon of black pepper, ½ teaspoon of garlic powder, and ¼ teaspoon of onion powder. Stir everything together. These seasonings build layers of flavor that make this dish special.
Step 10: Bring the mixture to a boil over medium-high heat. Once boiling, reduce the heat to medium-low. You want a gentle simmer, not a rolling boil.
Step 11: Cook uncovered for 10-12 minutes, stirring every 2 minutes. The orzo will absorb the broth and become tender. You’ll know it’s done when the pasta is soft and most of the liquid has been absorbed. There should be about ¼ cup of liquid remaining in the pan.
Phase 4: Creating the Creamy Sauce (5 minutes)
Step 12: Remove the pan from heat. This is important because adding cream and cheese to a hot pan can cause them to separate.
Step 13: Stir in ½ cup of heavy cream and the remaining 2 tablespoons of butter. Mix thoroughly until the butter melts completely. The mixture will look soupy at this stage.
Step 14: Add 1 cup of freshly grated parmesan cheese in three additions. After each addition, stir vigorously for 30 seconds before adding more. This method prevents clumping and creates a smooth, creamy sauce.
Step 15: Stir in 2 tablespoons of fresh lemon juice. The acidity brightens all the flavors and cuts through the richness of the cream and cheese.
Step 16: Add the chopped fresh parsley and give everything a final stir. Let the orzo rest for 2 minutes before serving. The sauce will thicken as it sits.
Chef’s Notes
Temperature Control: Keep the heat at medium-low when simmering the orzo. High heat will cause the liquid to evaporate too quickly, leaving you with undercooked pasta. If you notice the liquid disappearing before the orzo is tender, add ¼ cup more broth and continue cooking.
Cheese Quality: The type of parmesan you use makes a massive difference in this orzo side dish. Authentic Parmigiano-Reggiano creates a nutty, complex flavor that pre-grated cheese simply can’t match. I know it costs more, but it’s worth every penny.
Broth Selection: Chicken broth gives the best flavor, but vegetable broth works perfectly for vegetarian guests. Low-sodium broth lets you control the salt level better. If you only have regular broth, reduce the added salt to ½ teaspoon.
Make-Ahead Timing: You can toast the orzo and mince the garlic up to 2 hours ahead. Store them separately at room temperature. Don’t cook the entire dish ahead because orzo continues absorbing liquid as it sits, and you’ll end up with a dry, sticky mess.
Nutrition Information (Per Serving)
Calories: 485 | Protein: 18g | Carbohydrates: 48g | Fat: 24g | Fiber: 2g | Sodium: 890mg | Calcium: 320mg
Creative Variations
Sun-Dried Tomato & Basil Orzo
Add ½ cup of chopped sun-dried tomatoes and ¼ cup of fresh basil in the final step. The tangy tomatoes pair beautifully with the creamy base. This variation tastes amazing alongside grilled chicken, similar to how Tennessee onions complement steak perfectly.
Spinach & Mushroom Orzo
Sauté 2 cups of sliced mushrooms and 2 cups of fresh spinach in 1 tablespoon of butter before adding the orzo. The earthiness of mushrooms adds depth that transforms this simple side into something restaurant-worthy.
Lemon Herb Orzo
Double the lemon juice to 4 tablespoons and add 1 tablespoon of fresh thyme and 1 tablespoon of fresh dill. This bright, herbaceous version works beautifully with seafood or as a lighter summer option.
Bacon & Pea Orzo
Cook 6 strips of bacon until crispy, then crumble and stir in with 1 cup of frozen peas during the last 2 minutes of cooking. The salty bacon and sweet peas create an irresistible combination that kids absolutely love. This hearty variation pairs well with comfort foods like jacket potatoes.
Storage & Reheating
Refrigerator Storage: Transfer cooled orzo to an airtight container. It will keep for 3-4 days in the fridge. The sauce will thicken considerably as it chills, which is completely normal.
Reheating Method: Add 2-3 tablespoons of chicken broth or milk per serving before reheating. Warm in a covered skillet over medium-low heat for 3-4 minutes, stirring frequently. The microwave works too – heat on 50% power in 30-second intervals, stirring between each interval.
Freezing: I don’t recommend freezing this orzo side dish because cream-based sauces separate and become grainy when thawed. The texture just won’t be the same.
Serving Temperature: This dish tastes best served warm, not piping hot. Let it rest for 2-3 minutes after cooking so the sauce can thicken to the perfect consistency.
Troubleshooting Common Problems
Problem 1: Orzo Is Mushy or Overcooked
Solution: You cooked it too long or at too high a temperature. Orzo only needs 10-12 minutes of simmering. Set a timer and check it at the 10-minute mark. The pasta should be tender but still have a slight bite. If your orzo regularly overcooks, reduce the heat and check it 2 minutes earlier next time.
Problem 2: Sauce Is Too Thick and Clumpy
Solution: You either didn’t have enough liquid remaining when you added the cream and cheese, or you added the cheese while the pan was too hot. To fix it, stir in ¼ cup of warm broth or cream until you reach the desired consistency. Always remove the pan from heat before adding dairy products.
Problem 3: Cheese Won’t Melt Smoothly
Solution: You’re using pre-shredded cheese or the pan temperature is wrong. Pre-shredded cheese contains cellulose that prevents smooth melting. Always grate your own parmesan. If the cheese is clumping, your pan is too hot. Remove from heat, let it cool for 1 minute, then add the cheese gradually while stirring constantly.
Problem 4: Orzo Sticks to the Bottom of the Pan
Solution: You’re not stirring enough or your heat is too high. Stir the orzo every 2 minutes while it cooks. If you notice sticking, reduce the heat immediately and add ¼ cup more liquid. A heavy-bottomed pan distributes heat better and reduces sticking.
Problem 5: Dish Tastes Bland
Solution: You need more salt or you’re using low-quality ingredients. Taste the orzo after adding the broth and adjust the seasoning. Remember that parmesan adds saltiness, so season lightly at first. Using real parmesan cheese instead of generic “parmesan” makes a huge flavor difference. Fresh garlic beats garlic powder every single time.
Equipment Essentials
- Large skillet or sauté pan (12-inch with high sides works best)
- Wooden spoon or silicone spatula (for constant stirring)
- Box grater (for fresh parmesan)
- Measuring cups and spoons
- Sharp knife and cutting board
- Garlic press (optional but helpful)
Shopping List by Store Section
Pasta Aisle
- Orzo pasta (1½ cups)
Dairy Section
- Butter (stick form, need 4 tablespoons)
- Heavy cream (½ cup)
- Parmesan cheese (block form, need 1 cup grated)
Produce Section
- Fresh garlic (4 cloves)
- Fresh parsley (1 bunch)
- Fresh lemon (1 lemon for juice)
Canned/Boxed Goods
- Chicken broth (32 oz container)
Spice Aisle
- Salt
- Black pepper
- Garlic powder
- Onion powder
Success Secrets
1. Toast the orzo until it’s golden brown. This step adds a nutty flavor that makes this orzo side dish taste like it came from an Italian restaurant. Don’t skip it or rush through it. The color should be a light golden brown, similar to toasted almonds.
2. Use freshly grated parmesan cheese only. Pre-shredded cheese will give you a grainy, separated sauce instead of the silky smooth texture you want. Spend the extra three minutes grating fresh cheese. Your taste buds will thank you.
3. Remove the pan from heat before adding cream and cheese. This single step prevents the dairy from breaking and creating a greasy, separated mess. Let the pan cool for 60 seconds off the heat, then proceed with adding the creamy ingredients.
4. Stir every 2 minutes while the orzo cooks. Consistent stirring prevents sticking and ensures even cooking. Set a timer on your phone so you don’t forget. This isn’t a “set it and forget it” recipe.
5. Let the finished orzo rest for 2 minutes before serving. The sauce thickens as it cools slightly, giving you the perfect creamy consistency. If you serve it immediately, it will look soupy. Trust the process and wait those two minutes.