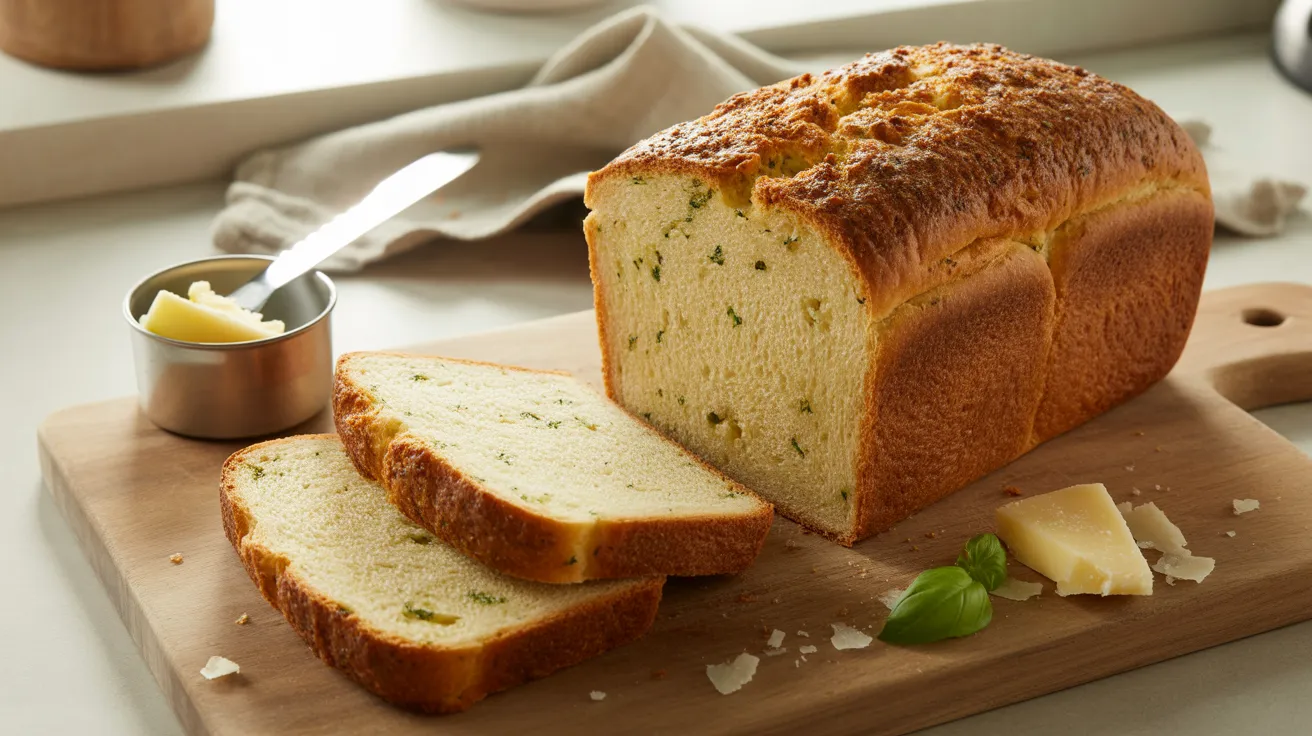
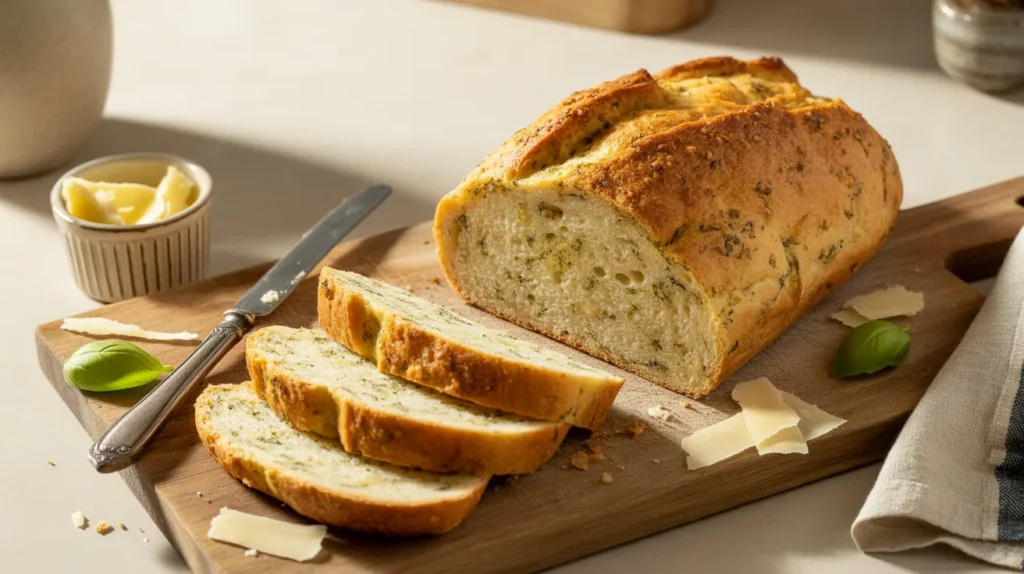
There’s something magical about waking up to the smell of freshly baked bread machine garlic parmesan bread filling your kitchen. This easy bread machine recipe combines savory roasted garlic with sharp Parmesan cheese to create a golden, crusty loaf that’s perfect for sandwiches, garlic toast, or simply enjoying warm with butter. I’ve been making this bread machine garlic parmesan bread for years, and it never fails to impress my family and guests.
SERVES: 4 | PREP: 15 MIN | COOK: 3 HRS | TOTAL: 3 HRS 15 MIN
Ingredients
Wet Ingredients
| Ingredient | Measurement |
|---|---|
| Warm water (110°F) | 1 cup |
| Olive oil | 2 tablespoons |
| Eggs | 1 large |
Dry Ingredients
| Ingredient | Measurement |
|---|---|
| Bread flour | 3 cups |
| Granulated sugar | 1 tablespoon |
| Salt | 1½ teaspoons |
| Freshly grated Parmesan cheese | ¾ cup |
| Garlic powder | 2 teaspoons |
| Dried Italian herbs | 1 teaspoon |
Leavening
| Ingredient | Measurement |
|---|---|
| Active dry yeast | 2¼ teaspoons (1 packet) |
Optional Topping
| Ingredient | Measurement |
|---|---|
| Melted butter | 2 tablespoons |
| Minced garlic | 1 clove |
| Extra Parmesan | 2 tablespoons |
Step-by-Step Instructions
Phase 1: Preparation (5 minutes)
Step 1: Check your water temperature using a kitchen thermometer. The water should be between 105-115°F. Why this matters: Water that’s too hot will kill the yeast, while water that’s too cold won’t activate it properly. If you don’t have a thermometer, the water should feel warm but not hot when you test it on your wrist.
Step 2: Measure your bread flour using the spoon-and-level method. Spoon flour into your measuring cup and level off with a knife rather than scooping directly from the bag. This prevents adding too much flour, which makes your bread dense and dry.
Step 3: Grate fresh Parmesan cheese if you’re not using pre-grated. Fresh Parmesan melts better and provides superior flavor. Avoid pre-shredded cheese as it contains anti-caking agents that can affect your bread’s texture.
Step 4: Crack your egg into a small bowl first to check for shells, then beat it lightly with a fork. Room temperature eggs incorporate better into the dough.
Phase 2: Loading the Bread Machine (5 minutes)
Step 5: Pour the warm water into your bread machine pan first. Adding liquids first prevents dry ingredients from getting stuck in the corners.
Step 6: Add the olive oil and beaten egg to the water. Drizzle the oil around the edges so it coats the pan slightly.
Step 7: Add all dry ingredients in this specific order: bread flour first, spreading it evenly to cover the liquid. Then add sugar, salt, grated Parmesan cheese, garlic powder, and Italian herbs. Keep the salt and sugar separated initially as salt can inhibit yeast if they touch directly.
Step 8: Make a small well (indentation) in the center of the flour mixture using your finger. Pour the yeast into this well, making sure it doesn’t touch the liquid below. This gives the yeast a dry nest where it can begin activating without being overwhelmed by moisture immediately.
Phase 3: Programming and Baking (3 hours)
Step 9: Close your bread machine lid and select the “Basic” or “White Bread” setting. Choose your preferred crust color (I recommend medium for this recipe). Set the loaf size to 1.5 or 2 pounds depending on your machine’s options.
Step 10: Press start and let the machine run through its complete cycle. You’ll hear the machine mixing first (about 10-15 minutes), then it will rest for the first rise (about 45-60 minutes). Don’t open the lid during the cycle as this releases heat and can cause your bread to collapse.
Step 11: During the kneading phase, check the dough consistency after about 10 minutes. Open the lid briefly and look at the dough ball. It should be smooth and slightly tacky but not sticky. If it’s too dry and crumbly, add water one tablespoon at a time. If it’s too wet and sticking to the sides, add flour one tablespoon at a time.
Step 12: After the mixing and first rise, your machine will punch down the dough and begin the second rise. You’ll notice the dough rising again in the pan. This is when the garlic and Parmesan flavors really develop.
Phase 4: Final Baking Phase (1 hour)
Step 13: Your bread machine will beep when the final baking phase begins. At this point, you can prepare your optional garlic butter topping by mixing melted butter with minced fresh garlic.
Step 14: When the baking cycle is complete, your machine will beep. Immediately remove the bread pan using oven mitts as it will be extremely hot. Don’t leave the bread in the machine as the keep-warm function can make the crust overly hard.
Step 15: Let the bread rest in the pan for exactly 5 minutes. This allows the bread to contract slightly from the sides, making it easier to remove.
Step 16: Turn the bread pan upside down and gently shake to release the loaf onto a wire cooling rack. If it sticks, use a plastic spatula (never metal, which can scratch the pan) to loosen the edges.
Phase 5: Finishing and Cooling (30 minutes)
Step 17: While the bread is still hot, brush the top with the garlic butter mixture if using. The butter will soak into the crust, creating a glossy, flavorful finish. Sprinkle with extra Parmesan cheese immediately so it adheres.
Step 18: Let the bread cool on the wire rack for at least 30 minutes before slicing. Cutting too early releases steam that makes the interior gummy. I know it’s tempting, but patience pays off with better texture.
Chef’s Notes
Cheese Selection: Use freshly grated Parmesan from a block rather than the shelf-stable kind in a shaker. The moisture content and melting properties are completely different. Real Parmigiano-Reggiano gives the best flavor, though Grana Padano works beautifully too.
Garlic Intensity: If you want a stronger garlic flavor, add 2-3 cloves of minced fresh garlic along with the garlic powder. Add the fresh garlic with the wet ingredients. For roasted garlic bread machine garlic parmesan bread, roast a whole bulb until soft, squeeze out the cloves, and add them mashed.
Bread Machine Variations: Different bread machines have slightly different temperature and timing settings. If your first loaf comes out too light or too dark, adjust your crust setting next time. My bread machine tends to bake hot, so I always use the light crust setting.
Freshness Factor: This bread tastes best within 24 hours of baking. The Parmesan adds moisture that helps keep it soft, but bread machine loaves generally don’t have the same shelf life as store-bought bread with preservatives.
Nutrition Information (Per Serving – ¼ of Loaf)
Calories: 385
Protein: 15g
Carbohydrates: 58g
Fat: 11g
Fiber: 2g
Sodium: 680mg
Calcium: 215mg
Delicious Variations
Herb Garden Bread: Add 2 tablespoons of fresh chopped herbs (basil, rosemary, and thyme) along with the cheese. Fresh herbs create a more complex flavor profile similar to what you’ll find in bread machine herb and parmesan bread.
Asiago Garlic Bread: Replace half the Parmesan with shredded Asiago cheese for a sharper, nuttier flavor. Asiago melts differently than Parmesan, creating pockets of gooey cheese throughout the loaf.
Sun-Dried Tomato Addition: Add ⅓ cup chopped sun-dried tomatoes (oil-packed, drained) during the add-in phase when your machine beeps. This creates a Mediterranean-style loaf that’s perfect for sandwiches.
English Muffin Style: For a softer, more tender crumb similar to bread machine English muffin bread, replace ½ cup of the bread flour with all-purpose flour and add an extra tablespoon of sugar.
Storage & Reheating Guide
Room Temperature Storage: Wrap cooled bread tightly in plastic wrap or aluminum foil. Store at room temperature for up to 3 days. The Parmesan adds fat that helps prevent staling, but avoid storing in direct sunlight or warm areas.
Refrigerator Storage: I don’t recommend refrigerating this bread as cold temperatures accelerate starch crystallization, making the bread stale faster. If you must refrigerate, wrap it well and use within 5 days.
Freezer Storage: Slice the bread first, then wrap individual slices in plastic wrap and place in a freezer bag. This lets you remove just what you need. Properly wrapped bread machine garlic parmesan bread keeps for up to 3 months in the freezer.
Reheating Methods: Toast slices in a toaster for the best texture. For whole loaf reheating, wrap in foil and warm at 350°F for 10-15 minutes. You can also microwave individual slices for 15-20 seconds, but this makes them slightly chewy rather than crispy.
Garlic Bread Transformation: Turn day-old slices into garlic bread by brushing with butter, adding more garlic and Parmesan, and broiling for 2-3 minutes until golden and crispy.
Troubleshooting Common Problems
Problem 1: Bread Didn’t Rise Properly
Your yeast was likely dead or the water temperature was wrong. Always check yeast expiration dates and store opened yeast in the refrigerator. Test your yeast by mixing it with warm water and a pinch of sugar—it should foam within 10 minutes. Water temperature is critical: use a thermometer to ensure it’s 105-115°F.
Problem 2: Dense, Heavy Texture
Too much flour is the usual culprit. Humidity affects flour, so you might need slightly less than the recipe calls for. Watch the dough during the first few minutes of kneading—it should form a smooth ball that’s slightly tacky. The dough should clean the sides of the pan but stick slightly to the bottom.
Problem 3: Collapsed Top or Sunken Center
This happens when dough over-rises and then falls during baking. Your room might be too warm, causing excessive rising. Try reducing yeast by ¼ teaspoon or using cooler water (100-105°F instead of 110°F). Over-rising can also occur if you use too much sugar, which feeds the yeast too aggressively.
Problem 4: Bread Stuck in Pan
Remove the kneading paddle before the baking cycle starts (if your machine allows) to prevent it from baking into the loaf. If bread still sticks, your pan’s nonstick coating might be wearing out. Let the bread cool in the pan for exactly 5 minutes—no longer—as the condensation between bread and pan helps with release.
Problem 5: Uneven Browning or Pale Crust
Check your bread machine’s heating element. If the bottom is done but the top is pale, your machine might not have proper top heating. Brush the top with an egg wash (1 egg beaten with 1 tablespoon water) before baking for better browning. You can also finish the loaf in a regular oven at 375°F for 5-10 minutes.
Equipment Essentials
- Bread machine (1.5 to 2-pound capacity)
- Kitchen thermometer for checking water temperature
- Measuring cups and spoons (dry and liquid measures)
- Cheese grater or food processor for Parmesan
- Wire cooling rack (prevents soggy bottom)
- Sharp bread knife for clean slicing
- Oven mitts for removing hot pan
- Plastic spatula for loosening bread from pan
- Mixing bowl for optional toppings
- Pastry brush for applying garlic butter
Shopping List by Store Section
Baking Aisle
- Bread flour (3 cups)
- Active dry yeast (1 packet)
- Granulated sugar (1 tablespoon)
- Garlic powder (2 teaspoons)
- Dried Italian herbs (1 teaspoon)
- Salt (if not in pantry)
Dairy Section
- Parmesan cheese block (for ¾ cup grated)
- Eggs (1 large)
- Butter (for optional topping)
Oils & Condiments
- Olive oil (2 tablespoons)
Produce (Optional)
- Fresh garlic (for topping)
5 Success Secrets
1. Temperature is Everything
Invest in a simple kitchen thermometer. Water temperature between 105-115°F activates yeast perfectly without killing it. This single tool has saved more of my loaves than any other piece of equipment.
2. Watch the First Knead
The first 10 minutes tell you everything. Peek at your dough ball during initial kneading. It should be smooth and elastic, cleaning the sides of the pan while remaining slightly tacky. This visual check prevents failed loaves.
3. Use Fresh Ingredients
Yeast loses potency over time, and old flour can taste stale. Buy yeast in small packets if you don’t bake often, and store opened packages in the refrigerator. Bread flour should smell fresh and slightly sweet, never musty.
4. Don’t Skip the Cooling Time
I’ve ruined too many loaves by cutting them too soon. That 30-minute cooling period lets the interior crumb set properly. Hot bread might look ready, but it’s still cooking inside from residual heat. Patience makes perfect slices.
5. Clean Your Machine Immediately
Wash the bread pan and kneading paddle right after removing your bread while everything is still warm. Dried-on dough with cheese baked on is incredibly hard to clean later. A quick wash now saves scrubbing later and keeps your machine in top condition.
Enjoy your homemade bread machine garlic parmesan bread warm with butter, or use it for the ultimate grilled cheese sandwich!